Create an Embroidered Patch Style With Adobe Illustrator

Final product imageFinal product imageFinal product image
What You’ll Be Creating

Bring a little bit of nostalgia to your designs with a set of embroidered patch style pictograms. In this embroidery effect Illustrator tutorial, you’ll learn how to layer fills, strokes, and special effects in the Appearance panel to create a complex embroidered patch image using just one circle and a few shapes. Let’s begin!

Want to create amazing embroidered designs without all the fuss? Then browse our incredible selection of Illustrator add-ons from Envato Elements. Here’s a nice, fun Illustrator style.

Fabric-Kingdom-Illustrator-EditionFabric-Kingdom-Illustrator-EditionFabric-Kingdom-Illustrator-Edition

What if you prefer to watch video tutorials to learn how to make embroidery patches? We’ve got you covered. You can watch this new video from the Envato Tuts+ YouTube channel to learn how to make embroidered patches in Illustrator:

What You’ll Learn in This Embroidery Effect Illustrator Tutorial

  • How to make an embroidered patch in Illustrator
  • How to create a path border
  • How to create a stitched border
  • How to create a fabric pattern
  • How to create an embroidered logo

1. How to Create a New Document and Set Up a Grid

Let’s start this Illustrator embroidery effect tutorial by setting up a new document. Hit Control-N to create a new document. Select Pixels from the Units drop-down menu, set the Width and Height to 850 px, and then click that Advanced Options button. Select RGB for the Color Mode and set the Raster Effects to Screen (72 ppi), and then click the Create button.

Enable the Grid (View > Show Grid or Control-“) and Snap to Grid (View > Snap to Grid or Shift-Control-“). You will need a grid every 1 px, so simply go to Edit > Preferences > Guides & Grid, and enter 1 in the Gridline every box and 1 in the Subdivisions box. Try not to get discouraged by all that grid—it will make your work easier, and keep in mind that you can easily enable or disable it using the Control-“ keyboard shortcut.

You can learn more about Illustrator’s grid system in this short tutorial from Andrei Stefan: Understanding Adobe Illustrator’s Grid System.

You should also open the Info panel (Window > Info) for a live preview with the size and position of your shapes. Don’t forget to set the unit of measurement to pixels from Edit > Preferences > Units. All these options will significantly increase your work speed.

illustrator new documentillustrator new documentillustrator new document

2. How to Make the Fabric Fill

Step 1

Our embroidery Illustrator effect needs a fabric fill. Focus on your toolbar and pick the Rectangle Tool (M), and then focus on the color settings. Select the stroke and remove the color, and then double-click the fill and set it to yellow.

Move to your artboard and simply click and drag to create a 4 x 1 px shape—the grid and the Snap to Grid feature should make things easier.

Switch to the Selection Tool (V), hold down the Alt key and drag a copy of your rectangle 4 px to the right, as shown in the second image. Keep this new shape selected and replace the yellow fill with a blue one.

Reselect your yellow shape, remember to hold down the Alt key, and drag a copy 8 px to the right, as shown in the third image.

rectanglesrectanglesrectangles

Step 2

Keep using the Selection Tool (V) to add more copies of our blue and yellow rectangles, as shown in the following image.

multiply rectanglesmultiply rectanglesmultiply rectangles

Step 3

Keep using the Selection Tool (V) and hold down the Shift key to select all your yellow shapes.

Open the Gradient panel (Window > Gradient) and click that Linear Gradient button to replace the yellow fill with a linear gradient.

Set the Angle to 0 degrees and then move to the gradient colors. Double-click the left one, change the color mode to RGB and replace the color with R=108 G=90 B=76, move to the left one and change the color to R=147 G=123 B=99, and then click on the gradient bar to add a third gradient slider. Select it and set the Location to 55%, and then replace the color with R=225 G=186 B=145.

linear gradientlinear gradientlinear gradient

Step 4

Using the Selection Tool (V), select all those blue rectangles and again click that Linear Gradient button from the Gradient panel.

Make sure that the Angle is set to 0 degrees and then select the gradient sliders one by one to replace the existing colors with the ones shown in the following image.

linear gradientlinear gradientlinear gradient

Step 5

Reselect the Rectangle Tool (M), create an 8 x 4 px shape, and place it exactly as shown in the following image.

Keep it selected and remove the fill color (which will make your shape invisible), and then press Shift-Control-[ to send this rectangle to the back.

invisible rectangleinvisible rectangleinvisible rectangle

Step 6

Using the Selection Tool (V), select all your shapes (including that invisible rectangle) and simply drag them into the Swatches panel (Window > Swatches) to save them as a pattern.

save pattern illustratorsave pattern illustratorsave pattern illustrator

3. How to Create the Initial Patch Border

Step 1

The next step in this Illustrator embroidery effect tutorial is to create a patch border. Pick the Ellipse Tool (L) and just click on your artboard to create a 140 px circle.

Keep it selected and focus on the Appearance panel. Remove the fill color and select the stroke. Set the color to R=247 G=148 B=30 and then open the Stroke fly-out panel. Increase the Weight to 3 pt, and don’t forget to check the Round Cap and Round Join buttons.

circle strokecircle strokecircle stroke

Step 2

Make sure that your circle stays selected for the following steps, and keep focusing on the Appearance panel.

Select the existing stroke and go to Effect > Distort & Transform > Zig Zag. Check the Absolute and Corner boxes, drag those sliders to 6 px and 100, and then click OK to apply the effect.

zig zag effectzig zag effectzig zag effect

Step 3

Keep the stroke selected, and this time go to Effect > Distort & Transform > Transform. Drag both Scale sliders to 103% and the Move sliders to 1.4 px, and then click OK to apply this second effect.

transform effecttransform effecttransform effect

Step 4

Return to the Appearance panel, make sure that the stroke is still selected, and duplicate it using the Duplicate Selected Item button.

Select the new stroke and replace the color with R=251 G=176 B=64, and then open the Transform effect that’s already applied to this new stroke. Lower both Scale settings to 100% and click OK.

add new strokeadd new strokeadd new stroke

Step 5

Return to the Appearance panel, make sure that the top stroke is selected, and duplicate it using that same Duplicate Selected Item button.

Select the new stroke, lower the Weight to 0.25 pt and replace the color with R=251 G=220 B=111, and then open the Zig Zag effect that’s already applied to this new stroke. Just lower the Scale to 3 px and click OK.

duplicate selected itemduplicate selected itemduplicate selected item

Step 6

Return to the Appearance panel and duplicate the top stroke.

Select the new stroke, increase the Weight to 0.75 pt and replace the color with R=255 G=227 B=140, and then open the Zig Zag effect that’s already applied to this new stroke. Increase the Scale to 6 px and click OK.

edit zig zagedit zig zagedit zig zag

Step 7

Return to the Appearance panel and add a new stroke for your circle using that Add New Stroke button from the bottom of the panel. Make sure that this new stroke lies above the rest of the strokes and select it.

Set the color to R=186 G=111 B=24 and the Weight to 1 pt, remember to check those Round Cap and Round Join buttons, and then go to Effect > Distort & Transform > Zig Zag. Check the Absolute and Corner boxes, drag those sliders to 3 px and 100, and then click OK to apply the effect.

brown strokebrown strokebrown stroke

Step 8

With that top stroke still selected, go to Effect > Distort & Transform > Transform. Drag both Scale sliders to 95% and the Move sliders to 0.7 px, and then click OK to apply this second effect.

transform stroketransform stroketransform stroke

4. How to Add the Fabric Pattern

Step 1

The next step in making our embroidery patches is to add the fabric pattern. Make sure that your circle is still selected and keep focusing on the Appearance panel. Select the fill and simply apply your pattern from the Swatches panel.

apply fabric patternapply fabric patternapply fabric pattern

Step 2

Keep that fill selected and go to Effect > Distort & Transform > Transform. Disable the Transform Objects box and enable the Transform Patterns box, set the Angle to -20 degrees, and then click OK to easily rotate the applied pattern.

rotate patternrotate patternrotate pattern

Step 3

Keep that fill selected, and this time go to Effect > Stylize > Drop Shadow. Enter the settings shown in the following image, and click OK to apply a subtle shadow effect.

drop shadowdrop shadowdrop shadow

Step 4

Return to the Appearance panel, make sure that the fill is still selected, and click that Add New Fill button to add a second fill on top of the existing one.

Select the new fill, replace the pattern with R=198 G=156 B=109, and lower its Opacity to 65%.

fill opacityfill opacityfill opacity

Step 5

Keep focusing on the Appearance panel, select the top stroke, and again click that Add New Stroke button to add another stroke on top of the existing ones.

Select the new stroke, set the color to R=253 G=245 B=198 and the Weight to 1 pt, and then go to Effect > Path > Offset Path. Set the Offset to -10 px and click OK, and then go to Effect > Distort & Transform > Transform. Set those Move sliders to 1 px and 2 px, and then click OK.

inside strokeinside strokeinside stroke

Step 6

Keep focusing on that top stroke and open the Stroke fly-out panel. First, click the Round Cap and Round Join buttons, and then check that Dashed Line button. Enter 6 pt in all those dash and gap boxes, and don’t forget to also check that Align dashes to corners… button.

illustrator dashed strokeillustrator dashed strokeillustrator dashed stroke

Step 7

Make sure that your dashed stroke is still selected and go to Effect > Stylize > Drop Shadow. Enter the settings shown in the following image and click OK.

drop shadowdrop shadowdrop shadow

Step 8

Make sure that your dashed stroke is still selected, and duplicate it using that same Duplicate Selected Item button.

Select the new stroke and go to Effect > Distort & Transform > Transform. Drag those Move sliders to 1 px and 2 px, set the Angle to 45 degrees, and then click OK. Return to the Appearance panel, focus on that top stroke, and drag the Transform effect between the Offset Path and Drop Shadow effects.

duplicate dashed strokeduplicate dashed strokeduplicate dashed stroke

Step 9

Return to the Appearance panel, add a new fill for your circle, and drag it to the top of the panel.

Lower the Opacity of this new fill to 25%, and then click the Radial Gradient button from the Gradient panel to apply a radial gradient. Replace the gradient colors with the ones shown in the following image, and don’t forget to lower the Opacity of the right gradient slider to 0%.

Once you’re done, use the Gradient Tool (G) to stretch the gradient as shown in the following image, and then go to Effect > Path > Offset Path. Set the Offset to -11 px and click OK.

radial gradientradial gradientradial gradient

Step 10

Return to the Appearance panel and duplicate the top fill.

Select the new fill and replace the existing linear gradient with the one shown below. Use the Gradient Tool (G) again to stretch the gradient as shown in the following image, and then open the Offset Path effect that’s already applied. Just lower the Offset to -7 px and click OK.

radial gradientradial gradientradial gradient

Step 11

Return to the Appearance panel and add one more stroke on top of the existing fills and strokes.

Select it and set the color to R=252 G=242 B=183, lower the Opacity to 40% and the Blending Mode to Screen, and then open the Stroke fly-out panel.

Lower the Weight to 0.75 pt, and don’t forget to check the Round Cap and Round Join buttons.

new strokenew strokenew stroke

Step 12

Keep focusing on the Appearance panel and make sure that the top stroke is still selected, and then apply the Zig Zag and Transform effects shown in the following image.

zig zag transformzig zag transformzig zag transform

5. How to Create an Embroidered Logo

Step 1

Our embroidery Illustrator effect needs a logo as well. Return to the set of rectangles that you used to create your first pattern. Select the top-left rectangle, and then go to Select > Same > Fill Color to easily select the rest of the shapes that have the same fill color.

Move to the Gradient panel and replace the existing linear gradient with the one shown in the following image.

edit gradientedit gradientedit gradient

Step 2

Select the bottom-left rectangle and again go to Select > Same > Fill Color. Again, replace the existing linear gradient with the one shown in the following image.

select same fillselect same fillselect same fill

Step 3

Reselect all these shapes and drag them into the Swatches panel (Window > Swatches) again to save them as a new pattern.

second fabric patternsecond fabric patternsecond fabric pattern

Step 4

Using the Pen Tool (P) or the Line Tool (\), create a 4 px vertical path. Add a 1 pt black (R=0 G=0 B=0) stroke for this path, and remember to check the Round Cap button to add those nice rounded edges.

Switch to the Selection Tool (V) and use the bounding box (View > Show Bounding Box) to rotate your path 45 degrees, as shown in the second image.

Keep your path selected and go to Object > Transform > Reflect. Check the Vertical box and click that Copy button to add a horizontally flipped copy of your path.

path rotate reflectpath rotate reflectpath rotate reflect

Step 5

Select both paths, open the Brushes panel (Window > Brushes), and click that New Brush button. Check the Pattern Brush box and click OK to open the Pattern Brush Options window. Set the Spacing to 20% and the Colorization to Tints (which will allow you to adjust the brush color once it’s applied), and then you can click OK to save this brush.

illustrator pattern brushillustrator pattern brushillustrator pattern brush

Step 6

You can finish the design by adding your logo. Make sure there are no corners on the logo as it can distort the stitching pattern. I’ve added some subtle rounded corners to this Pen Tool icon from this pack: Design Duotone Icons.

Scale the logo to fit your round frame, and then here’s how you can center it. Use the Selection Tool (V) to select the logo along with the circle, click the border of the circle to highlight it (and make it the reference shape), and then focus on the Control panel (Window > Control). Simply click the Horizontal Align Center and Vertical Align Center buttons.

center vector logocenter vector logocenter vector logo

Step 7

Keep your logo selected and start by adding two more fills besides the original one.

Select the bottom fill, set the color to R=134 G=115 B=100, and go to Effect > Path > Offset Path. Set the Offset to 3 px and click OK.

Move to the top fill, select it and set the color to R=251 G=176 B=64, and then lower its Opacity to 35%.

Finally, select the middle fill and just apply your second pattern from the Swatches panel.

apply fabric patternapply fabric patternapply fabric pattern

Step 8

Keep your logo selected, apply your pattern brush, and set the color to R=253 G=245 B=198. Increase or decrease the stroke weight whenever you wish to adjust the brush size.

apply pattern brushapply pattern brushapply pattern brush

Step 9

Finally, select your entire design and click the Recolor Artwork button from the Control panel to easily recolor your design.

ABCDABCDABCD

Congratulations! Your Embroidery Effect Illustrator Design Is Done!

And that’s how to make embroidered patches in Illustrator. Here is how your embroidered patch style should look. I hope you’ve enjoyed this tutorial and can apply these techniques in your future projects.

Feel free to adjust the final design and make it your own. You can find some great sources of inspiration at Envato Elements, with interesting solutions to improve your embroidered patch styles.

Embroidered Patch Style Embroidered Patch Style Embroidered Patch Style

Popular Assets From Envato Elements

Envato Elements is an excellent resource for embroidered patch styles. Here’s a short list of some of the most popular assets that you can find.

Sewing Kit (AI, PNG, JPG)

Need to make embroidery patches quickly? This sewing kit is a really good alternative whenever you need to create some quick sewing effects.

sewing kit illustratorsewing kit illustratorsewing kit illustrator

Textile Tartan (AI, EPS)

Wondering how to make an embroidered patch with text? Just double-click the text and type in yours to easily create an embroidered text effect in Illustrator.

embroidered text effectembroidered text effectembroidered text effect

Fabric Kingdom Illustrator Edition (AI, EPS, PNG)

Check out this set of Illustrator brushes and use them to easily create stitched effects. Among these 19 highly detailed pattern brushes, you’ll definitely find one that fits your needs. It’s an easy way to recreate this embroidery Illustrator design!

stitch brush illustratorstitch brush illustratorstitch brush illustrator

Sewing and Embroidery Procreate Brushes (BRUSHSET)

This massive pack of sewing and embroidery brushes is the perfect solution if you prefer to make embroidery patches using Procreate.

sewing embroidery Procreate brushessewing embroidery Procreate brushessewing embroidery Procreate brushes

Stitching Embroidery Mockup (PSD)

You know how to make an embroidered patch in Illustrator. Now, are you searching for mockups? Photoshop can also be an alternative if you’re looking to create realistic stitching effects. Check out this amazing mockup and create embroidered logotypes, insignias, icons, and more.

stitching embroidery Photoshop mockupstitching embroidery Photoshop mockupstitching embroidery Photoshop mockup

Want to Learn More?

We have loads of tutorials on Envato Tuts+, from beginner to intermediate level. Take a look!


This content originally appeared on Envato Tuts+ Tutorials and was authored by Andrei Marius

Final product imageFinal product imageFinal product image
What You'll Be Creating

Bring a little bit of nostalgia to your designs with a set of embroidered patch style pictograms. In this embroidery effect Illustrator tutorial, you'll learn how to layer fills, strokes, and special effects in the Appearance panel to create a complex embroidered patch image using just one circle and a few shapes. Let's begin!

Want to create amazing embroidered designs without all the fuss? Then browse our incredible selection of Illustrator add-ons from Envato Elements. Here's a nice, fun Illustrator style.

Fabric-Kingdom-Illustrator-EditionFabric-Kingdom-Illustrator-EditionFabric-Kingdom-Illustrator-Edition

What if you prefer to watch video tutorials to learn how to make embroidery patches? We've got you covered. You can watch this new video from the Envato Tuts+ YouTube channel to learn how to make embroidered patches in Illustrator:

What You'll Learn in This Embroidery Effect Illustrator Tutorial

  • How to make an embroidered patch in Illustrator
  • How to create a path border
  • How to create a stitched border
  • How to create a fabric pattern
  • How to create an embroidered logo

1. How to Create a New Document and Set Up a Grid

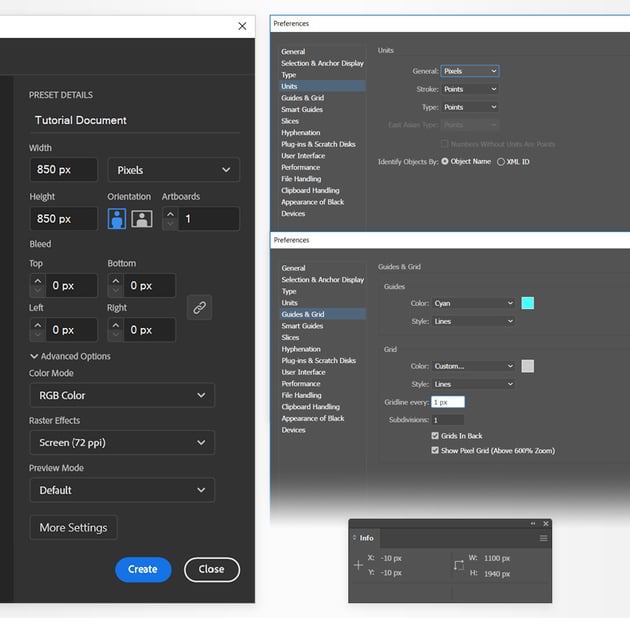
Let's start this Illustrator embroidery effect tutorial by setting up a new document. Hit Control-N to create a new document. Select Pixels from the Units drop-down menu, set the Width and Height to 850 px, and then click that Advanced Options button. Select RGB for the Color Mode and set the Raster Effects to Screen (72 ppi), and then click the Create button.

Enable the Grid (View > Show Grid or Control-") and Snap to Grid (View > Snap to Grid or Shift-Control-"). You will need a grid every 1 px, so simply go to Edit > Preferences > Guides & Grid, and enter 1 in the Gridline every box and 1 in the Subdivisions box. Try not to get discouraged by all that grid—it will make your work easier, and keep in mind that you can easily enable or disable it using the Control-" keyboard shortcut.

You can learn more about Illustrator's grid system in this short tutorial from Andrei Stefan: Understanding Adobe Illustrator's Grid System.

You should also open the Info panel (Window > Info) for a live preview with the size and position of your shapes. Don't forget to set the unit of measurement to pixels from Edit > Preferences > Units. All these options will significantly increase your work speed.

illustrator new documentillustrator new documentillustrator new document

2. How to Make the Fabric Fill

Step 1

Our embroidery Illustrator effect needs a fabric fill. Focus on your toolbar and pick the Rectangle Tool (M), and then focus on the color settings. Select the stroke and remove the color, and then double-click the fill and set it to yellow.

Move to your artboard and simply click and drag to create a 4 x 1 px shape—the grid and the Snap to Grid feature should make things easier.

Switch to the Selection Tool (V), hold down the Alt key and drag a copy of your rectangle 4 px to the right, as shown in the second image. Keep this new shape selected and replace the yellow fill with a blue one.

Reselect your yellow shape, remember to hold down the Alt key, and drag a copy 8 px to the right, as shown in the third image.

rectanglesrectanglesrectangles

Step 2

Keep using the Selection Tool (V) to add more copies of our blue and yellow rectangles, as shown in the following image.

multiply rectanglesmultiply rectanglesmultiply rectangles

Step 3

Keep using the Selection Tool (V) and hold down the Shift key to select all your yellow shapes.

Open the Gradient panel (Window > Gradient) and click that Linear Gradient button to replace the yellow fill with a linear gradient.

Set the Angle to 0 degrees and then move to the gradient colors. Double-click the left one, change the color mode to RGB and replace the color with R=108 G=90 B=76, move to the left one and change the color to R=147 G=123 B=99, and then click on the gradient bar to add a third gradient slider. Select it and set the Location to 55%, and then replace the color with R=225 G=186 B=145.

linear gradientlinear gradientlinear gradient

Step 4

Using the Selection Tool (V), select all those blue rectangles and again click that Linear Gradient button from the Gradient panel.

Make sure that the Angle is set to 0 degrees and then select the gradient sliders one by one to replace the existing colors with the ones shown in the following image.

linear gradientlinear gradientlinear gradient

Step 5

Reselect the Rectangle Tool (M), create an 8 x 4 px shape, and place it exactly as shown in the following image.

Keep it selected and remove the fill color (which will make your shape invisible), and then press Shift-Control-[ to send this rectangle to the back.

invisible rectangleinvisible rectangleinvisible rectangle

Step 6

Using the Selection Tool (V), select all your shapes (including that invisible rectangle) and simply drag them into the Swatches panel (Window > Swatches) to save them as a pattern.

save pattern illustratorsave pattern illustratorsave pattern illustrator

3. How to Create the Initial Patch Border

Step 1

The next step in this Illustrator embroidery effect tutorial is to create a patch border. Pick the Ellipse Tool (L) and just click on your artboard to create a 140 px circle.

Keep it selected and focus on the Appearance panel. Remove the fill color and select the stroke. Set the color to R=247 G=148 B=30 and then open the Stroke fly-out panel. Increase the Weight to 3 pt, and don't forget to check the Round Cap and Round Join buttons.

circle strokecircle strokecircle stroke

Step 2

Make sure that your circle stays selected for the following steps, and keep focusing on the Appearance panel.

Select the existing stroke and go to Effect > Distort & Transform > Zig Zag. Check the Absolute and Corner boxes, drag those sliders to 6 px and 100, and then click OK to apply the effect.

zig zag effectzig zag effectzig zag effect

Step 3

Keep the stroke selected, and this time go to Effect > Distort & Transform > Transform. Drag both Scale sliders to 103% and the Move sliders to 1.4 px, and then click OK to apply this second effect.

transform effecttransform effecttransform effect

Step 4

Return to the Appearance panel, make sure that the stroke is still selected, and duplicate it using the Duplicate Selected Item button.

Select the new stroke and replace the color with R=251 G=176 B=64, and then open the Transform effect that's already applied to this new stroke. Lower both Scale settings to 100% and click OK.

add new strokeadd new strokeadd new stroke

Step 5

Return to the Appearance panel, make sure that the top stroke is selected, and duplicate it using that same Duplicate Selected Item button.

Select the new stroke, lower the Weight to 0.25 pt and replace the color with R=251 G=220 B=111, and then open the Zig Zag effect that's already applied to this new stroke. Just lower the Scale to 3 px and click OK.

duplicate selected itemduplicate selected itemduplicate selected item

Step 6

Return to the Appearance panel and duplicate the top stroke.

Select the new stroke, increase the Weight to 0.75 pt and replace the color with R=255 G=227 B=140, and then open the Zig Zag effect that's already applied to this new stroke. Increase the Scale to 6 px and click OK.

edit zig zagedit zig zagedit zig zag

Step 7

Return to the Appearance panel and add a new stroke for your circle using that Add New Stroke button from the bottom of the panel. Make sure that this new stroke lies above the rest of the strokes and select it.

Set the color to R=186 G=111 B=24 and the Weight to 1 pt, remember to check those Round Cap and Round Join buttons, and then go to Effect > Distort & Transform > Zig Zag. Check the Absolute and Corner boxes, drag those sliders to 3 px and 100, and then click OK to apply the effect.

brown strokebrown strokebrown stroke

Step 8

With that top stroke still selected, go to Effect > Distort & Transform > Transform. Drag both Scale sliders to 95% and the Move sliders to 0.7 px, and then click OK to apply this second effect.

transform stroketransform stroketransform stroke

4. How to Add the Fabric Pattern

Step 1

The next step in making our embroidery patches is to add the fabric pattern. Make sure that your circle is still selected and keep focusing on the Appearance panel. Select the fill and simply apply your pattern from the Swatches panel.

apply fabric patternapply fabric patternapply fabric pattern

Step 2

Keep that fill selected and go to Effect > Distort & Transform > Transform. Disable the Transform Objects box and enable the Transform Patterns box, set the Angle to -20 degrees, and then click OK to easily rotate the applied pattern.

rotate patternrotate patternrotate pattern

Step 3

Keep that fill selected, and this time go to Effect > Stylize > Drop Shadow. Enter the settings shown in the following image, and click OK to apply a subtle shadow effect.

drop shadowdrop shadowdrop shadow

Step 4

Return to the Appearance panel, make sure that the fill is still selected, and click that Add New Fill button to add a second fill on top of the existing one.

Select the new fill, replace the pattern with R=198 G=156 B=109, and lower its Opacity to 65%.

fill opacityfill opacityfill opacity

Step 5

Keep focusing on the Appearance panel, select the top stroke, and again click that Add New Stroke button to add another stroke on top of the existing ones.

Select the new stroke, set the color to R=253 G=245 B=198 and the Weight to 1 pt, and then go to Effect > Path > Offset Path. Set the Offset to -10 px and click OK, and then go to Effect > Distort & Transform > Transform. Set those Move sliders to 1 px and 2 px, and then click OK.

inside strokeinside strokeinside stroke

Step 6

Keep focusing on that top stroke and open the Stroke fly-out panel. First, click the Round Cap and Round Join buttons, and then check that Dashed Line button. Enter 6 pt in all those dash and gap boxes, and don't forget to also check that Align dashes to corners... button.

illustrator dashed strokeillustrator dashed strokeillustrator dashed stroke

Step 7

Make sure that your dashed stroke is still selected and go to Effect > Stylize > Drop Shadow. Enter the settings shown in the following image and click OK.

drop shadowdrop shadowdrop shadow

Step 8

Make sure that your dashed stroke is still selected, and duplicate it using that same Duplicate Selected Item button.

Select the new stroke and go to Effect > Distort & Transform > Transform. Drag those Move sliders to 1 px and 2 px, set the Angle to 45 degrees, and then click OK. Return to the Appearance panel, focus on that top stroke, and drag the Transform effect between the Offset Path and Drop Shadow effects.

duplicate dashed strokeduplicate dashed strokeduplicate dashed stroke

Step 9

Return to the Appearance panel, add a new fill for your circle, and drag it to the top of the panel.

Lower the Opacity of this new fill to 25%, and then click the Radial Gradient button from the Gradient panel to apply a radial gradient. Replace the gradient colors with the ones shown in the following image, and don't forget to lower the Opacity of the right gradient slider to 0%.

Once you're done, use the Gradient Tool (G) to stretch the gradient as shown in the following image, and then go to Effect > Path > Offset Path. Set the Offset to -11 px and click OK.

radial gradientradial gradientradial gradient

Step 10

Return to the Appearance panel and duplicate the top fill.

Select the new fill and replace the existing linear gradient with the one shown below. Use the Gradient Tool (G) again to stretch the gradient as shown in the following image, and then open the Offset Path effect that's already applied. Just lower the Offset to -7 px and click OK.

radial gradientradial gradientradial gradient

Step 11

Return to the Appearance panel and add one more stroke on top of the existing fills and strokes.

Select it and set the color to R=252 G=242 B=183, lower the Opacity to 40% and the Blending Mode to Screen, and then open the Stroke fly-out panel.

Lower the Weight to 0.75 pt, and don't forget to check the Round Cap and Round Join buttons.

new strokenew strokenew stroke

Step 12

Keep focusing on the Appearance panel and make sure that the top stroke is still selected, and then apply the Zig Zag and Transform effects shown in the following image.

zig zag transformzig zag transformzig zag transform

5. How to Create an Embroidered Logo

Step 1

Our embroidery Illustrator effect needs a logo as well. Return to the set of rectangles that you used to create your first pattern. Select the top-left rectangle, and then go to Select > Same > Fill Color to easily select the rest of the shapes that have the same fill color.

Move to the Gradient panel and replace the existing linear gradient with the one shown in the following image.

edit gradientedit gradientedit gradient

Step 2

Select the bottom-left rectangle and again go to Select > Same > Fill Color. Again, replace the existing linear gradient with the one shown in the following image.

select same fillselect same fillselect same fill

Step 3

Reselect all these shapes and drag them into the Swatches panel (Window > Swatches) again to save them as a new pattern.

second fabric patternsecond fabric patternsecond fabric pattern

Step 4

Using the Pen Tool (P) or the Line Tool (\), create a 4 px vertical path. Add a 1 pt black (R=0 G=0 B=0) stroke for this path, and remember to check the Round Cap button to add those nice rounded edges.

Switch to the Selection Tool (V) and use the bounding box (View > Show Bounding Box) to rotate your path 45 degrees, as shown in the second image.

Keep your path selected and go to Object > Transform > Reflect. Check the Vertical box and click that Copy button to add a horizontally flipped copy of your path.

path rotate reflectpath rotate reflectpath rotate reflect

Step 5

Select both paths, open the Brushes panel (Window > Brushes), and click that New Brush button. Check the Pattern Brush box and click OK to open the Pattern Brush Options window. Set the Spacing to 20% and the Colorization to Tints (which will allow you to adjust the brush color once it's applied), and then you can click OK to save this brush.

illustrator pattern brushillustrator pattern brushillustrator pattern brush

Step 6

You can finish the design by adding your logo. Make sure there are no corners on the logo as it can distort the stitching pattern. I've added some subtle rounded corners to this Pen Tool icon from this pack: Design Duotone Icons.

Scale the logo to fit your round frame, and then here's how you can center it. Use the Selection Tool (V) to select the logo along with the circle, click the border of the circle to highlight it (and make it the reference shape), and then focus on the Control panel (Window > Control). Simply click the Horizontal Align Center and Vertical Align Center buttons.

center vector logocenter vector logocenter vector logo

Step 7

Keep your logo selected and start by adding two more fills besides the original one.

Select the bottom fill, set the color to R=134 G=115 B=100, and go to Effect > Path > Offset Path. Set the Offset to 3 px and click OK.

Move to the top fill, select it and set the color to R=251 G=176 B=64, and then lower its Opacity to 35%.

Finally, select the middle fill and just apply your second pattern from the Swatches panel.

apply fabric patternapply fabric patternapply fabric pattern

Step 8

Keep your logo selected, apply your pattern brush, and set the color to R=253 G=245 B=198. Increase or decrease the stroke weight whenever you wish to adjust the brush size.

apply pattern brushapply pattern brushapply pattern brush

Step 9

Finally, select your entire design and click the Recolor Artwork button from the Control panel to easily recolor your design.

ABCDABCDABCD

Congratulations! Your Embroidery Effect Illustrator Design Is Done!

And that's how to make embroidered patches in Illustrator. Here is how your embroidered patch style should look. I hope you've enjoyed this tutorial and can apply these techniques in your future projects.

Feel free to adjust the final design and make it your own. You can find some great sources of inspiration at Envato Elements, with interesting solutions to improve your embroidered patch styles.

Embroidered Patch Style Embroidered Patch Style Embroidered Patch Style

Popular Assets From Envato Elements

Envato Elements is an excellent resource for embroidered patch styles. Here's a short list of some of the most popular assets that you can find.

Sewing Kit (AI, PNG, JPG)

Need to make embroidery patches quickly? This sewing kit is a really good alternative whenever you need to create some quick sewing effects.

sewing kit illustratorsewing kit illustratorsewing kit illustrator

Textile Tartan (AI, EPS)

Wondering how to make an embroidered patch with text? Just double-click the text and type in yours to easily create an embroidered text effect in Illustrator.

embroidered text effectembroidered text effectembroidered text effect

Fabric Kingdom Illustrator Edition (AI, EPS, PNG)

Check out this set of Illustrator brushes and use them to easily create stitched effects. Among these 19 highly detailed pattern brushes, you'll definitely find one that fits your needs. It's an easy way to recreate this embroidery Illustrator design!

stitch brush illustratorstitch brush illustratorstitch brush illustrator

Sewing and Embroidery Procreate Brushes (BRUSHSET)

This massive pack of sewing and embroidery brushes is the perfect solution if you prefer to make embroidery patches using Procreate.

sewing embroidery Procreate brushessewing embroidery Procreate brushessewing embroidery Procreate brushes

Stitching Embroidery Mockup (PSD)

You know how to make an embroidered patch in Illustrator. Now, are you searching for mockups? Photoshop can also be an alternative if you're looking to create realistic stitching effects. Check out this amazing mockup and create embroidered logotypes, insignias, icons, and more.

stitching embroidery Photoshop mockupstitching embroidery Photoshop mockupstitching embroidery Photoshop mockup

Want to Learn More?

We have loads of tutorials on Envato Tuts+, from beginner to intermediate level. Take a look!


This content originally appeared on Envato Tuts+ Tutorials and was authored by Andrei Marius


Print Share Comment Cite Upload Translate Updates
APA

Andrei Marius | Sciencx (2014-01-20T02:39:18+00:00) Create an Embroidered Patch Style With Adobe Illustrator. Retrieved from https://www.scien.cx/2014/01/20/create-an-embroidered-patch-style-with-adobe-illustrator/

MLA
" » Create an Embroidered Patch Style With Adobe Illustrator." Andrei Marius | Sciencx - Monday January 20, 2014, https://www.scien.cx/2014/01/20/create-an-embroidered-patch-style-with-adobe-illustrator/
HARVARD
Andrei Marius | Sciencx Monday January 20, 2014 » Create an Embroidered Patch Style With Adobe Illustrator., viewed ,<https://www.scien.cx/2014/01/20/create-an-embroidered-patch-style-with-adobe-illustrator/>
VANCOUVER
Andrei Marius | Sciencx - » Create an Embroidered Patch Style With Adobe Illustrator. [Internet]. [Accessed ]. Available from: https://www.scien.cx/2014/01/20/create-an-embroidered-patch-style-with-adobe-illustrator/
CHICAGO
" » Create an Embroidered Patch Style With Adobe Illustrator." Andrei Marius | Sciencx - Accessed . https://www.scien.cx/2014/01/20/create-an-embroidered-patch-style-with-adobe-illustrator/
IEEE
" » Create an Embroidered Patch Style With Adobe Illustrator." Andrei Marius | Sciencx [Online]. Available: https://www.scien.cx/2014/01/20/create-an-embroidered-patch-style-with-adobe-illustrator/. [Accessed: ]
rf:citation
» Create an Embroidered Patch Style With Adobe Illustrator | Andrei Marius | Sciencx | https://www.scien.cx/2014/01/20/create-an-embroidered-patch-style-with-adobe-illustrator/ |

Please log in to upload a file.


There are no updates yet.
Click the Upload button above to add an update.

You must be logged in to translate posts. Please log in or register.