
This content originally appeared on Envato Tuts+ Tutorials and was authored by Laura Keung
In this tutorial, we'll look at the basics of opening an Adobe template in InDesign and also see how to edit an InDesign template. I will talk you through opening the files, adding images and logos, and editing colors and fonts to match your brand. Lastly, we'll take a look at how to export files for professional printing and email sharing.
For the purpose of this tutorial, I will show you how to open a flyer template and how to edit a brochure template in InDesign. Opening and editing each one is slightly different as brochures have more pages than flyers.
Follow along with this tutorial over on our Envato Tuts+ YouTube Channel:
What You'll Need
In addition to the assets listed below, you'll need Adobe InDesign. If you don't have the software, you can download a trial from the Adobe website. I'll be using the following assets:
- Brochure template for InDesign (if you are using a different template, check the help or font text file to download the fonts for that specific template)
- Electronics technician
- Castle logo
Save all of these files in a folder that's easy to locate. Let's get started!
Looking for amazing InDesign brochure templates? Head on over to Envato Elements.
1. How to Open an InDesign Flyer Template
Step 1
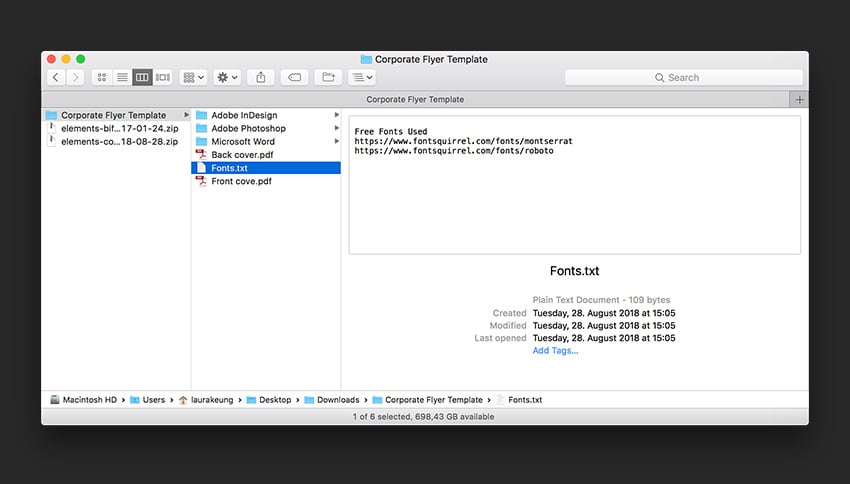
Locate the .zip file downloaded from Envato Elements. Double-click on the file to decompress it.
In the decompressed file, there are a few folders and files, one of them named Font.txt. This file contains links to download the fonts used in the template. Here, you have the option to go ahead and download the fonts. Alternatively, you can reinforce your brand by using your brand’s fonts.


Step 2
In this specific template, we will find files for Adobe InDesign, Photoshop, and Microsoft Word. We'll work with Adobe InDesign.
IDML vs. INDD
You'll notice different file formats: IDML vs. INDD. Which one is better, or is there even any difference? Neither is better than the other, but the difference between these two is that INDD is version specific and IDML is an (almost) universal file that can be opened by InDesign CS4 (or later). I am working with InDesign CC, so I will be opening the INDD file for the front cover.
Jump to step 3 to learn how to place images and how to edit text in InDesign.


2. How to Edit an InDesign Template
Step 1
For this step, I'll switch to working with a brochure as it contains more elements. Follow the same steps as above. Decompress the file, and open the InDesign file that corresponds to your setup.
In this specific template for InDesign, the font information is within the help.txt file. Follow the links in the file to download the fonts and install them in your FontBook.
If you are using InDesign CC, there’s a chance some of these fonts are part of the Adobe Fonts package. In this case, you can activate them in the pop-up warning window upon opening the file.


Step 2
With the file open, we can check what we will be working with.
Open the Pages panel to see the layout template in InDesign and all its pages. If you don’t have it open, head over to Windows > Pages. We can see that the file consists of a cover, back cover, and inside pages.
Open the Layers panel by going to Window > Layers. Check the layers—in this case, we are working with one layer only. Doing this will help you identify the pages of your layout template in InDesign faster.
Let’s check the Paragraph Style panel by going to Window > Styles > Paragraph Styles. You can see we have a variety of styles.
Paragraph styles are a collection of formatting attributes given to specific paragraphs or lines of text. Styles contain formatting such as fonts, family, size, alignment, indents, etc. The advantage of using them is that they can save time and help you design consistently, avoiding mistakes.
In this case, these styles will be helpful if you decide to make general type changes to the brochure.


Step 3
Let’s start by adding an image to the cover. Select the grey object at the top of the page. Press Command-D to Place an image. In the Place window, find the image you’d like to place. Click Open.
To resize the image, use the Direct Selection Tool (A) from the toolbar. Select the image, which will activate a bounding box on the image but within the object. You’ll know it is the right bounding box because the color should be different from blue.


Step 4
If you want to know how to edit text in InDesign, just use the Text Tool (T) from the toolbar. Click on the text and replace it with your own.


If you don’t have much text to add, you can select a text box and delete it by pressing the Backspace key. In my case, I don’t have much text to add to the subtitle, so I will be making this text box smaller. Double-click on the middle handle to automatically collapse the box.


Step 5
To add a logo, make sure you have an EPS or AI file. Select the logo placed on the template and delete it. Press Command-D to Place a new logo. This time, click outside of the page to resize it to create its own box.


To resize the logo, press Shift-Command and drag one of the corners. Shift will scale the logo evenly, while Command will fit the content to the box. Delete the template logo and replace it with the new one.


Step 6
Let’s work on the interior pages. Select the rectangle at the top of the page and press Command-D to add an image. To resize the image, use the Direct Selection Tool (A) from the toolbar.


Step 7
Using the Text Tool (T), add the desired text. In this case, the subtitle and copy are in two separate text boxes.
For the purpose of this tutorial, let’s say you’ve added a shorter amount of copy. To polish things off, we will shorten the text boxes. Double-click on the handle point of the bounding box, and it should automatically shorten.


Step 8
If you’d like to add a third paragraph, select the Selection Tool (V) from the toolbar. Select the last headline and text box. Hold down Shift and drag both boxes upwards. Shift will maintain the vertical positioning of the box.


Step 9
Select a headline and a copy text box from above. Hold down Shift-Option and drag downwards. This shortcut will duplicate and maintain the vertical positioning of the box.


You can edit in the template and the rest of the text by using the Text Tool (T) and deleting elements you might not have copy for.


Step 10
To change the font you are using or other InDesign formats, you can do so in the Paragraph Style. As an example, let’s edit the body text style on page 3. While on the Paragraph panel, select any text box, and the style will be highlighted. Double-click on it to open the window option.


In the Paragraph Style window option, check the Preview box at the bottom so you can see the changes live.
Select the Basic Character Formats on the left side. Under Font Family, you can select any other font you’d like. I am changing from Lato to Open Sans. This will replace all the text throughout the brochure that is using this style. If you want to use a different font throughout the document, you can replace the font for each style. This is a quick way that will ensure all the fonts have been replaced. Here, you can also change other formatting options like color, size, indents, etc.


Step 11
Lastly, you can also edit the colors on the template if you want to have something more aligned with your branding guidelines.
Open the Swatches panel by going to Window > Color > Swatches. Extend the Swatches panel and you’ll notice swatches for all the colors being used in the template.


To edit these in your template, select an object on the page to see what swatch is being used. I selected one of the blue objects. Double-click on the highlighted swatch.
In the Swatch window option, feel free to adjust the CMYK values to something that applies to your brand. I’ll be changing all of my swatches to a turquoise color. Click OK.
You can alter any color in the template. Just keep in mind that when you edit this swatch, all the objects using the color you edited will also change.


Step 12
You can also change the colors on each of the text boxes individually. Select a text box, head over to the Swatches panel, and select a color. Below, I’ve changed the color for some of the bullet points and the facts background.


For the facts background, you can see that the color is lighter than the real color. This is because the Tint is lower. On the Swatches panel, you can alter the Tint percentage by moving the slider.


Let’s keep editing the rest of the brochure. I’ve added a photo on the back cover and changed the color of the quotation marks to match the facts background.


Step 13
When you are done editing the file, you can export the file for printing. Make sure that all the photos are meeting the bleed marks. The marks are represented with a red line around the page.


To export the file, press Command-E. In the Export window option, name your file. Set the InDesign Format to Adobe PDF (Print). Click Save.


In the Export Adobe PDF window option, set the Adobe PDF Preset to Press Quality. Select the Marks and Bleeds option from the menu on the left. Check All Printer’s Marks and Use Document Bleed Settings. Click Export. You’ll have a PDF ready for professional printing.


Step 14
To export the file to attach to an email for online marketing, press Command-E to Export. Save the file with a different name or add ‘-online’ to differentiate it from the print file. Set the InDesign Format to Adobe PDF (Interactive). This will help make the file size smaller compared to the printing file.


In the Export to Interactive PDF window option, select the General option from the menu on the left side. Make sure All is selected under Pages. In the Export As section, you have the option to export the PDF file as single pages or as spreads. Here you can choose what you prefer.


Select the Compression menu, and set the JPEG Quality to High. This will ensure the PDF file is of good quality. Click Export. Click OK in the color space warning window. You’ll have a PDF ready to be shared in marketing emails.


Great Job! You’ve Finished This Tutorial!
In this tutorial, you learned different ways to open a file and also how to edit a template flyer and brochures. If you're new to InDesign, grab one of the many great flyers and brochures Envato Elements offers. Along with this tutorial, you are sure to successfully edit it to market your business. Today, we’ve learned to:
- Open an Adobe InDesign file.
- Place and format images and logos.
- Edit and format typography.
- Use the Paragraph Styles panel.
- Use the color Swatches panel.
If you'd like to explore more templates for InDesign or more creative assets, you can find many customizable brochures and flyers over at Envato Elements. Check them out!


If you liked this tutorial on how to edit an Adobe template in InDesign, you might like these:

 Adobe InDesign for Beginners


 How to Edit Parent Pages in InDesign


 How to Package an InDesign File


 How to Edit Text in InDesign


 How to Make an Architecture Portfolio Template in InDesign

 How to Create a Simple Magazine Template in Adobe InDesign


 50+ InDesign Templates Every Designer Should Own

 The Graphic Designer's Resource Kit

This content originally appeared on Envato Tuts+ Tutorials and was authored by Laura Keung
Laura Keung | Sciencx (2018-11-22T15:57:44+00:00) How Do I Open and Edit a Template in InDesign?. Retrieved from https://www.scien.cx/2018/11/22/how-do-i-open-and-edit-a-template-in-indesign/
Please log in to upload a file.
There are no updates yet.
Click the Upload button above to add an update.