
This content originally appeared on DEV Community and was authored by Daniel Krupnyy
Welcome to the second part of the production deployment of the Strapi + Gatsby app on VPS Shared Hosting! ?
Before install Node, you need to connect to the server over SSH. You can find all the data for connecting via SSH on your host.
So, in your terminal enter:
shh root@00.0.000.000
Instead "00.0.000.000" enter your server IP. After enter password.
Installing Node
In order to install Node, you need to find out what OS installed on the your server.
In different hosts it can be find out on different ways.
So, you need to find out it in your case ?
In my case, the server had Cent OS installed and I'll show you how I installed Node on this OS.
For different OS Node has some great documentation ?
let's continue.
First install yum:
curl -sL https://rpm.nodesource.com/setup_10.x | sudo bash -
Then install Node:
sudo yum install nodejs
That's it!
You can check out the Node version:
node --version
Adding new domain and subdomain
To add a domain to VestaCP you must:
Log in to control panel and go to the section Web.

In the upper left corner click on Add Web Domain. Fill in all the required fields and click Add.

Also you need to create a subdomain. The procedure for creating a subdomain is the same as for a domain.
When you're enter your domain name, you need to write "admin." in front of it.
It looks like this: admin.your-domain.com.
In the future, we will install the Strapi backend on a subdomain.
Adding template for nginx in VestaCP
Templates for nginx on a server with VestaCP installed are stored along the path: /usr/local/vesta/data/templates/web/nginx/.
Each template must be provided in two formats:
- *.tpl - for http
- *.stpl - for ssl(https)
The file names must be the same.
Let's create them:
nodeproxy.stpl
server {
  listen   %ip%:%proxy_port%;
  server_name %domain_idn% %alias_idn%;
  error_log /var/log/%web_system%/domains/%domain%.error.log error;

  location /error/ {
    alias  %home%/%user%/web/%domain%/document_errors/;
  }

  location @fallback {
    proxy_pass   http://%ip%:%web_port%;
  }

  location ~ /\.ht  {return 404;}
  location ~ /\.svn/ {return 404;}
  location ~ /\.git/ {return 404;}
  location ~ /\.hg/  {return 404;}
  location ~ /\.bzr/ {return 404;}

  include %home%/%user%/conf/web/nginx.%domain%.conf*;
}
nodeproxy.tpl
server {
  listen   %ip%:%proxy_port%;
  server_name %domain_idn% %alias_idn%;
  error_log /var/log/%web_system%/domains/%domain%.error.log error;

  location /error/ {
    alias  %home%/%user%/web/%domain%/document_errors/;
  }

  location @fallback {
    proxy_pass   http://%ip%:%web_port%;
  }

  location ~ /\.ht  {return 404;}
  location ~ /\.svn/ {return 404;}
  location ~ /\.git/ {return 404;}
  location ~ /\.hg/  {return 404;}
  location ~ /\.bzr/ {return 404;}

  include %home%/%user%/conf/web/nginx.%domain%.conf*;
}
After adding a template in the domain settings panel, you need to select a template for nginx:
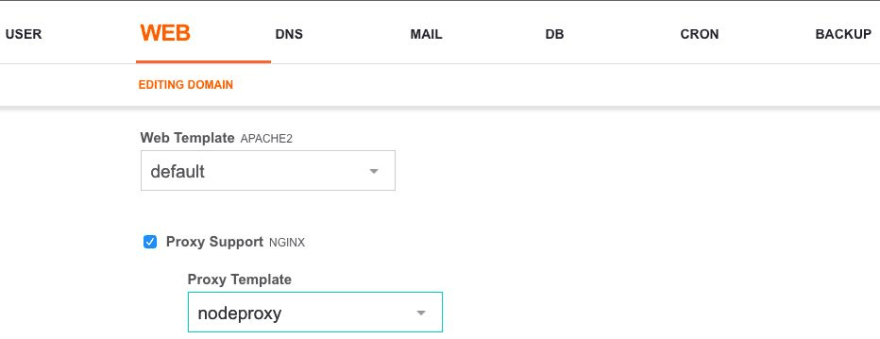
All the above steps must be repeated for the subdomain.
After editing the nginx configurations, it must be restarted for the changes to take effect!
For that go to the "Server" on top menu of VestaCP:

There you'll see nginx. Move mouse on it end click restart.
Nginx configuration
After applying the template for nginx, configuration files will be automatically generated under the path /home/{username}/conf/web. Let's take a closer look at the contents of the template, namely, we are interested in the line:
include /home/username/conf/web/nginx.example.com.conf*;
Since nginx configuration files are dynamic, we cannot change their content, otherwise we will lose the changes after regenerating the template. But we can create an nginx.example.com.conf* file to be extracted. It is worth noting that we only have access to the server block of the configuration file, since include is done there. This is done because the server block should be generated automatically and have basic settings.
So let's create files for main domain:
snginx.example.com.conf*
Empty
nginx.example.com.conf*
if ( $scheme = "http" ) {
 rewrite ^/(.*)$ https://$host/$1 permanent;
}
The code above redirects the request from http to https.
Now create files for subdomain:
snginx.admin.example.com.conf*
location / {
  proxy_pass http://00.0.000.000:1337;
}
Instead 00.0.000.000 your server IP.
nginx.admin.example.com.conf*
if ( $scheme = "http" ) {
 rewrite ^/(.*)$ https://$host/$1 permanent;
}
That's it! ?
In next part we will deploy Gatsby and Strapi, create web hooks and install pm2.
If you want to add something, drop it in the comments??
This content originally appeared on DEV Community and was authored by Daniel Krupnyy
Daniel Krupnyy | Sciencx (2021-04-12T10:47:39+00:00) Production deployment Strapi + Gatsby app on VPS Shared Hosting: installing Node & Creating configs. (2). Retrieved from https://www.scien.cx/2021/04/12/production-deployment-strapi-gatsby-app-on-vps-shared-hosting-installing-node-creating-configs-2/
Please log in to upload a file.
There are no updates yet.
Click the Upload button above to add an update.