
This content originally appeared on DEV Community and was authored by Lev Eidelman Nagar
In this tutorial we'll build a simple CRM app utilizing an awesome tech stack consisting of:
- React - React really needs no introduction, since it's the most popular front-end framework around.
- Inertia.js - Inertia allows you to create fully client-side rendered, single-page apps, without much of the complexity that comes with modern SPAs.
- Typescript - A strongly typed superset of ECMAScript.
- AdonisJS - A fully featured web framework focused on productivity and developer ergonomics.
If I were inclined to name things, I might call it the RITA stack.
Prerequisites
- You should have the latest stable version of Node.js installed.
- Some kind of code editor or IDE (if you're not sure, Visual Studio Code is a great option).
Now, let's build this thing...
Scaffolding a New App
Let's create a new Adonis project, by running the following from the terminal:
npm init adonis-ts-app@latest simple-crm
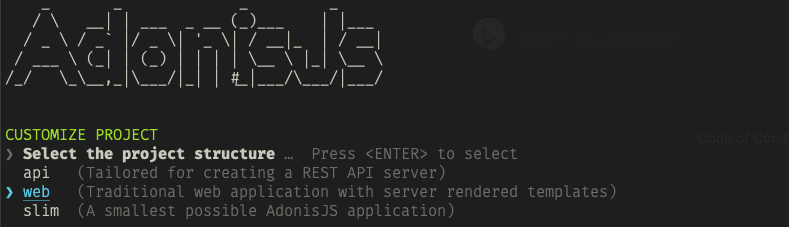
When prompted for the type of application you would like to scaffold select web:
We'll leave all options as their default values except Configure webpack encore for compiling frontend assets? which we'll set to true.

Let's cd into our project directory and continue.
Install Lucid ORM and Create Our User Model
We will use SQLite and LucidORM to store and retrieve our user data.
To install and set up LucidORM run the following in the terminal:
npm i @adonisjs/lucid

node ace configure @adonisjs/lucid
When prompted for the database driver you would like to use, choose SQLite.
Next, we will create our users schema.
Create the User Schema Migration
Run the following in your terminal to create the User schema migration:
node ace make:migration users

We will edit the migration script that was created for us and make a simple user schema consisting of a first name, last name and email:
import BaseSchema from '@ioc:Adonis/Lucid/Schema'

export default class Users extends BaseSchema {
  protected tableName = 'users'

  public async up() {
    this.schema.createTable(this.tableName, (table) => {
      table.increments('id').primary()
      table.string('first_name').notNullable()
      table.string('last_name').notNullable()
      table.string('email').unique().notNullable()

      table.timestamps(true, true)
    })
  }

  public async down() {
    this.schema.dropTable(this.tableName)
  }
}
Now, let's run our migration to create the user table:
node ace migration:run
With that out of the way, let's focus on our front end.
Configure Webpack-Encore for Typescript and React
By default Encore (the asset bundler provided to us by Adonis) is configured for Javascript, but since we want to use the same language throughout our app, let's modify it a bit.
First, let's install ts-loader and @babel/preset-react so encore knows how to handle Typescript files and JSX syntax:
npm install ts-loader@^8.0.1 @babel/preset-react --save-dev
Then, let's edit webpack.config.js by changing the following from:
Encore.addEntry('app', './resources/js/app.js')
To:
Encore.addEntry('app', './resources/js/app.tsx')
Encore.enableTypeScriptLoader()
Encore.enableReactPreset()
Also, let's rename /resources/js/app.js to /resources/js/app.tsx to match our previous changes.
Now, let's configure typescript for our client side code. Create a file called /resources/js/tsconfig.json and paste this minimal config in it:
{
  "include": ["**/*"],
  "compilerOptions": {
    "lib": ["DOM"],
    "jsx": "react",
    "esModuleInterop": true
  }
}
Lastly, let's install react:
npm i react react-dom @types/react @types/react-dom
Now we're ready to install and configure Inertia.js
Install and Configure Inertia Adapter
To install the Inertia adapter for Adonis, run the following command:
npm i @eidellev/inertia-adonisjs
Now let's configure the adapter by running:
node ace configure @eidellev/inertia-adonisjs
When prompted, please select to install the inertia adapter for react.
Setting Up the Client-Side Inertia Adapter
With everything installed, let's set up our root view. Open /resources/views/app.edge and add this script tag to the <head> section:
<!DOCTYPE html>
<html lang="en">
<head>
  <meta charset="UTF-8">
  <meta name="viewport" content="width=device-width, initial-scale=1.0">
  <link rel="icon" type="image/png" href="/favicon.ico">
  <!-- This -->
  <script src="{{ asset('assets/app.js') }}" defer></script>
  <!-- -->
  <title>simple-crm</title>
</head>
<body>
  @inertia()
</body>
</html>
Now, let's configure our app's entrypoint. Open resources/js/app.tsx and replace the code with:
import { InertiaApp } from '@inertiajs/inertia-react'
import React from 'react'
import { render } from 'react-dom'
import '../css/app.css'

const el = document.getElementById('app')

render(
  <InertiaApp
    // Pass props from the server down to the client app
    initialPage={JSON.parse(el.dataset.page)}
    // Dynamically load the required page component
    resolveComponent={(name) => import(`./Pages/${name}`).then((module) => module.default)}
  />,
  el
)
Next, let's add our first page component. Create a new react component in resources/js/Pages/Test.tsx:
import React from 'react'

const Test = () => <div>hello from inertia</div>

// All pages need to be exported as default
export default Test
Finally, let's configure a route for our new page. Open start/routes.ts and replace whatever is currently there with:
import Route from '@ioc:Adonis/Core/Route'

Route.get('/test', async ({ inertia }) => {
  return inertia.render('Test')
})
Now that we're all set, let's run our app and watch the magic happen:
node ace serve --watch # this will start both adonis and webpack dev server
When you visit http//localhost:3333/test you should see something like this:

Awesome!
To Be Continued
In the next posts in this series we will continue to flesh out our app and see some of the cool features of both Adonis and Inertia in action.
This content originally appeared on DEV Community and was authored by Lev Eidelman Nagar
Lev Eidelman Nagar | Sciencx (2021-05-16T20:24:44+00:00) Getting started with AdonisJS and Inertia.js. Retrieved from https://www.scien.cx/2021/05/16/getting-started-with-adonisjs-and-inertia-js/
Please log in to upload a file.
There are no updates yet.
Click the Upload button above to add an update.