
This content originally appeared on DEV Community and was authored by Hiep Le

I'm Hiep. I work as a full-time software engineer. Most of my open-source projects are focused on one thing - to help people learn ?.
Before moving on with this part, you should follow the first part in this series:
I created a git repository that helps you learn Redux by buiding Netflix. It means that you are learning Redux by building a real-life project. I will explain concepts in detail. This post is the second part in my series and it is suitable for beginners.
Github link: https://github.com/hieptl/netflix-clone/tree/main/advanced/netflix-clone-with-redux
If you feel the repository is useful, please help me share the post and give me a Github ⭐. It will make me feel motivation to work even harder. I will try to make many open sources and share to the community.
I also created some series that help you improve your practical skills:
1. Master Design Patterns by Building Real Projects - Javascript.
Github: https://github.com/hieptl/master-javascript-design-patterns-by-building-real-projects
Preface
This course will help you to learn Redux by building Netflix. It means that you are learning by doing a real-life project. You will learn the following Redux concepts:
- Redux.
- React Redux.
- actions.
- reducers.
- store.
- combineReducers.
- createStore.
- useDispatch.
- useSelector.
Table of Contents
| No. | Topics |
|---|---|
| 0 | How to Run the Project. |
| 1 | Live Demo. |
| 2 | Introduction about the Creator. |
| 2.1 | Greenwich University. |
| 2.2 | Hitachi Vantara Vietnam. |
| 3 | Prequisites. |
| 3.1 | Softwares. |
| 3.2 | Technical Skills. |
| 3.3 | Materials. |
| 4 | Purposes of the Course. |
| 4.1 | Final Project. |
| 4.2 | Job. |
| 5 | Redux. |
| 5.1 | What. |
| 5.2 | The Architecture of Redux. |
| 5.3 | Why. |
| 5.4 | When. |
| 5.5 | How. |
| 6 | Show Loading Component By Using Redux - Netflix. |
| 7 | Summary. |
| 8 | Useful Resources to Learn React. |
| 9 | References. |
Table of Images.
| No. | Topics |
|---|---|
| 1 | Figure 1: Redux. |
| 2 | Figure 2: Loading Component - Netflix. |
0. How to Run the Project.
Step 1: Clone the project by using git clone or download the zip file.
Step 2: Open "terminal" / "cmd" / "gitbash" and change directory to "netflix-clone" and run "npm install" to install dependencies.
Step 3: Run "npm start" to run the fron-end project.
1. Live Demo.
2. Introduction about the Creator.
2.1. Greenwich University.
GPA 4.0 / 4.0.
Machine Learning paper - Recommendation System - IEEE/ICACT2020.
Co-Founder / Mentor IT club.
2.2. Hitachi Vantara Vietnam.
Employee of the year.
Second prize - innovation contest.
Techlead - HN branch.
One of CoE Leaders (Center of Excellence).
3. Prequisites.
3.1. Softwares.
Install NodeJS.
An IDE or a text editor (VSCode, Intellij, Webstorm, etc).
3.2. Technical Skills.
Basic programming skill.
Basic HTML, CSS, JS skills.
3.3. Materials.
Html, css, js (source code) was prepared because I want to focus on React and share knowledge about React. Building html and css from scratch would take a lot of time.
README.md (the md file will contain everything about the course).
Netflix data will be used to import to Firebase. In this course, we use Firebase as our back-end service.
4. Purposes of the Course.
4.1. Final Project.
The course would help you have understanding about React.
You could build the final project with end-to-end solution (front-end solution using React and back-end solution using Firebase).
4.2. Job.
- After finishing the course, you could get a job with fresher / junior position.
5. Redux
5.1. What
- It is a predictable state container.
- It is based on Flux pattern.
- Is is just 2Kb.
- It has no dependencies.
5.2. The Architecture of Redux
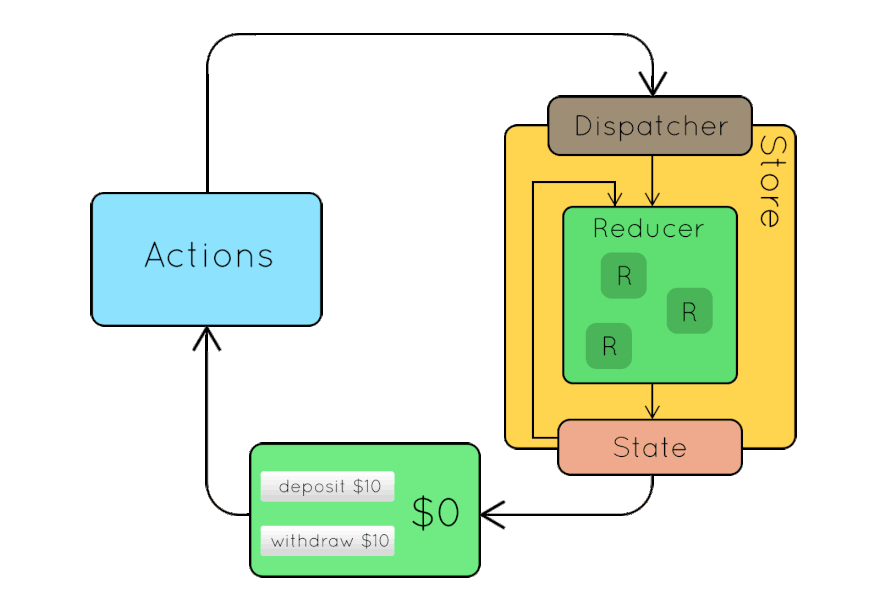
Figure 1. Redux.
5.3. Why
- It provides a single source of truth.
- State is read only.
- Changes are made with pure function.
- Changes in your application will be more predictable and tracable.
- It is easy to integrate with any view libraries.
5.4. When
Not all apps need Redux. It's important to understand the kind of application you're building, the kinds of problems that you need to solve, and what tools can best solve the problems you're facing.
Redux helps you deal with shared state management, but like any tool, it has tradeoffs. It's not designed to be the shortest or fastest way to write code.
It helps answer the question "When did a certain slice of state change, and where did the data come from?"
It's a trade-off between short term and long term productivity.
5.5. How
Firstly, we need to understand the flow first.
The components will get state from the store. Whenever the state is changed, the components will be re-rendered.
The components will dispatch actions to tell the reducers update the state in the store.
The reducers will take the responsibility to update the state. It will be used to return the latest state. In fact, we will not dispatch actions in the reducers. It is an anti-patten, we should avoid that.
In order to integrate Redux in our Netflix application, please follow the below steps:
Step 1: define the actions including the actions and the action's types.
Step 2: define the reducers.
Step 3: define the store.
Step 4: Use the store in our application.
Step 5: Let our components get the state from the store.
Step 6: Let our components dispatch the actions to the store.
6. Show Loading Component by Using Redux - Netflix.

Figure 2. Loading Component - Netflix
In this course, we will understand Redux by building Loading component for our Netflix application.
First of all, we need to know about why Redux should be applied to show Loading. As mentioned before, Redux helps you deal with shared state management. On the other hand, every pages need to show Loading component when fetching apis from the server. For this reasons, the state of Loading component should be available globally and should be shared between components. That's why we want to use Redux in this case.
- Step 1: Create Loading.js file in src/components folder to define Loading component.
function Loading() {
  return (
    <div className="lds-roller">
      <div></div>
      <div></div>
      <div></div>
      <div></div>
      <div></div>
      <div></div>
      <div></div>
      <div></div>
    </div>
  );
}

export default Loading;
- Step 2: Copy the following css to the bottom of the index.css file.
.lds-roller {
  display: inline-block;
  position: fixed;
  width: 80px;
  height: 80px;
  top: 50%;
  left: 48%;
}
.lds-roller div {
  animation: lds-roller 1.2s cubic-bezier(0.5, 0, 0.5, 1) infinite;
  transform-origin: 40px 40px;
}
.lds-roller div:after {
  content: " ";
  display: block;
  position: absolute;
  width: 7px;
  height: 7px;
  border-radius: 50%;
  background: #fff;
  margin: -4px 0 0 -4px;
}
.lds-roller div:nth-child(1) {
  animation-delay: -0.036s;
}
.lds-roller div:nth-child(1):after {
  top: 63px;
  left: 63px;
}
.lds-roller div:nth-child(2) {
  animation-delay: -0.072s;
}
.lds-roller div:nth-child(2):after {
  top: 68px;
  left: 56px;
}
.lds-roller div:nth-child(3) {
  animation-delay: -0.108s;
}
.lds-roller div:nth-child(3):after {
  top: 71px;
  left: 48px;
}
.lds-roller div:nth-child(4) {
  animation-delay: -0.144s;
}
.lds-roller div:nth-child(4):after {
  top: 72px;
  left: 40px;
}
.lds-roller div:nth-child(5) {
  animation-delay: -0.18s;
}
.lds-roller div:nth-child(5):after {
  top: 71px;
  left: 32px;
}
.lds-roller div:nth-child(6) {
  animation-delay: -0.216s;
}
.lds-roller div:nth-child(6):after {
  top: 68px;
  left: 24px;
}
.lds-roller div:nth-child(7) {
  animation-delay: -0.252s;
}
.lds-roller div:nth-child(7):after {
  top: 63px;
  left: 17px;
}
.lds-roller div:nth-child(8) {
  animation-delay: -0.288s;
}
.lds-roller div:nth-child(8):after {
  top: 56px;
  left: 12px;
}
@keyframes lds-roller {
  0% {
    transform: rotate(0deg);
  }
  100% {
    transform: rotate(360deg);
  }
}
1st NOTE:
The next step is to define the action's types.
Actually, we would have many actions in our applications. Each action has specific name. We should not hardcode the name.
The best practice is to define the action's types as constant variables and import them in different places in the application.
- Step 3: Create a folder which is called actions, actions folder will be used to contain redux's actions in the application. Following that, we need to create LoadingActionTypes.js. LoadingActionTypes.js defines the action's types for Loading component. Those action's types will be used to update the state of Loading component.
export const SHOW_LOADING = "SHOW_LOADING";
export const HIDE_LOADING = "HIDE_LOADING";
2nd NOTE:
After the actions were dispatched, the reducer will update the state based on the dispatched actions.
It is time to define the LoadingReducer in our application.
- Step 4: Create a folder which is called reducers, reducers folder will be used to contain reducers in the application. Following that, we need to create LoadingReducer.js in reducers folder.
// import loading actiont types.
import * as loadingActionTypes from "../actions/LoadingActionTypes";

const initialState = {
  isLoadingShown: false
};

function reducer(state = initialState, action) {
  switch (action.type) {
    case loadingActionTypes.SHOW_LOADING:
      return {
        ...state,
        isLoadingShown: true
      };
    case loadingActionTypes.HIDE_LOADING:
      return {
        ...state,
        isLoadingShown: false
      };
    default:
      return state;
  }
}

export default reducer;
3rd NOTE:
initialState: defines the initial state for loading. It means that when we refresh the web page or go to the web page for the first time. Loading component will be hidden.
reducer: It is a function that accept state and action as parameters. It will update the state for loading and return the latest state.
In fact, we will have many reducers in our application. For this reason, we should combine all reducers into a single reducer.
- Step 5: Define index.js in reducers folder. It work as the root reducer.
// import combine reducer.
import { combineReducers } from "redux";
import loading from "./LoadingReducers";

export default combineReducers({
  loading
});
4th NOTE:
- After defining the reducers, we need to define the store.
- Step 6: Define store.js in src folder.
// import create store
import { createStore } from "redux";
// import root reducer.
import reducer from "./reducers";

export default createStore(reducer);
5th NOTE:
createStore: defines the store. It accepts the root reducer as parameter.
Before moving on, we should refactor our App.js
- Step 7: Create Layout.js file in components folder.
// import react router dom.
import { BrowserRouter as Router, Switch, Route } from "react-router-dom";
// import custom components.
import Home from "../home/Home";
import Login from "../login/Login";
import Loading from "../loading/Loading";

function Layout() {
  return (
    <>
      <Router>
        <Switch>
          {/* Home Route */}
          <Route exact path="/">
            <Home />
          </Route>
          {/* End Home Route */}
          {/* Login Route */}
          <Route exact path="/login">
            <Login />
          </Route>
          {/* End Login Route */}
        </Switch>
      </Router>
      <Loading />
    </>
  );
}

export default Layout;
6th NOTE:
- Now our App component should be like this:
// import custom components.
import Layout from './components/layout/Layout';
// import global styling.
import "./index.css";
// create App components.
function App() {
 return <Layout />
}
// export App component.
export default App;
If you run the code, Loading component will be shown. However, we just want to show when we fetch apis from the server.
It is time to get the state from Redux's store.
If the loading state is true, we will show Loading component and vice versa.
- Step 8: Update App.js with the following code:
// import custom components.
import Layout from './components/layout/Layout';
// import global styling.
import "./index.css";
// import provicer.
import { Provider } from "react-redux";
// import store.
import store from "./store";
// create App components.
function App() {
  return <Provider store={store}>
    <Layout />
  </Provider>;
}
// export App component.
export default App;
7th NOTE:
- Provider: helps us to integrate the store to our application.
- Step 9: Update Layout component with the following code
// import react router dom.
import { BrowserRouter as Router, Switch, Route } from "react-router-dom";
// import custom components.
import Home from "../home/Home";
import Login from "../login/Login";
import Loading from "../loading/Loading";
// import useSelector to get state from the store.
import { useSelector } from "react-redux";

function Layout() {
  const loading = useSelector((state) => state.loading);

  return (
    <>
      <Router>
        <Switch>
          {/* Home Route */}
          <Route exact path="/">
            <Home />
          </Route>
          {/* End Home Route */}
          {/* Login Route */}
          <Route exact path="/login">
            <Login />
          </Route>
          {/* End Login Route */}
        </Switch>
      </Router>
      {loading.isLoadingShown && <Loading />}
    </>
  );
}

export default Layout;
8th NOTE:
- We can image our state as a single JSON object, it will be similar to some thing like this:
{
 loading: {
   isLoadingShown: false
 }
}
- useSeletor: is used to get the state from the store. In this case, we want to get the loading state. Hence, we write some thing like this:
...
const loading = useSelector((state) => state.loading);
...
- In order to show / hide Loading component based on the loading state, we use inline conditional expression with ternary operator.
...
{loading.isLoadingShown && <Loading />}
...
However, If we run the code, Loading component will not be shown because the default value of loading state is false.
For this reason, we should dispatch SHOW_LOADING action to show the loading indicator when we fetch apis and dispatch HIDE_LOADING action to hide the loading indicator after receiving the result from the server or when an error occurs.
Step 10: Update Row.js component with the following code:
// import react.
import { useEffect, useState } from "react";
// import firebase database.
import { firebaseDatabase } from "../../firebase/firebase";
// import useDispatch to dispatch action to the store.
import { useDispatch } from "react-redux";
// import action types.
import * as loadingActionTypes from "../../actions/LoadingActionTypes";

/**
 * create Row component.
 * @param {*} props which are passed to the Row component.
 */
function Row(props) {
  // create "movies" state to store list of movies from Firebase.
  const [movies, setMovies] = useState([]);
  // get props.
  const { title, movieType, onMovieSelected } = props;
  // leafRoot to get data from Firebase.
  const leafRoot = "movies";
  // create dispatch instance to dispathc action to the store.
  const dispatch = useDispatch();

  /**
   * fetch movies from Firebase when getting "movieType" prop.
   */
  useEffect(() => {
    fetchMovies(movieType);
  }, [movieType]);

  /**
   * fetch movies from Firebase.
   * @param {*} movieType which is used to get movies from Firebase.
   */
  const fetchMovies = (movieType) => {
    dispatch({ type: loadingActionTypes.SHOW_LOADING });
    const movieRef = firebaseDatabase.ref(`${leafRoot}/${movieType}`);
    movieRef.on("value", (snapshot) => {
      const movies = snapshot.val();
      if (movies && movies.length !== 0) {
        // update "movies" state after getting movies from Firebase.
        setMovies(() => movies);
        dispatch({ type: loadingActionTypes.HIDE_LOADING });
      }
    });
  };

  /**
   * handle event when the user clicks on a movie.
   * @param {*} movie which is selected by the user.
   */
  const onMovieClicked = (movie) => {
    // dispatch callback function through props.
    onMovieSelected(movie);
  };

  return (
    <div className="row">
      {/* Title */}
      <h2>{title}</h2>
      {/* End Title */}
      {/* List of Movies */}
      <div className="row__posters">
        {movies.map((movie) => (
          <img
            key={movie.id}
            onClick={() => onMovieClicked(movie)}
            className="row__poster row__posterLarge"
            src={`https://image.tmdb.org/t/p/original/${movie.poster_path}`}
            alt={movie.original_name}
          />
        ))}
      </div>
      {/* End List of Movies */}
    </div>
  );
}
// export Row component.
export default Row;
9th NOTE:
useDispatch: is used to dispatch an action to the store. It accept a JSON object as parameter.
We dispatch SHOW_LOADING action before fetch data from Firebase and dispatch HIDE_LOADING action after getting data.
Summary
Store: It is a single source of truth. It help us to manage state and changes are more predictable and tracable.
Action: a single object that tell the reducer update the state in the store.
Reducer: accepts the initial state and action as parameters. It will return the latest state based on the actions and the previous state.
combineReducers: the application may contain many reducers. The best practice is to combine many reducers into a single reducer.
createStore: create the store for the application.
Provider: provides the store to the application.
useDipatch: dispatch an action to the store.
useSelector: get the state from the store.
Thank you so much for taking the course. I hope that you could understand about Redux and you can build many real-life projects by using React (as front-end) and Firebase (as back-end) in order to solve many problems and make our life become better.
Useful Resources to Learn React.
[1]. https://reactjs.org/docs/getting-started.html.
References
[1]. https://reactjs.org/docs/getting-started.html.
[2]. https://firebase.google.com/docs/database.
[3]. https://firebase.google.com/docs/auth/web/password-auth.
[4]. https://firebase.google.com/docs/hosting.
[5]. https://redux.js.org/
This content originally appeared on DEV Community and was authored by Hiep Le
Hiep Le | Sciencx (2021-06-09T16:09:46+00:00) Learn Redux By Building Netflix. Retrieved from https://www.scien.cx/2021/06/09/learn-redux-by-building-netflix/
Please log in to upload a file.
There are no updates yet.
Click the Upload button above to add an update.