This content originally appeared on DEV Community and was authored by Modern Web
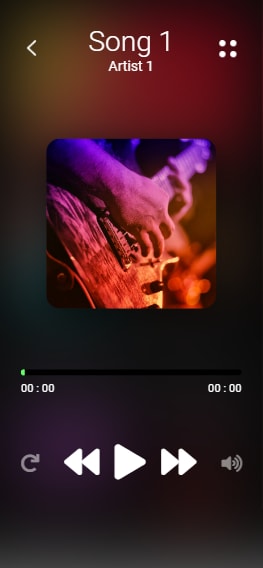
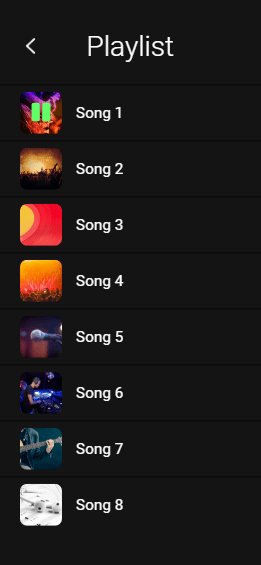
Hello, Today we'll see, how we can easily create a music player using HTML, CSS and JS only. No other library. Our music player has three section or screen. Home screen, player screen and playlist section. We have a smooth working slider in our home section and we also have horizontal scrolling. And the best part of this music player is it minimizing music player. Yes, you can minimize and maximize the player itself. Makes this project an awesome music player.
To see demo or you want full coding tutorial video for better understanding. You can watch the tutorial below.
Video Tutorial
I appreciate if you can support me by subscribing my youtube channel.
So, without wasting more time let's see how to code this.
Code
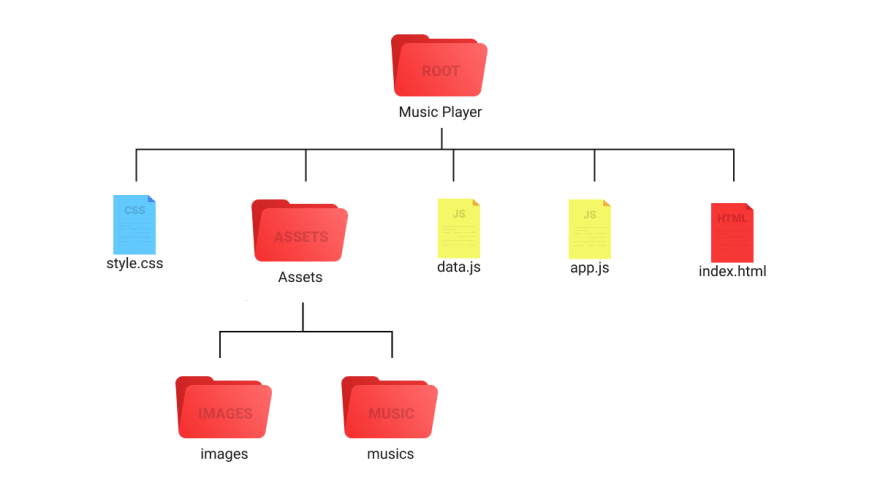
Before we start writing our code. Although it's not a Nodejs app but we should see its folder structure at least.
You can see we have a file named data.js. This file contain our music related data. You can see below.
let songs = [
    {
        name: 'song 1',
        path: 'assets/musics/Song 1.mp3',
        artist: 'artist 1',
        cover: 'assets/images/cover 1.png'
    },
    {
        name: 'song 2',
        path: 'assets/musics/Song 2.mp3',
        artist: 'artist 2',
        cover: 'assets/images/cover 2.png'
    },
    // +6 more
]
If you see our data JS. you'll notice our music data. we have stored the music related data here.
So without wasting more time let's code home section.
Home section
Open index.html and inside that start by writing basic HTML structure. Also link style.css and both JS files. Remember to add data.js file before app.js. Otherwise we'll not be able to access the data.
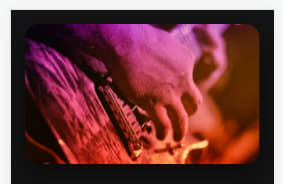
After done linking all the files let's create the first thing. Image carousel. Inside body tag code this.
<!-- home section -->

<section class="home-section">
    <!-- carousel -->
    <div class="carousel">
        <img src="assets/images/cover 1.png" class="active" alt="">
        <img src="assets/images/cover 2.png" alt="">
        <img src="assets/images/cover 3.png" alt="">
        <img src="assets/images/cover 4.png" alt="">
        <img src="assets/images/cover 5.png" alt="">
    </div>
</section>
Notice - wrap carousel inside home-section element.
@import url('https://fonts.googleapis.com/css2?family=Roboto:wght@300;400;500;700;900&display=swap');

*{
    margin: 0;
    padding: 0;
    box-sizing: border-box;
}

:root{
    --background: #141414;
    --text-color: #fff;
    --primary-color: #63ff69;
    --secondary-color: #000;
    --alpha-color: rgba(0, 0, 0, 0.5);
    --shadow: 0 15px 40px var(--alpha-color);
}

html{
    background: var(--background);
    display: flex;
    justify-content: center;
}

body{
    width: 100%;
    height: 100vh;
    max-width: 375px;
    position: relative;
    background: var(--background);
    font-family: 'roboto', sans-serif;
    color: var(--text-color);
}

::-webkit-scrollbar{
    display: none;
}

/* home section */

.home-section{
    width: 100%;
    padding: 20px;
    height: 100%;
    padding-bottom: 100px;
    overflow-y: auto;
}

/* carousel */

.carousel{
    width: 100%;
    height: 200px;
    overflow: hidden;
    border-radius: 20px;
    box-shadow: var(--shadow);
    position: relative;
}

.carousel img{
    position: absolute;
    width: 100%;
    height: 100%;
    object-fit: cover;
    opacity: 0;
    transition: 1s;
}

.carousel img.active{
    opacity: 1;
}
You can see we are using CSS variable here, so it will be easy in future for us to change this music player theme.
Output
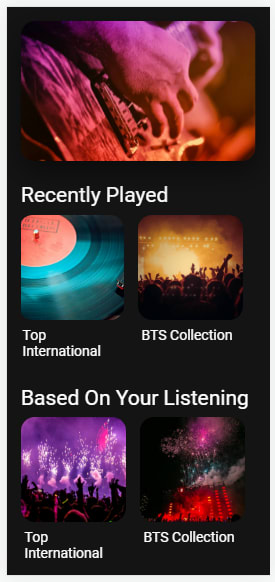
Note this is designed for mobile view that's why I am using chrome inspector to view this in mobile size.
Now create Horizontal scrolling Playlists. Inside homde-section
<h1 class="heading">recently played</h1>
<div class="playlists-group">
    <div class="playlist-card">
        <img src="assets/images/cover 9.png" class="playlist-card-img" alt="">
        <p class="playlist-card-name">top international</p>
    </div>
    <div class="playlist-card">
        <img src="assets/images/cover 2.png" class="playlist-card-img" alt="">
        <p class="playlist-card-name">BTS collection</p>
    </div>
    //+3 more
</div>
<h1 class="heading">based on your listening</h1>
<div class="playlists-group">
    <div class="playlist-card">
        <img src="assets/images/cover 11.png" class="playlist-card-img" alt="">
        <p class="playlist-card-name">top international</p>
    </div>
    <div class="playlist-card">
        <img src="assets/images/cover 12.png" class="playlist-card-img" alt="">
        <p class="playlist-card-name">BTS collection</p>
    </div>
    //+3 more
</div>
.heading{
    margin: 30px 0 10px;
    text-transform: capitalize;
    font-weight: 400;
    font-size: 30px;
}

/* playlists card */

.playlists-group{
    position: relative;
    width: 100%;
    min-height: 200px;
    height: auto;
    display: flex;
    flex-wrap: nowrap;
    overflow-x: auto;
}

.playlist-card{
    flex: 0 0 auto;
    max-width: 150px;
    height: 100%;
    margin-right: 20px;
}

.playlist-card-img{
    width: 100%;
    height: 150px;
    object-fit: cover;
    border-radius: 20px;
}

.playlist-card-name{
    width: 100%;
    text-align: justify;
    font-size: 20px;
    text-transform: capitalize;
    padding: 5px;
}
Output
We are done with home section. But our carousel is not working, so let's make it work. Open app.js file and start coding.
///// carousels/////////////////

const carousel = [...document.querySelectorAll('.carousel img')];

let carouselImageIndex = 0;

const changeCarousel = () => {
    carousel[carouselImageIndex].classList.toggle('active');

    if(carouselImageIndex >= carousel.length - 1){
        carouselImageIndex = 0;
    } else{
        carouselImageIndex++;
    }

    carousel[carouselImageIndex].classList.toggle('active');
}

setInterval(() => {
    changeCarousel();
}, 3000);
You can see we are first selecting our carousel element and after every 3 seconds we are toggling images active class.
Now let's make our player section.
Player
Start by making it's minimize view.
<section class="music-player-section">

    <img src="assets/images/back.png" class="back-btn icon hide" alt="">
    <img src="assets/images/nav.png" class="nav-btn icon hide" alt="">

    <h1 class="current-song-name">song 1</h1>
    <p class="artist-name hide">artist 1</p>

    <img src="assets/images/cover 1.png" class="cover hide" alt="">

    <div class="seek-bar-container">
        <input type="range" class="music-seek-bar" value="0">
        <p class="current-time hide">00 : 00</p>
        <p class="duration hide">00 : 00</p>
    </div>

    <div class="controls">
        <span class="fas fa-redo"></span>
        <div class="main">
            <i class="fas fa-backward active"></i>
            <i class="fas fa-play active"></i>
            <i class="fas fa-pause"></i>
            <i class="fas fa-forward active"></i>
        </div>
        <input type="range" class="volume-slider" max="1" value="1" step="0.1">
        <span class="fas fa-volume-up"></span>
    </div>

</section>
If you see our player structure you'll notice we have hide class for lot elements. This hide class indicate that the element will be hidden in minimize view. And we gave same class to all elements so we can easily style them in CSS.
* music player */

/* minimize view */

.music-player-section{
    width: 100%;
    height: 100px;
    position: fixed;
    bottom: 0;
    left: 0;
    background: var(--alpha-color);
    backdrop-filter: blur(50px);
    transition: 1s;
}

.music-seek-bar{
    -webkit-appearance: none;
    width: 100%;
    position: absolute;
    top: -4px;
    height: 8px;
    background: var(--secondary-color);
    overflow: hidden;
}

.music-seek-bar::-webkit-slider-thumb{
    -webkit-appearance: none;
    height: 10px;
    width: 5px;
    background: var(--primary-color);
    cursor: pointer;
    box-shadow: -400px 0 0 400px var(--primary-color);
}

.current-song-name{
    font-weight: 300;
    font-size: 20px;
    text-align: center;
    margin-top: 5px;
    text-transform: capitalize;
}

.controls{
    position: relative;
    width: 80%;
    margin: auto;
    display: flex;
    justify-content: center;
    align-items: center;
    height: 60px;
    font-size: 30px;
}

.controls span{
    display: none;
    opacity: 0;
    transition: 1s;
}

.music-player-section.active .controls{
    justify-content: space-between;
}

.music-player-section.active .controls span{
    font-size: 25px;
    display: block;
    opacity: 0.5;
}

.music-player-section.active .controls span.active{
    color: var(--primary-color);
    opacity: 1;
}

.controls .main i{
    margin: 0 5px;
    display: none;
}

.controls .main i.active{
    display: inline;
}
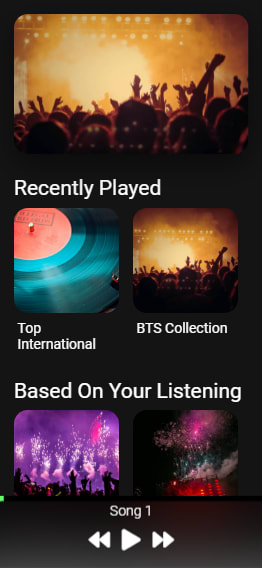
These styles are just for minimize view.
Output
Now let's create styles for maximize view.
/* maximize music player styles */

.music-player-section .hide{
    display: none;
    opacity: 0;
    transition: 1s;
}

.music-player-section.active .hide{
    display: block;
    opacity: 1;
}

.music-player-section.active{
    width: 100%;
    height: 100%;
    padding: 30px;
    display: flex;
    flex-direction: column;
}

.music-player-section.active .music-seek-bar{
    position: relative;
    display: block;
    border-radius: 50px;
    margin: auto;
}

.music-player-section.active .current-song-name{
    font-size: 40px;
}

.music-player-section.active .controls{
    width: 100%;
    font-size: 50px;
}

.artist-name{
    text-align: center;
    font-size: 20px;
    text-transform: capitalize;
}

.cover{
    width: 30vh;
    height: 30vh;
    object-fit: cover;
    margin: auto;
    border-radius: 20px;
    box-shadow: var(--shadow);
}

.current-time{
    position: absolute;
    margin-top: 5px;
    left: 30px;
}

.duration{
    position: absolute;
    margin-top: 5px;
    right: 30px;
}

.icon{
    position: absolute;
    top: 60px;
    transform: scale(1.3);
}

.back-btn{
    left: 40px;
}

.nav-btn{
    right: 40px;
}

/* volume button */

.volume-slider{
    -webkit-appearance: none;
    width: 100px;
    height: 40px;
    position: absolute;
    right: -35px;
    bottom: 80px;
    transform: rotate(-90deg);
    border-radius: 20px;
    background: var(--alpha-color);
    overflow: hidden;
    opacity: 0;
    display: none;
}

.volume-slider.active{
    opacity: 1;
    display: block;
}

.volume-slider::-webkit-slider-thumb{
    -webkit-appearance: none;
    height: 40px;
    width: 10px;
    background: var(--primary-color);
    box-shadow: -200px 0 1px 200px var(--primary-color);
}
And to check these style add active class to music-player-section for now like this.
<section class="music-player-section active">
...
</section>
Output
We'll make this player functional at last. For now remove this active class from the player section. And let's create playlist section.
Playlist section
<section class="playlist active">

    <img src="assets/images/back.png" class="back-btn icon" alt="">

    <h1 class="title">playlist</h1>

    <div class="queue active">
        <div class="queue-cover">
            <img src="assets/images/cover 1.png" alt="">
            <i class="fas fa-pause"></i>
        </div>
        <p class="name">song 1</p>
    </div>
    // +7 more
</section>
/* playlist section */

.playlist{
    width: 100%;
    height: 100%;
    position: fixed;
    top: 0;
    right: -100%;
    padding: 30px 0;
    background: var(--background);
    z-index: 3;
    transition: 1s;
    overflow: auto;
}

.playlist.active{
    right: 0;
}

.title{
    font-weight: 300;
    font-size: 40px;
    text-align: center;
    margin-top: 15px;
    text-transform: capitalize;
    margin-bottom: 30px;
}

.queue{
    width: 100%;
    height: 80px;
    padding: 0 30px;
    display: flex;
    align-items: center;
    border-top: 2px solid var(--alpha-color);
}

.queue-cover{
    width: 60px;
    height: 60px;
    border-radius: 10px;
    overflow: hidden;
    margin-right: 20px;
    position: relative;
}

.queue-cover img{
    width: 100%;
    height: 100%;
    object-fit: cover;
}

.queue-cover i{
    position: absolute;
    top: 50%;
    left: 50%;
    transform: translate(-50%, -50%);
    font-size: 30px;
    color: var(--primary-color);
    display: none;
}

.queue.active i{
    display: block;
}

.queue .name{
    font-size: 22px;
    text-transform: capitalize;
}
Output
We are done with all styling. Remove active class from playlist section also.
Now let's JS to make this music app fully functional.
Navigation
We have three section in our music player. So it is very important for us to setup a navigation system for this app. Through which we can easily navigate from one section to another. right? So code this.
/////////////////////navigations////////////

////////////toggling music player

const musicPlayerSection = document.querySelector('.music-player-section');

let clickCount = 1;

musicPlayerSection.addEventListener('click', () => {
    // checking for double click manually idk why default dbclick event was not working with this project If you know what could the problem Kindly tell me in the discussion below
    if(clickCount >= 2){
        musicPlayerSection.classList.add('active');
        clickCount = 1;
        return;
    }
    clickCount++;
    setTimeout(() => {
        clickCount = 1;
    }, 250);
})

/////// back from music player

const backToHomeBtn = document.querySelector('.music-player-section .back-btn');

backToHomeBtn.addEventListener('click', () => {
    musicPlayerSection.classList.remove('active');
})

//////// access playlist

const playlistSection = document.querySelector('.playlist');
const navBtn = document.querySelector('.music-player-section .nav-btn');

navBtn.addEventListener('click', () => {
    playlistSection.classList.add('active');
})

////////// back from playlist to music player

const backToMusicPlayer = document.querySelector('.playlist .back-btn');

backToMusicPlayer.addEventListener('click', () => {
    playlistSection.classList.remove('active');
})

//////navigation done ////////////////
This is basic JS and I also added comments to the code. So if you have any doubt in this code feel free to ask me in discussion. Our navigation is done. So let's create our music player.
Music
For music player we need an audio source in our page, but we don't have any. So for that create an audio element inside index.html. Create this element at the start of body tag.
<audio src="" id="audio-source"></audio>
Now we have to create a lot of function so before starting let's quickly select all the elements that we might need for manipulation.
/////// music

let currentMusic = 0;

const music = document.querySelector('#audio-source');

const seekBar = document.querySelector('.music-seek-bar');
const songName = document.querySelector('.current-song-name');
const artistName = document.querySelector('.artist-name');
const coverImage = document.querySelector('.cover');
const currentMusicTime = document.querySelector('.current-time');
const musicDuration = document.querySelector('.duration');

const queue = [...document.querySelectorAll('.queue')];

// select all buttons here

const forwardBtn = document.querySelector('i.fa-forward');
const backwardBtn = document.querySelector('i.fa-backward');
const playBtn = document.querySelector('i.fa-play');
const pauseBtn = document.querySelector('i.fa-pause');
const repeatBtn = document.querySelector('span.fa-redo');
const volumeBtn = document.querySelector('span.fa-volume-up');
const volumeSlider = document.querySelector('.volume-slider');
That's a lot of selection, isn't it. Now setup music source.
// funtion for setting up music

const setMusic = (i) => {
    seekBar.value = 0;
    let song = songs[i];
    currentMusic = i;

    music.src = song.path;

    songName.innerHTML = song.name;
    artistName.innerHTML = song.artist;
    coverImage.src = song.cover;

    setTimeout(() => {
        seekBar.max = music.duration;
        musicDuration.innerHTML = formatTime(music.duration);
    }, 300);
    currentMusicTime.innerHTML = '00 : 00';
    queue.forEach(item => item.classList.remove('active'));
    queue[currentMusic].classList.add('active');
}

setMusic(0);
I'll recommend watching this part from the tutorial video because I did this code there in pieces, step by step.
You can notice, to set duration we are calling formatTime. So create this now.
// format duration in 00 : 00 format

const formatTime = (time) => {
    let min = Math.floor(time / 60);
    if(min < 10){
        min = `0` + min;
    }

    let sec = Math.floor(time % 60);
    if(sec < 10){
        sec = `0` + sec;
    }

    return `${min} : ${sec}`;
}
Now let's add play/pause events.
// playBtn click event

playBtn.addEventListener('click', () => {
    music.play();
    playBtn.classList.remove('active');
    pauseBtn.classList.add('active');
})


// pauseBtn click event

pauseBtn.addEventListener('click', () => {
    music.pause();
    pauseBtn.classList.remove('active');
    playBtn.classList.add('active');
})
We are done with setting up the music, and playing/pausing it. Now make forward/backward events.
//  forward btn

forwardBtn.addEventListener('click', () => {
    if(currentMusic >= songs.length - 1){
        currentMusic = 0;
    } else{
        currentMusic++;
    }
    setMusic(currentMusic);
    playBtn.click();
})

// backward btn

backwardBtn.addEventListener('click', () => {
    if(currentMusic <= 0){
        currentMusic = songs.length - 1;
    } else{
        currentMusic--;
    }
    setMusic(currentMusic);
    playBtn.click();
})
As we are almost done, Now create seek bar functional.
// seekbar events

setInterval(() => {
    seekBar.value = music.currentTime;
    currentMusicTime.innerHTML = formatTime(music.currentTime);
    if(Math.floor(music.currentTime) == Math.floor(seekBar.max)){
        if(repeatBtn.className.includes('active')){
            setMusic(currentMusic);
            playBtn.click();
        } else{
            forwardBtn.click();
        }
    }
}, 500)

seekBar.addEventListener('change', () => {
    music.currentTime = seekBar.value;
})
And after making this. Create repeat unction and volume options.
// repeat button

repeatBtn.addEventListener('click', () => {
    repeatBtn.classList.toggle('active');
})

// volume section

volumeBtn.addEventListener('click', () => {
    volumeBtn.classList.toggle('active');
    volumeSlider.classList.toggle('active');
})

volumeSlider.addEventListener('input', () => {
    music.volume = volumeSlider.value;
})
Our player is done. The last thing we have to do is to make our playlist functional. For that do this.
queue.forEach((item, i) => {
    item.addEventListener('click', () => {
        setMusic(i);
        playBtn.click();
    })
})
And that's it. We are done with everything. We are done with player, navigation, playlist, carousel. I hope you understood each and everything. If you have doubt or I missed something let me know in the comments.
Articles you may find Useful
I really appreciate if you can subscribe my youtube channel. I create awesome web contents.
Thanks For reading.
This content originally appeared on DEV Community and was authored by Modern Web
Modern Web | Sciencx (2021-08-17T09:35:40+00:00) How to create Music player with pure HTML, CSS, JS. Retrieved from https://www.scien.cx/2021/08/17/how-to-create-music-player-with-pure-html-css-js/
Please log in to upload a file.
There are no updates yet.
Click the Upload button above to add an update.

