
This content originally appeared on DEV Community and was authored by Modern Web
Hello, In today's article you'll learn to create awesome visiting card designer. Where you can add company logo, its slogan, website link and support email. You can also change the visiting card's background. And the best thing you can also download the designed visiting card on your system.
To see demo or you want full coding tutorial video for better understanding. You can watch the tutorial below.
Video Tutorial
I appreciate if you can support me by subscribing my youtube channel.
Code
For this project, we have 3 files. index.html, style.css and app.js.
So, start with HTML basic structure, link style.css and app.js file to it. After that, make an h1 element for heading.
<h1 class="heading">design your <span>visiting card</span></h1>
*{
    margin: 0;
    padding: 0;
    box-sizing: border-box;
}

body{
    width: 100%;
    height: 100vh;
    background: #f6f6f6;
    font-family: 'roboto', sans-serif;
    padding: 50px;
}

.heading{
    text-align: center;
    text-transform: capitalize;
    font-size: 70px;
    font-weight: 400;
    margin-bottom: 5vh;
}

.heading span{
    color: #467aff;
}
Output

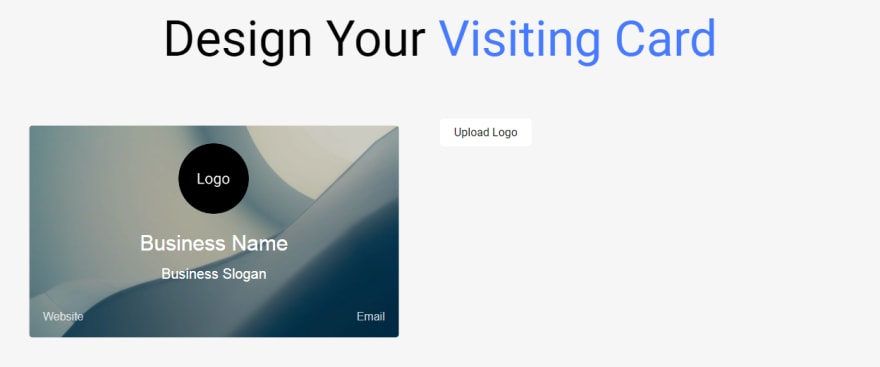
Now, make a div element which will contain our card on left side and design options on right side. Make a div for card element also.
<div class="main">
    <div class="card">

    </div>
</div>
.main{
    display: flex;
    padding: 50px;
    flex-wrap: wrap;
}

.card{
    width: 45%;
    margin-right: 5%;
    min-width: 500px;
    height: 300px;
    background: #fff;
    position: relative;
    border-radius: 5px;
    padding: 20px;
    background-image: url(img/img1.png);
    background-size: cover;
    overflow: hidden;
}

.card::before{
    content: '';
    position: absolute;
    top: 0;
    left: 0;
    width: 100%;
    height: 100%;
    background: #000;
    opacity: 0.2;
}
Output

Now make a logo container inside card element.
<div class="logo"></div>
.logo{
    position: relative;
    width: 100px;
    height: 100px;
    border-radius: 50%;
    display: block;
    margin: 5px auto;
    background-image: url('img/logo.png');
    background-size: cover;
}
Now of course name some inputs inside card element.
<input type="text" class="name" maxlength="30" placeholder="business name">
<input type="text" class="slogan" maxlength="50" placeholder="business slogan">

<input type="text" class="website-link" placeholder="website">
<input type="text" class="email" placeholder="email">
input{
    position: relative;
    text-align: center;
    outline: none;
    font-weight: 500;
    margin-top: 20px;
    margin-bottom: 10px;
    background: none;
    width: 100%;
    border: none;
    font-size: 30px;
    color: #fff;
    transition: .5s;
}

::placeholder{
    text-transform: capitalize;
    color: #fff;
}

.slogan{
    font-size: 20px;
    margin: 5px 0;
}

input:focus{
    background: rgba(255, 255, 255, 0.1);
    border-radius: 2px;
}

.website-link, .email{
    font-size: 16px;
    opacity: .75;
    position: absolute;
    text-align: left;
    width: 50%;
    height: auto;
    bottom: 10px;
}

.website-link{
    left: 20px;
}

.email{
    right: 20px;
    text-align: right;
}
Output

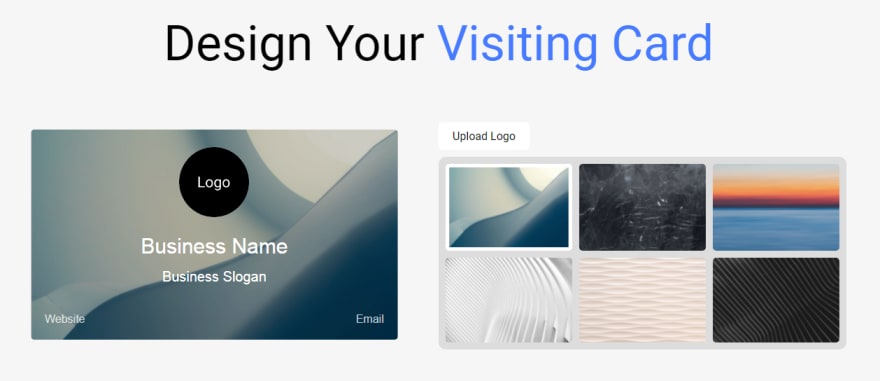
Great! we are done with card designing. Now if you want you can quickly type the details on the input box. Let's make options now on the right side.
<!-- settings -->
<div class="setting">
    <input type="file" accept="*image" id="upload" hidden>
    <label for="upload" class="btn upload">upload logo</label>
</div>
In above code, I just made a single div element inside main element. And inside this setting element. I made an upload input. hidden attribute is used to hide an input.
.setting{
    width: 50%;
}

.btn{
    font-size: 16px;
    text-transform: capitalize;
    padding: 10px 20px;
    border-radius: 5px;
    background: #fff;
    border: none;
    outline: none;
    cursor: pointer;
}

.btn:focus, .btn:hover{
    background-color: rgba(0, 0, 0, 0.1);
}
Output
Now make background images of course.
<!-- backgrounds -->
<div class="backgrounds">
    <img src="img/img1.png" class="active" alt="">
    <img src="img/img2.png" alt="">
    <img src="img/img3.png" alt="">
    <img src="img/img4.png" alt="">
    <img src="img/img5.png" alt="">
    <img src="img/img6.png" alt="">
</div>
.backgrounds{
    width: 100%;
    height: auto;
    display: grid;
    grid-template-columns: repeat(3, 1fr);
    grid-gap: 10px;
    padding: 10px;
    background: rgba(0, 0, 0, 0.1);
    border-radius: 10px;
    margin: 20px 0;
}

.backgrounds img{
    width: 100%;
    height: 100%;
    object-fit: cover;
    border-radius: 5px;
    transition: .5s;
    border: 0;
    cursor: pointer;
}

.backgrounds img:hover{
    opacity: 0.5;
}

.backgrounds img.active{
    border: 5px solid #fff;
}
Output
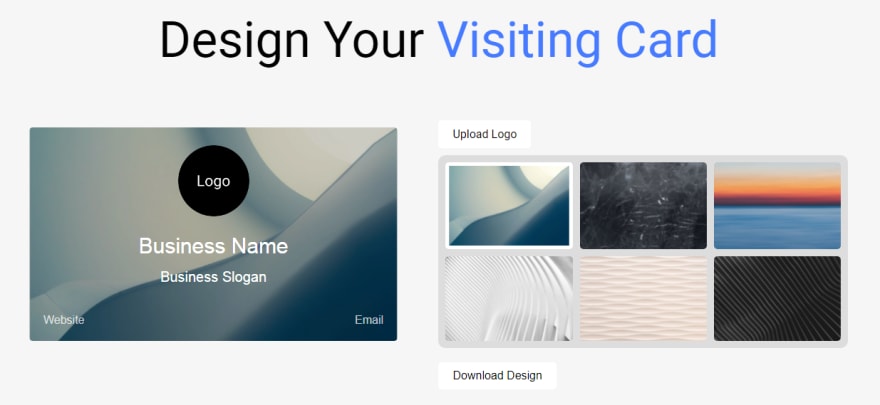
Now we are done with our styles. Now just create a button for download. And also make an anchor link but don;t give any text to it.
<a href="#" id="link" download="visiting card.png"></a>
<button class="btn download-btn">download design</button>
The above code is inside
.settingelement.
download attribute is used to set up a download link. And the value of download attribute is the filename for the downloaded image. We'll use the link element for download.
Output
Now let's quickly write some JS. Open app.js file. Make sure to import it in index file.
First let's make logo upload functional. Select the upload input and logo element.
// setting up logo
const uploadBtn = document.querySelector('#upload');
const logo = document.querySelector('.logo');
Then add change event to upload input.
uploadBtn.addEventListener('change', () => {
    if(uploadBtn.files && uploadBtn.files[0]){
        let reader = new FileReader(); // init the file reader

        reader.addEventListener('load', () => {
            // reader.result will return the src of the uploaded image
            logo.style.backgroundImage = `url('${reader.result}')`;
        })

        reader.readAsDataURL(uploadBtn.files[0]);
    }
})
Inside the change event.
if(uploadBtn.files && uploadBtn.files[0]) This line checking for the uploaded file existence. This condition will only be true when a file is uploaded.
Then after we got the file, we need a file reader to read that image file. So for that we are using this. let reader = new FileReader(); After initializing the reader, add load event to it, and change the logo element's background there.
reader.addEventListener('load', () => {
            // reader.result will return the src of the uploaded image
            logo.style.backgroundImage = `url('${reader.result}')`;
        })
And at very last, reader.readAsDataURL(uploadBtn.files[0]); this line is telling which the reader has to read. In this case we want the first uploaded file in our files array.
Great! the upload logo is working. Now, we have to allow user to change card's background. Select all background's image element. and card elements also.
const bgs = document.querySelectorAll('.backgrounds img');
const card = document.querySelector('.card');
let activeBg = 0; //default background
activeBg will store the current selected background index. Because of this, we can to perform less for loops to achieve the result.
Now use forEach to loop through bgs and add click event to all the images. Inside that change toggle the active class, and change the activeBg value.
bgs.forEach((item, i) => {
    item.addEventListener('click', () => {
        bgs[activeBg].classList.remove('active');
        item.classList.add('active');
        card.style.backgroundImage = `url('${item.src}')`;
        activeBg = i;
    })
})
Now the last thing, we have to make download functional. For this we'll use html2canvas library. This library will help us in converting the HTML elements into a canvas. And after that we can download the canvas.
Don't forget to add html2canvas CDN inside index file.
<script src="https://cdnjs.cloudflare.com/ajax/libs/html2canvas/0.5.0-beta4/html2canvas.min.js"></script>
Add this before
app.jsscript.
Now, select download button in app.js. And make a functionexportCard which will export the card. And call the exportCard function when clicking download button.
// download button
let downloadBtn = document.querySelector('.download-btn');

let exportCard = () => {

}

downloadBtn.addEventListener('click', () => {
    exportCard();
})
Now code inside exportCard.
let exportCard = () => {
    html2canvas(card)
    .then(canvas => {
        let link = document.getElementById('link');
        link.href = canvas.toDataURL();
        link.click(); // click on the link
    })
}
html2canvas is the library method. Which covert the element into a canvas. The first argument for this method is element. In this case I have passed the card element. After that get the canvas using then method. And inside this, select the link element that we have made in HTML file. Set its href to canvas.toDataURL()(this will return the src/link of the canvas). And at last click on the link by calling link.click().
If you run the site and try to download you probably see this error in your console.
Error

Well, this error is only coming because the browser is stopping you from converting the canvas into a link. Because you can't access local files on users system. If you host this site, then you'll not see the error. But in video tutorial, I made a node server to run this on localhost. So let's make a server now.
- Run
npm initcommand in you terminal to initialize node app. Then run
npm i express.js nodemonto installepxressandnodemonlibrary.Now make some changes in your
package.json. Change themaintoserver.js. And change thescripts.
"main": "server.js",
"scripts": {
    "start": "nodemon server.js"
  },
- Now create
server.jsfile in your directory. And code the server.
Server.js
const express = require('express');

const app = express();
app.use(express.static(__dirname));

app.get('/', (req, res) => {
    res.sendFile('index.html');
})

app.listen(3000, () => {
    console.log('listening......')
})
Start your server by running npm start command in terminal.
Great! Now the site is running on localhost. And you are now able to download the design. That's it for today guys. I hope you understood each and everything. If you have doubt or I missed something let me know in the comments.
Articles you may find Useful
I really appreciate if you can subscribe my youtube channel. I create awesome web contents.

Your donation really motivates me to do more amazing tutorials like this. Support me on patreon, Buy me a coffee, Donate me on paypal
Thanks For reading.
This content originally appeared on DEV Community and was authored by Modern Web
Modern Web | Sciencx (2021-09-07T13:19:48+00:00) How to make a designing website with HTML, CSS and JS. Visiting card Designer. Retrieved from https://www.scien.cx/2021/09/07/how-to-make-a-designing-website-with-html-css-and-js-visiting-card-designer/
Please log in to upload a file.
There are no updates yet.
Click the Upload button above to add an update.