
This content originally appeared on DEV Community and was authored by Roopali Singh
Hi there👋,
In this guide we will be learning how to integrate a payment gateway in our web application using stripe.
We are working with React for the frontend and Node & Express for the backend. To make api calls we are using axios library.
For simplicity we will not be focusing on design.
To start we are using create-react-app.
1. After getting our project bootstrapped with create-react-app, in your React code we need to add two dependencies.
npm install --save @stripe/react-stripe-js @stripe/stripe-js
2. Now in App.js file, call the loadStripe function to pass the stripe test publishable key which you can get from the stripe dashboard.
(it is safe to share the stripe publishable key, they aren’t secret).
import { loadStripe } from "@stripe/stripe-js";
const stripePromise = loadStripe(STRIPE_PUBLISHABLE_KEY);

// Make sure to call `loadStripe` outside of a component’s render
// to avoid recreating the `Stripe` object on every render.
3. Next, we will pass the returned promise from loadStripe function to Elements provider which is a wrapper that allows us to access Stripe object in any nested component.
import { Elements } from "@stripe/react-stripe-js";
import { loadStripe } from "@stripe/stripe-js";

const stripePromise = loadStripe(STRIPE_PUBLISHABLE_KEY);

function App() {
  return (
    <Elements stripe={stripePromise}>
      <CheckoutPage />
    </Elements>
  );
};
// Render an Elements provider at the root of your React app
// so that it is available everywhere you need it.
4. In the CheckoutPage component, we're going to add a CardElement which is a flexible single-line input that collects all necessary card details.
import { CardElement } from "@stripe/react-stripe-js";

function CheckoutPayment() {

  function paymentHandler() {
    // We're going to make the function async in the next step
    // handling the payment
  }

  return (
    <div>
      <Form onSubmit={paymentHandler}>
        <CardElement />
        <button>Pay Now</button>
      </Form>
    </div>
  );
};

export default CheckoutPage;
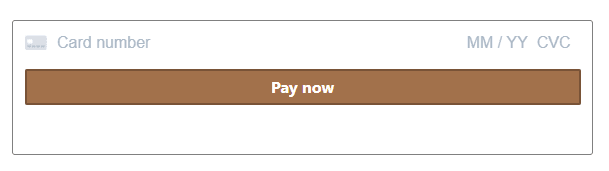
The CardElement will look something like this:
5. Now we are going to use these two powerful hooks: useStripe and useElements.
useElements is used to safely pass the payment information collected by the Payment Element to the Stripe API.
useStripe hook returns a reference to the Stripe instance passed to the Elements provider (we're going to use it to confirm payments).
import { CardElement, useElements, useStripe }
from "@stripe/react-stripe-js";

function CheckoutPayment() {
  const stripe = useStripe();
  const elements = useElements();

  async function paymentHandler() {
    if (!stripe || !elements) {
      // Stripe.js has not yet loaded.
      // Make sure to disable form submission until Stripe.js has
      // loaded.
        return;
    }
      // hadling the payment
   }

 return (
   <div>
     <Form onSubmit={paymentHandler}>
       <CardElement />
         <button disabled={!stripe || !elements}>Pay Now</button>
     </Form>
   </div>
  );
};

export default CheckoutPage;
Now to complete payment with stripe, we need a clientSecret which is unique for every payment.
For this we have to create a paymentIntent by providing it with the amount and currency.
This code will be in the backend so let's move to our Node.js code.
6. First, we will install stripe in the backend.
npm install stripe
7. For this step, we will need the stripe test secret key which we can get from the dashboard.
▶️(Remember: You must keep your secret API keys confidential. Do not just put it on any version control platform)
import express from "express";
import Stripe from "stripe";

const stripeSecret = new Stripe(STRIPE_SECRET_KEY);

///////////// Getting client secret /////////////

app.post(
  "/api/payment/create", async (request, response) => {
   const total = request.query.total;
   const paymentIntent = await
stripeSecret.paymentIntents.create({
      amount: total,
      currency: "inr",
    });
    response.status(201).send({
      clientSecret: paymentIntent.client_secret
    });
  }
);
😃Whoa!
If you have reached up till here then you have covered more than half of the journey. Just a couple more steps to go 🔥

So we have written our function to get the clientSecret at the backend.
Now back to frontend.
In the CheckoutPage component, we need to make a request to our server to create a new paymentIntent as soon as the page loads.
import React, { useEffect } from "react";

const [clientSecret, setClientSecret] = useState("");
const [errorMsg, setErrorMsg] = useState("");

useEffect(() => {
  async function getClientSecret(total) {
    try {
      const { data } = await axios.post(
        `/api/payment/create?total=${total * 100}`
      );
      // All API requests expect amounts to be provided
      // in a currency’s smallest unit.

      setClientSecret(data.clientSecret);
    } catch (error) {
      setErrorMsg(error.message);
    }
  }
  getClientSecret(the_amount);
  }, [the_amount]);
We have now received out clientSecret.
Now there's one last step to complete the payment handler function and do some error handling.
In the CheckoutPage component, we will check if the payment is completed by calling stripe.confirmPayment().
import React, { useEffect, useState } from "react";

function CheckoutPayment({ amount }) {
  const [clientSecret, setClientSecret] = useState("");
  const [errorMsg, setErrorMsg] = useState("");
  const [processing, setProcessing] = useState(false);
  const [success, setSuccess] = useState(false);

  useEffect(() => {
      .
      .
      .
    getClientSecret(the_amount);
    }, [the_amount]);

  async function paymentHandler(e) {
      e.preventDefault();
      if (!stripe || !elements || errorMsg) {
        return;
      } else {
        setProcessing(true);
        await stripe.confirmCardPayment(clientSecret, {
            payment_method: {
              card: elements.getElement(CardElement),
            },
          })
          .then(({ paymentIntent }) => {
            setErrorMsg(false);
            setProcessing(false);
            setSuccess(true);
          })
          .catch((error) => {
            setErrorMsg(error.message);
            setProcessing(false);
            setSuccess(false);
          });
      }
    }

  return (
    <div>
      <Form onSubmit={paymentHandler}>
        <CardElement />
        {errorMsg && <div className="errorMsg">{errorMsg}</div>}
        <button disabled={
          !stripe || !elements || processing || success
        }>
          Pay Now
        </button>
      </Form>
    </div>
  );
};
We have successfully integrated the payment gateway in our webapp using stripe.
Note: You need to change the test publishable key and test secret key with the live publishable and secret key to use it in the production enviroment.
Here's a demo that I have made with some styling:
I call it Moon with Stripes

This content originally appeared on DEV Community and was authored by Roopali Singh
Roopali Singh | Sciencx (2021-11-04T00:09:05+00:00) How to start with stripe. Retrieved from https://www.scien.cx/2021/11/04/how-to-start-with-stripe/
Please log in to upload a file.
There are no updates yet.
Click the Upload button above to add an update.