
This content originally appeared on DEV Community and was authored by Andy Piper
It all began, as many things do, with a Tweet. @GeekMomProjects (aka Debra) posted this, late one evening in my timezone.

 Geek Mom Projects@geekmomprojects
 Some vendor bedazzled an ESP32 C3 controller with 25 WS2812B 1515 LEDs, and it makes me feel seen.21:56 PM - 06 Jan 2022


(sidenote, she has a really good blog and Twitter feed, especially if you are into hardware projects)...
Let's break this down. This is an Espressif ESP32-C3 board with USB-C, covered in 25 multicoloured LEDs (WS2812b / NeoPixels) in a 5x5 grid. The ESP32 is equipped with wifi and Bluetooth LE, 400Kb of SRAM and 4Mb of Flash memory. All in all, it is almost exactly 2cm square. Basically, it's a very capable little microcontroller, for about $10.
I had to have one of these, for no good reason, apart from...
🎆 ✨ BLINKY LIGHTS!!! ✨ 🎆
(quite a few other folks in the community also saw the original Tweet, and jumped in on the excitement!)
Getting started
The board arrived about 10 days (if you order right now delivery is likely to vary, with the Lunar New Year). Plugging it in to power immediately resulted in a fun and colourful cycling light display.
The manufacturer's example software for the board is on GitHub, and works absolutely fine with the Arduino IDE. I'm using the new Arduino IDE 2.0. One thing to note here is that you also need the Espressif development release core for the ESP32-C3 board - these are relatively new within the Espressif family of chips.
That's great, and folks quickly got building things in the Arduino environment - see this excellent Wordle example...


MicroPython, ESP32-C3, and NeoPixels
We quickly tried the MicroPython port for ESP32-C3 with USB, but both @GeekMomProjects and I were finding a few issues - in my case, no matter what I tried, as soon as I did anything with the NeoPixels, the first one in the group lit up in bright 🟩 green, and could not be switched off, unless I power cycled the board.
I was able to make a start, though.
To flash MicroPython to the board, I needed to hold the button marked B (top left, looking at the back of the board with USB-C on the top edge) when connecting it to my machine. The blue light on the back of the board lit up, and a new USB device showed up. On my M1 Pro MacBook, depending on which side I plugged in to, it was either /dev/tty.usbmodem11301 or /dev/tty.usbmodem21301 (I resorted to ls -lrt /dev to figure this out). Then, I used esptool.py to wipe the board, and reflash with the MicroPython build.
Looking at the Arduino code, the NeoPixels are controlled via pin 8, and there are 25 of them, so in the REPL, this sequence let me initialize the board to talk to the NeoPixels.
import esp32
from machine import Pin
from neopixel import NeoPixel

pin = Pin(8, Pin.OUT)  # NP control on Pin 8
pixels = 25  # we have 25 pixels, set here to use for loops

np = NeoPixel(pin, pixels)
As an aside here, I'm using the Thonny editor to do the editing, but you could use VS Code, mu, or an alternative of your choice. Thonny lets me access the REPL easily, but I could do the same using one of several terminal tools.
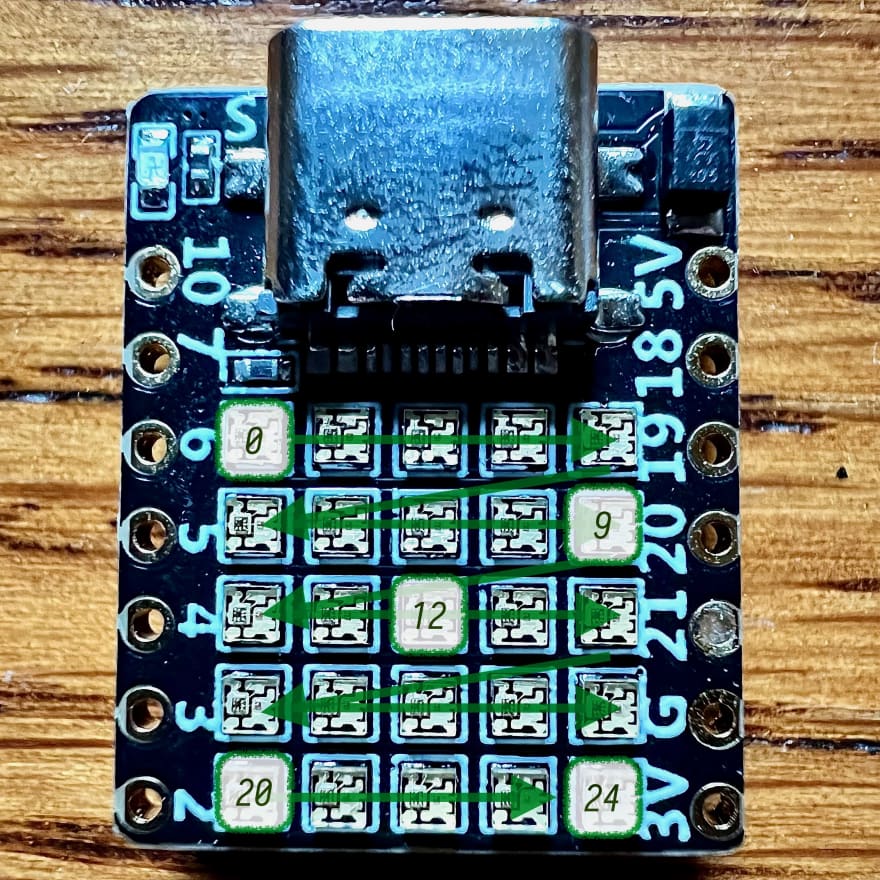
The next thing I wanted to do was to understand the board layout. How are the LEDs arranged? By lighting each one in sequence, it was easy to figure this out. Here's the answer.
np[0] = (0,255,0) # top left green
np.write()
np[2] = (0,255,0) # top middle green
np.write()
np[4] = (255,0,0) # top right red
np.write()
np[24] = (255,0,255) # bottom right magenta
np.write()
If the board is aligned with the USB-C / power in along the top edge, the LEDs run from 0 (top left), left to right in rows, down to the last one 24 (bottom right). Here's a visual guide.
Working with the MicroPython developers via Tweets and GitHub issues and commit comments, we eventually figured out the problem with the first pixel staying green. To fix this, I needed to add a specific call at the start of the MicroPython code:
esp32.RMT.bitstream_channel(0)
The ESP32 C3 seems to require the RMT channel to be set this way (this is associated with a change in the implementation of accessing the NeoPixels in MicroPython). In my case, this is currently working, with the most recent nightly builds of MicroPython.
Since the manufacturer's content is limited to a YouTube video, and the Arduino code, I've documented various experiments and findings on GitHub in a set of discovery notes.
In my FiveByFive repository you can find an example which will run a full test - blinking each pixel in turn in a randomised RGB colour tuple, and then displaying a happy smiley face 😀
 andypiper
/
fivebyfive
andypiper
/
fivebyfive
Five by Five
"Five by Five"
MicroPython code for a 01Space 5x5 Neopixel board (ESP32-C3 with USB-C)
It all started with this Tweet from @GeekMomProjects...
Images
![]()

Requirements
More information
Finally, a huge Thank You to Debra @GeekMomProjects (check out the cool necklace, and the 🌧️ raincloud), and also to Matt Trentini and especially Damien George from the MicroPython project, for the patience and support in figuring these boards out.
I've got more ideas in mind than a simple test, the board is capable of a lot more. I'm still learning the MicroPython tooling though (I've used CircuitPython before, but rarely MicroPython itself). Stay tuned for more experiments and discoveries, and let me know in the comments if you have any questions or suggestions!
This content originally appeared on DEV Community and was authored by Andy Piper
Andy Piper | Sciencx (2022-02-03T14:29:21+00:00) Bringing the bling 🌟 with MicroPython 🐍. Retrieved from https://www.scien.cx/2022/02/03/bringing-the-bling-%f0%9f%8c%9f-with-micropython-%f0%9f%90%8d/
Please log in to upload a file.
There are no updates yet.
Click the Upload button above to add an update.