
This content originally appeared on Level Up Coding - Medium and was authored by Chris Bao
Introduction
Firewalls are an important tool that can be configured to protect your servers and infrastructure. Firewalls’ main functionalities are filtering data, redirecting traffic, and protecting against network attacks. There are both hardware-based firewalls and software-based firewalls. I will not discuss too much about the background here, since you can find many online documents about it.
Have you ever thought of implementing a simple mini-firewall from scratch? Sounds crazy? But with the power of Linux, you can do that. After you read this series of articles, you will find that actually, it is quite simple.
You may once use various firewalls on Linux such as iptables, nftables, UFW, etc. All of these firewall tools are user-space utility programs, and they are all relying on Netfilter. Netfilter is the Linux kernel subsystem that allows various networking-related operations to be implemented. Netfilter allows you to develop your firewall using the Linux Kernel Module. If you don’t know the techniques such as the Linux Kernel module and Netfilter, don’t worry. In this article, let’s write a Linux firewall from scratch based on Netfilter. You can learn the following interesting points:
- Linux kernel module development.
- Linux kernel network programming.
- Netfilter module development.
This article will be a little bit long, which consists of five sections:
- Background of Netfilter and Kernel modules: introduce the theory about Netfilter and kernel module.
- Make the first kernel module: learn how to write a simple kernel module.
- Netfilter architecture and API: review Netfilter hooks architecture and the source code.
- Impement mini-firewall: write the code for our mini-firewall.
Background of Netfilter and Kernel modules
Basics of Netfilter
Netfilter can be considered to be the third generation of firewall on Linux. Before Netfilterwas introduced in Linux Kernel 2.4, there are two older generations of firewalls on Linux as follows:
- The first generation was a port of an early version of BSD UNIX’s ipfw to Linux 1.1.
- The second generation was ipchains developed in the 2.2 series of Linux Kernel.
As we mentioned above, Netfilter was designed to provide the infrastructure inside the Linux kernel for various networking operations. So firewall is just one of the multiple functionalities provided by Netfilter as follows:
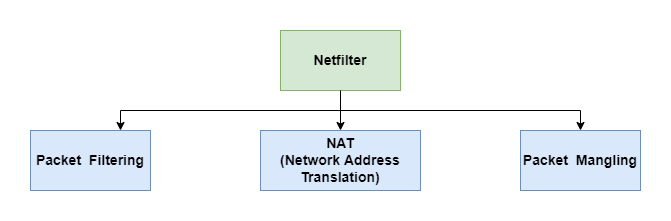
- Packet filtering: is in charge of filtering the packets based on the rules. It is also the topic of this article.
- NAT (Network address translation): is in charge of translating the IP address of network packets. NAT is an important protocol, which has become a popular and essential tool in conserving global address space in the face of IPv4 address exhaustion. If you don’t know NAT protocol, you can refer to other documents. I will examine it in other future articles.
- Packet mangling: is in charge of modifying the packet content(In fact, NAT is one kind of packet mangling, which modifies the source or destination IP address). For example, MSS (Maximum Segment Size) value of TCP SYN packets can be altered to allow large-size packets transported over the network.
Note: this article will focus on building a simple firewall to filter packets based on Netfilter. So the NAT and Packet Mangling parts are not in the scope of this article.
Packet filtering can only be done inside the Linux kernel (Netfilter’s code is in the kernel as well), if we want to write a mini firewall, it has to run in the kernel space. Right? Does it mean we need to add our code into the kernel and recompile the kernel? Imagine you have to recompile the kernel each time you want to add a new packet filtering rule. That’s a bad idea. The good news is that Netfilter allows you to add extensions using the Linux kernel modules.
Basics of Linux Kernel modules
Although Linux is a monolithic kernel, it can be extended using kernel modules. Modules can be inserted into the kernel and removed on demand. Linux isolates the kernel but allows you to add specific functionality on the fly through modules. In this way, Linux keeps a balance between stability and usability.
I want to examine one confusing point about the kernel module here: what is the difference between driver and module:
- A driver is a bit of code that runs in the kernel to talk to some hardware device. It drives the hardware. Standard practice is to build drivers as kernel modules where possible, rather than link them statically to the kernel since that gives more flexibility.
- A kernel module may not be a device driver at all.
In the next section, we will make our hands dirty and start implementing our mini-firewall. We will walk through the whole process step by step. First step, let’s write our first Linux kernel module using a simple hello world demo. Then let’s learn how to build the module(which is very different from compiling an application in the user space) and how to load it in the kernel.
Make the first Kernel module
First, I have to admit that Linux Kernel module development is a kind of large and complex technology topic. And there are many great online resources about it. This series of articles is focusing on developing the mini-firewall based on Netfilter, so we can’t cover all the aspects of the Kernel module itself. In future articles, I’ll examine more in-depth knowledge of kernel modules.
Write the module
You can write the hello world Kernel module with a single C source code file hello.c as follows:
We can write a Kernel module in such an easy and simple way because the Linux Kernel does the magic for you. Remember the design philosophy of Linux(Unix): Design for simplicity; add complexity only where you must.
Let’s examine several technical points worth to remark as follows:
First, Kernel modules must have at least two functions: a “start” function which is called when the module is loaded into the kernel, and an “end” function which is called just before it is removed from the kernel. Before kernel 2.3.13, the names of these two functions are hardcoded as init_module() and cleanup_module(). But in the new versions, you can use whatever name you like for the start and end functions of a module by using the module_init and module_exit macros. The macros are defined in include/linux/module.h and include/linux/init.h. You can refer there for detailed information.
Typically, module_init either registers a handler for something with the kernel (for example, the mini-firewall developed in this article), or it replaces one of the kernel functions with its own code (usually code to do something and then call the original function). The module_exit function is supposed to undo whatever module_init did, so the module can be unloaded safely.
Second, printk function provides similar behaviors to printf, which accepts the format string as the first argument. The printk function prototype goes as follows:
printk function allows a caller to specify log level to indicate the type and importance of the message being sent to the kernel message log. For example, in the above code, the log level KERN_INFO is specified by prepending to the format string. In C programming, this syntax is called string literal concatenation. (In other high-level programming languages, string concatenation is generally done with + operator). For the function printk and log level, you can find more information in include/linux/kern_levels.h and include/linux/printk.h.
Note: The path to header files for Linux kernel module development is different from the one you often used for the application development. Don’t try to find the header file inside /usr/include/linux, instead please use the following path /lib/modules/`uname -r`/build/include/linux (uname -r command returns your kernel version).
Next, let’s build this hello-world kernel module.
Build the module
The way to build a kernel module is a little different from how to build a user-space application. The efficient solution to build kernel image and its modules is Kernel Build System(Kbuild).
Kbuild is a complex topic and I won’t explain it in too much detail here. Simply speaking, Kbuild allows you to create highly customized kernel binary images and modules. Technically, each subdirectory contains a Makefile compiling only the source code files in its directory. And a top-level Makefile recursively executes each subdirectory’s Makefile to generate the binary objects. And you can control which subdirectories are included by defining config files. In detail, you can refer to other documents.
The following is the Makefile for the hello world module:
The make -C dir command changes to directory dir before reading the makefiles or doing anything else. The top-level Makefile in /lib/modules/$(shell uname -r)/build will be used. You can find that command make M=dir modules is used to make all modules in specified dir.
And in the module-level Makefile, the obj-m syntax tells kbuild system to build module_name.o from module_name.c, and after linking, will result in the kernel module module_name.ko. In our case, the module name is hello.
The build process goes as follows:
chrisbao:~$ sudo make
make -C /lib/modules/4.15.0-176-generic/build M=/home/DIR/jbao6/develop/kernel/hello-1  modules
make[1]: Entering directory '/usr/src/linux-headers-4.15.0-176-generic'
  CC [M]  /home/DIR/jbao6/develop/kernel/hello-1/hello.o
  Building modules, stage 2.
  MODPOST 1 modules
  CC      /home/DIR/jbao6/develop/kernel/hello-1/hello.mod.o
  LD [M]  /home/DIR/jbao6/develop/kernel/hello-1/hello.ko
make[1]: Leaving directory '/usr/src/linux-headers-4.15.0-176-generic'
After the build, you can get several new files in the same directory:
chrisbao:~$ ls
hello.c  hello.ko  hello.mod.c  hello.mod.o  hello.o  Makefile  modules.order  Module.symvers
The file ends with .ko is the kernel module. You can ignore other files now, I will write another article later to have a deep discussion about the kernel module system.
Load the module
With the file command, you can note that the kernel module is an ELF(Executable and Linkable Format) format file. ELF files are typically the output of a compiler or linker and are a binary format.
chrisba:~$ file hello.ko
hello.ko: ELF 64-bit LSB relocatable, x86-64, version 1 (SYSV), BuildID[sha1]=f0da99c757751e7e9f9c4e55f527fb034a0a4253, not stripped
Next step, let’s try to install and remove the module dynamically. You need to know the following three commands:
- lsmod: shows the list of kernel modules currently loaded.
- insmod: inserts a module into the Linux Kernel by running sudo insmod module_name.ko
- rmmod: removes a module from the Linux Kernel by running sudo rmmod module_name
Since the hello world module is quite simple, you can easily install and remove the module as you wish. I will not show the detailed commands here and leave it to the readers.
Note: It doesn’t mean that you can easily install and remove any kernel module without any issues. If the module you are loading has bugs, the entire system can crash.
Debug the module
Next step, let’s prove that the hello world module is installed and removed as expected. We will use dmesg command. dmesg (diagnostic messages) can print the messages in the kernel ring buffer.
First, a ring buffer is a data structure that uses a single, fixed-size buffer as if it were connected end-to-end. The kernel ring buffer is a ring buffer that records messages related to the operation of the kernel. As we mentioned above, the kernel logs printed by the printk function will be sent to the kernel ring buffer.
We can find the messages produced by our module with command dmesg | grep world as follows:
chrisbao:~$ dmesg | grep world

[2147137.177254] Hello, world
[3281962.445169] Goodbye, world
[3282008.037591] Hello, world
[3282054.921824] Goodbye, world
Now you can see that the hello world is loaded into the kernel correctly. And it can be removed dynamically as well. Great.
Based on this understanding of the kernel module, let’s continue our journey to write a Netfilter module as our mini-firewall.
Netfilter architecture.
Basics of Netfilter hooks
The Netfilter framework provides a bunch of hooks in the Linux kernel. As network packets pass through the protocol stack in the kernel, they will traverse these hooks as well. And Netfilter allows you to write modules and register callback functions with these hooks. When the hooks are triggered, the callback functions will be called. This is the basic idea behind Netfilter architecture. Not difficult to understand, right?
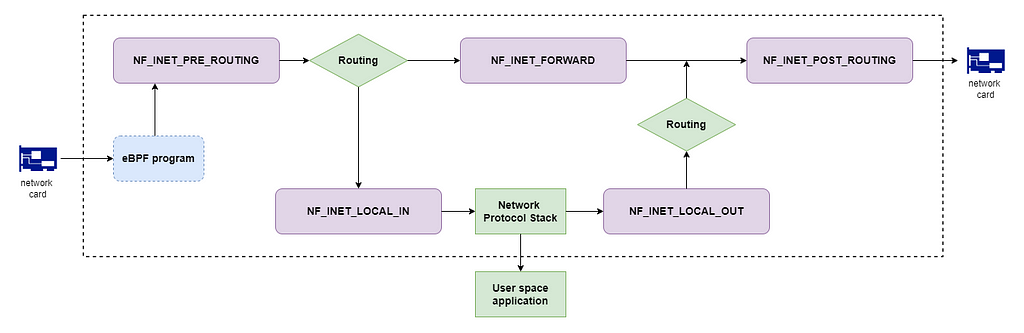
Currently, Netfilter provides the following 5 hooks for IPv4:
- NF_INET_PRE_ROUTING: is triggered right after the packet has been received on a network card. This hook is triggered before the routing decision was made. Then the kernel determines whether this packet is destined for the current host or not. Based on the condition, the following two hooks will be triggered.
- NF_INET_LOCAL_IN: is triggered for network packets that are destined for the current host.
- NF_INET_FORWARD: is triggered for network packets that should be forwarded.
- NF_INET_POST_ROUTING: is triggered for network packets that have been routed and before being sent out to the network card.
- NF_INET_LOCAL_OUT: is triggered for network packets generated by the processes on the current host.
The hook function you defined in the module can mangle or filter the packets, but it eventually must return a status code to Netfilter. There are several possible values for the code, but for now, you only need to understand two of them:
- NF_ACCEPT: this means the hook function accepts the packet and it can go on the network stack trip.
- NF_DROP: this means the packet is dropped and no further parts of the network stack will be traversed.
Netfilter allows you to register multiple callback functions to the same hook with different priorities. If the first hook function accepts the packet, then the packet will be passed to the next functions with low priority. If the packet is dropped by one callback function, then the next functions(if existing) will not be traversed.
As you see, Netfilter has a big scope and I can’t cover every detail in the articles. So the mini-firewall developed here will work on the hook NF_INET_PRE_ROUTING, which means it works by controlling the inbound network traffic. But the way of registering the hook and handling the packet can be applied to all other hooks.
Note: there is another remarkable question: what’s the difference between Netfilter and eBPF? If you don’t know eBPF, please refer to my previous article. Both of them are important network features in the Linux kernel. The important thing is Netfilter and eBPF hooks are located in different layers of the Kernel. As I drew in the above diagram, eBPF is located in a lower layer.
Kernel code of Netfilter hooks
To have a clear understanding of how the Netfilter framework is implemented inside the protocol stack, let’s dig a little bit deeper and take a look at the kernel source code (Don’t worry, only shows several simple functions). Let’s use the hook NF_INET_PRE_ROUTING as an example; since the mini-firewall will be written based on it.
When an IPv4 packet is received, its handler function ip_rcv will be called as follows:
In this handler function, you can see the hook is passed to the function NF_HOOK. Based on the name NF_HOOK, you can guess that it is for triggering the Netfilter hooks. Right? Let’s continue to examine how NF_HOOK is implemented as follows:
The function NF_HOOK contains two steps:
- First, runs the hook’s callback functions by calling the underlying function nf_hook.
- Second, invokes the function okfn (passed to NF_HOOK as the argument), if the packet passes through the hook functions and doesn’t drop.
For the hook NF_INET_LOCAL_IN, the function ip_rcv_finish will be invoked after the hook functions pass. Its job is to pass the packet on to the next protocol handler(TCP or UDP) in the protocol stack to continue its journey!
The other 4 hooks all use the same function NF_HOOK to trigger the callback functions. The following table shows where the hooks are embedded in the kernel, I leave them to the readers.

Next, Let’s review the Netfilter’s APIs to create and register the hook function.
Netfilter API
It’s straightforward to create a Netfilter module, which involves three steps:
- Define the hook function.
- Register the hook function in the kernel module initialization process.
- Unregister the hook function in the kernel module clean-up process.
Let’s go through them quickly one by one.
Define a hook function
The hook function name can be whatever you want, but it must follow the signature below:
The hook function can mangle or filter the packet whose data is stored in the sk_buff structure (we can ignore the other two parameters; since we don’t use them in our mini-firewall). As we mentioned above, the callback function must return a Netfilter status code which is an integer. For instance, the accepted and dropped status is defined as follows:
Register and unregister a hook function
To register a hook function, we should wrap the defined hook function with related information, such as which hook you want to bind to, the protocol family and the priority of the hook function, into a structure struct nf_hook_ops and pass it to the function nf_register_net_hook.
Most of the fields are very straightforward to understand. The one need to emphasize is the field hooknum, which is just the Netfilter hooks discussed above. They are defined as enumerators as follows:
Next, let’s take a look at the functions to register and unregister hook functions goes as follows:
The first parameter struct net is related to the network namespace, we can ignore it for now and use a default value.
Next, let’s implement our mini-firewall based on these APIs. All right?
Implement mini-firewall
First, we need to clarify the requirements for our mini-firewall. We’ll implement two network traffic control rules in the mini-firewall as follows:
- Network protocol rule: drops the ICMP protocol packets.
- IP address rule: drops the packets from one specific IP address.
The completed code implementation is in this Github repo.
Drop ICMP protocol packets
ICMP is a network protocol widely used in the real world. The popular diagnostic tools like ping and traceroute run the ICMP protocol. We can filter out the ICMP packets based on the protocol type in the IP headers with the following hook function:
The logic in the above hook function is easy to understand. First, we retrieve the IP headers from the network packet. And then according to the protocol type field in the headers, we decided to accept TCP and UDP packets but drop the ICMP packets. The only technique we need to pay attention to is the function ip_hdr, which is the kernel function defined as follows:
The function ip_hdr delegates the task to the function skb_network_header. It gets IP headers based on the following two data:
- head: is the pointer to the packet;
- network_header: is the offset between the pointer to the packet and the pointer to the network layer protocol header. In detail, you can refer to this document.
Next, we can register the above hook function as follows:
The above logic is self-explaining. I will not spend too much time here.
Next, it’s time to demo how our mini-firewall works.
Demo time
Before we load the mini-firewall module, the ping command can work as expected:
chrisbao@CN0005DOU18129:~$ lsmod | grep mini_firewall
chrisbao@CN0005DOU18129:~$ ping www.google.com
PING www.google.com (142.250.4.103) 56(84) bytes of data.
64 bytes from sm-in-f103.1e100.net (142.250.4.103): icmp_seq=1 ttl=104 time=71.9 ms
64 bytes from sm-in-f103.1e100.net (142.250.4.103): icmp_seq=2 ttl=104 time=71.8 ms
64 bytes from sm-in-f103.1e100.net (142.250.4.103): icmp_seq=3 ttl=104 time=71.9 ms
64 bytes from sm-in-f103.1e100.net (142.250.4.103): icmp_seq=4 ttl=104 time=71.8 ms
^C
--- www.google.com ping statistics ---
4 packets transmitted, 4 received, 0% packet loss, time 3005ms
rtt min/avg/max/mdev = 71.857/71.902/71.961/0.193 ms
In contrast, after the mini-firewall module is built and loaded (based on the commands we discussed previously):
chrisbao@CN0005DOU18129:~$ lsmod | grep mini_firewall
mini_firewall          16384  0
chrisbao@CN0005DOU18129:~$ ping www.google.com
PING www.google.com (142.250.4.105) 56(84) bytes of data.
^C
--- www.google.com ping statistics ---
6 packets transmitted, 0 received, 100% packet loss, time 5097ms
You can see all the packets are lost; because it is dropped by our mini-firewall. We can verify this by running the command dmesg:
chrisbao@CN0005DOU18129:~$ dmesg | tail -n 5
[ 1260.184712] Drop ICMP packet
[ 1261.208637] Drop ICMP packet
[ 1262.232669] Drop ICMP packet
[ 1263.256757] Drop ICMP packet
[ 1264.280733] Drop ICMP packet
But other protocol packets can still run through the firewall. For instance, the command wget 142.250.4.103 can return normally as follows:
chrisbao@CN0005DOU18129:~$ wget 142.250.4.103
--2022-06-25 10:12:39--  http://142.250.4.103/
Connecting to 142.250.4.103:80... connected.
HTTP request sent, awaiting response... 302 Moved Temporarily
Location: http://142.250.4.103:6080/php/urlblock.php?args=AAAAfQAAABAjFEC0HSM7xhfO~a53FMMaAAAAEILI_eaKvZQ2xBfgKEgDtwsAAABNAAAATRPNhqoqFgHJ0ggbKLKcdinR4UvnlhgAR4~YyrY4tAnroOFkE_IsHsOg9~RFPc7nEoj6YdiDgqZImAmb_xw9ZuFLvF91P2HzP5tlu1WX&url=http://142.250.4.103%2f [following]
--2022-06-25 10:12:39--  http://142.250.4.103:6080/php/urlblock.php?args=AAAAfQAAABAjFEC0HSM7xhfO~a53FMMaAAAAEILI_eaKvZQ2xBfgKEgDtwsAAABNAAAATRPNhqoqFgHJ0ggbKLKcdinR4UvnlhgAR4~YyrY4tAnroOFkE_IsHsOg9~RFPc7nEoj6YdiDgqZImAmb_xw9ZuFLvF91P2HzP5tlu1WX&url=http://142.250.4.103%2f
Connecting to 142.250.4.103:6080... connected.
HTTP request sent, awaiting response... 200 OK
Length: 3248 (3.2K) [text/html]
Saving to: ‘index.html’

index.html                                           100%[===================================================================================================================>]   3.17K  --.-KB/s    in 0s

2022-06-25 10:12:39 (332 MB/s) - ‘index.html’ saved [3248/3248]
Next, let’s try to ban the traffic from this IP address.
Drop packets source from one specific IP address
As we mentioned above, multiple callback functions are allowed to be registered on the same Netfilter hook. So we will define the second hook function with a different priority. The logic of this hook function goes like this: we can get the source IP address from the IP headers and make the drop or accept decision according to it. The code goes as follows:
This hook function uses two interesting techniques:
- ntohl: is a kernel function, which is used to convert the value from network byte order to host byte order. Byte order is related to the computer science concept of Endianness. Endianness defines the order or sequence of bytes of a word of digital data in computer memory. A big-endian system stores the most significant byte of a word at the smallest memory address. A little-endian system, in contrast, stores the least-significant byte at the smallest address. Network protocol uses the big-endian system. But different OS and platforms run various Endianness system. So it may need such conversion based on the host machine.
- IPADDRESS: is a macro, which generates the standard IP address format(four 8-bit fields separated by periods) from a 32-bit integer. It uses the technique of the equivalence of arrays and pointers in C. I will write another article to examine what it is and how it works. Please keep watching my updates!
Next, we can register this hook function in the same way discussed above. The only remarkable point is this callback function should have a different priority as follows:
Let’s see how it works with a demo.
Demo time
After re-build and re-load the module, we can get:
chrisbao@CN0005DOU18129:~$ wget 142.250.4.103
--2022-06-25 10:20:07--  http://142.250.4.103/
Connecting to 142.250.4.103:80... failed: Connection timed out.
Retrying.
The wget 142.250.4.103 can’t return response. Because it is dropped by our mini-firewall. Great!
chrisbao@CN0005DOU18129:~$ dmesg | tail -n 5
[ 3162.064284] Drop packet from 142.250.4.103
[ 3166.089466] Drop packet from 142.250.4.103
[ 3166.288603] Drop packet from 142.250.4.103
[ 3174.345463] Drop packet from 142.250.4.103
[ 3174.480123] Drop packet from 142.250.4.103
More space to expand
You can find the full code implementation here. But I have to say, our mini-firewall only touches the surface of what Netfilter can provide. You can keep expanding the functionalities. For example, currently, the rules are hardcoded, why not make it possible to config the rules dynamically. There are many cool ideas worth trying. I leave it for the readers.
Summary
In this article, we implement the mini-firewall step by step and examined many detailed techniques. Not only code; but we also verify the behavior of the mini-firewall by running real demos.
Level Up Coding
Thanks for being a part of our community! More content in the Level Up Coding publication.
Follow: Twitter, LinkedIn, Newsletter
Level Up is transforming tech recruiting ➡️ Join our talent collective
Write a Linux firewall from scratch based on Netfilter was originally published in Level Up Coding on Medium, where people are continuing the conversation by highlighting and responding to this story.
This content originally appeared on Level Up Coding - Medium and was authored by Chris Bao
Chris Bao | Sciencx (2022-06-26T12:34:36+00:00) Write a Linux firewall from scratch based on Netfilter. Retrieved from https://www.scien.cx/2022/06/26/write-a-linux-firewall-from-scratch-based-on-netfilter/
Please log in to upload a file.
There are no updates yet.
Click the Upload button above to add an update.