
This content originally appeared on Level Up Coding - Medium and was authored by David Bethune
Part 1: Properties, Values, & Data Binding
In my 3-part series on Getting Started with Web components & Lit, we created a sample application to show how custom web components work. In this spin-off, we’ll use these components as containers to demonstrate some of the basics of web application development with Typescript.
Quick Index
Part 1: Properties, Values, & Data Binding
Part 2: Working with Arrays
Part 3: Working with JSON Objects
Why Learn Typescript?
Typescript is nothing more than the next version of JavaScript, the world’s most popular and important programming language. You can enjoy its futuristic features today by using a server and builder that support Typescript. Add an IDE with Typescript support and you’re ready to blast off!
Why learn TS with Web Components and Lit?
Since the DOM (which the browser actually renders) is ugly and horrible to use, many JavaScript programming examples try to avoid using it altogether! Instead, they will ask you to use “coding playgrounds” where they have setup a web interface to display the output of your code. The alternative is console.log() statements that don’t even display inside your HTML page but outside it in a debugging panel. Yuck.
If, however, we were to start out Typescript learning journey with web components already setup, we could go directly from coding Typescript to seeing its real output in the browser. If we are developing any kind of application with a web UI, we can scaffold our component behavior and appearance with Typescript.
Prerequisites: VSCode, Lit, & Vite
If you’re starting the series here, you’ll need VSCode with Lit and Vite installed. You can find step-by-step instructions for these in Part 2 of my web components series, or you can download my Lit starter kit from GitHub which is ready to use out-of-the-box.
Using Values in Your Component
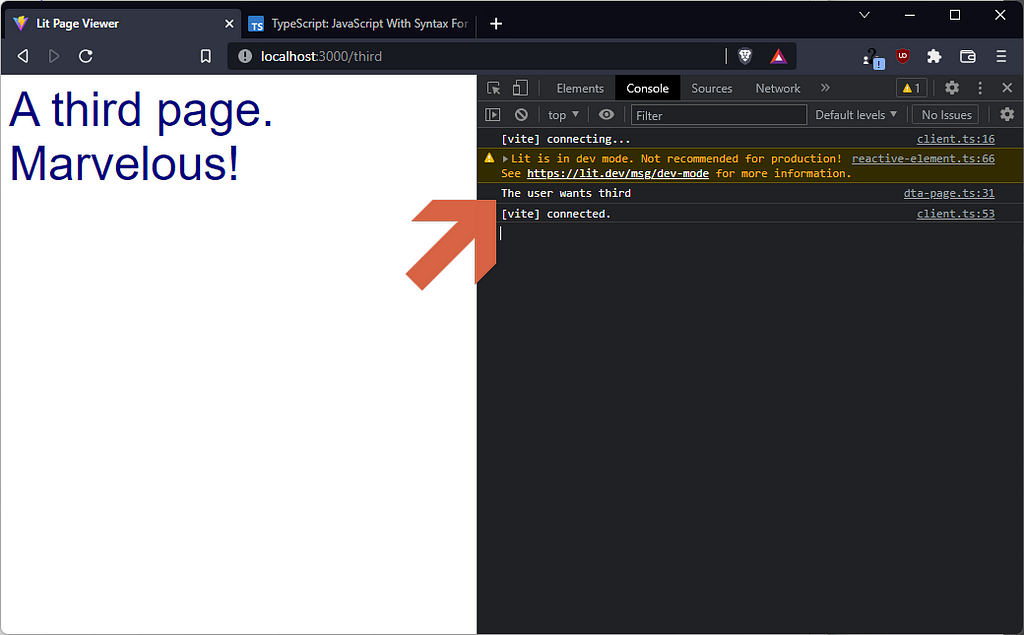
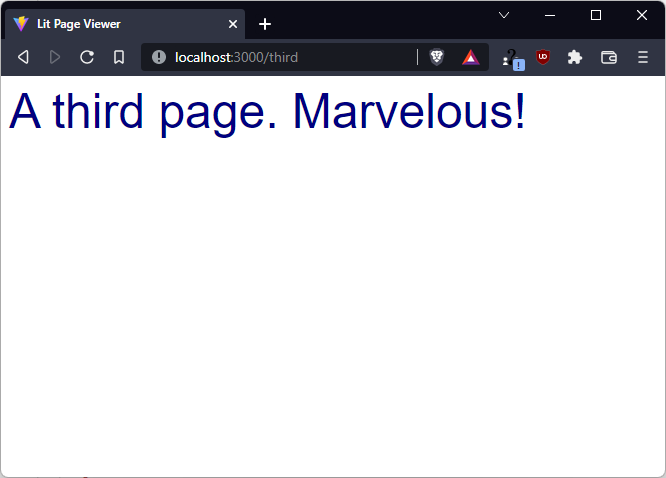
At the end of Part 3 of the previous series, we built a web component that performed routing. The result was to show two different pages of content based on the user’s URL. Let’s look at how that was achieved:
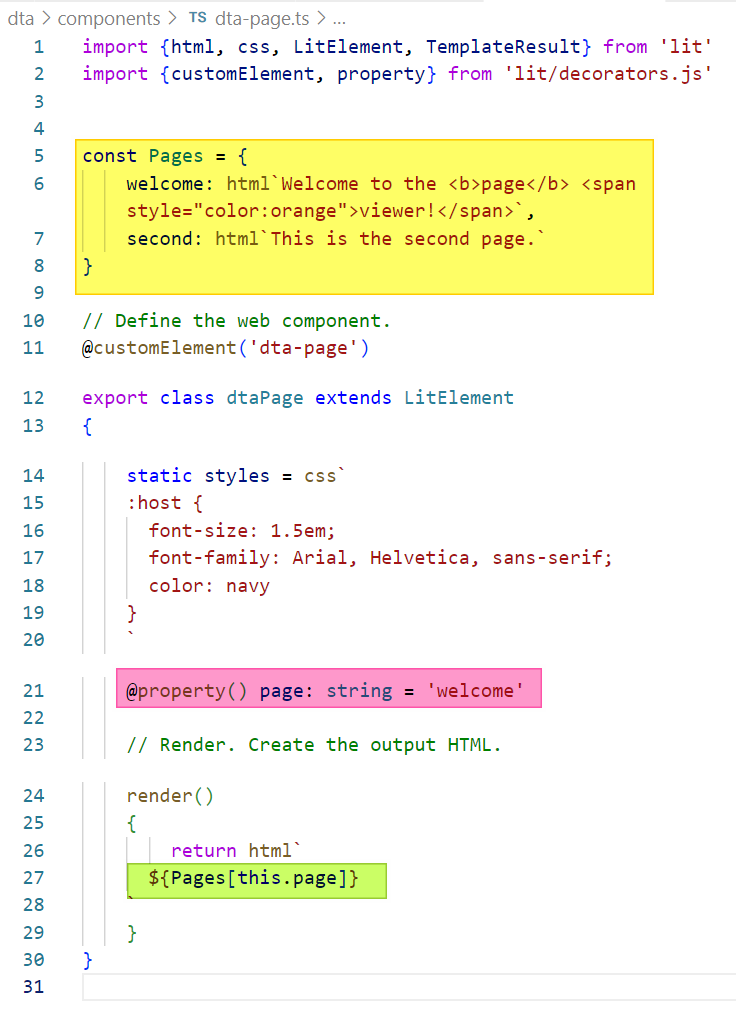
Assigning a Constant Value
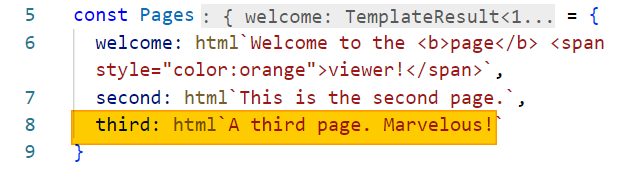
To store the content for our HTML pages, we used a Typescript constant, written const. By definition, a constant is a variable which should not vary! In other words, we define a constant if we don’t expect or want its value to change during our application.
Our const definition for Pages also assigns a value (after the = sign). The curly braces around the value tell us that it’s a JSON object.

Everything’s an Object
You may have heard that in JavaScript, everything’s an object. And that’s true, but not important right now. For our purposes, I’m going to use the term JSON object so we know we are talking about data in JSON format in our model. JSON (pronounced “JAY-sun”) is the standard way that all data (and everything else) is represented “under the hood” in JavaScript, and therefore in Typescript, too.
JSON isn’t terrible to read once you know the rules.
A JSON object can be thought of as a kind of dictionary. Each entry in the dictionary has a key and a value. While we can lookup anything in the dictionary by its key, the items aren’t in any particular order. Each key must be unique and we need the exact key to get the value.

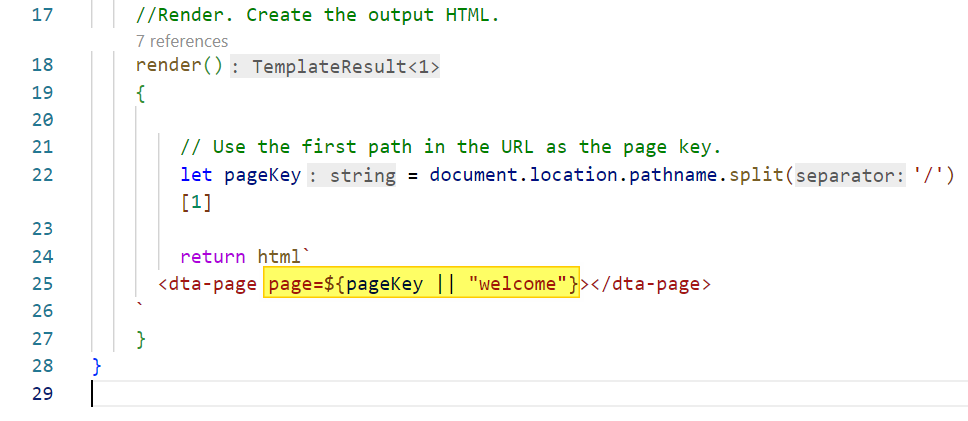
Outputting Data with ${expression}
If the page content is stored in our JSON model, we need a way to display it when the component renders (in the render() function’s return).
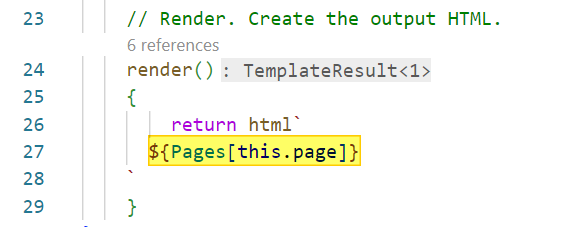
To output data from our model, we use the ${expression} syntax, where expression is a something from our model (including function calls for our functions).
Getting Values Out of JSON
To lookup something in a JSON object, we use an accessor. There are two kinds. Let’s look at the one in this code first.
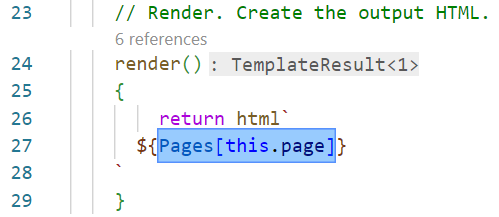
The Square Brackets Accessor
Here, we are passing the key we want inside square brackets. This method of accessing a JSON object is particularly useful if we don’t know the key when we write the code, as is the case here. Another way of saying this is that the key is variable. In this case, it comes from a property, which we’ll look at momentarily.
Square Brackets with Literals
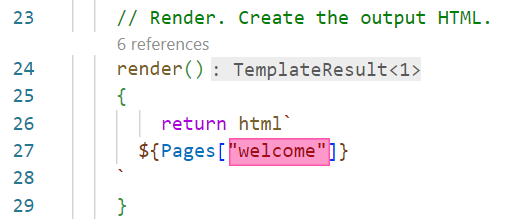
If we knew the key up front, we could pass a literal value in quotes. For example, if always wanted the welcome page and not any other, we can just write “welcome” in quotes.
Note that in Typescript it does not matter which of the three types of quotes you use, as long as each type is property nested. However, the special backtick quote (used here after html to surround the HTML content) has the magical feature of understanding the ${expression} syntax.
Shortcut Accessor for Literals
When we do know the key, there’s an even shorter way to write it. With a dot.
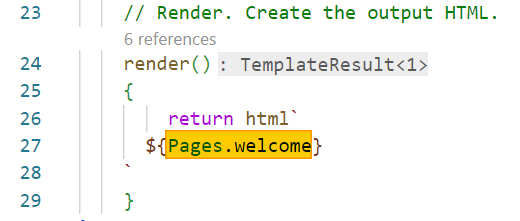

In fact, we’ve been using this technique all along without even knowing it. Every time we write object.key in Typescript (and that’s a lot), we are just using this shortcut on some JSON object. We’ve even seen this go “three layers deep” with document.location.pathname in our <dta-home> component.

JSON objects can, and often do, contain other JSON objects in their values. When this happens, we can use this shortcut notation to “drill down” through the keys to get to the value we want. In this example, the JSON object called document has a location key. The value of that key is another JSON object, and it has a key named pathname.

Introducing Properties
This is all well and good for unchanging, static values like our page content. But to give our component dynamic behavior, we need properties. A property is a special kind of variable with two unique features.
- It can be set from the outside, via an attribute on your custom element.
- Lit will redraw your component if a displayed property changes.
In order to bring in data from the outside, we need a property. In this case, the data we want from the outside is the key of the page we’re supposed to display. These kind of properties are often called public to indicate that they can be affected by outside code. It’s good programming practice to put all of those definitions together — before the render() output. So I’ll add a section for that and a comment in my code:
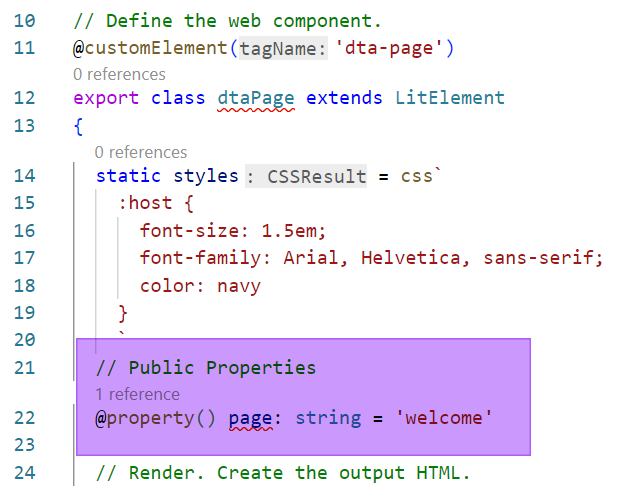
This property definition says that the value of this.page in our model will always be equal to what was passed in from the outside when we use this component in some other HTML. So let’s do it!
Setting Properties with an Attribute
To set the value of a property, we provide an attribute on “the other side” where we call (or use, or invoke) the component. In this design, that’s <dta-home>, because it contains a <dta-page> element that we can put an attribute on.
In fact, this method of setting properties with attributes is the primary way your web components will communicate with each other. This way, each component only gets the information that it needs, and in a convenient form for you to pass.
You may be wondering at this point, “If we’re setting properties, why are we calling them attributes?” And the answer is that attribute here specifically means propertyName=”value” on an HTML element. That element itself has other properties, hence the separate name. In this text, I’ll use the term page= attribute when I mean the “sent” value — and page property when I mean the “received value” in the other component. Sound good?
Dealing with Default Values
In web applications, it’s often necessary to deal with default or missing values. Even in this very simple app, we only defined two web “pages.” We never said what would happen if the user didn’t navigate to either one! Let’s look at two techniques for dealing with defaults and missing values.

Trapping for Null with OR
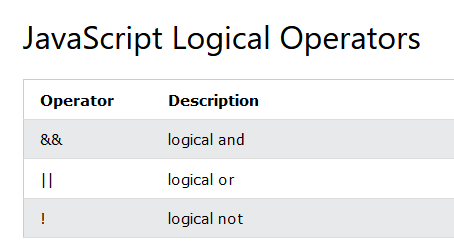
A great deal of the business logic of computer applications comes down to simple tests of AND and OR. In JS and TS, the OR operator (written || and read “OR”) has a useful feature for dealing with empty values. If the first value is empty, OR returns the second! We can use this to say, “If the pageKey is empty, use ‘welcome’.”
Using OR in the page= attribute results in the default value of ‘welcome’ being passed if the user didn’t type a path on the URL. But what if we didn’t provide a page= attribute at all?
Setting Property Defaults
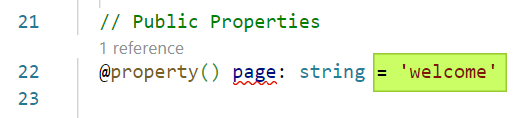
Many times in your component definitions, you’ll want to setup defaults for values that you don’t pass at all. This makes it simpler to write your elements, since you only need to pass the attributes that aren’t the defaults.
To achieve this, you can simply assign a value to the property when its defined in the component. Just like our assignment to const earlier, the new value is written after the = sign. In this case, it’s the literal string “welcome”, the key that we want to serve up if we aren’t given one.
Putting It All Together
Ok, then! If we’ve defined the property correctly (in its component definition) and used it correctly (in its caller or parent component), the value from the attribute should be available in the component’s model. Let’s see if it is…
We’ve Come So Far!
So, fellow travelers, where have we gotten to? We’ve looked at how to define a JSON object that acts like a dictionary and gives back values based on the key we ask for. We’ve seen how attributes and properties combine to pass data from one web component to another. And we’ve shown how using variable data and expressions in your output HTML, together known as data binding, can result in web components that update themselves with minimal effort.

Next Up, The Wonderful World of Arrays
In our next segment, we’ll look at the concept of arrays, the wonderful way that JS deals with lists of things. We’ll create a custom <dta-palette> component that can display color chips for a list of colors we supply. Along the way, we’ll see several great techniques for working with arrays in Typescript.
As always, thank you for reading. See you next time!
— D
Level Up Coding
Thanks for being a part of our community! More content in the Level Up Coding publication.
Follow: Twitter, LinkedIn, Newsletter
Level Up is transforming tech recruiting 👉 Join our talent collective
Learning Typescript with Web Components & Lit was originally published in Level Up Coding on Medium, where people are continuing the conversation by highlighting and responding to this story.
This content originally appeared on Level Up Coding - Medium and was authored by David Bethune
David Bethune | Sciencx (2022-07-13T01:43:09+00:00) Learning Typescript with Web Components & Lit. Retrieved from https://www.scien.cx/2022/07/13/learning-typescript-with-web-components-lit/
Please log in to upload a file.
There are no updates yet.
Click the Upload button above to add an update.