
This content originally appeared on Level Up Coding - Medium and was authored by Andrew Allison
Implement a web map, marker, geofence, and address search
Introduced at Re:Invent in 2019, Amazon Location Service provides affordable data, tracking and geofencing capabilities, as well as native integrations with AWS services. Developers can create sophisticated location-enabled applications quickly, without the death march of developing custom APIs, guardrails, and governance from scratch. In this tutorial I’ll delve a little into what Amazon Location Services can do and show how to integrate it into a React.js application.
The Service
So what does the new service from AWS come with? There are 5 main features at present with plenty more on the product roadmap.
Maps
Web Maps that are served as vector tiles from a secure server authenticated by Sig V4 API calls.
Places
Capability to search for points of interest, perform geocoding (i.e. getting the latitude and longitude for a given address), as well as reverse geocoding.
Routes
Finding the shortest path between Point A and Point B on a map. This includes the approximate travel time, distance, and directions.
Trackers
APIs to keep a record of the current and historical location of a devices that have your tracking client enabled.
Geofences
Draw arbitrary shapes on a map and be notified of events involving the invisible “fence”.
Now that we have a basic idea of what we can do with Location Service let’s whip this dope in the crockpot.
Part I: Setting up the React App
I’m going to use npx and the typescript template to execute our create-react-app bootstrapping. Taking the instructions from here, we’re simply going to open our terminal and execute:
$ npx clear-npx-cache
$ npx create-react-app als-demo-app --template typescript
Next I’m going to add a few dependencies that I’ll need in order to make this work; namely Maplibre and Amplify.
$ cd als-demo-app
$ npm install aws-amplify
$ npm install @aws-amplify/ui-react
$ npm install maplibre-gl
$ npm install maplibre-gl-js-amplify
$ npm install @maplibre/maplibre-gl-geocoder
Maplibre is open source and will facilitate being able to display and interact with the web map. Amplify is a frontend library for interacting with backend services hosted on AWS.
Part II: Adding Amplify Authentication and Geo
At this point I only have the boilerplate CRA application. Before touching the code however, I am going to configure the entire backend with just a few simple commands:
$ npm i -g @aws-amplify/cli@geo
$ amplify configure
Follow these steps to set up access to your AWS account:
Sign in to your AWS administrator account:
https://console.aws.amazon.com/
Press Enter to continue
Specify the AWS Region
? region:  us-east-1 (or whatever region is closest to you)
Specify the username of the new IAM user:
? user name:  amplify-X0X0X
Just click through the default settings then download the CSV file and press enter in the terminal at the end.
Enter the access key of the newly created user:
? accessKeyId:  ******************** (copy this from the CSV file)
? secretAccessKey:  **************************************** (copy this from the CSV file)
This would update/create the AWS Profile in your local machine
? Profile Name:  als-demo-app
What’s going on here? The first command is installing a special version of the Amplify CLI that includes Location Service commands. The second command is for setting the global configuration. Next I need to initialize a new Amplify project. This is just a fancy way of saying I’m going to set up the local configuration (as opposed to the global configuration which I did in the last step).
$ amplify init
Note: It is recommended to run this command from the root of your app directory
? Enter a name for the project alsDemoApp
The following configuration will be applied:
Project information
| Name: alsDemoApp
| Environment: dev
| Default editor: Visual Studio Code
| App type: javascript
| Javascript framework: react
| Source Directory Path: src
| Distribution Directory Path: build
| Build Command: npm run-script build
| Start Command: npm run-script start
? Initialize the project with the above configuration? Yes
Using default provider  awscloudformation
? Select the authentication method you want to use: AWS access keys
? accessKeyId:  ******************** (copy this from the CSV file)
? secretAccessKey:  **************************************** (copy this from the CSV file)
? region:  us-east-1 (or whatever region is closest to you)
Adding backend environment dev to AWS Amplify app: xx0x0x00x0xxx
⠇ Initializing project in the cloud...
Finally, I’m going to add Authentication and Location Service to our backend.
$ amplify add geo
? Select which capability you want to add: Map (visualize the geospatial data)
✔ geo category resources require auth (Amazon Cognito). Do you want to add auth now? (Y/n) · yes
Using service: Cognito, provided by: awscloudformation
The current configured provider is Amazon Cognito.
Do you want to use the default authentication and security configuration? Default configuration
 Warning: you will not be able to edit these selections.
 How do you want users to be able to sign in? Email
 Do you want to configure advanced settings? No, I am done.
✅ Successfully added auth resource alsdemoappxx0x0x00x0xxx locally
✅ Some next steps:
"amplify push" will build all your local backend resources and provision it in the cloud
"amplify publish" will build all your local backend and frontend resources (if you have hosting category added) and provision it in the cloud
✔ Provide a name for the Map: · alsDemoApp
✔ Who can access this Map? · Authorized users only
Available advanced settings:
- Map style & Map data provider (default: Streets provided by Esri)
✔ Do you want to configure advanced settings? (y/N) · no
At this point our entire backend is still waiting to be deployed to the cloud. It’s not running locally either if you were wondering. For that you would need to do some docker gymnastics with a project called Local Stack, but I’ll cover that in another article. The fastest way to get your backend up and running is to simply push the local configuration you just created:
$ amplify push
Part III: Securely Calling the Map Tile Server
The application code is still showing the boilerplate CRA code, so now is the time to change that. Our src/index.tsx file is going to look like this:
import React from 'react';
import ReactDOM from 'react-dom';
import App from './App';
import Amplify from 'aws-amplify';
import awsconfig from './aws-exports';
import './index.css';

Amplify.configure(awsconfig);

ReactDOM.render(
  <React.StrictMode>
    <App />
  </React.StrictMode>,
  document.getElementById('root')
);
The main change being the call to Amplify configure. Jumping to src/App.tsx I’m going to make a few tweaks here as well:
import React from 'react';
import logo from './logo.svg';
import { withAuthenticator } from '@aws-amplify/ui-react';
import '@aws-amplify/ui-react/styles.css';
import './App.css';
function App() {
  return (
    <div className="App">
      <header className="App-header">
        <img src={logo} className="App-logo" alt="logo" />
        <p>
          Edit <code>src/App.tsx</code> and save to reload.
        </p>
        <a
          className="App-link"
          href="https://reactjs.org"
          target="_blank"
          rel="noopener noreferrer"
        >
          Learn React
        </a>
      </header>
    </div>
  );
}

export default withAuthenticator(App);
Adding withAuthenticator gives your app an entire authentication flow and have the application make calls to the Location Service APIs securely. So now when you start your app using npm start you will see a Login/Signup screen instead of the default CRA screen.
Now comes the juicy part: adding that hot web map.
import React, { useEffect, useRef } from 'react';
import { Auth } from 'aws-amplify';
import maplibregl from 'maplibre-gl';
import { withAuthenticator } from '@aws-amplify/ui-react';
import { createMap } from "maplibre-gl-js-amplify";
import "maplibre-gl/dist/maplibre-gl.css";
import "@maplibre/maplibre-gl-geocoder/dist/maplibre-gl-geocoder.css";
import "maplibre-gl-js-amplify/dist/public/amplify-geocoder.css";
import '@aws-amplify/ui-react/styles.css';
import './App.css';
function App() {
const mapRef = useRef(null);
useEffect(() => {
let map: maplibregl.Map;
async function initializeMap() {
if (mapRef.current != null) {
map = await createMap({
container: mapRef.current,
center: [-122.431297, 37.773972],
zoom: 11,
});
}
}
initializeMap();
return function cleanup() {
if (map != null) map.remove();
};
}, []);
return (
<div ref={mapRef} id="map" />
);
}
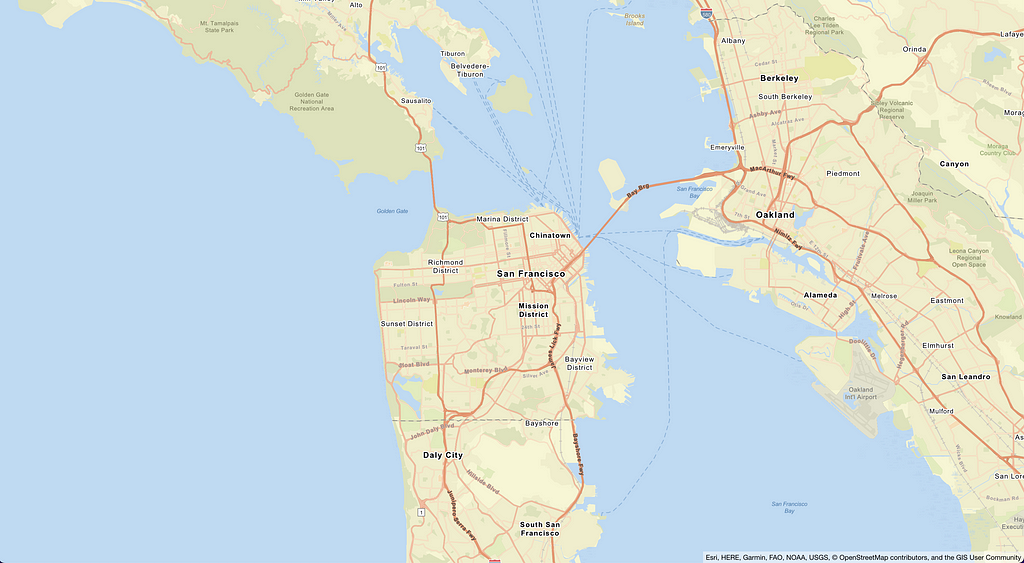
export default withAuthenticator(App);I’m going to need to update my src/App.css while I’m at it too:
#map {
position: absolute;
top: 0;
bottom: 0;
width: 100%;
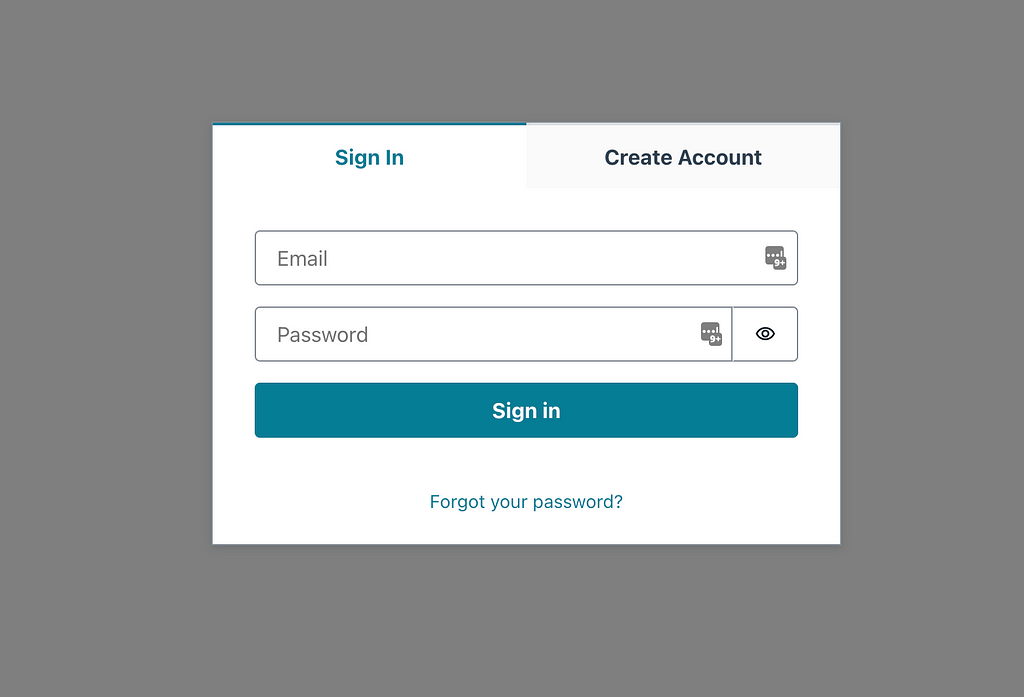
}All this time I haven’t created an account in my own application, so I’m going to pause and do that. I have to enter my email and password and wait for Amazon Cognito to email me a stupid little code which I’ll paste in the web form and be on my way. After logging in I should be able to see this:
Part IV: Adding Markers
With the overhead of getting everything set up out of the way, adding new functionality the app is fairly unambiguous from here on out. One little extra block of code inside of our useEffect call
import React, { useEffect, useRef } from 'react';
import { createMap, drawPoints } from "maplibre-gl-js-amplify";
import { withAuthenticator } from '@aws-amplify/ui-react';
import "maplibre-gl/dist/maplibre-gl.css";
import "@maplibre/maplibre-gl-geocoder/dist/maplibre-gl-geocoder.css";
import "maplibre-gl-js-amplify/dist/public/amplify-geocoder.css";
import '@aws-amplify/ui-react/styles.css';
import './App.css';
function App() {
const mapRef = useRef(null);
useEffect(() => {
let map: maplibregl.Map;
async function initializeMap() {
if (mapRef.current != null) {
map = await createMap({
container: mapRef.current,
center: [-122.431297, 37.773972],
zoom: 11,
});
}
map.on('load', () => {
drawPoints("pointsSource",
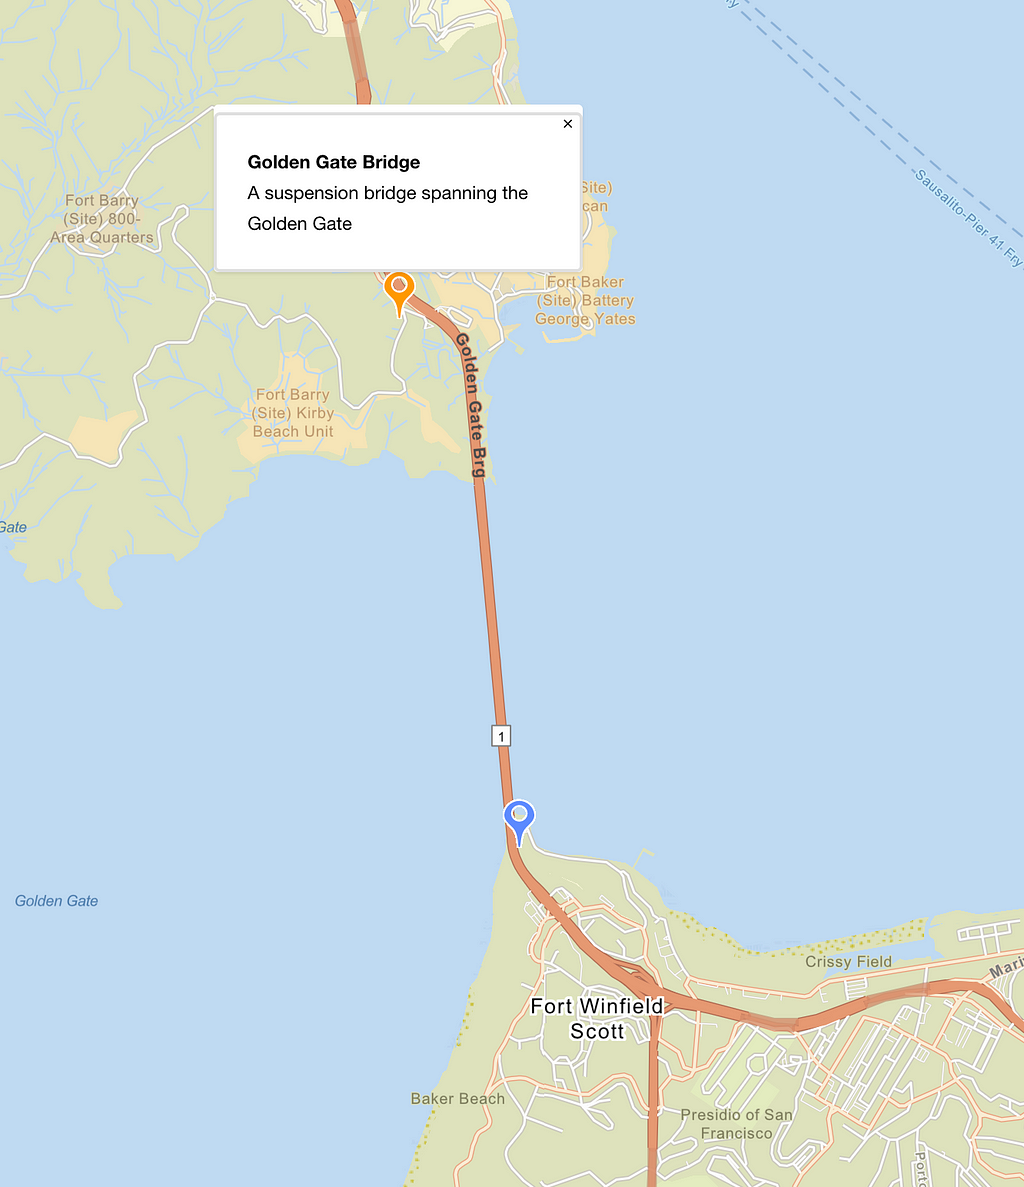
[
{
coordinates: [-122.483696, 37.833818],
title: "Golden Gate Bridge",
address: "A suspension bridge spanning the Golden Gate",
},
{
coordinates: [- 122.4770, 37.8105],
},
],
map,
{
showCluster: true,
unclusteredOptions: {
showMarkerPopup: true,
},
clusterOptions: {
showCount: true,
},
}
);
});
}
initializeMap();
return function cleanup() {
if (map != null) map.remove();
};
}, []);
return (
<div ref={mapRef} id="map" />
);
}
export default withAuthenticator(App);And we get this:
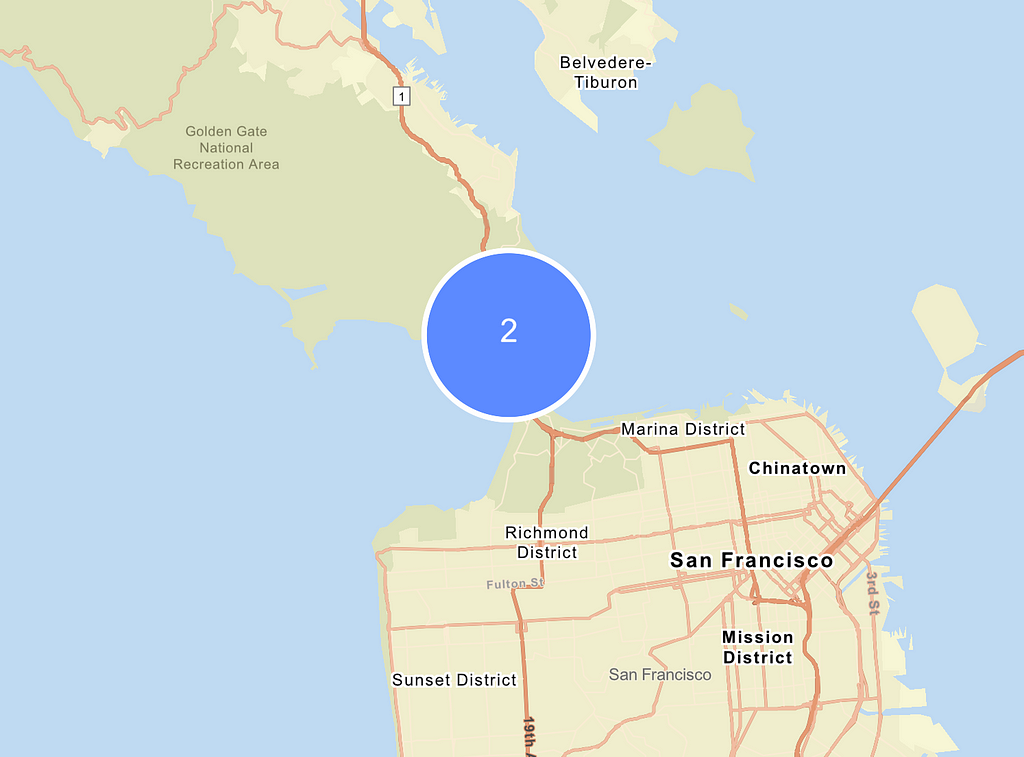
Upon zooming in the clusters break apart and you can see the individual markers which include an informational popup that can show up when you click the marker:
Part V: Display Geofences
If good fences make good neighbors then I’m about to make some fake ass neighbors. From the command line I need to add geofencing to my current setup:
$ amplify geo add
? Select which capability you want to add: Geofencing (visualize virtual perimeters)
✔ Provide a name for the Geofence Collection: · alsDemoAppCollection
✔ Geofencing requires a Cognito user group for Admin only access control settings. Do you want to add it now? (Y/n) · yes
Select "Create or update Cognito user pool groups" to add a Cognito user group
Please note that certain attributes may not be overwritten if you choose to use defaults settings.
Using service: Cognito, provided by: awscloudformation
 What do you want to do? Create or update Cognito user pool groups
? Provide a name for your user pool group: admins
? Do you want to add another User Pool Group No
✔ Sort the user pool groups in order of preference · admins
Some updates will need to be made, just select the options I have shown here
✔ Select one or more cognito groups to give access: · admins
✔ What kind of access do you want for admins users? Select ALL that apply: · Read geofence, Create/Update geofence, Delete geofence, List geofences
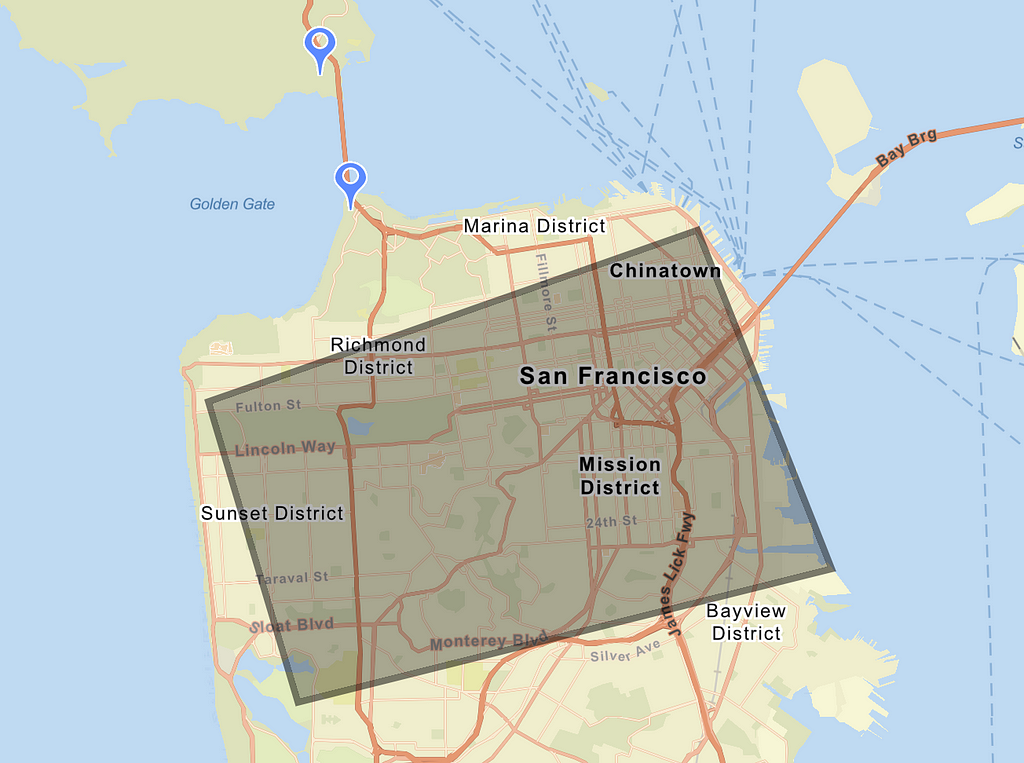
Again, the configuration gets created locally so I have to push it to the cloud. Once it’s been updated in the cloud, I can populate the backend with a sample geofence collection. First I download this sample JSON file and stick it in my root directory (above src/):
AmazonLocationServiceReactDemo/geojson.json at main · beatleboy501/AmazonLocationServiceReactDemo
Then I execute the Amplify CLI commands:
$ amplify push
$ amplify geo populate
Now I can update my useEffect hook and send a GetGeofenceCommand to Amazon Location Service as part of the component initialization.
import React, { useEffect, useRef } from 'react';
import { Auth } from 'aws-amplify';
import { withAuthenticator } from '@aws-amplify/ui-react';
import { LocationClient, GetGeofenceCommand } from "@aws-sdk/client-location";
import { createMap, drawPoints, drawGeofences } from "maplibre-gl-js-amplify";
import "maplibre-gl/dist/maplibre-gl.css";
import "@maplibre/maplibre-gl-geocoder/dist/maplibre-gl-geocoder.css";
import "maplibre-gl-js-amplify/dist/public/amplify-geocoder.css";
import '@aws-amplify/ui-react/styles.css';
import './App.css';

function App() {
  const mapRef = useRef(null);

  useEffect(() => {
    let map: maplibregl.Map;
    async function initializeMap() {
      if (mapRef.current != null) {
        map = await createMap({
          container: mapRef.current,
          center: [-122.431297, 37.773972],
          zoom: 11,
        });
      }
      Auth.currentCredentials()
        .then(async (credentials) => {
          try {
            const client = new LocationClient({ region: 'us-east-1', credentials: Auth.essentialCredentials(credentials) });
            const data = await client.send(new GetGeofenceCommand({
              CollectionName: <Paste your Collection Name Here>,
              GeofenceId: <Paste your Geofence ID Here>,
            }));
            map.on('load', () => {
              drawPoints("pointsSource",
                [
                  {
                    coordinates: [-122.483696, 37.833818],
                    title: "Golden Gate Bridge",
                    address: "A suspension bridge spanning the Golden Gate",
                  },
                  {
                    coordinates: [- 122.4770, 37.8105],
                  },
                ],
                map,
                {
                  showCluster: true,
                  unclusteredOptions: {
                    showMarkerPopup: true,
                  },
                  clusterOptions: {
                    showCount: true,
                  },
                }
              );
              // @ts-ignore
              drawGeofences('goldenGateBridgeSource', [data.Geometry.Polygon], map, {});
            });
          } catch (err) {
            console.error(err);
          }
        });
    }
    initializeMap();

    return function cleanup() {
      if (map != null) map.remove();
    };
  }, []);

  return (
    <div ref={mapRef} id="map" />
  );
}

export default withAuthenticator(App);
I can see my fake fence show up all over San Francisco now:
Part VI: Searching for Addresses
Admittedly, this step was the hardest.
Run the following from the CLI:
$ amplify add geo
? Select which capability you want to add: Location search (search by places, addresses, coordinates)
✔ Provide a name for the location search index (place index): · alsDemoAppIndex
✔ Restrict access by? · Auth/Guest Users
✔ Who can access this search index? · Authorized users only
Available advanced settings:
- Search data provider (default: HERE)
- Search result storage location (default: no result storage)
✔ Do you want to configure advanced settings? (y/N) · no
$ amplify push
Change an import statement to the top of src/App.tsx
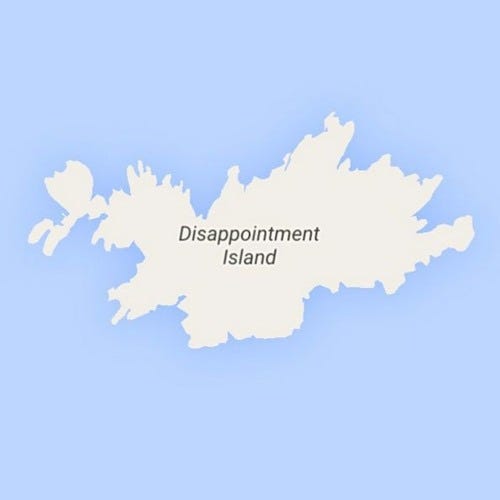
import { createMap, drawPoints, drawGeofences, createAmplifyGeocoder } from "maplibre-gl-js-amplify";And add a line to the very end of initializeMap:
map.addControl(createAmplifyGeocoder());
You’ll be looking up “Disappointment Island” in no time.
Conclusion
To clean up the demo, just open the AWS web console and search for “Cloudformation”. Once in the Cloudformation menu, search for your stacks and delete them from your life. If you would like to see the fully-completed code here is the link to the repo on Github:
GitHub - beatleboy501/AmazonLocationServiceReactDemo
Thanks for following!
Level Up Coding
Thanks for being a part of our community! More content in the Level Up Coding publication.
Follow: Twitter, LinkedIn, Newsletter
Level Up is transforming tech recruiting 👉 Join our talent collective
Tutorial: Cook up a Map Application with Amazon Location Service + React was originally published in Level Up Coding on Medium, where people are continuing the conversation by highlighting and responding to this story.
This content originally appeared on Level Up Coding - Medium and was authored by Andrew Allison
Andrew Allison | Sciencx (2022-07-18T00:31:40+00:00) Tutorial: Cook up a Map Application with Amazon Location Service + React. Retrieved from https://www.scien.cx/2022/07/18/tutorial-cook-up-a-map-application-with-amazon-location-service-react/
Please log in to upload a file.
There are no updates yet.
Click the Upload button above to add an update.