
This content originally appeared on Level Up Coding - Medium and was authored by Amy Li
Build and Deploy a Markdown Editor Using Next.js, TypeScript, CodeMirror 6, and react-markdown
Learn to build a Next.js Application.
Following our previous project — Build a Markdown Editor Using Electron, ReactJS, Vite, CodeMirror, and Remark, let us re-create this markdown editor app using Next.js, TypeScript, and TailwindCSS, and lastly host this web app. Hope you will enjoy this simple tutorial.
If you want to have access to the full code, please check out the Nextjs Markdown Editor on GitHub.
Tech Stack
- Next.js: A widely-used framework for building React applications
- TypeScript: A typed JavaScript
- CodeMirror 6: An extensible code editor for the web
- react-markdown: React component to render markdown
- remark-gfm: Add support for GitHub-flavored markdown support
- react-syntax-highlighter: Syntax highlighting component for react with prismjs or highlightjs using inline styles
- Neovim: Vim-based text editor
Create a New Next.JS Application
Create a new project from this template:
GitHub - amy-juan-li/Next.js-typescript-tailwindcss-template: A template for Next.js app
Or you could create on your own by following this article:
Set Up a Next.js Application Workflow Using Neovim, TypeScript, and TailwindCSS
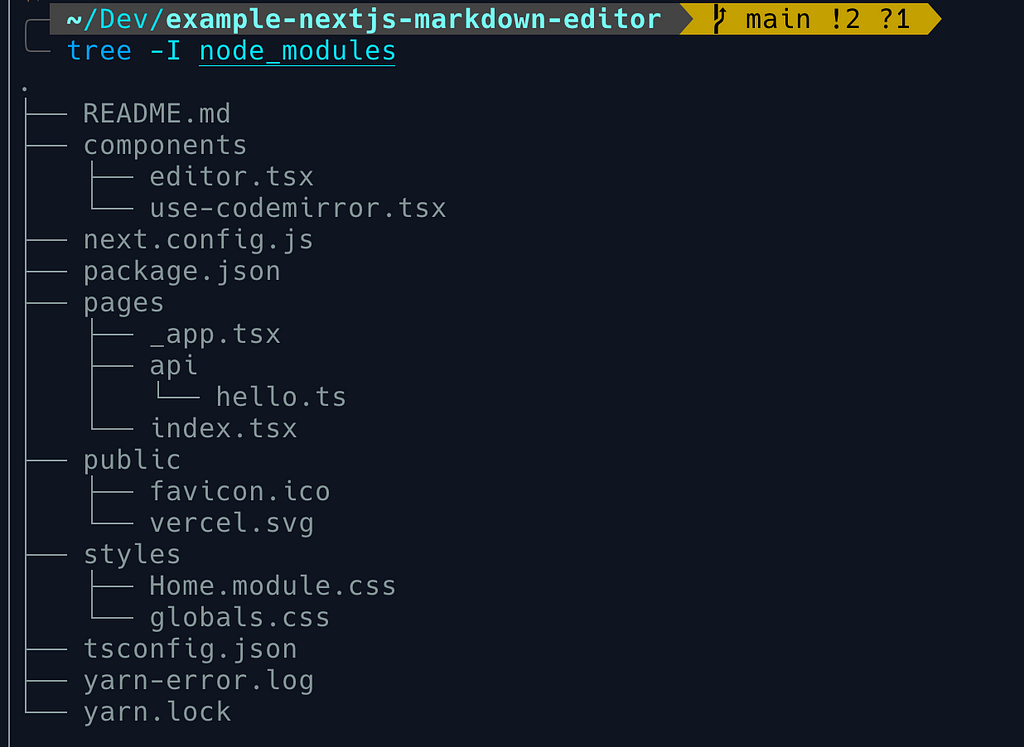
Project Structure
Run the app in development mode
yarn dev
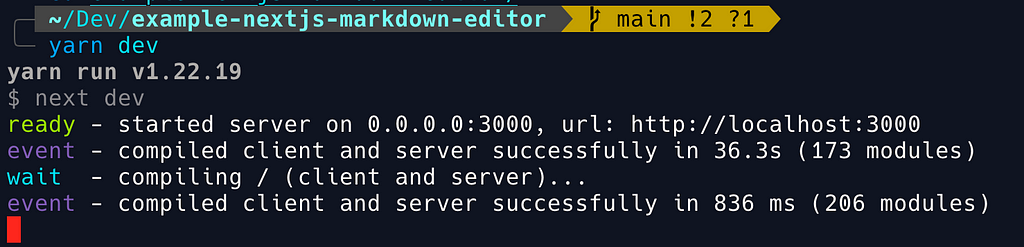
Output

Build Markdown Editor Using CodeMirror 6
CodeMirror 6 is a new code editor library for the web, a from-scratch implementation based on the experience of building and maintaining versions 1 to 5 for the past 13 years. It aims to be more extensible and accessible than previous versions.
by Marijn Haverbeke
Tip: Please refer to CodeMirror 6 migration guide.
Install Dependencies
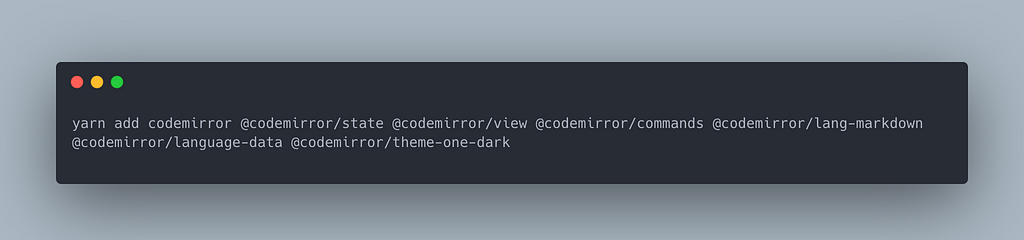
Three core parts for creating a Markdown (or any other language) Editor using CodeMirror 6:
- Create the editor state
- Create the editor view
- Create the parent (HTML) element for the editor
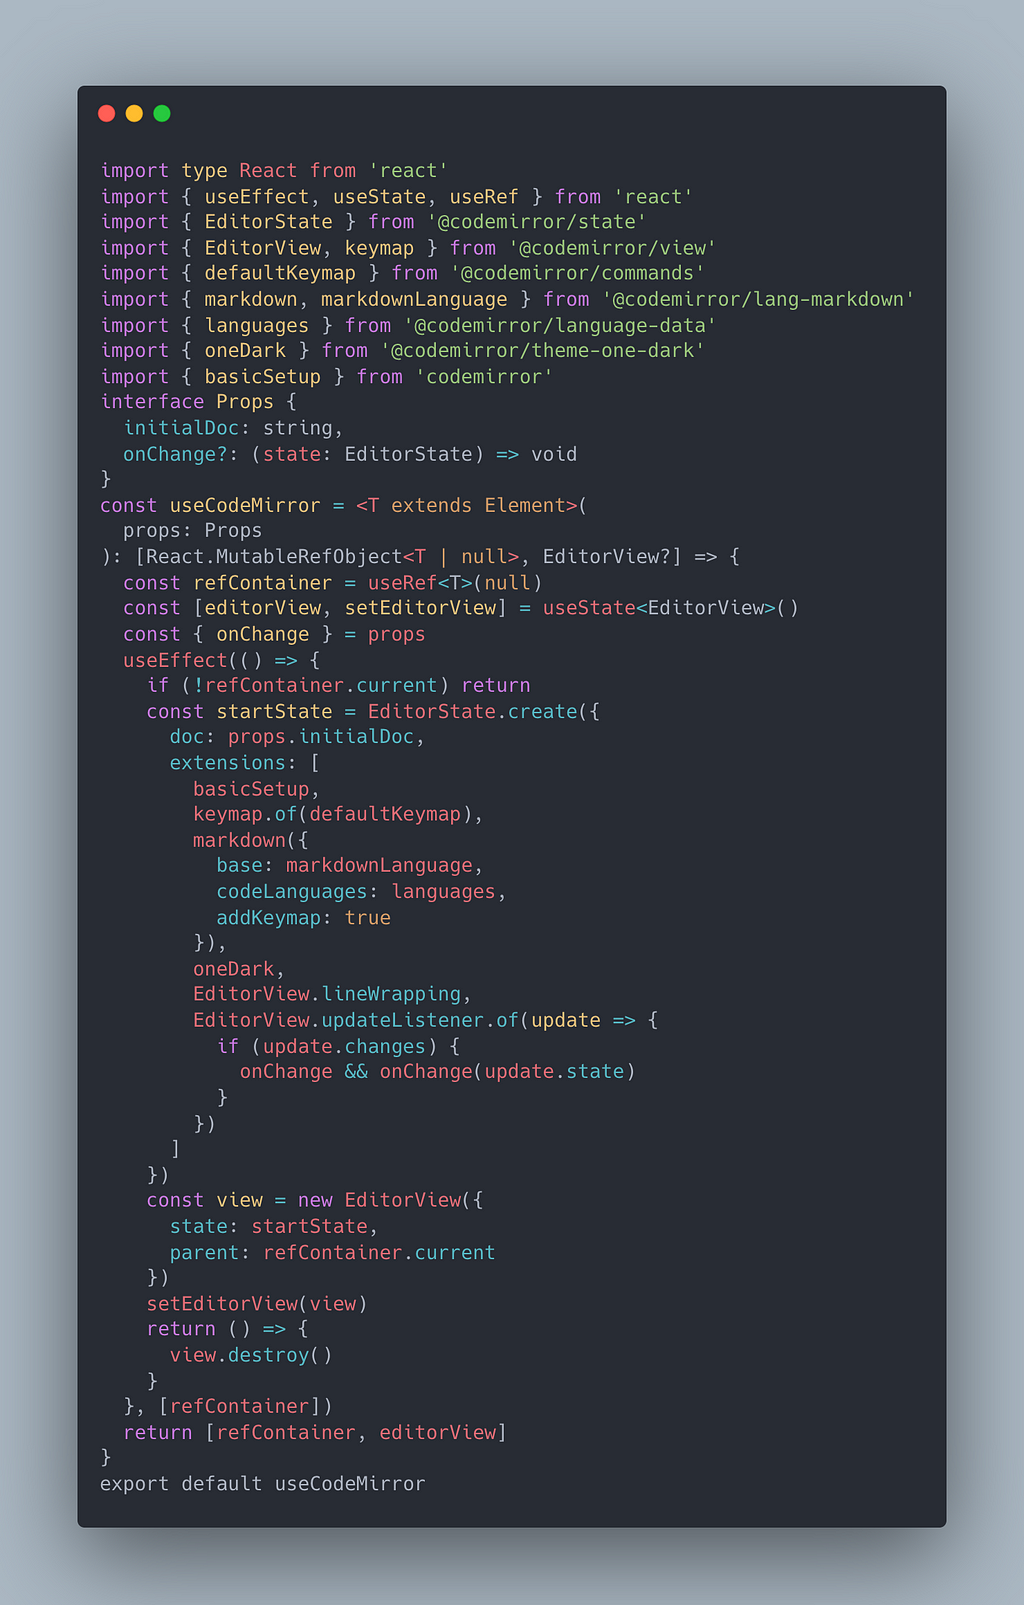
Create React Hook to Provide Editor View Component
A React Hook allows us to reuse the code in different places, allowing us to expand our app much easier in the future.
./components/use-codemirror.tsx
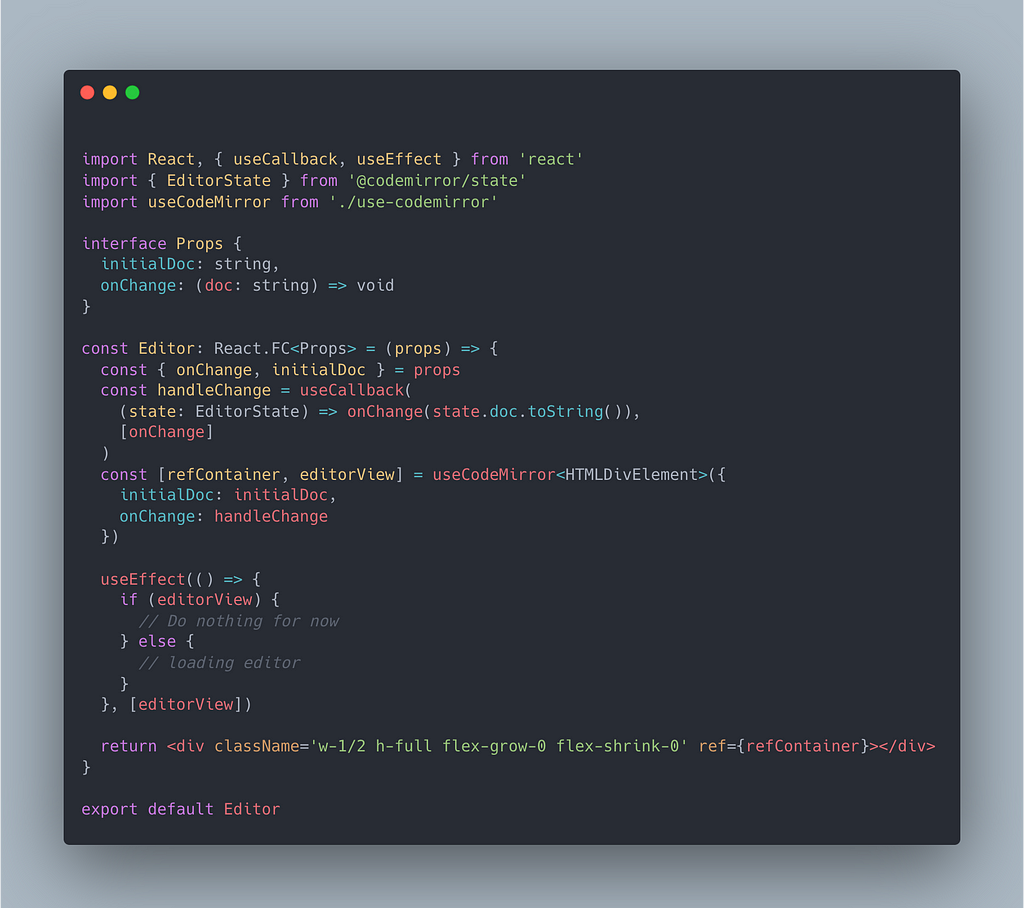
Consume the React Hook by Providing State Handler and Parent Element for the Editor
./components/editor.tsx
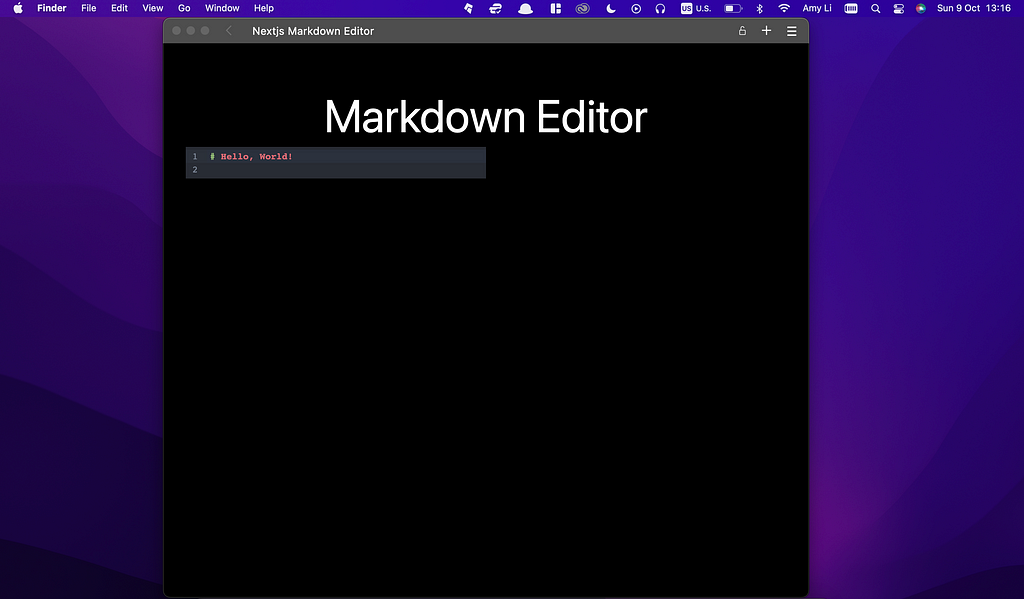
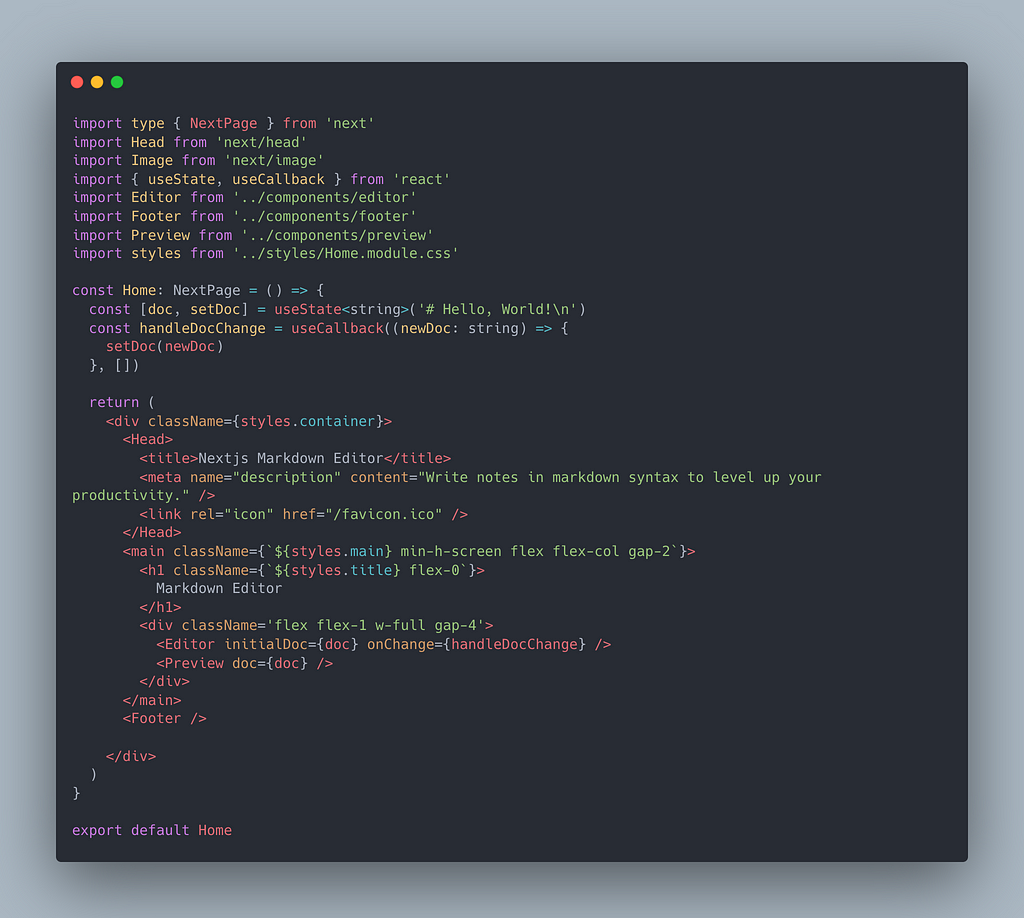
Implement the Editor component (./components/editor.tsx) in the Home component (./index.tsx)
Use TailwindCSS to style the container.

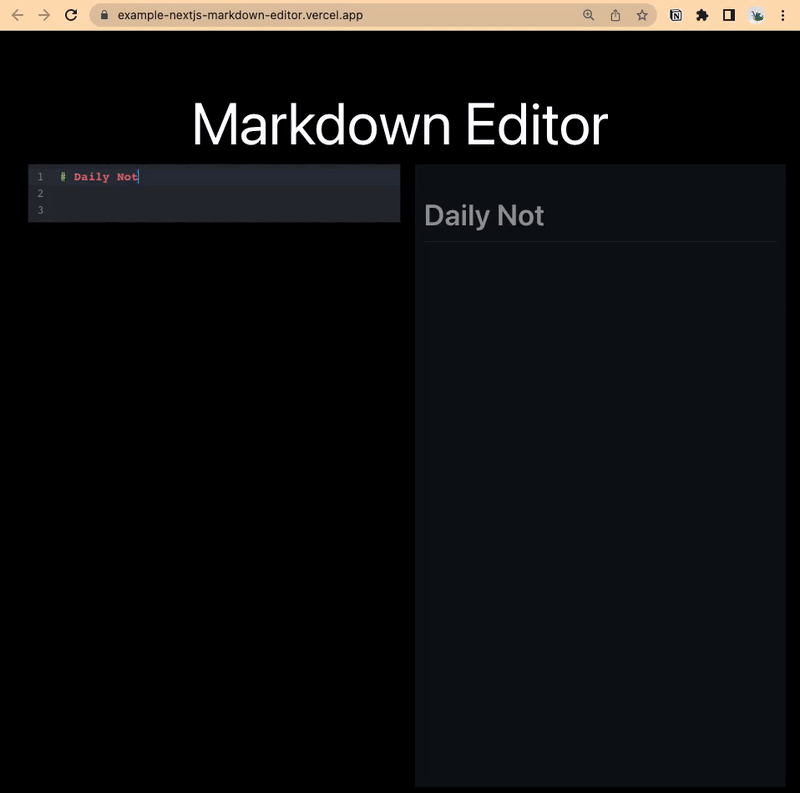
Output
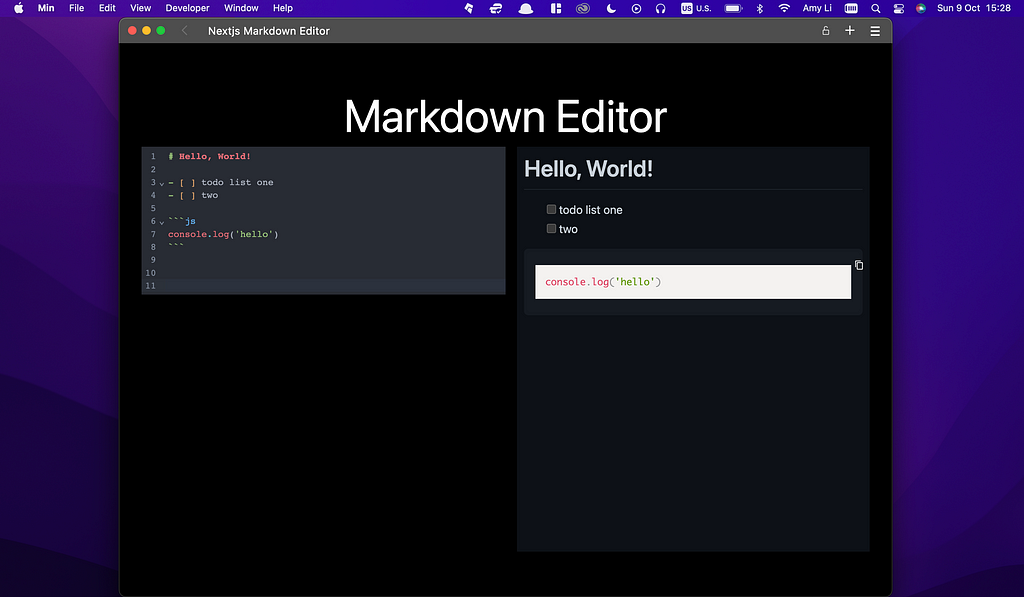
Create Markdown Preview in React Using react-markdown
There are other ways to use markdown in React out there so why use react-markdown?
The two main reasons are that they often rely on dangerouslySetInnerHTML or have bugs with how they handle markdown. react-markdown uses a syntax tree to build the virtual Dom which allows for updating only the changing DOM instead of completely overwriting. react-markdown is 100% CommonMark compliant and has plugins to support other syntax extensions (such as GFM).
Source: https://github.com/remarkjs/react-markdown#when-should-i-use-this
Install Dependencies
yarn add react-markdown
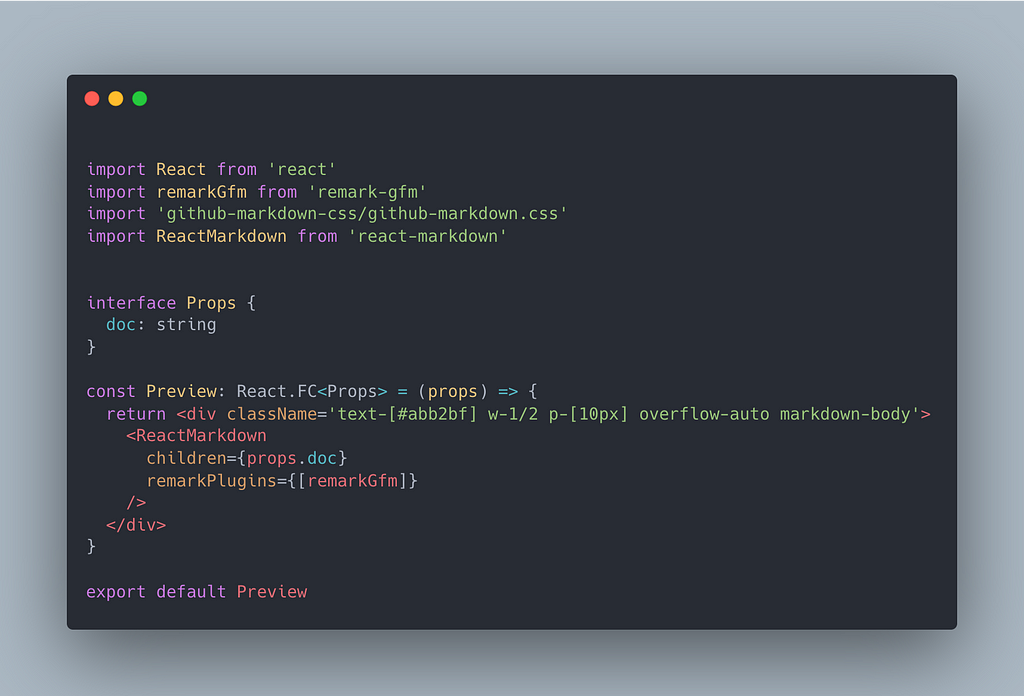
Create Preview Component and Implement ReactMarkdown Component
./components/preview.tsx
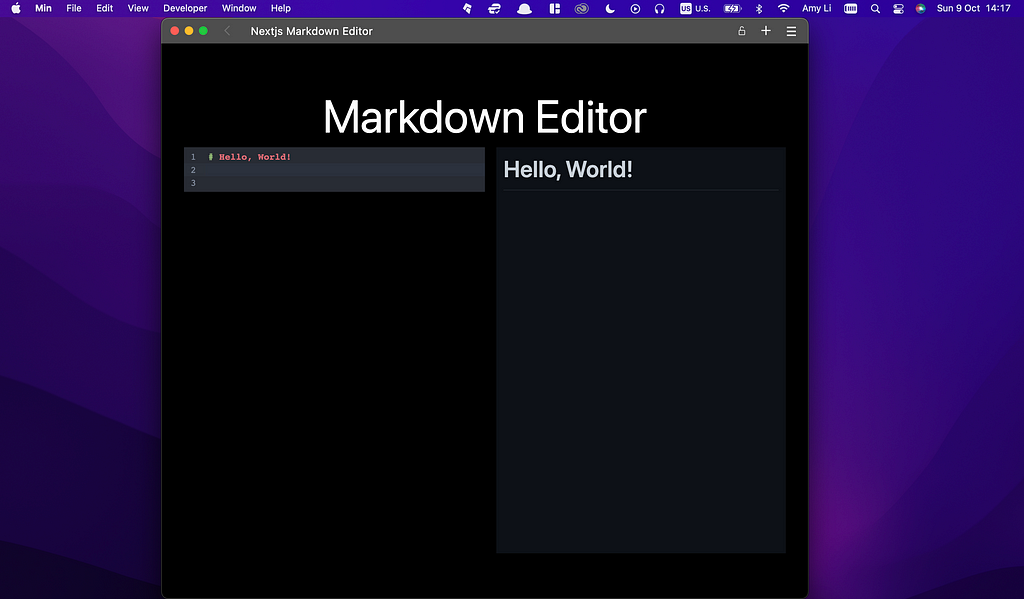
Implement Preview Component in Home Component
./index.tsx
Output
yarn dev
Yet, if we write code block using markdown, although it’s highlighted inside our markdown editor in the left panel, but not in the preview area on the right panel. Let’s fix this in the next.
Highlight Code Syntax Inside React Component
Install Dependencies
yarn add react-syntax-highlighter
Use It Inside Preview Component
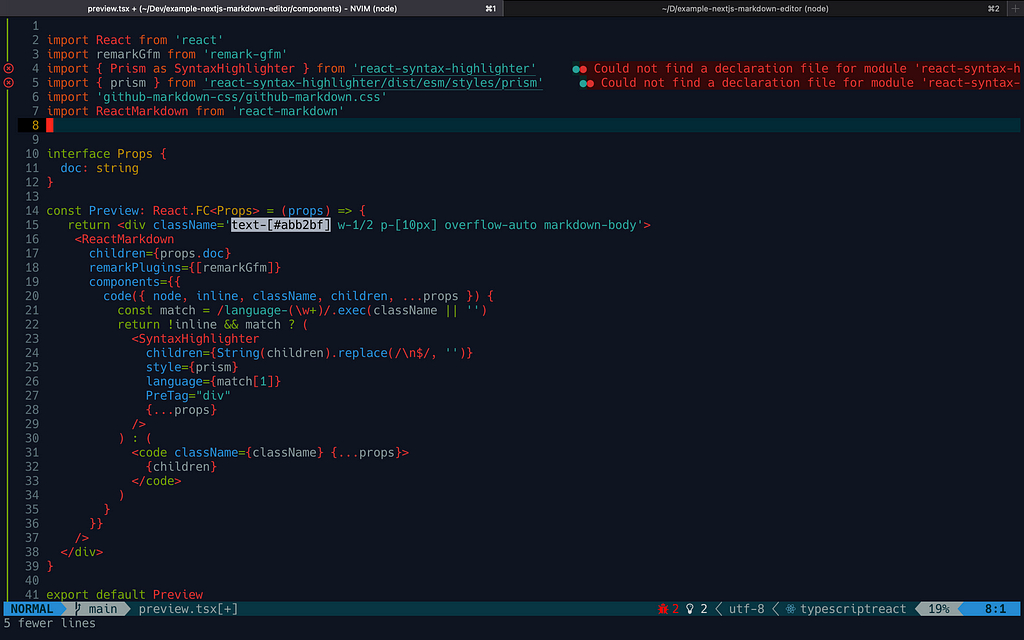
The error occurs inside our text editor
Could not find a declaration file for the module react-syntax-highlighter.

as well as in the output on the browser:
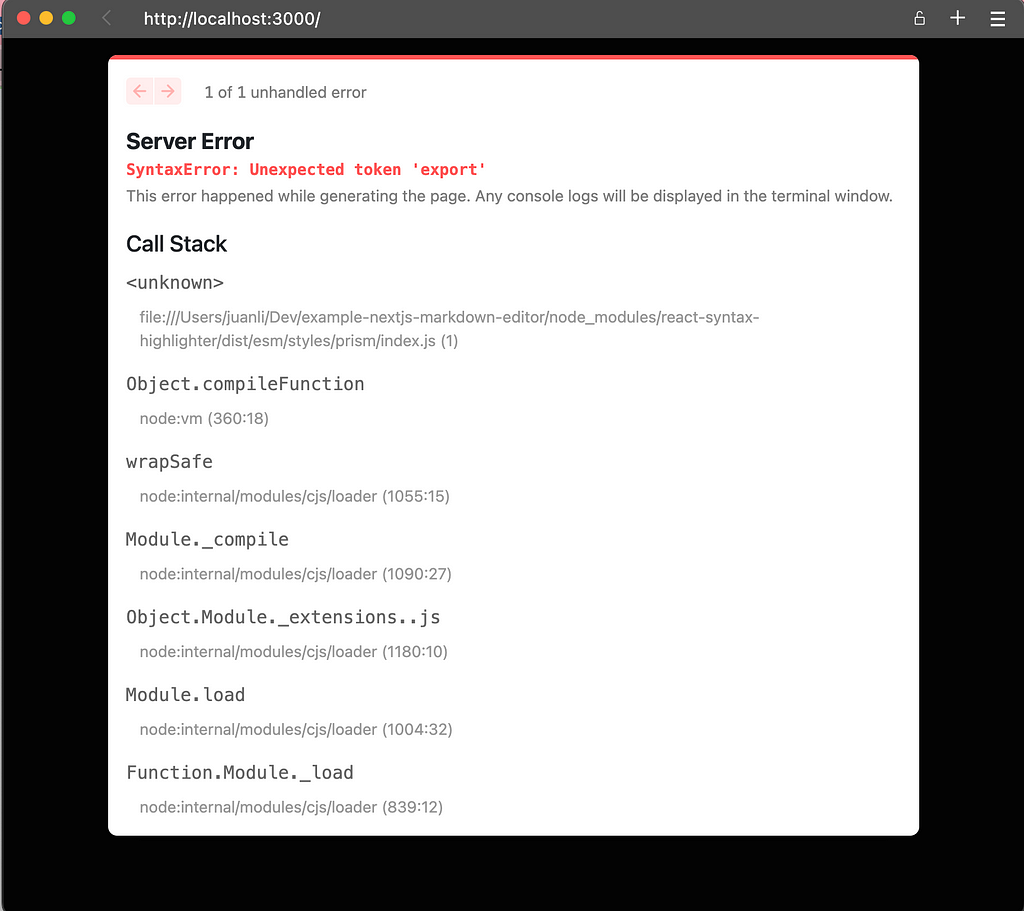
Fix
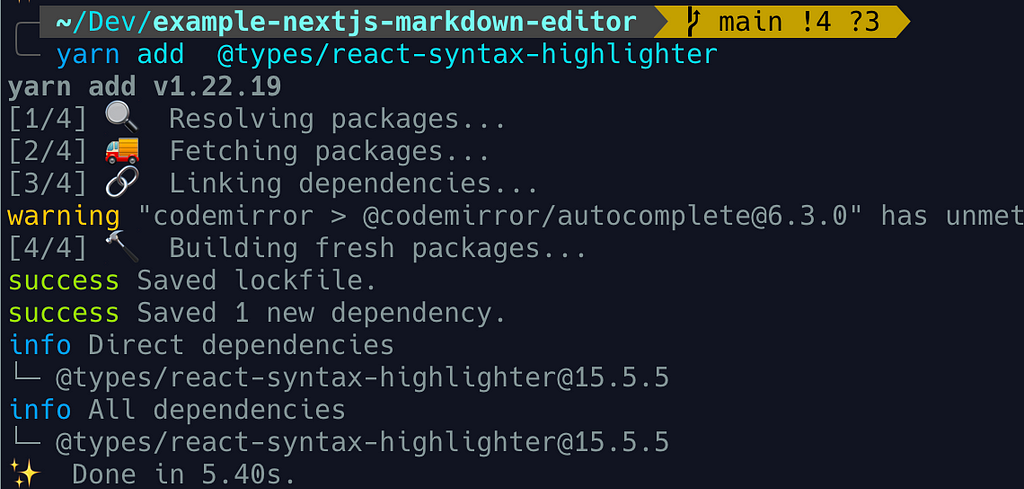
yarn add @types/react-syntax-highlighter

And replace
import { prism } from ‘react-syntax-highlighter/dist/esm/styles/prism’with
import { prism } from ‘react-syntax-highlighter/dist/cjs/styles/prism’Then, let’s continue to the next step.
Output
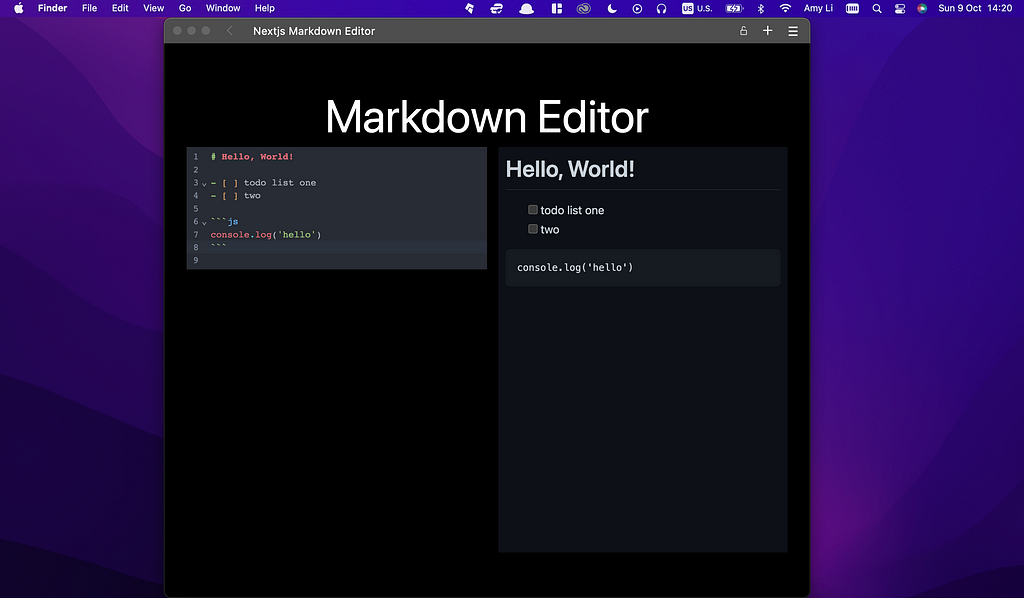
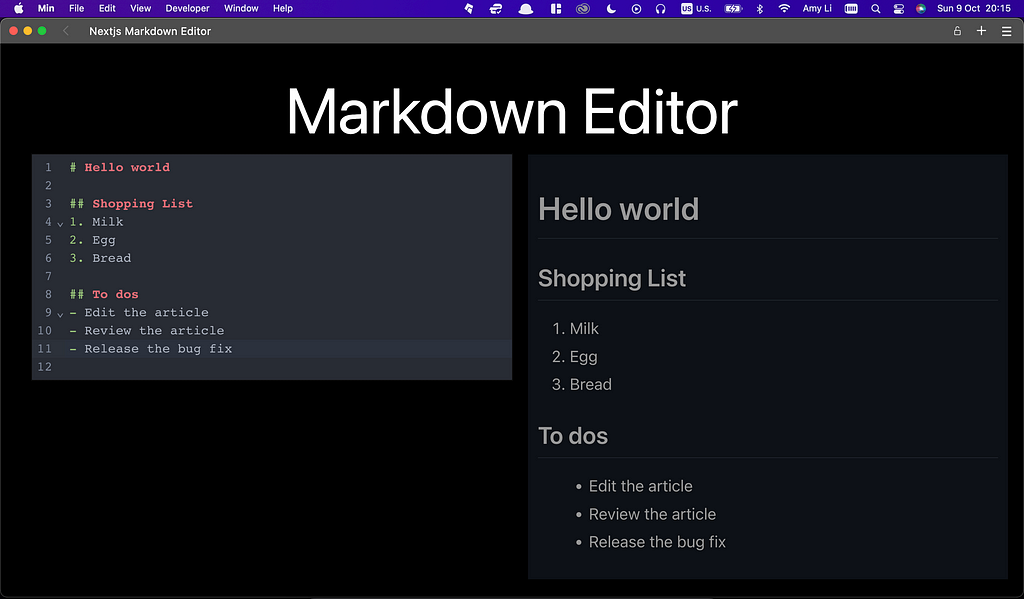
Now the code syntax on the preview area is highlighted.

Enable Users to Copy and Paste the Code
One of the use cases could be that a blogging website with a built-in markdown editor for the writers renders the blog posts in React components. Then, in that case, having a feature allowing users to copy the code from the blog and use it somewhere else.
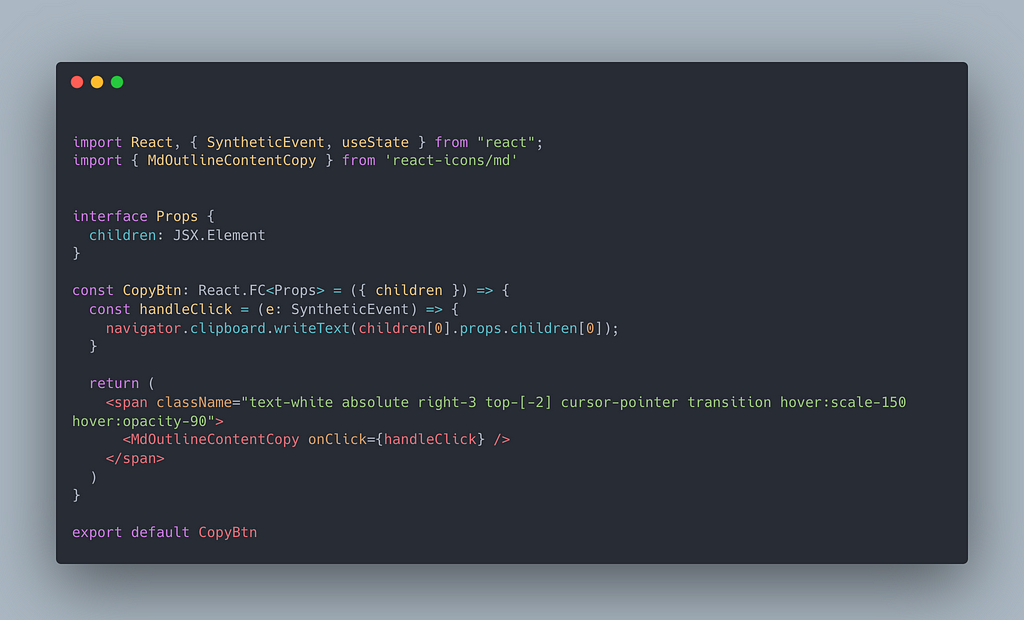
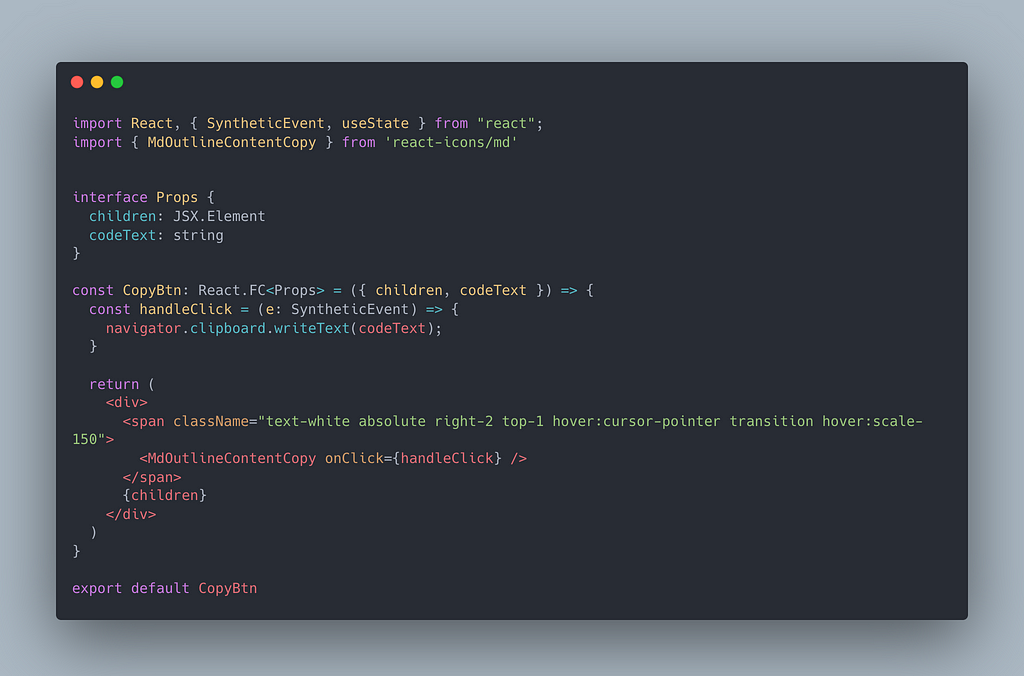
Create a Copy to Clipboard Button
./components/copy-btn.tsx
Use It
./components/preview.tsx
Output
Copy to the clipboard button on the top right corner of the code block in the markdown preview area.
Test the App When Running in Development Environment
Issue: the Some markdown elements such as the list don’t render properly.
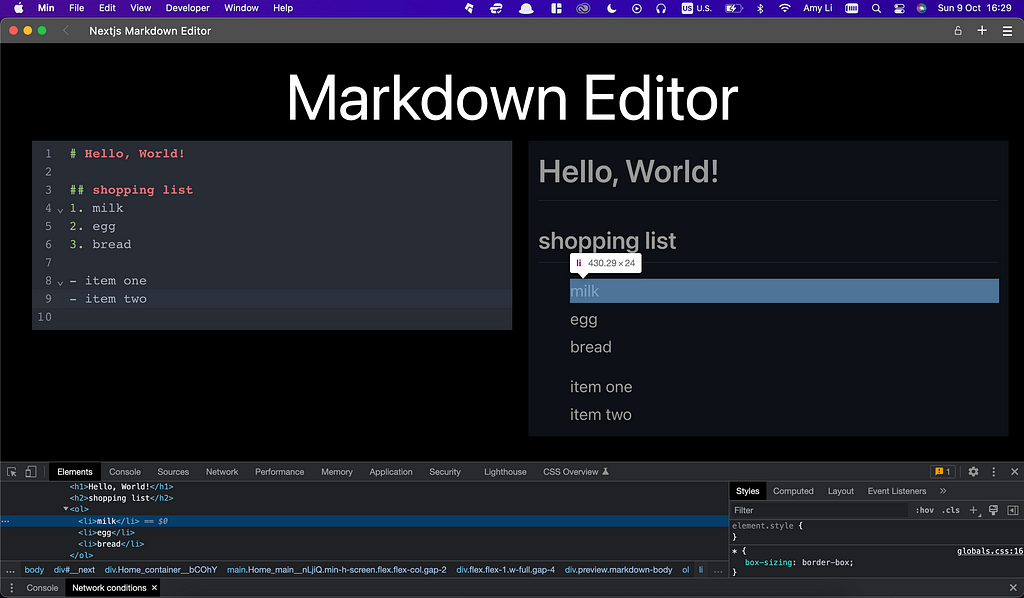
Fix
Not sure why that happens. After some research, I figure out to override the element style with CSS code as below.
./styles/markdown.module.css
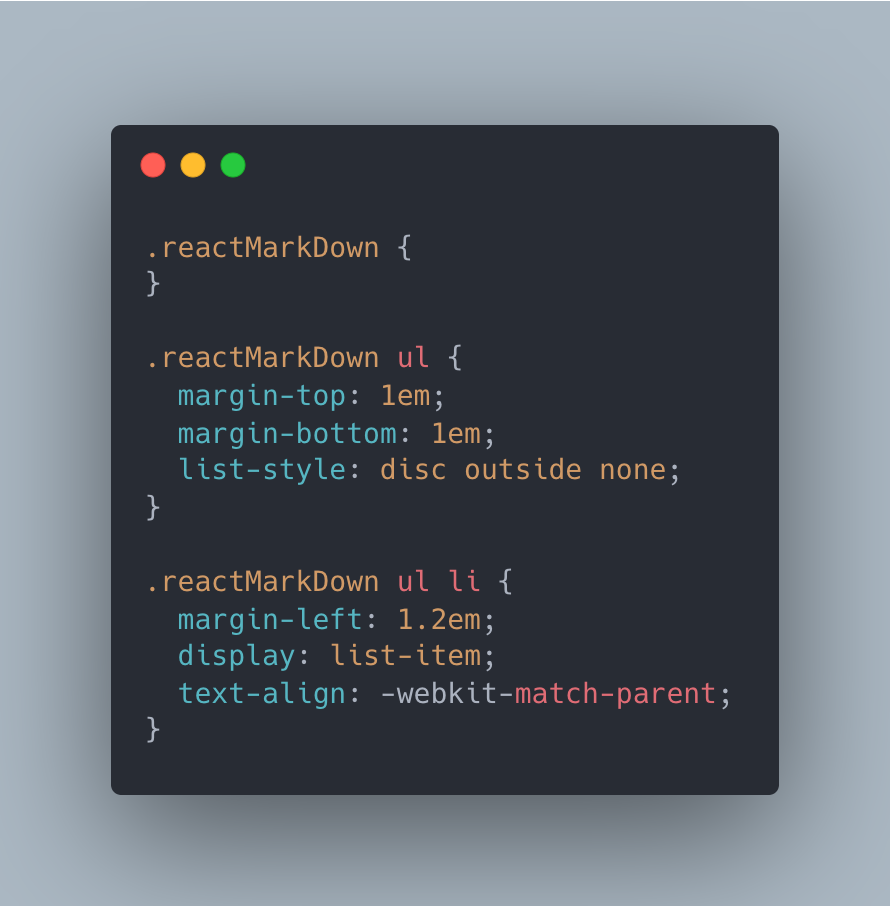
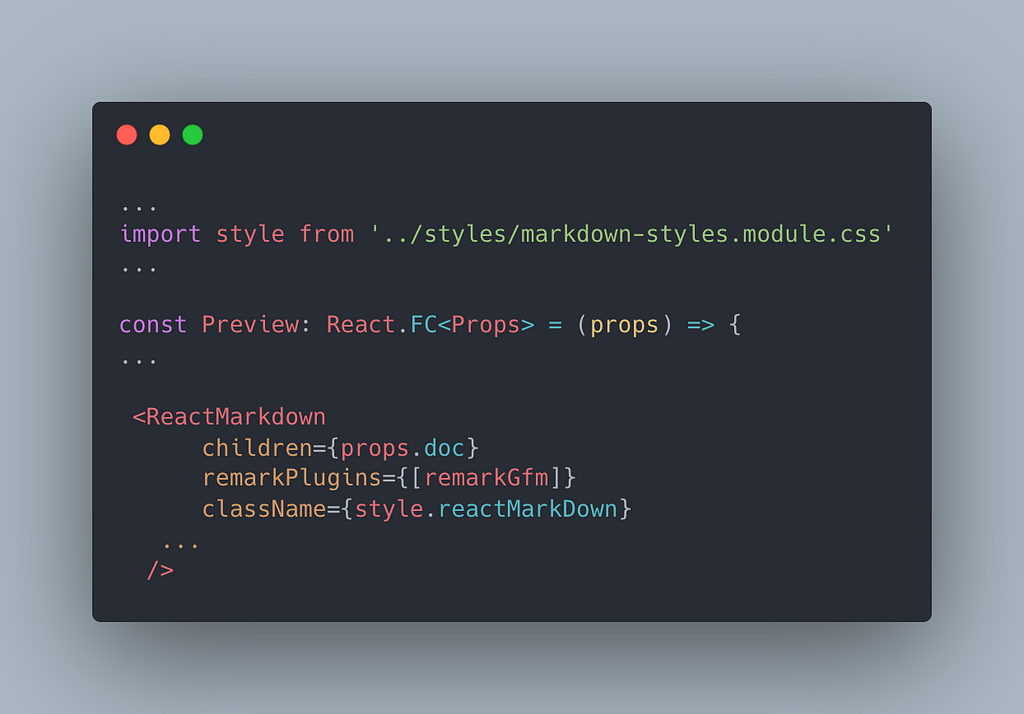
Then use the CSS inside the Preview component:
The Result
Up to now, our app seems to be working fine in the development environment. Let’s move on to the next building stage.
Prepare the App for the Deployment to the Production Environment
Although our app works on our machine, there are some Type errors we need to fix before deployment. There are three ways to find out these errors — one is simply from our LSP-configured Vim-based text editor, one is through building our app on our machine by running yarn build, and another one is through building our app during the deployment process on the cloud hosting services. The last one is the most expensive. We should try to find out any Type errors and fix them during the app development process.
Type error #1
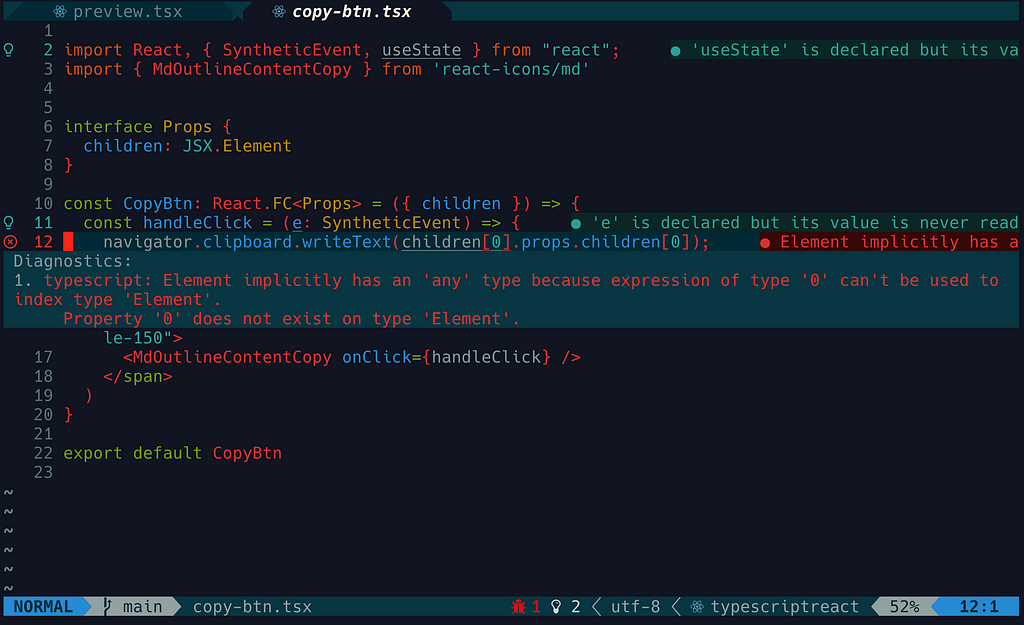
./components/copy-btn.tsx
Diagnostics:
typescript: Element implicitly has an ‘any’ type
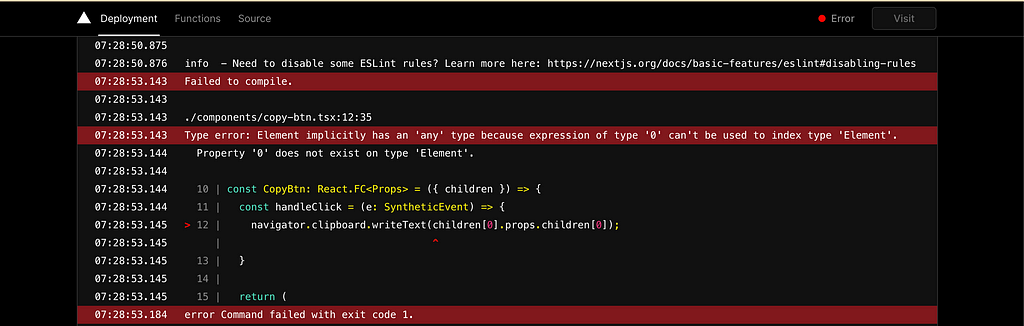
The same error occurs when building the app locally.
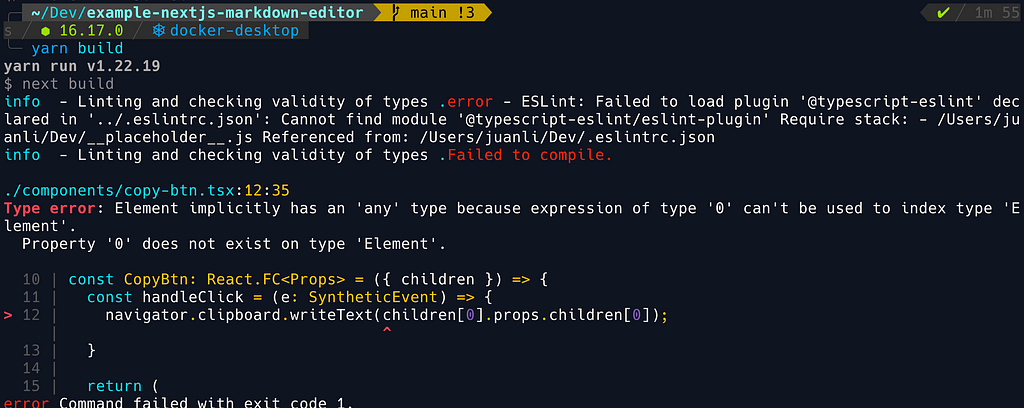
You would see the same complaints if you try to deploy this app to the hosting service by skipping the step of building the app locally.
As I mentioned before that we better do a cheap way of finding out Type errors and starting to fix them at the stage of app development, rather than at the stage of releasing to production.
Fix
Update the CopyBtn component(./components/copy-btn.tsx):
Now the Type error disappears.
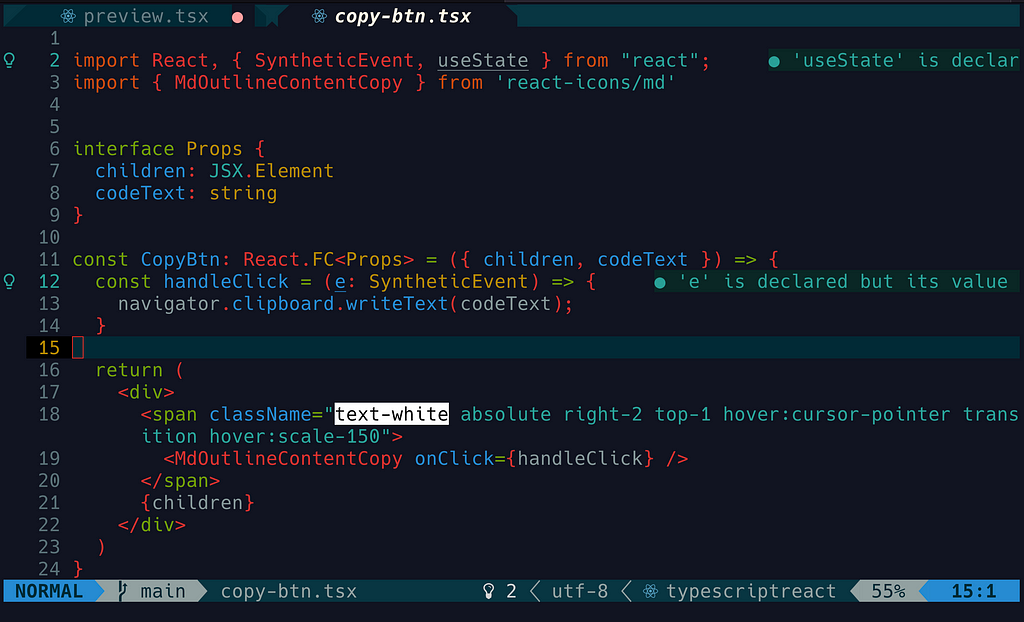
If we build our app again, we don’t see that Type error occurring in the CopyBtn component, but we do see another Type error inside the Preview component. Let’s keep fixing this different Type error.
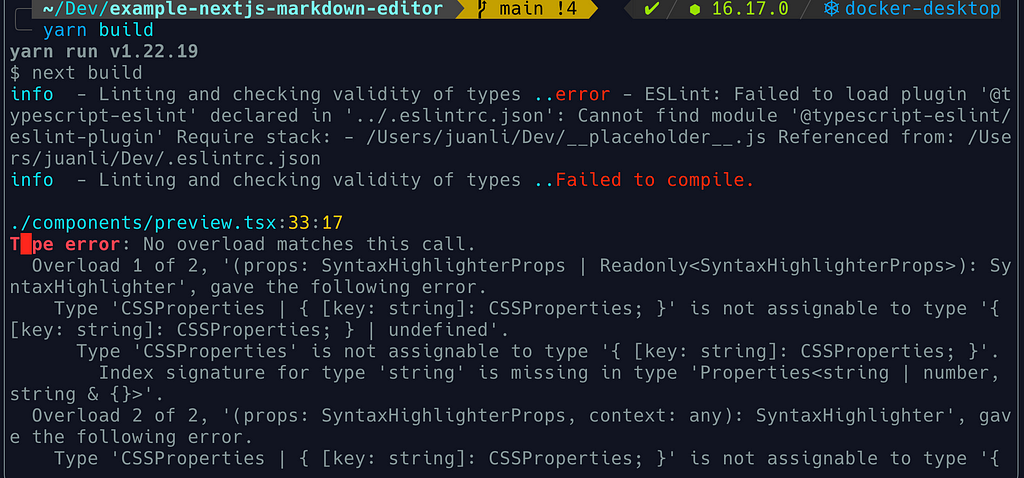
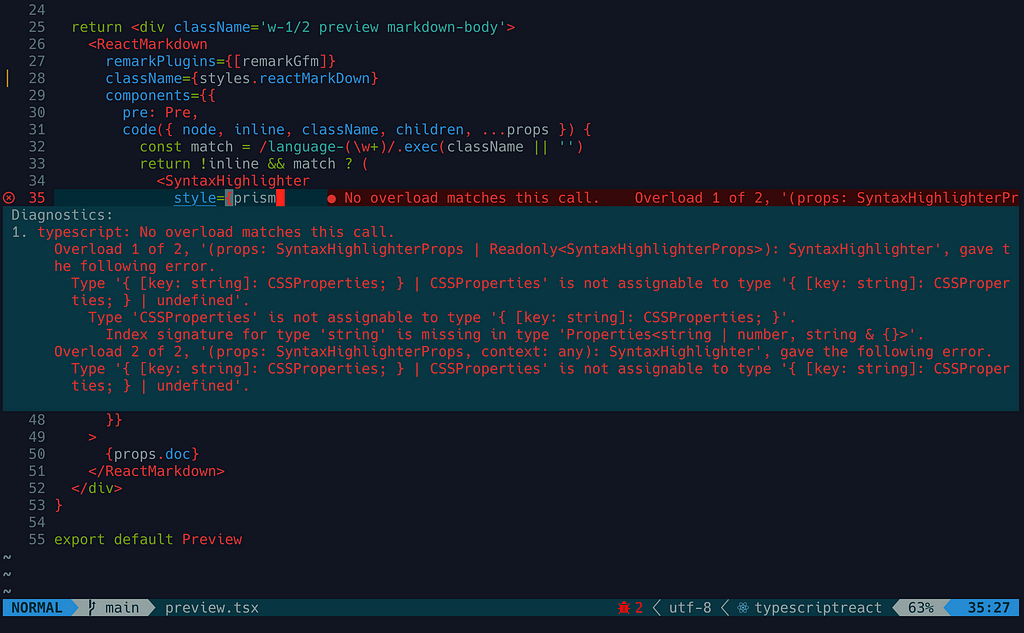
Type error #2
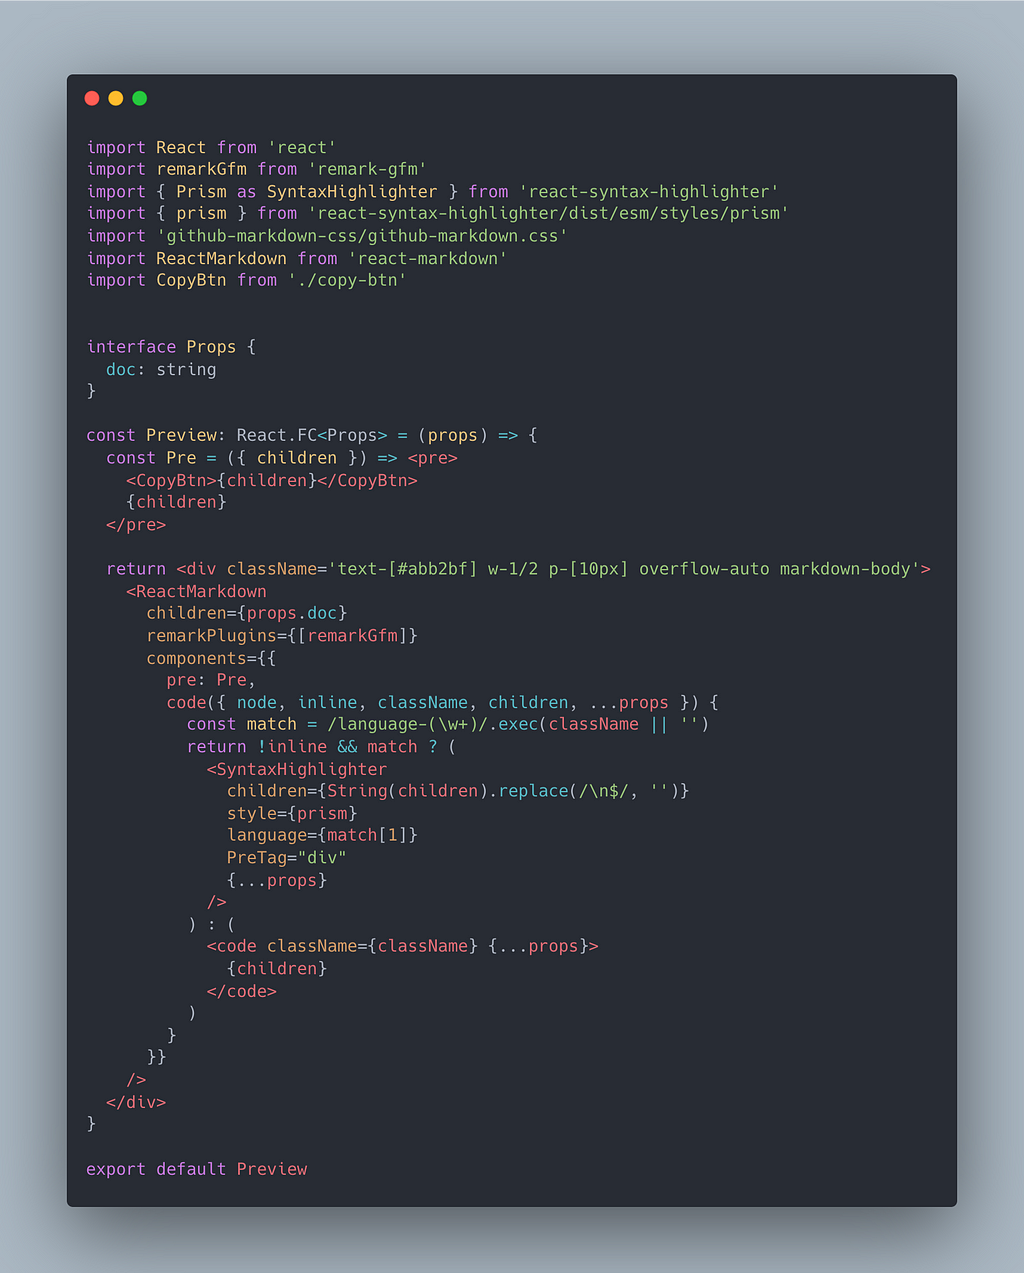
./components/preview.tsx
Diagnostics:
Type '{[key, string]: CSSProperties;} | CSSProperties' is not assignable to '{[key, string]: CSSProperties;} | undefined'. Type 'CSSProperties' is not assignable to '{[key, string]: CSSProperties;}'
Investigate
Very strange, because we notice that the type for prism is {[key, string]: CSSProperties;} rather than '{[key, string]: CSSProperties;} | CSSProperties'

Luckily I find the explanation and solution for the issue about Typescript incompatibility with the prop style #47:
The type mismatch error occurs because the style defined in CodeProps of react-markdown and the style defined in SyntaxHighlighterProps are different types.
Fix the — using style defined in CodeProps
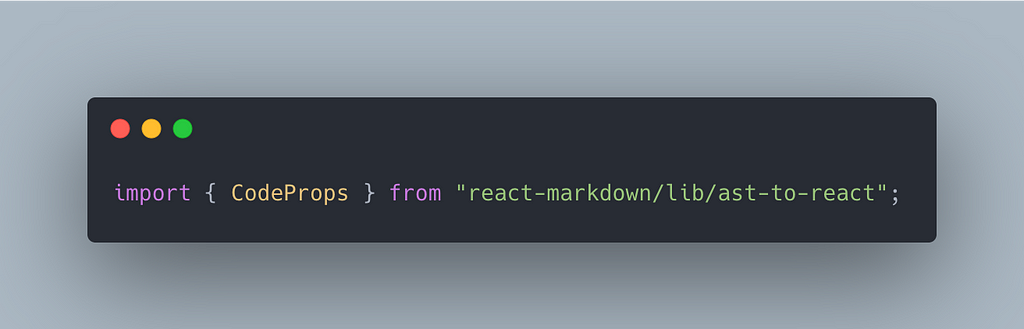
First import CodeProps from react-markdown/lib/ast-to-react
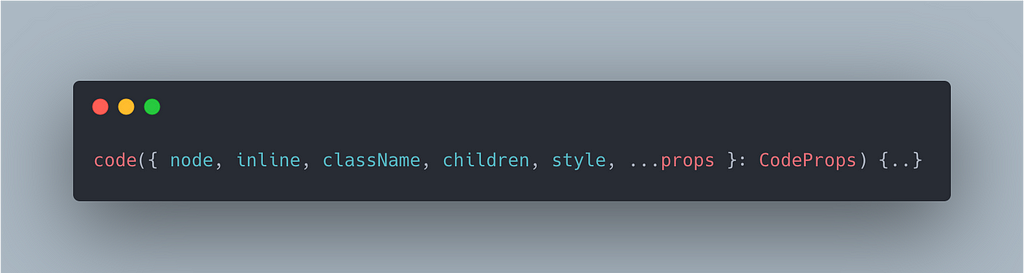
Then apply CodeProps as the type of the argument passed in the code function:
The style will be used in SyntaxHighlighter.
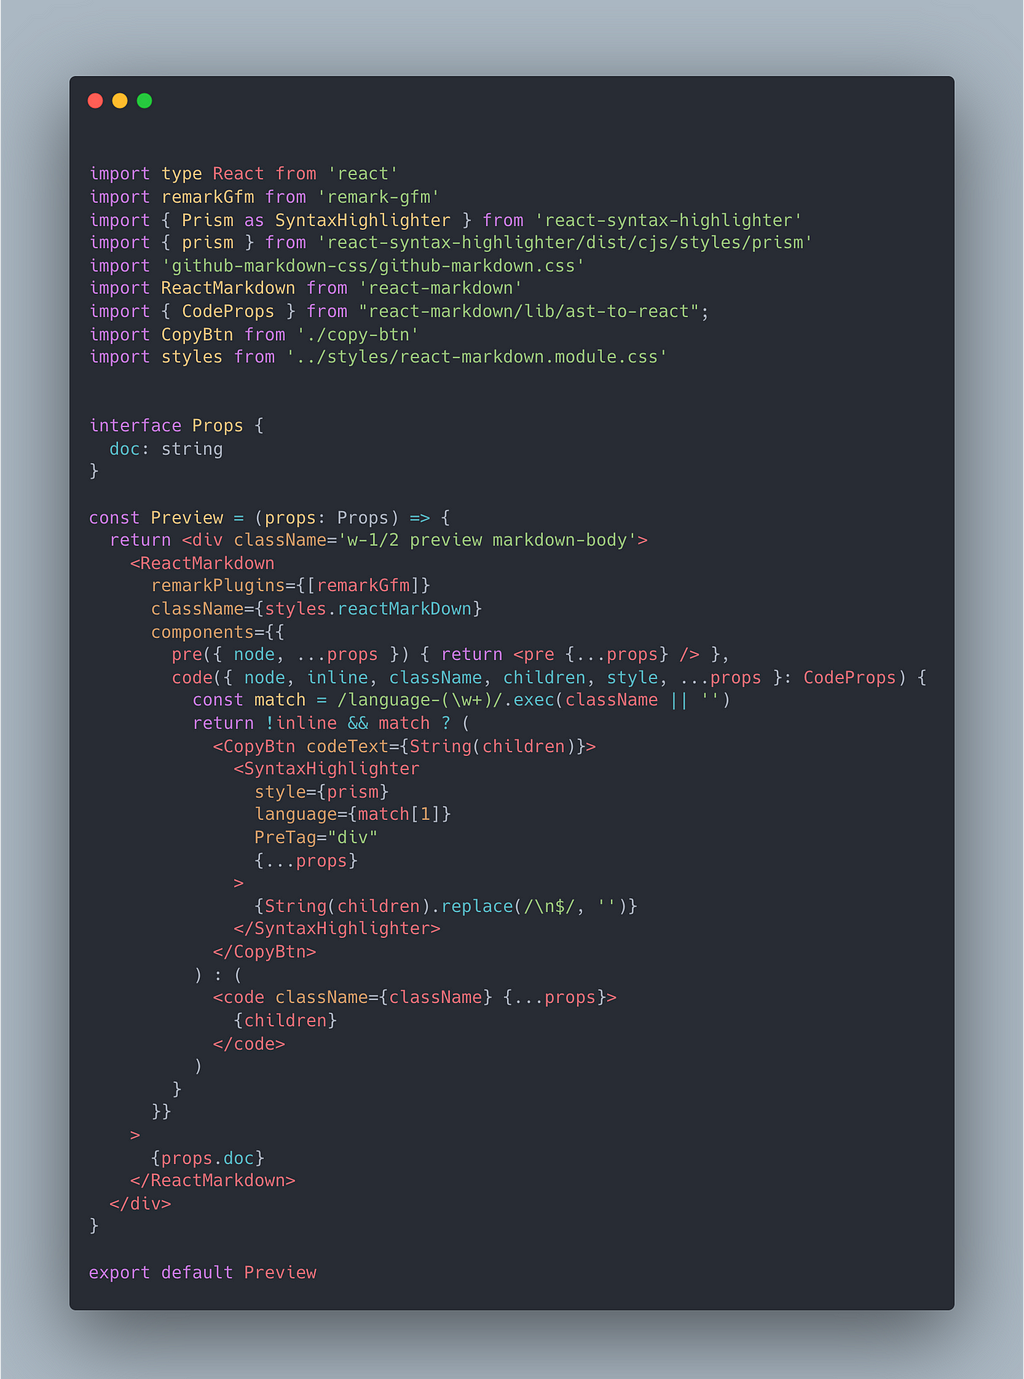
Now what the updated Preview component looks like:
Successful Building
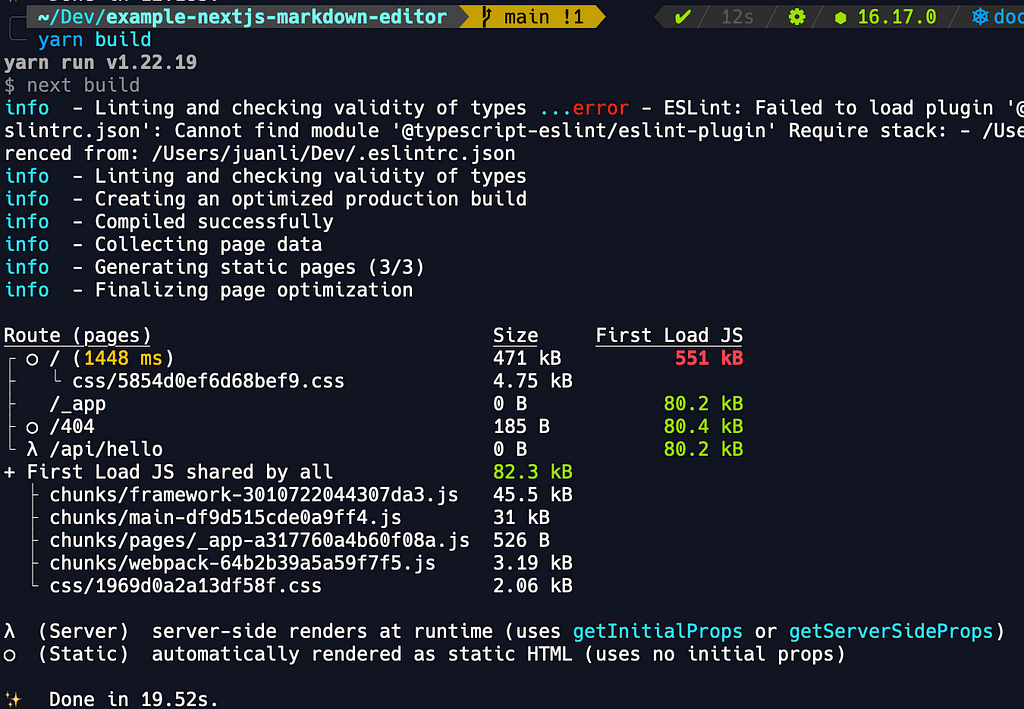
Note: We can ignore the error related to ESLint for now as it doesn’t impact our production results.
It’s time to deploy our Next.js app to the production environment.
Deploy the App
We are using Vercel as the hosting service for this Next.js web application.
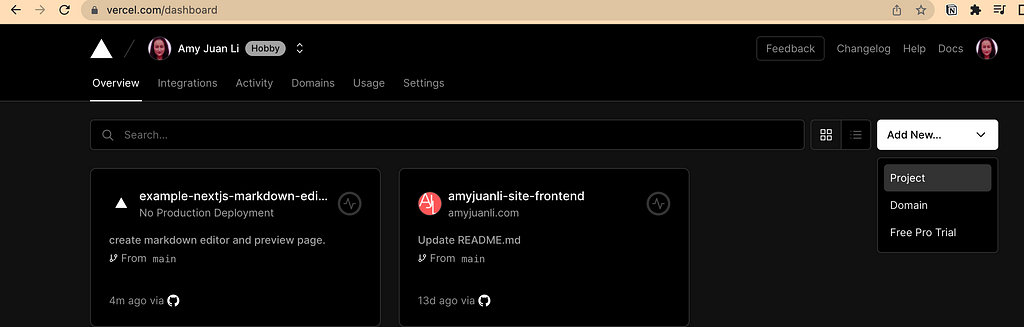
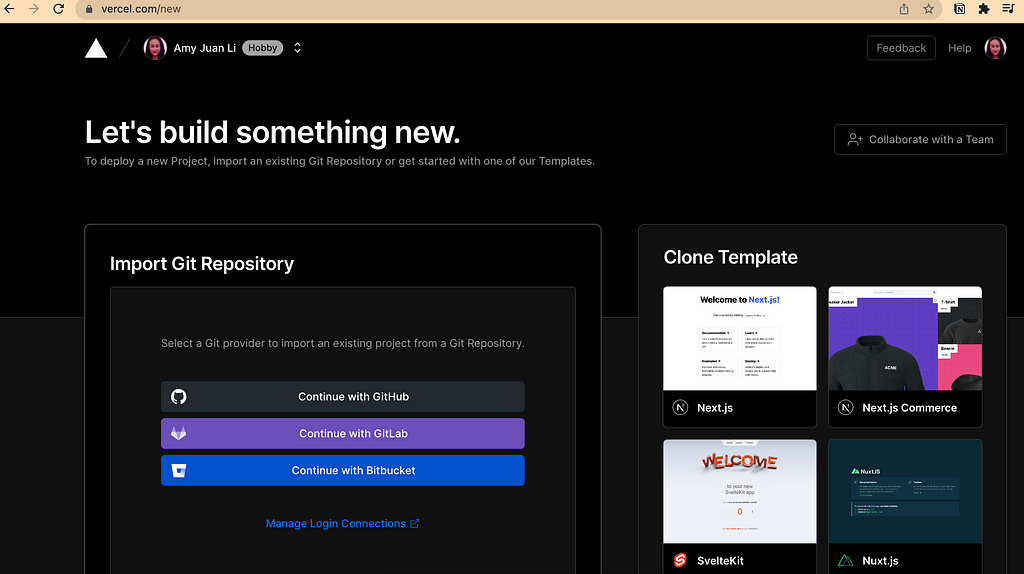
Step 1: Add a New Project from the Vercel dashboard
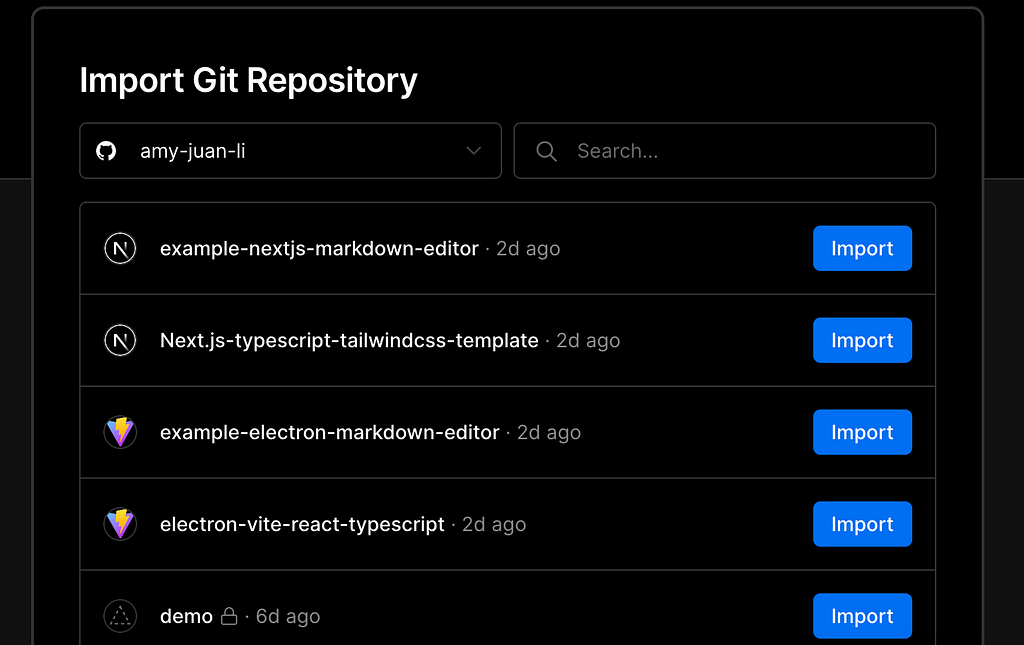
Step 2: Import the Target Git Repository
Select your project git repo:
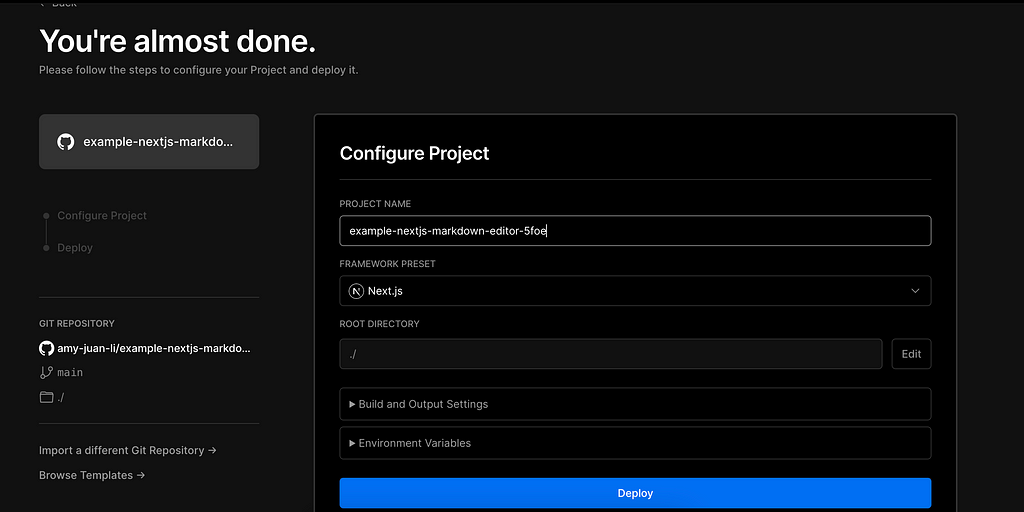
Step 3: Start Deploying
Compile error:
Do not pass children as props, nest children between the opening and closing tag
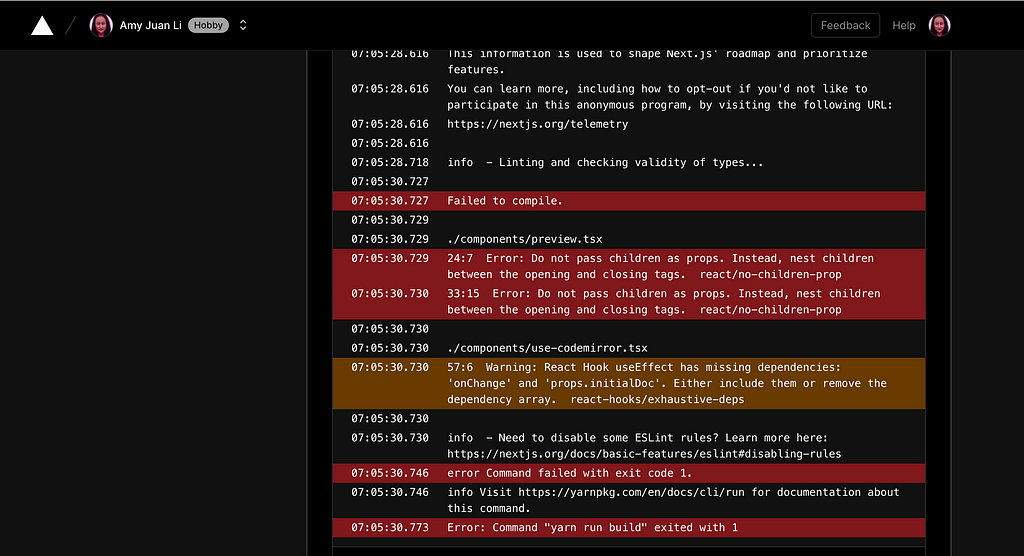
Investigation
When using JSX, the children should be nested between the opening and closing tags. When not using JSX, the children should be passed as additional arguments to React.createElement.
Source: Rules about eslint-plugin-react
Fix the Issue
Nesting children between the opening and closing tags of SyntaxHighlighter
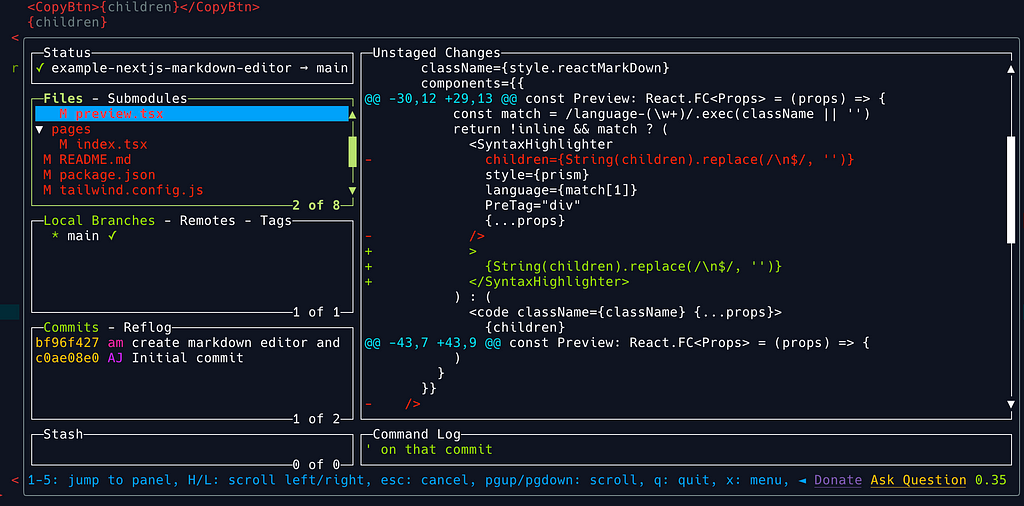
Once committing our change, the rebuilding process inside Vercel deployment pipeline starts automatically.

Successful Deployment
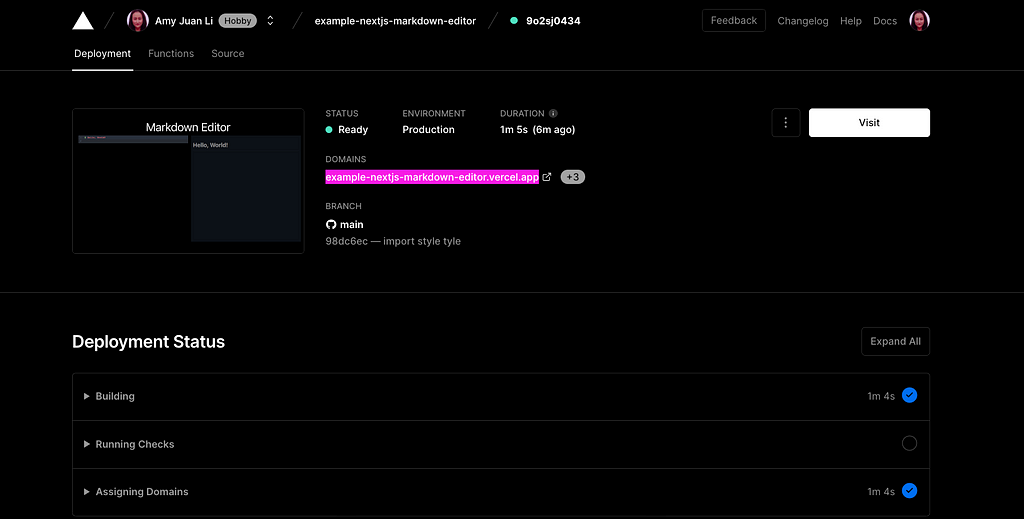
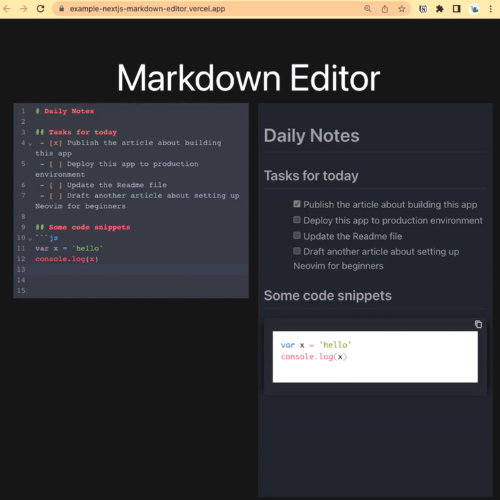
Open our app from the browser by clicking the generated app link to check out its performance in the production environment:
Welcome to try out the app. Please leave any comments or suggestions for the future development of this app.
Conclusion
This article has covered the whole process of creating a new Next.js app, integrating new packages, fixing Type errors, testing every functionality on the development environment, building the app to prepare for deploying to the production environment, and finally deploying the app. And you might notice that this article is not intended to provide you with every step with the correct code from the beginning. We keep learning from our mistakes and growing to be better than yesterday. By the way, you cannot ignore the fun parts of trying to figure out a solution, investigating the root cause of bugs, fixing bugs, etc. especially when we are challenged to build a completely new project.
Thanks for reading!
Happy coding! ☺️
Read Further
- Build a Markdown Editor Using Electron, ReactJS, Vite, CodeMirror, and Remark
- Build Next.js Applications
Useful Sources and Links
Build a Markdown Editor With Next.js, TypeScript and CodeMirror 6 was originally published in Level Up Coding on Medium, where people are continuing the conversation by highlighting and responding to this story.
This content originally appeared on Level Up Coding - Medium and was authored by Amy Li
Amy Li | Sciencx (2022-10-22T12:06:31+00:00) Build a Markdown Editor With Next.js, TypeScript and CodeMirror 6. Retrieved from https://www.scien.cx/2022/10/22/build-a-markdown-editor-with-next-js-typescript-and-codemirror-6/
Please log in to upload a file.
There are no updates yet.
Click the Upload button above to add an update.