
This content originally appeared on Level Up Coding - Medium and was authored by Kris Wong
Layering security into an existing application
You can find several different posts on the web about using CloudFront Signed URLs, including several from AWS itself. However, these posts leave out a very important part of the equation, and that is how URLs are actually signed and returned to the client, especially when those URLs can be anywhere in your data schema. This post will cover the topic of using signed URLs with Node.js, Express, and MongoDB end to end.
I do assume that you have at least a working knowledge of CloudFront and S3. If you don’t, there are many posts on the web that discuss these topics in great detail.
Background
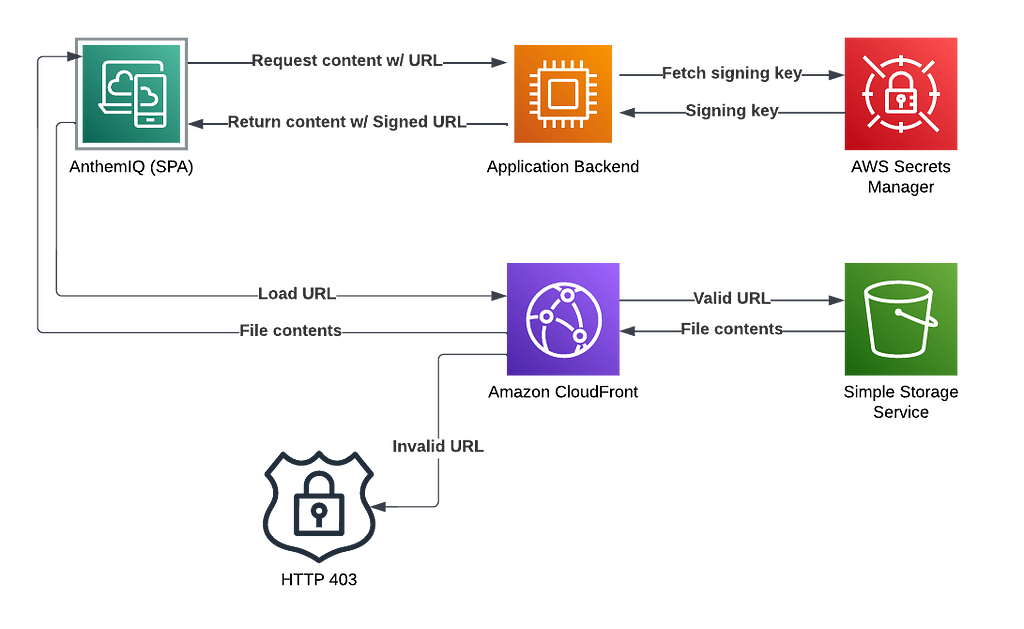
AnthemIQ is a SaaS application that facilitates commercial real estate transactions. As a part of this service, users are able to upload documents and images, which are ultimately stored in S3. When we first started, the files in these S3 buckets were publicly accessible (if a user could discover the URLs). The issues with this basic approach are obvious. We knew we needed to secure access to the files that our users were uploading, and we quickly discovered that signed URLs were the way to do this in AWS.
URL signing is quite straightforward — without using a URL that has been signed with our private keys, access to all files in our S3 buckets is denied. The only way to get a valid signed URL is from our application backend, only after it has validated that the user has access to the file in question.
There are actually currently 2 different ways to give a user access to these files through CloudFront. Rather than signing all URLs individually, you can instead use a signed cookie. The problem with this approach, for us, is that it gives a user access to all files that are served by a given CloudFront Behavior, which does not meet our requirements. We need to control access on a file-by-file basis.
First Steps
Once we understood how to accomplish what we needed in AWS (more on this in a bit), we needed to plan how to actually get these signed URLs back to the client. I know that sounds super simple, but there’s more to it than you might think. Firstly, we had to track down all the URLs that were present in our data schema. Once that was done, then we needed to ensure everywhere these URLs are returned that they are being signed. Because we are using Node.js and MongoDB, we’re obviously using Mongoose as well. We could have used something like virtual functions on our Mongoose schemas, but these do not work for aggregations. Once you’re using aggregations, pretty much all bets are off. Trying to handle these URLs manually everywhere they are accessed in the business logic would of course be very error-prone. We had to come up with a way to ensure all URLs get signed without the developers needing to do anything.
This required us to get… creative. We didn’t come up with a great solution if I am being completely honest, but it works. We wrote an Express middleware function that replaces the send and json functions on all response objects. This function uses a regex to find known media file URLs and sign them. Here’s the TypeScript code:
We’ll get to the actual signing code in a bit. If your API is 100% GraphQL you can actually use a custom scalar rather than this hack. We’re in the process of migrating, so we currently have a hybrid API and can’t employ that technique yet.
Now that we know how we can return signed URLs to the frontend, we also need to be able to handle the frontend sending signed URLs back to the backend (when saving data). We can’t persist them in their signed form. We need to remove all the signing parameters. This turns out to be a little bit cleaner, but we’re still more or less using Express middleware to do this. We are using the built-in json middleware function that is included in Express. This function actually takes what it calls a reviver function, which is called on every property in the request JSON, recursively. This makes it quite easy to run the values through a regex to find signed URLs and strip off the relevant query params.
OK, so we know what we need to do, at a high level, to make this work. Now, let’s get into the details of the AWS setup.
Configuring AWS
At this point, I am assuming that you know that CloudFront is a CDN, and the basics of using it to serve S3 files in an optimized way. Because we are using CloudFront to serve the files, we can already turn off public access through S3. Users must use a CloudFront URL to access the files. However, this still has the same problem that anyone with the URL can load the files.
As a quick review, we will be working with distributions, which have origins (configures where the files are pulled from), and behaviors (configures how the files are served). For this purpose, we will be updating the behavior(s) associated with our S3 origins.
Before we do that, however, we will need to create a keypair and upload the public key to CloudFront. You do that under Key management > Public keys > Create public key. If you don’t know how to create a keypair, it’s just a few commands to do so, and there are many posts on the topic. After you upload the public key, you must also create a key group: Key management > Key groups > Create key group. This is all the information CloudFront needs to verify a signed URL. Once you have created your key group, you associate it with the behavior on the CloudFront distribution by enabling Restrict viewer access, selecting Trusted key groups, and selecting your key group. I would wait to do this until you have the logic to sign the URLs working first.
I also highly recommend using AWS Secrets Manager to store your private key rather than committing it to your source repository and loading it from disk. There are, of course, other mechanisms you could use to store this, but Secrets Manager is purpose-built for this kind of thing, very secure, and very inexpensive. You can even set up auto-rotation of these keys, but I won’t go into that. Adding the private key to Secrets Manager is as simple as exporting it, creating a new secret, and pasting in the private key as plaintext. Now you just need to fetch it when your backend service starts up, and it can live in memory while it’s running.
Let’s Sign Some URLs
So far we have determined our strategy for how and when URLs get signed, and we have stepped through the details of getting URL signing set up in AWS. Now it’s time to actually sign the URLs.
The first step is to fetch the private key from Secrets Manager when the backend is started. This is quite simple — only a few lines of code using the AWS SDK for JavaScript. The npm package you will need is @aws-sdk/client-secrets-manager . Here’s the code:
To sign the URL we will use @aws-sdk/cloudfront-signer . This code is very straightforward as well:
Here we are simply specifying the URL to sign, the ID of the CloudFront key group, the exported plaintext private key, and the date at which the URL will expire. If no date is specified, the default is the start of the day two days from the current date (we use the date-fns package for this).
The only remaining piece is to create a regular expression (or otherwise identify the URLs that need to be signed) and plug this into the Express middleware described above (notice the calls to transformCloudFrontUrls in the first code snippet). Similarly, for all requests containing a signed URL, simply remove the signing parameters from the URL. That’s it!
Summary
In this post, we explored CloudFront URL signing end to end using Node.js and Express in our backend. We saw how to plug into Express to sign URLs on responses and remove signing parameters on request data. We saw what needs to be configured in AWS to support URL signing. And finally, we saw how to actually sign URLs using the AWS SDK.
Thank you for reading and stay tuned for more content like this in the near future!
CloudFront Signed URLs with Node.js and Express was originally published in Level Up Coding on Medium, where people are continuing the conversation by highlighting and responding to this story.
This content originally appeared on Level Up Coding - Medium and was authored by Kris Wong
Kris Wong | Sciencx (2022-11-03T12:53:31+00:00) CloudFront Signed URLs with Node.js and Express. Retrieved from https://www.scien.cx/2022/11/03/cloudfront-signed-urls-with-node-js-and-express/
Please log in to upload a file.
There are no updates yet.
Click the Upload button above to add an update.