
This content originally appeared on Bits and Pieces - Medium and was authored by Manusha Chethiyawardhana
Next.js Fundamentals for React Developers
Powering up React with Next.js to Develop High Performing Frontends

React is one of the most popular frontend frameworks for developing client-side rendering applications. Many developers prefer it because of its developer friendliness and short learning curve.
Next.js is a framework built on top of React that extends its capabilities, allowing you to develop React applications with less hassle and greater optimization.
Thus, this article will discuss why React developers should use Next.js and the basics of the framework. Let’s get started.
Why use Next.js
Next.js employs server-side rendering, which speeds up the loading of your application’s pages. It also makes indexing and crawling content easier for search engines because the content is rendered before the web page is loaded, which improves the application’s SEO ranking.
Furthermore, Next.js accelerates the development server, allowing you to see changes faster. Image and font optimization features make the application faster and more stable. In addition, built-in CSS, Sass, and CSS-in-JS library support make styling easier.
Getting Started
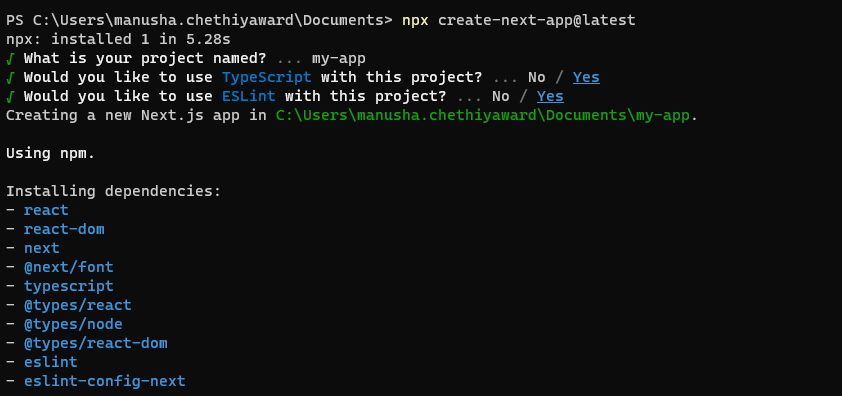
The ideal way to quickly start a Next.js application is to use the create-next-app CLI tool.
Note: You’ll need Node.js version 10.13 or higher to create a Next.js application using the CLI command.
npx create-next-app@latest
Running the above command will start the interactive project setup process. You can start the project with TypeScript and ESLint during the project setup process, as shown below.
After you’ve created the project, you can open it in your preferred IDE and run it with the command below.
npm run dev
Basic Project Structure
The project’s basic folder structure would initially look something like this.
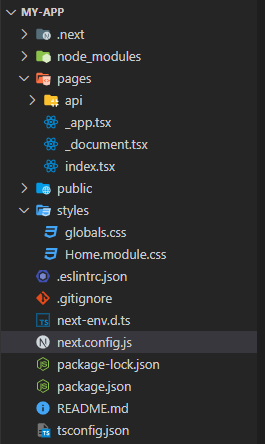
Let’s look at some of the crucial files and directories:
.next
This folder contains all the build content and will be required when you deploy your application to the server.
pages
Your application’s pages should be placed in the pages directory. During the build step, each file in the pages directory will be code split into its JavaScript bundle. If you open the index.tsx file in the pages directory, you'll see the code for the application's initial page.
Note: Components that are not pages should not be included in the pages directory; instead, they should be placed in a separate folder because a route will be created for each and every file in the pagesdirectory.
api
API routing takes place in the api folder within the pages directory. Any file in the api folder is mapped to /api/* and is treated as an API endpoint rather than a page. They are server-side-only bundles that will not increase the size of your client-side bundle. You can use this to build APIs with Next.js. But if you already have an API, you don't need to use it.
_app.tsx
During each page initialization, the _app.tsx file is called. This is used to override the global App component so that you can implement custom logic such as persisting state, global layouts, and nested routes. You can also add global CSS by importing a CSS file to the _app.tsx and do custom error handling using React Error Boundaries.
styles
You can place all of your style-related files in this directory. Initially, there will be two files inside there: global.css and Home.module.css. The global.css file contains the global styles that are imported into the _app file. The Home.module.css file contains the styles that are imported to the index.tsx file. It is a CSS module file used in Next.js for component-level styling. These CSS modules scope CSS locally by generating a unique class name. So, if you're using CSS modules, you can use the same class name in multiple files without conflicts.
next.config.tsx
You can easily define a custom build directory, extend Next.js’s features, add environment variables, and do many other customizations using the next.config.tsx file. Furthermore, as of Next.js 12.1.0, you can also use an async function. Below is an example of redirects using next.config.tsx.
module.exports = {
  redirects: async () => {
    return [
      { source: '/info', destination: '/custom-info', permanent: true, },
    ]
  },
}
middleware
Next.js introduces middleware to do redirects, rewrites, and modify request or response headers from version 12. You can also create a middleware.ts file at the same level as the pages directory.
layout
The layout component is not initially present, but it is something you should add. This component will contain components that are frequently reused between pages, such as the navigation bar and footer. Because the layout is not a page, it should be placed in a separate directory, preferably the component directory containing all non-page components. An example layout component is shown below.
type LayoutProps = {
 children: React.ReactNode,
};

const Layout = ({ children }: LayoutProps) => {
  return (
     <Container>
       <Header />
       <Navbar />
       <main> {children} </main>
       <Footer />
     </Container>
  );
}

export default Layout
Image Component
The built-in Image component in Next.js enables optimized image rendering in your applications. It is an enhancement to the HTML <img> element. To use this Image component for image rendering, you can provide a local image or a remote image URL string for the src prop. Consider the following example to understand how to use the Image component for local images.
import Image from 'next/image'
import userImage from '../public/user.png'

const Home = () => {
  return (
    <Image
      src={userImage}
      alt="image alt"
      width={500} //automatically provided
      height={500} //automatically provided
      placeholder="blur" //Optional blur-up while loading
    />
  )
}
Basic Operations
Now, let’s take a look at how Next.js handles basic operations such as routing and data fetching.
Routing
In Next.js, routing is linked to the file path of pages. For example, if you add a file called home.tsx to the pages directory, it will have the /home route. The files named index.tsx will be routed to the directory's root. A nested folder structure can be used to create nested routes. For instance, pages/service/category.tsx will have the routing /service/category.
Dynamic Routing
Next.js allows you to define dynamic routes by adding square brackets to a page (i.e: [parameter]). For example, the path pages/user/[id].tsx will match any route, such as /user/1, /user/abc, and so on. The matched path parameter is sent to the page component as a query parameter. Look at the code example below to understand how you can access the query parameter.
import { useRouter } from 'next/router'

const User = () => {
  router = useRouter()
  const { id } = router.query

  return <p> UserId: {id} </p>
}

export default User
Data Fetching
Data fetching in Next.js can be classified into four types.
Client-side rendering (CSR) is the standard data fetching performed with the useEffect hook in React. Next.js has a dedicated React hook library called SWR for client-side data fetching. The useSWR hook is the recommended method for fetching client-side data in Next.js.
Server-side rendering (SSR) is the data fetching that occurs on the server-side before loading a page. Server-side data fetching is accomplished by exporting getServerSideProps() function from a page. Therefore, You should only use getServerSideProps() if you need to render a page in which data must be fetched at the requested time.
Static Site Generation (SSG) is the data fetching that occurs on the server side at the build time of a page. It is accomplished by exporting getStaticProps() function from a page. If the page must be pre-rendered or data is retrieved from a headless CMS, SSG should be used.
Incremental Static Regeneration (ISR) allows you to create or update static pages after you’ve built your site. You can basically do static generation on a per-page basis without having to rebuild the entire site. ISR can be accomplished by adding the revalidate prop to the getStaticProps() function.
However, with Next.js 13, you can now get the benefits of SSR, SSG, and ISR via the native fetch API. You can learn more about the new Next.js 13 enhancements from here.
Conclusion
I have discussed in this article why you should use Next.js and the framework’s fundamentals. I hope this will help you quickly become acquainted with Next.js and develop excellent applications. Thank you for reading, and happy coding.
Build composable React Apps with Bit
Don’t build web monoliths. Use Bit to create and compose decoupled software components — in your favorite frameworks like React or Node. Build scalable and modular applications with a powerful and enjoyable dev experience.
Bring your team to Bit Cloud to host and collaborate on components together, and speed up, scale, and standardize development as a team. Try composable frontends with a Design System or Micro Frontends, or explore the composable backend with serverside components.

Learn More
- How We Build Micro Frontends
- How we Build a Component Design System
- The Composable Enterprise: A Guide
- 7 Tools for Faster Frontend Development in 2022
Fundamentals of Next.js for React Developers was originally published in Bits and Pieces on Medium, where people are continuing the conversation by highlighting and responding to this story.
This content originally appeared on Bits and Pieces - Medium and was authored by Manusha Chethiyawardhana
Manusha Chethiyawardhana | Sciencx (2023-02-14T07:32:34+00:00) Fundamentals of Next.js for React Developers. Retrieved from https://www.scien.cx/2023/02/14/fundamentals-of-next-js-for-react-developers/
Please log in to upload a file.
There are no updates yet.
Click the Upload button above to add an update.