
This content originally appeared on Level Up Coding - Medium and was authored by Karishma Agrawal
This year for the very first time I was making a test release on the Google play console. And when I was going through the process of understanding how to do it. It was very confusing to understand how to do it. So much back and forth to understand the app signing key. So here in this article, I am gonna write it in very simple language to help folks like me. Help them make their first release.
We will just cover very basic things and not go in very deep about what is best for the app.
So as we all know mostly we have separate env for development, testing, and release. You can just have 2 as well one for development and one for release according to your need. Now for diff env, you will have diff build flavors as well. Release flavor will be prod debug and prod release. Debug build variant is for debugging and testing, release is just for releasing. You will not be able to see any logs here. For generating a release build you need a singing key.
How to Sign your app:
Android requires that all APKs be digitally signed with a certificate before they are installed on a device or updated. When releasing using Android App Bundles, you need to sign your app bundle with an upload key before uploading it to the Play Console and Play App Signing takes care of the rest. For apps distributing using APKs on the Play Store or on other stores, you must manually sign your APKs for upload.
Step 1: Click on Build -> Generate Signed Bundle/APK
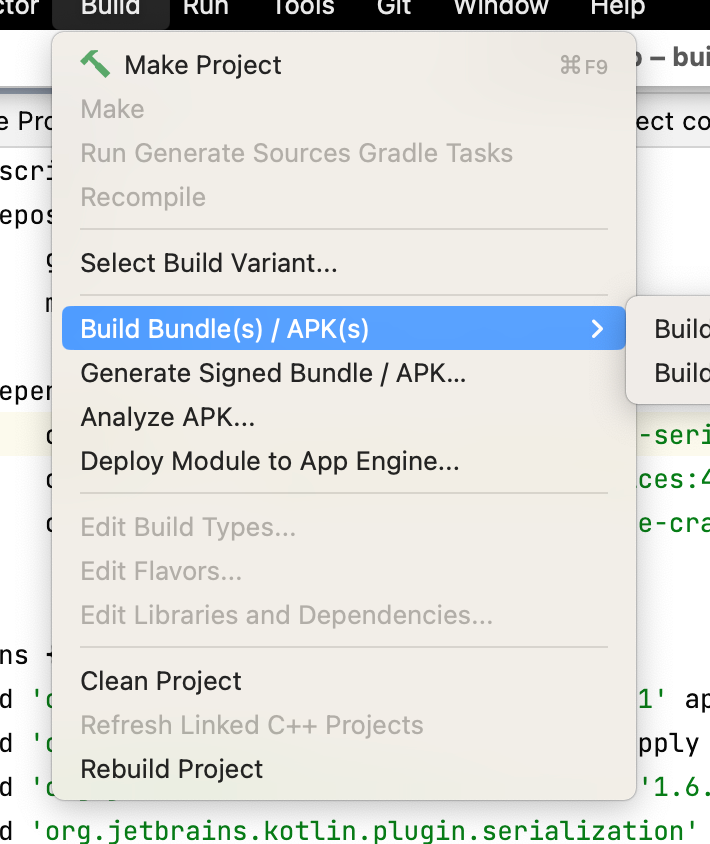
After clicking on Generate Signed Bundle You will see a window like below.
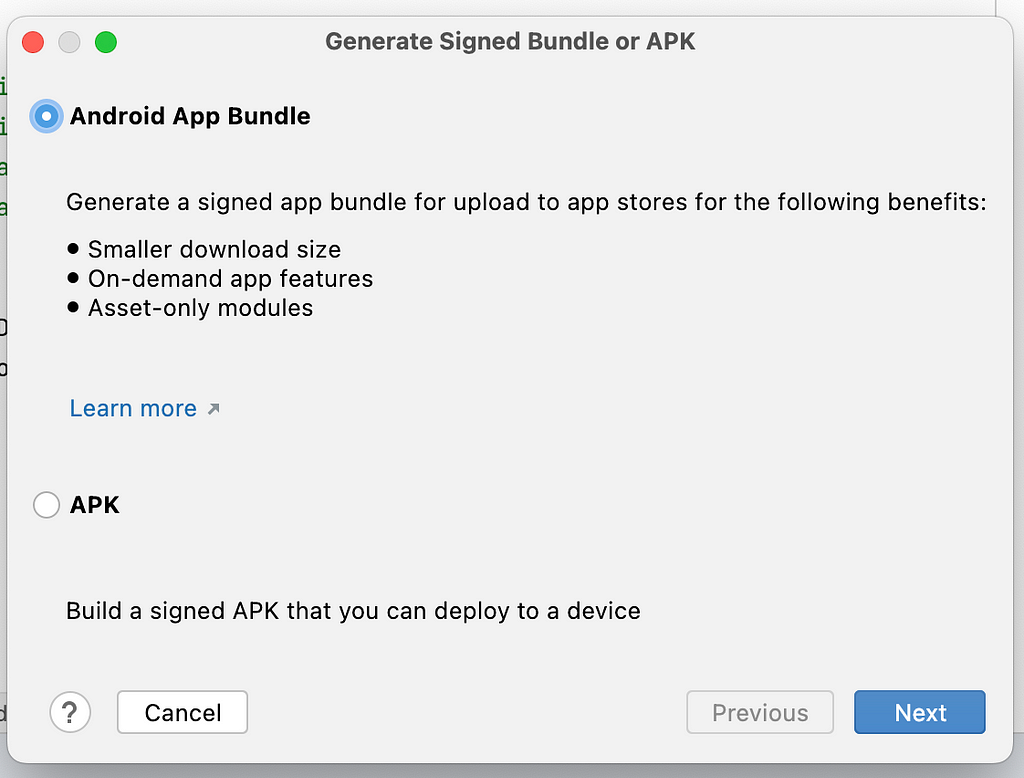
Here you can choose any option from the bundle or APK. Recommended is bundle because it reduces download size and app modularization is managed by it and many more.
Click next.
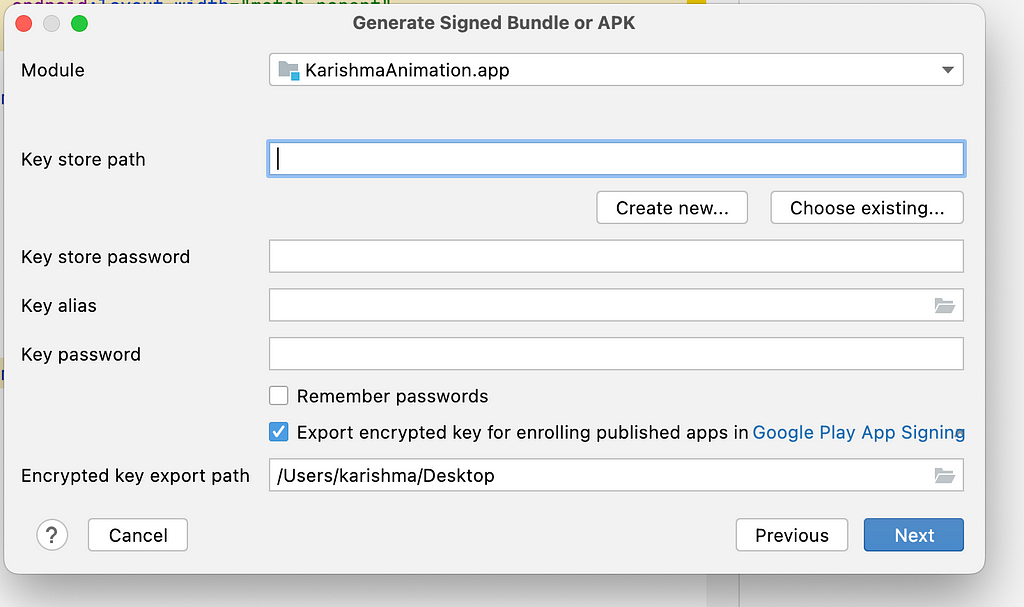
Here you need to add keystore path if not already generated. Click on Create New.
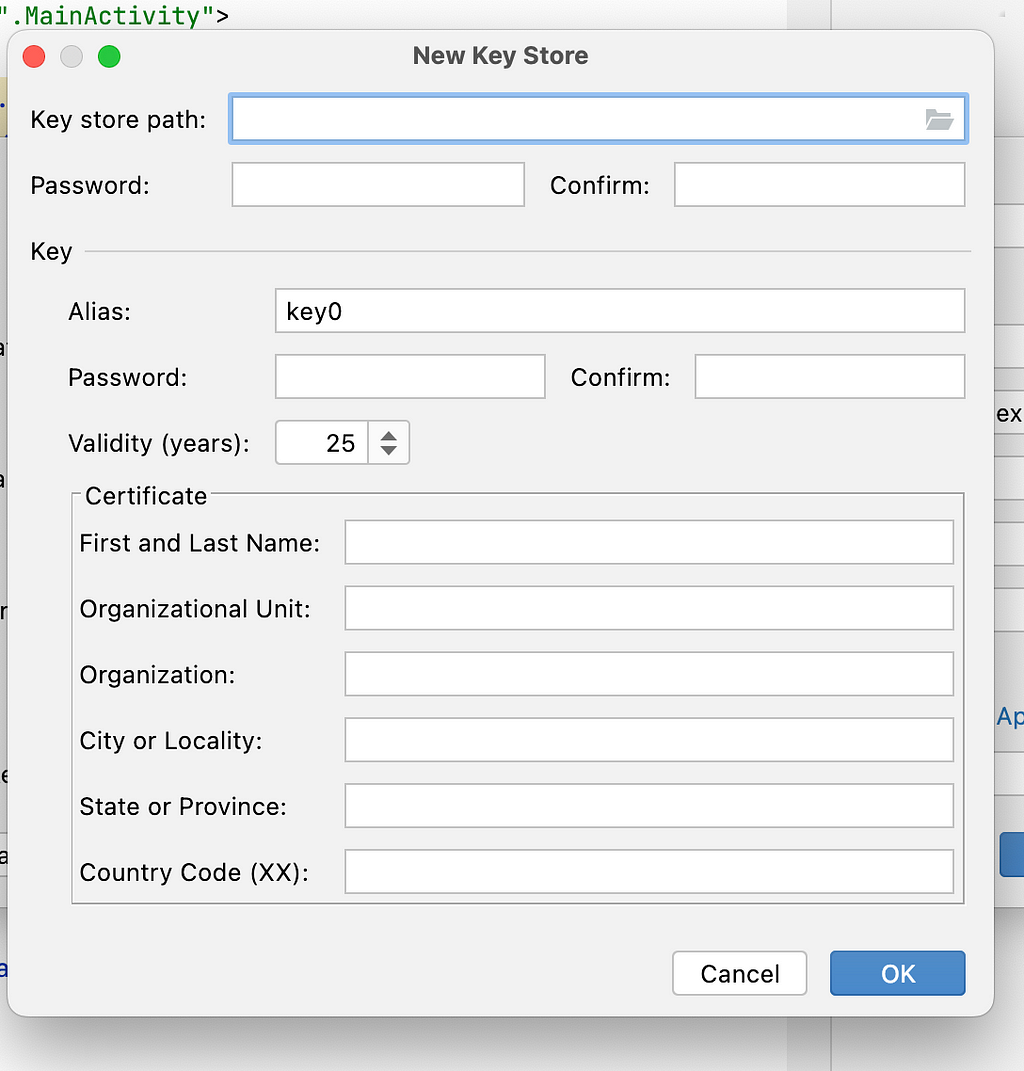
KeyStorePath : Add any path where you want to save your generated keystore file. and then file name should end with .jks file extension.
for example, your path is /user/download/upload_keystore.jks
Password: Add password, use a Random password generated which is not easy to crack. Also spaces and special characters are not allowed so use alphaNumerical char.
Alias : Use any key name
Password: Add one more password for the alias key. This should be the same as your keystore password.
Certificate : Add certificate details, If you are creating an app at the organization level, add organization details here else you can add personal work details too. Click ok after adding all the details.
Note: On Click OK if you see any error try changing the password or keystore file name. It will fix the issue.
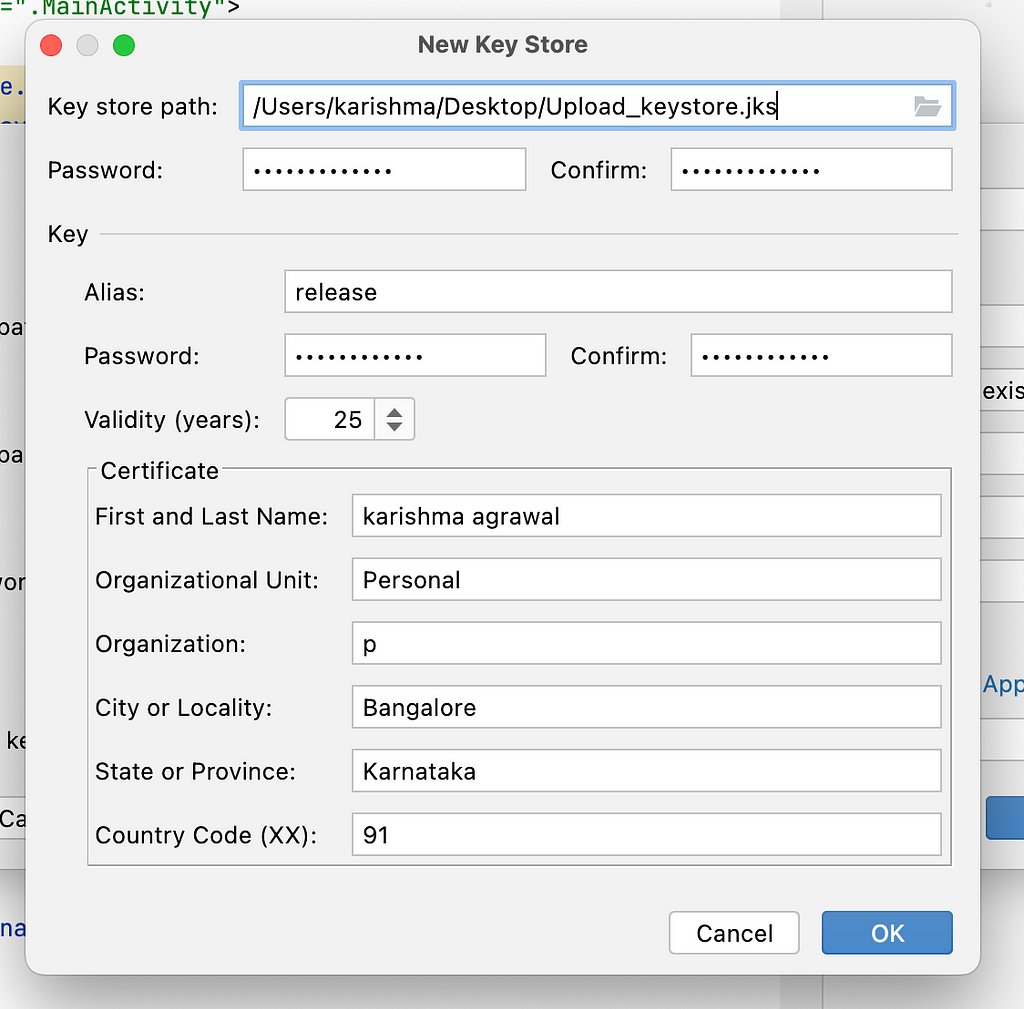
Once all the details are added, you will see prev window prefilled.
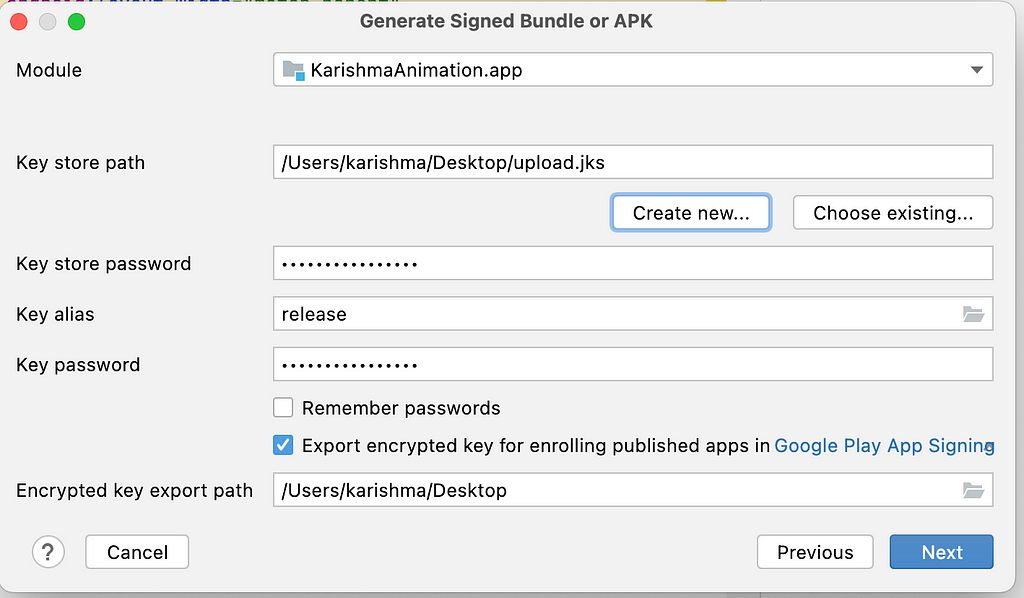
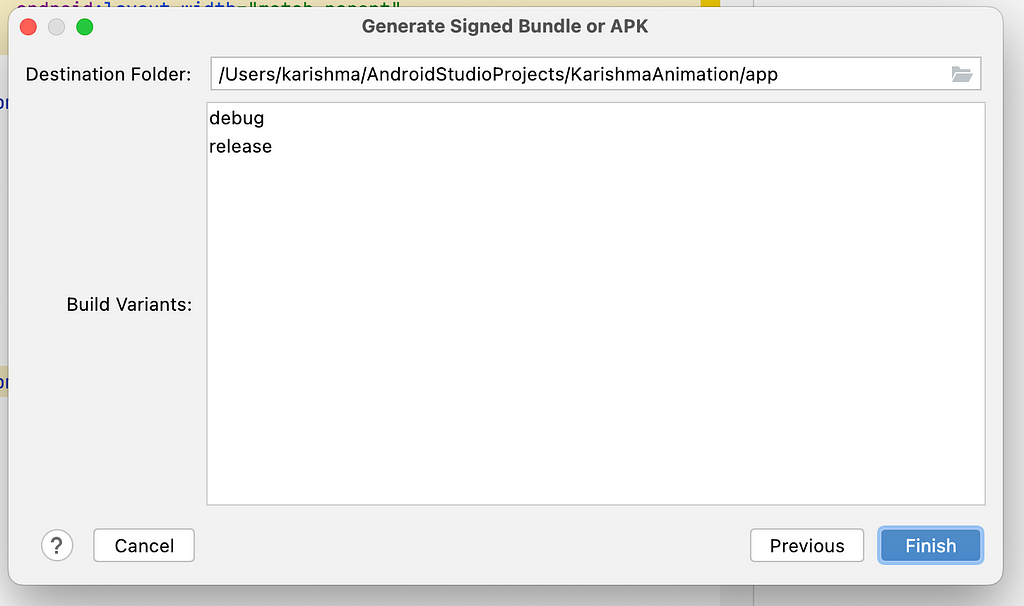
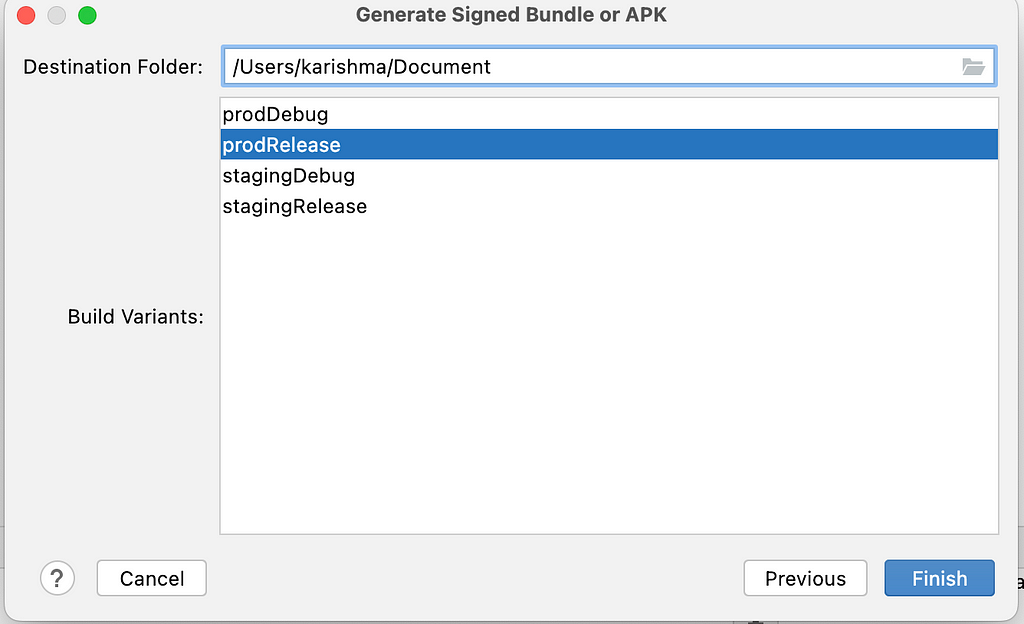
Click next. Select build Variant and click Finish.
After finish, you will see upload.jks file in the defined keystore path.
Release on Playstore
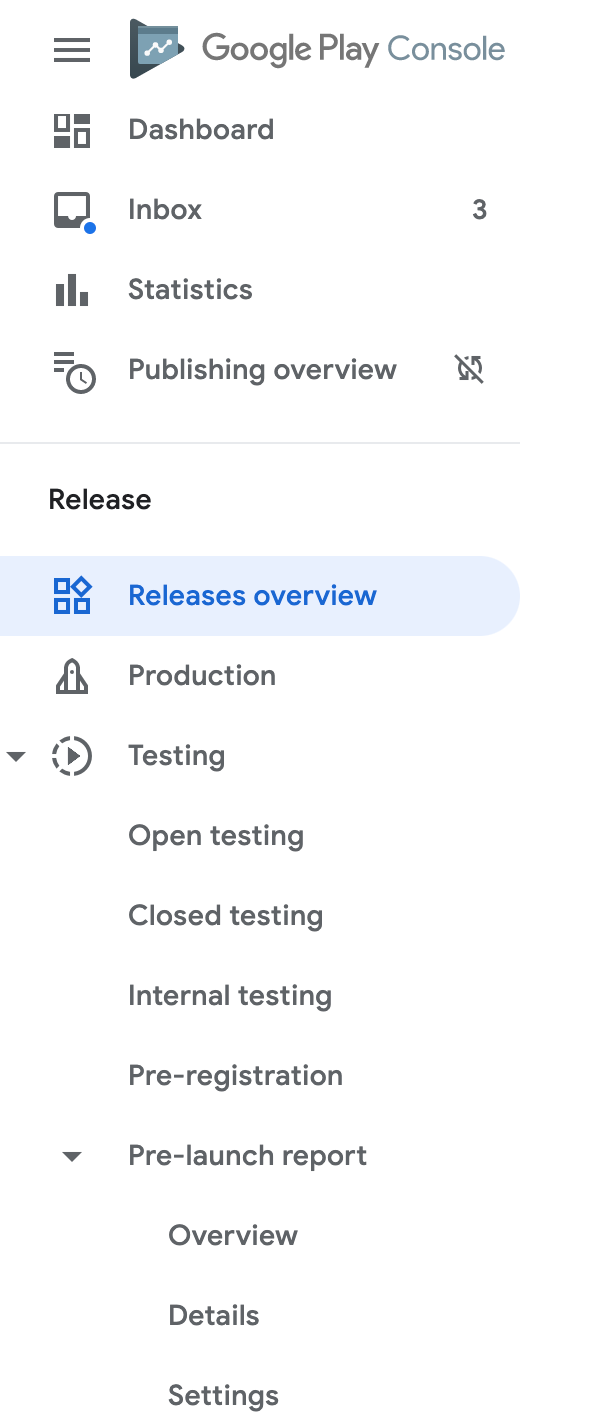
Difference between an internal, closed, and open test?
You can create releases on three testing tracks before you release your app to production. Each phase of testing helps you gather the feedback you need to make improvements to your app throughout its development.
Internal testing: Create an internal testing release to quickly distribute your app to up to 100 testers for initial quality assurance checks.
Closed testing: Create a closed testing release to test pre-release versions of your app with a wider set of testers to gather more targeted feedback.
If you’re testing an existing app that you’ve published before, only users in your test group will receive an update for your closed version.
Open testing: Create an open testing release to run a test with a large group and surface your app’s test version on Google Play. If you run an open test, anyone can join your testing program and submit private feedback to you. Before choosing this option, make sure your app and store listing is ready to be visible on Google Play.
Now because we are releasing it for the first time, Let’s do it on Internal testing.
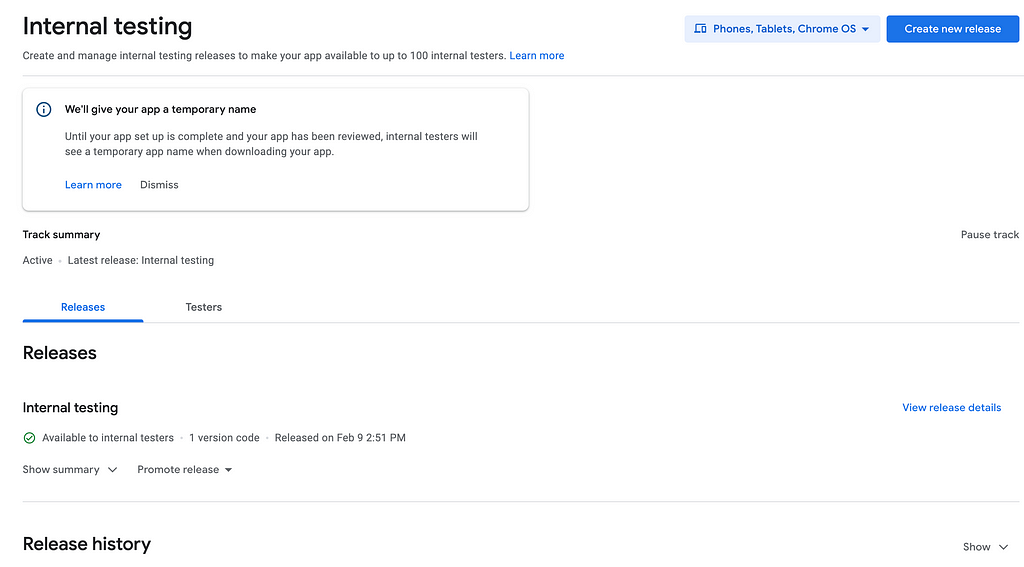
Click on create a new release.
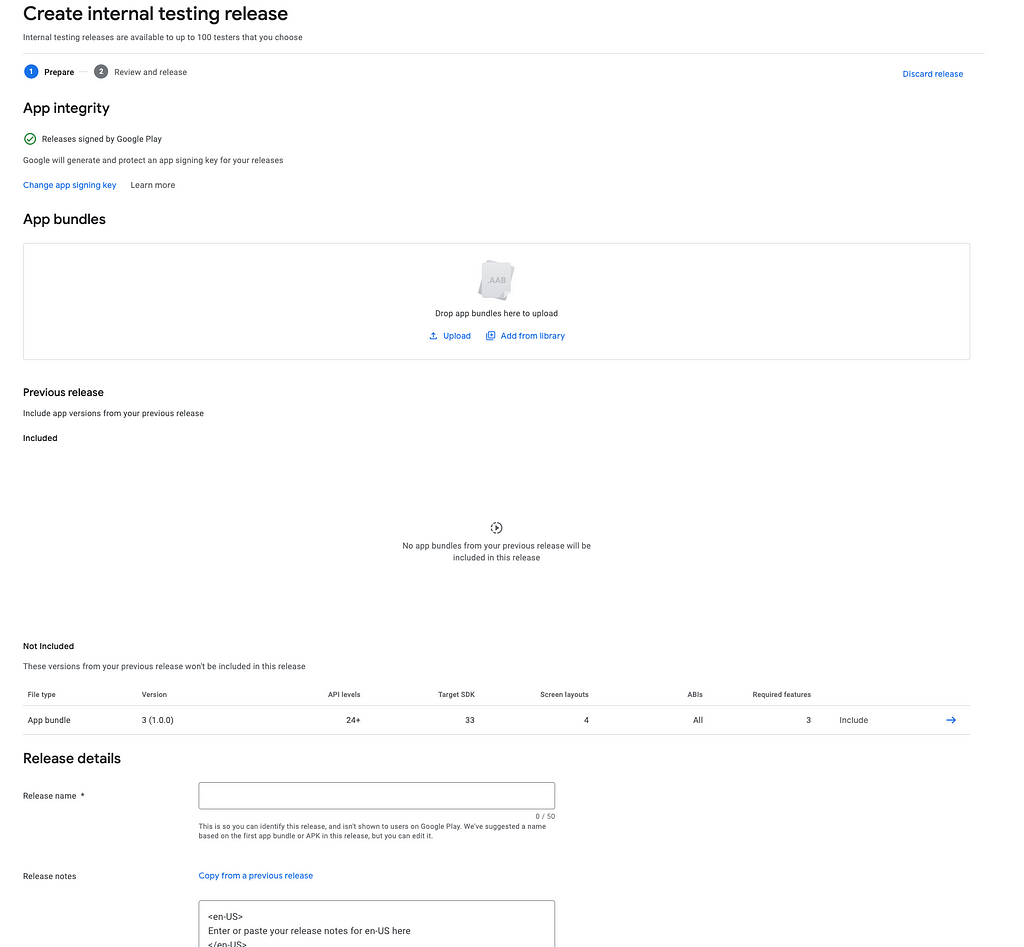
Now add app signing key and then upload build. Don’t upload build first and then add signing key else you will see error.
Step 1: Click on Change App Signing Key.
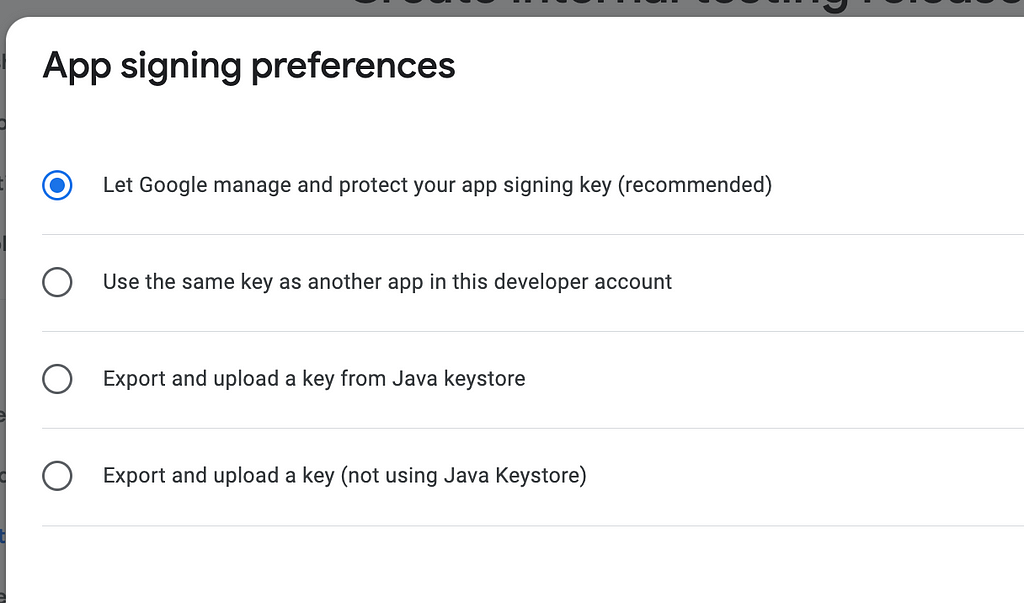
- Use a Google-generated app signing key: More than 90% of new apps use Google-generated app signing keys. Using a Google-generated key protects against loss or compromise (the key is not downloadable). If you choose this option, you can download distribution APKs from the App bundle explorer signed with the Google-generated key for other distribution channels, or use a different key for them.
In this option just click and save and move on to next step. - Use other : You can also use uploaded keystore file which you generated from android studio.
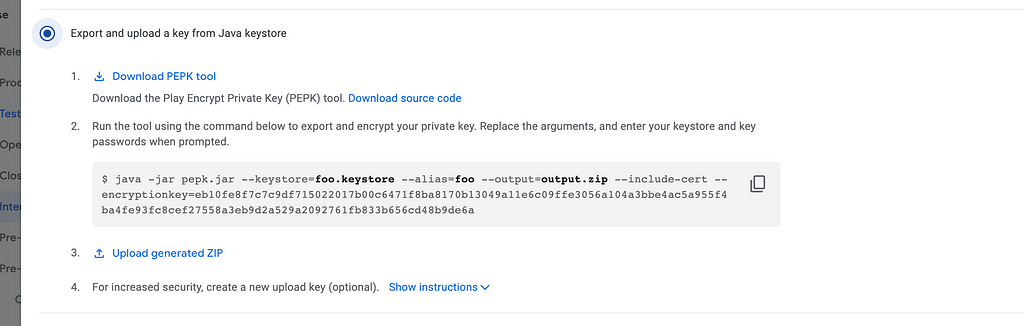
Export and upload a key from Java keystore :
- Download peek tool
- Run the given command to encrypt your private key.
$ java -jar pepk.jar --keystore=foo.keystore
--alias=foo --output=output.zip
--include-cert
--encryptionkey=eb10fe8f7c7c9df715022017b00c6471f8ba8170b13049a11e6c09ffe3056a104a3bbe4ac5a955f4ba4fe93fc8cef27558a3eb9d2a529a2092761fb833b656cd48b9de6a
add peek.jar file path, if it's in the download folder add the path to this peek file. Same for upload keystore file. Replace foo.keysore file with .jks file path. use encryptionkey same as given in console. Add alias name which you created while generating upload keystore.
Run this command. And it will generate output.zip file.
NOTE : Sometimes while running the command you see an error like below
Exception in thread "main" java.lang.UnsupportedClassVersionError: com/google/wireless/android/vending/developer/signing/tools/extern/export/ExportEncryptedPrivateKeyTool has been compiled by a more recent version of the Java Runtime (class file version 55.0), this version of the Java Runtime only recognizes class file versions up to 52.0
 at java.lang.ClassLoader.defineClass1(Native Method)
 at java.lang.ClassLoader.defineClass(ClassLoader.java:756)
 at java.security.SecureClassLoader.defineClass(SecureClassLoader.java:142)
 at java.net.URLClassLoader.defineClass(URLClassLoader.java:473)
 at java.net.URLClassLoader.access$100(URLClassLoader.java:74)
 at java.net.URLClassLoader$1.run(URLClassLoader.java:369)
 at java.net.URLClassLoader$1.run(URLClassLoader.java:363)
 at java.security.AccessController.doPrivileged(Native Method)
 at java.net.URLClassLoader.findClass(URLClassLoader.java:362)
 at java.lang.ClassLoader.loadClass(ClassLoader.java:418)
 at sun.misc.Launcher$AppClassLoader.loadClass(Launcher.java:355)
 at java.lang.ClassLoader.loadClass(ClassLoader.java:351)
 at sun.launcher.LauncherHelper.checkAndLoadMain(LauncherHelper.java:620)
This error can be because your java version is not matching somewhere just match and things will work. When i was implementing i was using JDK 11 which worked.
If you have any older version use below steps to fix error :
brew uninstall java
brew install openjdk@11
sudo ln -sfn /opt/homebrew/opt/openjdk@11/libexec/openjdk.jdk \
     /Library/Java/JavaVirtualMachines/openjdk-11.jdk
java -version
Step 2: Generate bundle and upload
Click on Bundle -> Generate Signed Bundle or APK

click next -> next.
Click Finish.
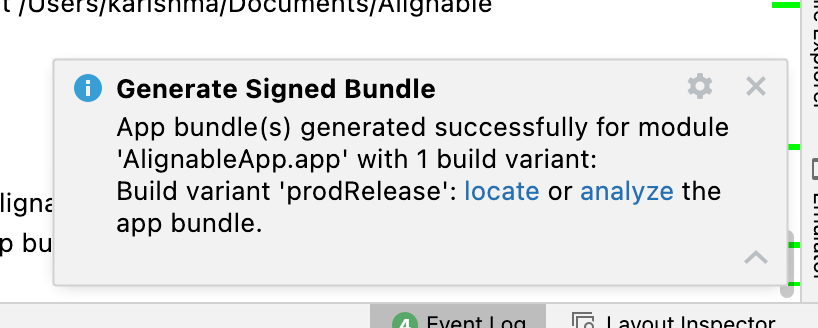
Locate the bundle and upload on Playstore.
Step 3: Add Release Name
Step 4: Add Release Notes
Now after all the details are done click next.
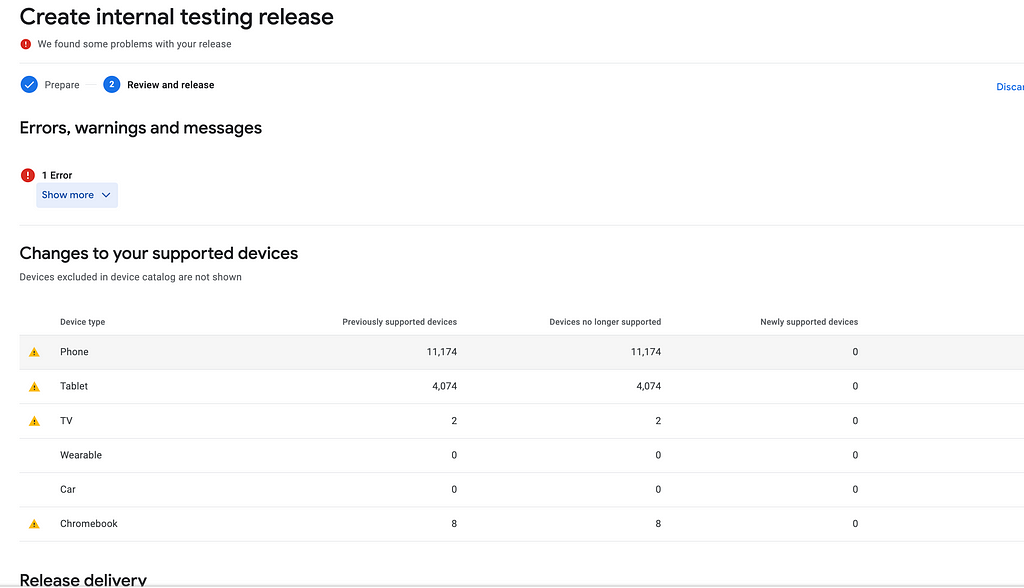
On the next page, you will see an error or warning which is there in your app. Once all of those are resolved. Your app will be ready for rollout. Playstore will take a few hours to 7 days to review and approve. Once that is done it will be distributed to the users you have added.
You can add testers in the testers tab. These will be the user who will receive notifications to test the app.
Update your app bundle
To update your app after you upload it to the Play Console, you need to increase the version code included in the base module, then build and upload a new app bundle. Google Play then generates updated APKs with new version codes and serves them to users as needed.
Sometimes you just discard any release and try to make a new release, then also it shows an error saying to change the version code. In that case, you can delete the app bundle from App Bundle explorer. Then you can use the same version code as before.
References
- Prepare your app for release | Android Developers
- Opting in Existing Apps to Google Play App Signing
- Use Play App Signing
- Prepare and roll out a release
Conclusion
The internal testing release is important before we do the production release. So other users have more bug-free and feature-ready apps.
Hope this article was helpful to you.
If you have any feedback or queries please write me back at karishma.agr1996@gmail.com. Or you can reach me on my Linkedin https://www.linkedin.com/in/karishma-agrawal-she-her-06966a126/
Your claps are really appreciated to help others find this article 😃 .

Release your build on the Google play store for Internal testing was originally published in Level Up Coding on Medium, where people are continuing the conversation by highlighting and responding to this story.
This content originally appeared on Level Up Coding - Medium and was authored by Karishma Agrawal
Karishma Agrawal | Sciencx (2023-02-21T16:19:17+00:00) Release your build on the Google play store for Internal testing. Retrieved from https://www.scien.cx/2023/02/21/release-your-build-on-the-google-play-store-for-internal-testing/
Please log in to upload a file.
There are no updates yet.
Click the Upload button above to add an update.