
This content originally appeared on Bits and Pieces - Medium and was authored by Ashan Fernando
Building scalable, maintainable, reusable and autonomous web applications

Modern web application architectures are built with loosely coupled components. It helps to keep the architecture lean and flexible. However, we still have to deal with existing applications that are yet to adopt these architectural styles.
This article will take you through transitioning a full-stack web application into independent component architecture as follows.
Let’s first look at the application we will transition into independent components. You can find the code of the application here.
Demo Application Structure
We will use a full-stack hello-world application built with React.js and Express.js. The frontend will be deployed to Netlify while the API is hosted in a cloud virtual machine.
- web // react.js
  - src
    - app.tsx
    - index.tsx
    - pages
      - landing-page
    - hooks
      - use-hello-world
    - ui
      - button
      - heading
- api // express.js
  - src
    - app.ts
    - index.ts
    - routes
      - hello
- .github
  - workflows
    - main.yml
- netlify.toml
- _redirects
Running Locally
You can start by cloning the Git repository to your machine and checkout to the branch which contains the code prior to the componentization.
git clone https://github.com/bitdev-community/hello-world
git checkout pre-bit
To run the React App
cd web
npm run start
To run the Express API
cd api
npm run start
Deploying to Cloud
Following are the configuration to deploy the React app to Netlify and the Express API to a remote server using SSH.
- Netlify Configuration: netlify.toml
- Deploy via SSH using GitHub Workflow: .github/workflows/main.yml
Moving into Independent Components
For an existing application to transition into independent component architecture, it takes time to complete. And it’s never a big-bang transition. We need to plan step by step to identify loosely coupled areas in the code and move them into independent components while keeping the whole application running.
Since we are using Bit as the platform for the transition, we can first start by creating a Bit workspace inside the existing code. Refer to the article How to Integrate Bit into your Existing Project: The Basics for more details.
Step 1: Initializing the Bit Workspace
The first step would be to create a Bit workspace inside the existing application code.
bit init
This will create the workspace.json for workspace configuration and .bitmap file that lists the independent components in your project. To learn more, refer the official docs.
This step is backwards compatible, keeping your current application functioning as usual. You can find the code after initializing the workspace here.
Step 2: Decide on the Component Structure
There are a few concepts you need to understand first before the transition.
Scopes: With Bit, we can create a remote component collection called scope. These scopes have independent access control capabilities, perfect for code governance. For example, we can create a design scope with all the design system-related components owned by the design team.
Envs: In addition to the scope, we also need to create a unique component named Env which acts as the environment for your frontend and backend components. The Envs can compile, build and deploy your applications.
Apps: The app component is the runtime component of your app which gets deployed (other components are used as dependencies). Bit Team has provided different app components, including React.js, Node.js etc. We can also find App Deployers designed to deploy the apps.
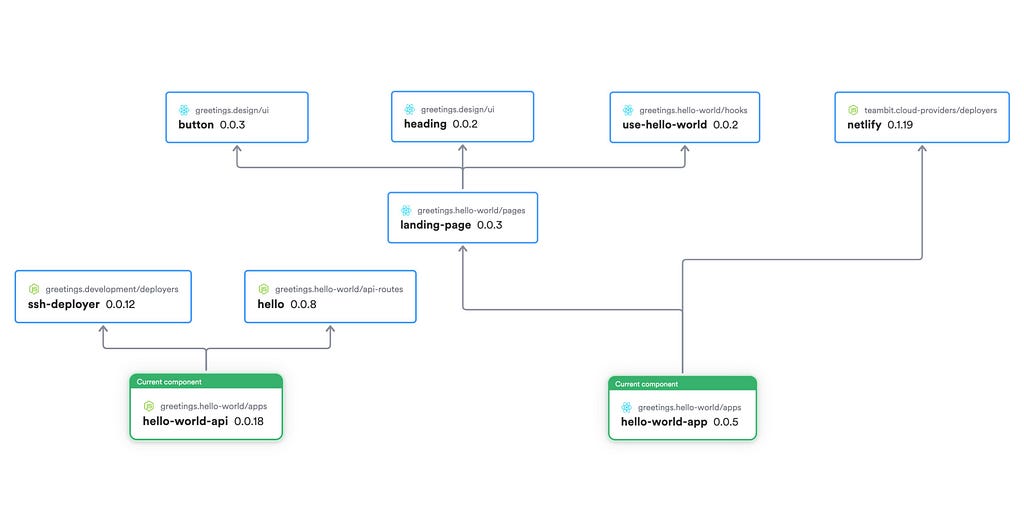
Let’s look at the independent component structure after the transition in advance. The following list contains the Bit component ids.
// Env Components
greetings.development/envs/react-env
greetings.development/envs/node-env
greetings.development/app-types/node-app-type // Node App type with bundling support

// React Frontend Components
greetings.hello-world/hooks/use-hello-world
greetings.hello-world/pages/landing-page
greetings.hello-world/apps/hello-world-app // React App component
greetings.development/deployers/ssh-deployer // React App deployer component

// Design System Components
greetings.design/button
greetings.design/heading

// Express Components
greetings.hello-world/api-routes/hello
greetings.hello-world/apps/hello-world-api // Express app component
You can find the final code after the transition here. You can also find the independent components hosted in the remote scopes here.
After deciding on the component structure, we need to create the two env components for React and Node.
Step 3: Creating Env Components
This is fairly straightforward since there are React and Node Envs, which we can customize based on usage. These Envs will act as component development environments for React and Node components later.
React Env
Let’s start by creating a React Env by running the below command.
bit create react-env envs/react-env --aspect teambit.react/react-env
Node Env
Similarly, we can create the Node Env for the express components.
bit create node-env envs/node-env --aspect teambit.harmony/node
Then we can choose components from the existing code base for the transition starting from the ones with the least dependencies.
Step 4: Track Directories as Bit Components
We can start with the button and the heading components as the first step since they don’t have any dependencies.
Let’s start by moving these components into a new directory structure, taking them out from the React source code into the root folder.
/ui/button
/ui/heading
Note: We’ve created a separate scope named design for these two components and ui as the namespace.
After running the below commands, they will be tracked as Bit components.
bit add /ui/button -n ui -s greetings.design
bit add /ui/heading -n ui -s greetings.design
Similarly we can move the landing-page , use-hello-world hook, hello api route, into the root directory and track them as Bit components.
After tracking them with Bit, run the following to replace the relative paths with the absolute paths of the independent components.
bit link --rewire
Step 5: Configuring Envs for Components
Now we are going to use the two Envs we created before. We can configure React Env for the UI components using the following commands.
bit envs set "greetings.design/ui/*" greetings.development/envs/react-env
Similarly you can configure it for the other components and use Node Env for the API components.
Step 6: Creating a Node App Type
In Bit, each application uses an app type. For example, React App uses react-18-app app type, which is the default used by React Env.
Similarly, there is a default app type for Node.js as well. However, we decided to bundle the Express API, which required creating a custom app type. You can find the custom app type component in the development scope.
Inside the app type we used ESBuild to bundle the Express API and passed the following variables for the DeployContext used by the deployer.
  await esbuild.build({
      entryPoints: [mainFile],
      bundle: true,
      platform: 'node',
      outfile: buildPath,
    }).catch((error) => {
      logger.consoleFailure(`node app bundling failed with the following error: ${error}`);
    });

const _context = Object.assign(context, { mainFile, buildPath, logger });- mainFile — Entry point for the build
- buildPath — Output directory inside the Bit capsule for the bundle.
- logger — Instance of the logger.
After creating the app type, we need to register it in our Node Env as follows.
import { NodeAppType } from '@greetings/development.app-types.node-app-type';

export class MyNodeEnv extends NodeEnv {
  /* shorthand name for the environment */
  name = 'my-node-env';

  /* register the new app  */
  apps(): EnvHandler<AppTypeList> {
    return AppTypeList.from([NodeAppType.from({})]);
  }
}
Note: Typically, you don’t need to create a custom app type. You can use an existing app type developed by the Bit Team or one like this.
Step 7: Creating the App Components
Each components needs to have its own directory with Bit. Same goes to the app component. Therefore, instead of moving the App code into the root, let’s create two new App components for React and Express.
bit create react-app apps/hello-world-app --aspect teambit.react/react-env
bit create express-app apps/hello-world-api
Note: You can also configure the React and Node Envs accordingly for these two app components.
After creating them, you can test them by using the below commands. It will start development servers for you to test the apps.
bit run hello-world-app
bit run hello-world-api
Then you need to wire the relevant components into these apps for complete functionality. You may need to update the API URL in the use-hello-world hook to pointing to the dev API server for it to work.
Note: Rename hello-world-api.node-app.cjs to hello-world-api.node-bundled-app.cjs to use the custom app type.
Managing CI/CD
Each Bit component has its own build pipeline. This usually works well as an addition to your project’s build.
However, when dealing with app components, the build pipelines for the components also include app build and app deployment. In these cases, it’s important to remove the equivalent build steps from your projects CI/CD.
Step 8: Configuring the Deployers
After creating the Apps, we need to use a deployer to deploy them.
Deploying React App: Netlify Deployer
For the React App, we can use the Netlify Deployer provided by the Bit team. You can install it by using the below command.
bit install @teambit/cloud-providers.deployers.netlify
Then configure the React App component to use the deployer.
/* @filename: hello-world-app.react-18-app.cjs */
const { Netlify } = require('@teambit/cloud-providers.deployers.netlify');

const netlifyConfig = {
  team: 'teambit',
  accessToken: process.env.NETLIFY_AUTH_TOKEN,
  productionSiteName: 'hello-world',
  stagingSiteName: 'hello-world-staging',
  skipLaneDeployments: false,
  useDefaultRedirectsForSPA: true,
};

module.exports.default = {
  name: 'hello-world-app',
  entry: [require.resolve('./hello-world-app.app-root')],
  deploy: Netlify.deploy(netlifyConfig),
};
For more information on using the Netlify deployer, refer to the article Deploying a Composable React App to Netlify.
Deploying Express API: Custom SSH Deployer
We created a custom SSH Deployer for the Express API to publish the Node bundle to a cloud virtual machine. It is tracked as a component named greetings.development/deployers/ssh-deployer in the development scope.
Then configure the Express API app component to use the SSH Deployer.
const { Ssh } = require('@greetings/development.deployers.ssh-deployer');

const config = {
  host: process.env.SSH_SERVER_HOST_IP,
  username: process.env.SSH_SERVER_USERNAME,
  cwd: './api',
  privateKeyPath: process.env.SSH_PRIVATE_KEY_PATH,
  runCommand: "cd api && forever stopall && nohup forever app.cjs  &> /dev/null &'"
};

/** @type {import("@greetings/hello-world.apps.node-app-type").NodeAppOptions} */
module.exports.default = {
  name: 'hello-world-api',
  entry: require.resolve('./hello-world-api.app-root'),
  deploy: Ssh.deploy(config),
  portRange: [3000, 4000],
};Tip: Use environment variables for the deployer parameters to avoid tracking them with code and make it easy to use across multiple stages.
Step 9: Tag and Export Components
First, we need to create an organization in Bit cloud to host all our components and their versions. We have created one namedgreetings. You can find it here.
Next, we can tag and export the components using the following commands.
bit tag -m "Initial tagging"
bit export
After exporting, all the components will be tracked in the Bit cloud. In addition to that, the components will be deployed upon tagging.
Summary
After completing the steps, we have successfully componentized the React and Express Apps. Though this is an example, it’s equally applicable to any size project. Yet, the complexity may change as there are many components you need to plan for the transition.
I hope the article will be helpful for you to carry out a phase-wise transition of your application into a component-driven architecture. Thanks for reading. Cheers!
Componentize Your React and Express Apps with Bit: Step by Step Guide was originally published in Bits and Pieces on Medium, where people are continuing the conversation by highlighting and responding to this story.
This content originally appeared on Bits and Pieces - Medium and was authored by Ashan Fernando
Ashan Fernando | Sciencx (2023-05-10T04:31:36+00:00) Componentize Your React and Express Apps with Bit: Step by Step Guide. Retrieved from https://www.scien.cx/2023/05/10/componentize-your-react-and-express-apps-with-bit-step-by-step-guide/
Please log in to upload a file.
There are no updates yet.
Click the Upload button above to add an update.