
This content originally appeared on Level Up Coding - Medium and was authored by Harish Siva Subramanian

In the world of artificial intelligence, few innovations have captured the imagination of researchers and creators like Generative Adversarial Networks (GANs). Introduced by Ian Goodfellow in 2014, GANs have revolutionized the way machines generate data, from hyper-realistic images to synthetic music and even deepfake videos. At their core, GANs are a fascinating interplay between two neural networks — a generator and a discriminator — competing to outsmart each other in a game-theoretic dance.
If you’ve ever wondered how AI can create lifelike art or transform simple sketches into photorealistic landscapes, you’re witnessing the power of GANs. In this blog, we’ll demystify the magic behind GANs and guide you through their implementation using PyTorch, one of the most popular deep learning frameworks. Whether you’re an AI enthusiast or a budding developer, this step-by-step journey will equip you with the knowledge to start building your own generative models.
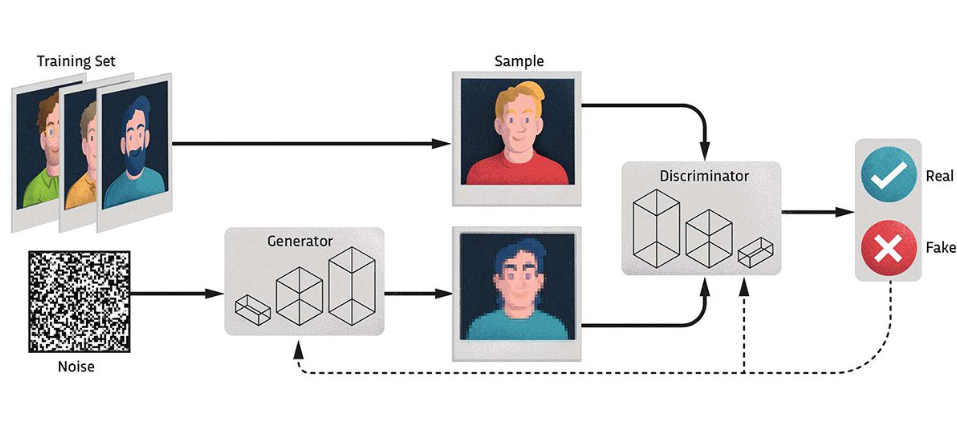
GANs consist of two neural networks: a Generator and a Discriminator, working in tandem in a game-theoretic setting.
- Generator: Creates synthetic data from random noise. It learns to mimic the real data distribution.
- Discriminator: Acts as a critic, distinguishing between real data (from the training set) and fake data (produced by the Generator).
These two networks compete:
- The Generator improves to produce data that looks more real.
- The Discriminator sharpens its ability to differentiate between real and fake.
This adversarial process pushes both networks to improve iteratively, resulting in a Generator that produces highly realistic outputs.
Let’s see how this works with human faces.
- Dataset:
You need a dataset of human faces, such as the CelebA dataset, which contains thousands of celebrity faces.
2. Initialization:
- Generator starts by creating random noise (e.g., a vector of random numbers) as its input.
- Discriminator is trained with both real faces (from the dataset) and fake faces (produced by the Generator).
3. Training:
- The Generator creates a face from noise, which is passed to the Discriminator.
- The Discriminator evaluates whether the face is real or fake and provides feedback (a probability score).
- Both networks adjust their parameters:
- The Generator learns to create faces that better fool the Discriminator.
- The Discriminator improves its ability to detect fakes.
4. Adversarial Play:
Over several iterations, the Generator gets better at producing realistic faces, while the Discriminator becomes a tougher critic. This “game” continues until the Generator produces faces indistinguishable from real ones.
The Generator gradually learns the intricate patterns in the dataset, such as:
- Shape: The structure of a human face.
- Details: Eyes, nose, mouth, and other features.
- Texture and Lighting: Skin tone, hair texture, and shadows.
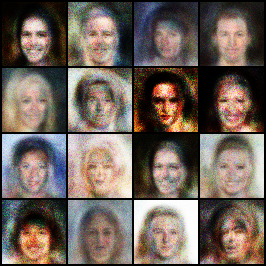
For example, in the early training stages, generated faces might be blurry or have distorted features. As training progresses, the faces become sharper and more realistic, reflecting the diversity and characteristics of the training dataset.
GANs are widely used in applications like:
- Deepfakes: Realistic face swaps.
- Art and Design: Generating artwork or avatars.
- Data Augmentation: Expanding datasets for training other models.
- Restoration: Reconstructing damaged or low-resolution photos.
By training a GAN on a dataset of human faces, you can generate entirely new, photorealistic faces that don’t belong to any real person — a fascinating leap in generative modeling.
First things first, lets create a new environment for the project!
Import the libraries
import torch
from torch.utils.data import Dataset, DataLoader
import torchvision
from torchvision import transforms
from PIL import Image
import os
import torch.nn as nn
import torch.optim as optim
import matplotlib.pyplot as plt
import numpy as np
Then create a Class to load the dataset,
class CelebADataset(Dataset):
    def __init__(self, root_dir, transform=None):
        """
        Args:
            root_dir (string): Directory with all the images.
            transform (callable, optional): Optional transform to be applied on a sample.
        """
        self.root_dir = root_dir
        self.transform = transform

        # Get all image file paths from the directory
        self.image_paths = [os.path.join(root_dir, img) for img in os.listdir(root_dir) if img.endswith('.jpg')]

    def __len__(self):
        return len(self.image_paths)

    def __getitem__(self, idx):
        # Load image
        img_path = self.image_paths[idx]
        image = Image.open(img_path).convert('RGB')

        # Apply the transform if provided
        if self.transform:
            image = self.transform(image)

        return image
This code defines a custom dataset class, CelebADataset, for loading and processing images, particularly useful when working with PyTorch's data loading utilities like DataLoader.
# Define transformations (resize, crop, convert to tensor, normalize)
transform = transforms.Compose([
    transforms.Resize(64),  # Resize images to 64x64
    transforms.CenterCrop(64),  # Crop center to 64x64
    transforms.ToTensor(),  # Convert images to tensor
    transforms.Normalize(mean=[0.5, 0.5, 0.5], std=[0.5, 0.5, 0.5])  # Normalize to [-1, 1]
])

# Load CelebA dataset from the specified directory
dataset_path = r'C:\Users\Harish\Documents\Github\GAN\GAN_Tutorial\img_align_celeba'
dataset = CelebADataset(root_dir=dataset_path, transform=transform)

# Create DataLoader
dataloader = DataLoader(dataset, batch_size=128, shuffle=True)

# Check how many images are loaded
print(f"Total number of images loaded: {len(dataset)}")

The Next step is to create the Generator and the Discriminator,
# Generator and Discriminator classes (same as previously described)
class Generator(nn.Module):
    def __init__(self, z_dim=100, img_channels=3):
        super(Generator, self).__init__()
        self.model = nn.Sequential(
            nn.Linear(z_dim, 256),
            nn.ReLU(True),
            nn.Linear(256, 512),
            nn.ReLU(True),
            nn.Linear(512, 1024),
            nn.ReLU(True),
            nn.Linear(1024, img_channels * 64 * 64),
            nn.Tanh()
        )

    def forward(self, z):
        img = self.model(z)
        img = img.view(img.size(0), 3, 64, 64)  # Reshape to image format
        return img

class Discriminator(nn.Module):
    def __init__(self, img_channels=3):
        super(Discriminator, self).__init__()
        self.model = nn.Sequential(
            nn.Flatten(),
            nn.Linear(img_channels * 64 * 64, 1024),
            nn.LeakyReLU(0.2, inplace=True),
            nn.Linear(1024, 512),
            nn.LeakyReLU(0.2, inplace=True),
            nn.Linear(512, 256),
            nn.LeakyReLU(0.2, inplace=True),
            nn.Linear(256, 1),
            nn.Sigmoid()
        )

    def forward(self, img):
        return self.model(img)
1. Generator Class
The Generator is responsible for creating synthetic data (images in this case) from random noise.
Key Features
- Input: Random noise vector (z) of size z_dim.
- Output: A synthetic image of dimensions (3,64,64)(3, 64, 64)(3,64,64) (3 channels for RGB, and 64x64 pixels).
__init__ Method
Purpose: Define the layers of the Generator model.
nn.Linear(z_dim, 256):
Fully connected layer that maps the noise vector (z_dim) to a hidden space of size 256.
nn.ReLU(True):
Applies the ReLU activation function to introduce non-linearity, allowing the network to model complex patterns.
The parameter True enables in-place operations, saving memory.
nn.Linear(256, 512) → nn.Linear(512, 1024) → nn.Linear(1024, img_channels * 64 * 64):
Additional fully connected layers progressively increase the dimensionality, transforming the noise vector into a higher-dimensional space suitable for image generation.
nn.Tanh():
The final activation function scales the pixel values of the output image to the range [−1,1][-1, 1][−1,1], which is common for normalized image data.
Forward Method
Purpose: Define how the input noise vector is transformed into an image.
img = self.model(z):
Pass the noise vector (z) through the network to get a flattened output representing pixel values.
img = img.view(img.size(0), 3, 64, 64):
Reshape the flat output to the image format (batch_size,3,64,64)(batch\_size, 3, 64, 64)(batch_size,3,64,64).
img.size(0): Refers to the batch size.
3, 64, 64: The desired image dimensions (RGB, 64x64 pixels).
Output
A tensor representing synthetic images.
2. Discriminator Class
The Discriminator distinguishes between real and fake images by outputting a probability (real = 1, fake = 0).
Key Features
- Input: An image tensor of dimensions (3,64,64)(3, 64, 64)(3,64,64).
- Output: A scalar probability value for each image in the batch.
__init__ Method
Purpose: Define the layers of the Discriminator model.
nn.Flatten():
Converts the input image tensor (3,64,64)(3, 64, 64)(3,64,64) into a flat vector of size 3×64×643 \times 64 \times 643×64×64 (12,288 values).
This is necessary for processing by the fully connected layers.
nn.Linear(img_channels * 64 * 64, 1024):
First fully connected layer that reduces the input dimensionality from 12,288 to 1,024.
nn.LeakyReLU(0.2, inplace=True):
LeakyReLU activation function introduces non-linearity, allowing small gradients (via a slope of 0.2) for negative inputs to avoid dying neurons.
In-place operations save memory.
Subsequent Layers:
- 1024→512→256→1\text{1024} \to \text{512} \to \text{256} \to \text{1}1024→512→256→1: Fully connected layers progressively reduce the dimensionality.
- Purpose: Capture hierarchical features to distinguish real from fake.
nn.Sigmoid():
The final activation function outputs a probability in the range [0,1][0, 1][0,1], where values closer to 1 indicate the image is real, and closer to 0 indicate fake.
Forward Method
Purpose: Define how an image is classified as real or fake.
self.model(img):
Processes the input image through the network, producing a scalar probability for each image.
Output
A tensor of probabilities ∈[0,1]\in [0, 1]∈[0,1] for the batch.
How They Work Together
Training Flow:
- The Generator creates synthetic images from random noise.
- The Discriminator evaluates both real images and synthetic images, predicting whether each is real or fake.
Adversarial Objective:
- The Generator learns to improve its output to “fool” the Discriminator.
- The Discriminator learns to become better at identifying fake images.
Loss Functions:
Generator: Optimizes to maximize the Discriminator’s likelihood of predicting “real” for fake images.
Discriminator: Optimizes to correctly predict real vs. fake for all inputs.
# Loss function and optimizers
adversarial_loss = nn.BCELoss()
generator = Generator(z_dim=100)
discriminator = Discriminator()
optimizer_G = optim.Adam(generator.parameters(), lr=0.0002, betas=(0.5, 0.999))
optimizer_D = optim.Adam(discriminator.parameters(), lr=0.0002, betas=(0.5, 0.999))

# Define device
device = torch.device('cuda' if torch.cuda.is_available() else 'cpu')
generator = generator.to(device)
discriminator = discriminator.to(device)
The provided code snippet sets up the loss function, optimizers, and device configuration for training a Generative Adversarial Network (GAN).
The Binary Cross-Entropy Loss is used to measure the error between the predicted probabilities and the true binary labels.
def save_generated_images(generator, epoch, device, num_images=16):
    z = torch.randn(num_images, 100).to(device)
    generated_imgs = generator(z).detach().cpu()
    grid = torchvision.utils.make_grid(generated_imgs, nrow=4, normalize=True)
    plt.imshow(np.transpose(grid, (1, 2, 0)))
    plt.title(f"Epoch {epoch}")
    plt.axis('off')
    plt.show()

# Training loop
def train(generator, discriminator, dataloader, epochs=5):
    for epoch in range(epochs):
        for i, imgs in enumerate(dataloader):
            real_imgs = imgs.to(device)
            batch_size = real_imgs.size(0)
            valid = torch.ones(batch_size, 1).to(device)
            fake = torch.zeros(batch_size, 1).to(device)

            # Train Discriminator
            optimizer_D.zero_grad()
            real_loss = adversarial_loss(discriminator(real_imgs), valid)
            fake_loss = adversarial_loss(discriminator(generator(torch.randn(batch_size, 100).to(device)).detach()), fake)
            d_loss = (real_loss + fake_loss) / 2
            d_loss.backward()
            optimizer_D.step()

            # Train Generator
            optimizer_G.zero_grad()
            g_loss = adversarial_loss(discriminator(generator(torch.randn(batch_size, 100).to(device))), valid)
            g_loss.backward()
            optimizer_G.step()

            if i % 50 == 0:
                print(f"[Epoch {epoch}/{epochs}] [Batch {i}/{len(dataloader)}] [D loss: {d_loss.item()}] [G loss: {g_loss.item()}]")

        # Optionally, save generated images at each epoch
        save_generated_images(generator, epoch, device)
The training loop alternates between training the Discriminator and the Generator. The Discriminator is trained to distinguish real images from fake ones by minimizing the loss for real images (labeled as real) and fake images (labeled as fake). The Generator is trained to create realistic fake images by fooling the Discriminator, minimizing the loss when fake images are labeled as real.
This adversarial process is repeated for multiple epochs, with updates to both models using their respective optimizers. Periodically, generated images can be saved to track the progress of the Generator.
Generated Images:
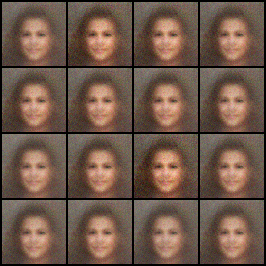
We need to train multiple epochs for the model to understand intricate details and recreate it just like the original image. For this article, I have stopped till 10 epochs.
If you like the article and would like to support me, make sure to:
- 👏 Clap for the story (50 claps) to help this article be featured
- Follow me on Medium
- 📰 View more content on my medium profile
- 🔔 Follow Me: LinkedIn | GitHub
Creating Human Faces from Scratch: A Hands-On Guide to GANs was originally published in Level Up Coding on Medium, where people are continuing the conversation by highlighting and responding to this story.
This content originally appeared on Level Up Coding - Medium and was authored by Harish Siva Subramanian
Harish Siva Subramanian | Sciencx (2025-01-17T19:02:21+00:00) Creating Human Faces from Scratch: A Hands-On Guide to GANs. Retrieved from https://www.scien.cx/2025/01/17/creating-human-faces-from-scratch-a-hands-on-guide-to-gans/
Please log in to upload a file.
There are no updates yet.
Click the Upload button above to add an update.