
This content originally appeared on Level Up Coding - Medium and was authored by Michalis Dobekidis

I will be making a series of complete step-by-step guides on how to build an onboarding and authentication flow using -almost- no code at all.
Honestly, there is so much on this guide that I had difficulty writing the title… so let’s get started!
Glossary
Framer (framer.com) A powerful web design and prototyping tool that enables designers to create interactive designs, animations, and fully functional websites without coding. It offers a visual editor and components that can be deployed directly to production.
Supabase (supabase.com) is an open-source alternative to Firebase that provides a PostgreSQL database, authentication, real-time subscriptions, and storage. It gives developers a complete backend solution that’s scalable and easy to implement.
Make.com (make.com) Make is a visual automation platform that lets you connect apps and automate workflows without coding. It offers more technical capabilities than similar tools, with complex routing and data manipulation features.
Brevo (brevo.com) Brevo is an all-in-one digital marketing platform that combines email marketing, SMS campaigns, and marketing automation. It offers features like CRM, landing page creation, and chat functionality, making it particularly suitable for small to medium-sized businesses looking for a comprehensive marketing solution.
Sender (sender.net) A user-friendly email marketing platform that focuses on simplicity and deliverability. At competitive pricing, it offers features like drag-and-drop email builders, automation workflows, and detailed analytics. Popular among small businesses and entrepreneurs who need reliable email marketing without complexity.
Step 0 Configuration of our services
Before we begin we need to set up our services like Supabase and Make.com so we can then start building right ahead, at this point, we assume that we also have an account on a mail campaigns service like Sender or Mailchimp and an account on a mail service like Brevo (all of these options offer a generous free tier so it is perfect for testing out things)
The overview of the flow can be seen here

Setting up Supabase
The Supabase setup is quite straightforward, we create an account on https://supabase.com/ and then proceed to create a new project, once this is done we navigate to the project settings, and on the Authentication section we make sure this option is on

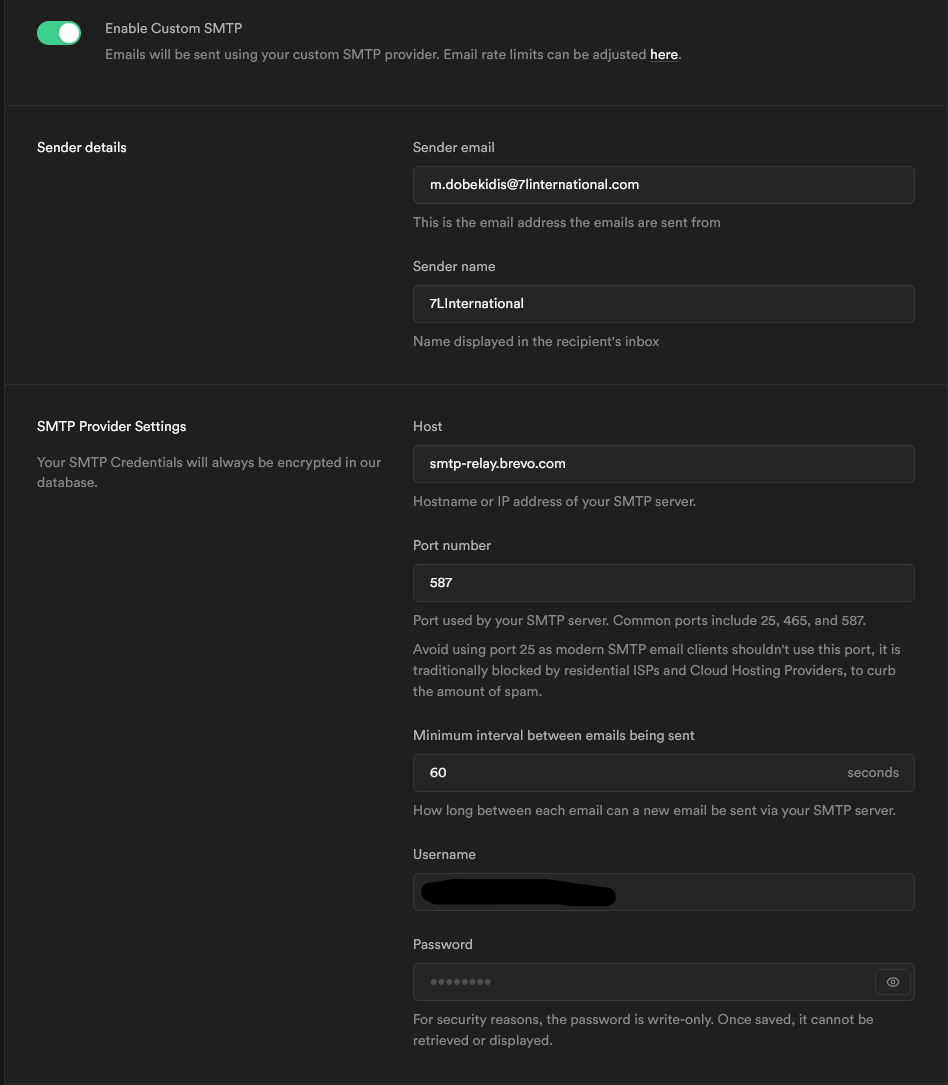
Then we scroll down to the SMTP section and add our Brevo SMTP/API information
(these can be found on Brevo here: https://app.brevo.com/settings/keys/smtp)
Finally, we need to set the Authentication provider on Supabase to accept signups via email, we can do this here:

At this point, our Supabase project can safely send emails and register new users via email and password.
Step 1 Registration / Signup
We will use a registration form with First-Name, Last-Name, Email and Password.
Using the Framer forms is quite easy, simply drag and drop the component from the import menu and customize its look, mine looks like this

As you can see we also have an error message and a confirm-password input, for these to work we will need four very basic overrides, they look like this:
// Our store
const useFormStore = createStore({
    pass: null,
    confirmPass: null,
    error: null,
    email: null,
})

export function logPassword(Component): ComponentType {
    return (props) => {
        const [store, setStore] = useFormStore()
        const ref = useRef(null)

        const storePass = (e) => {
            setStore({ pass: e.currentTarget.value })
        }

        useEffect(() => {
            if (ref.current) {
                const inputElement = ref.current.querySelector("input")
                inputElement.addEventListener("blur", storePass)
            }

            return () => {
                if (ref.current) {
                    const inputElement = ref.current.querySelector("input")
                    inputElement.removeEventListener("blur", storePass)
                }
            }
        }, [])

        return <Component {...props} ref={ref} type="password" />
    }
}

export function checkPassword(Component): ComponentType {
    return (props) => {
        const [store, setStore] = useFormStore()
        const ref = useRef(null)

        const storePass = (e) => {
            setStore({ confirmPass: e.currentTarget.value })
        }

        useEffect(() => {
            if (ref.current) {
                const inputElement = ref.current.querySelector("input")
                inputElement.addEventListener("blur", storePass)
            }

            return () => {
                if (ref.current) {
                    const inputElement = ref.current.querySelector("input")
                    inputElement.removeEventListener("blur", storePass)
                }
            }
        }, [])

        useEffect(() => {
            if (store.pass && store.confirmPass) {
                if (store.pass !== store.confirmPass) {
                    setStore({ error: true })
                } else {
                    setStore({ error: null })
                }
            }
        }, [store.pass, store.confirmPass])

        return <Component {...props} ref={ref} type="password" />
    }
}

export function showError(Component): ComponentType {
    return (props: any) => {
        const [store, setStore] = useFormStore()
        const ref = useRef(null)
        const [visibility, setVisibility] = useState("none")

        useEffect(() => {
            if (store.error) {
                setVisibility("block")
            } else {
                setVisibility("none")
            }
        }, [store.error])

        return (
            <Component
                {...props}
                style={{ ...props.style, display: visibility }}
                ref={ref}
            />
        )
    }
}

export function submitButtonOverride(Component): ComponentType {
    return (props: any) => {
        const [store, setStore] = useFormStore()

        const getVariant = () => {
            if (store.error) return "Disabled"
            return "Default"
        }

        return <Component {...props} variant={getVariant()} />
    }
}
Simply add them to an override file and then assign the overrides
logPassword to the main password input
checkPassword to confirm password input
showError to the error text
and finally submitButtonOverride to the submit button.
These will allow us to have some basic form validation and error handling with proper user feedback.
Of course, we can enhance the experience here with more robust password strength controls, etc but let’s keep it simple for now.
Making the Webhook
Framer forms have a neat way of sending form data to services, we will utilize webhook for this operation via Make.com the whole process is quite straightforward and requires no code at all.
The end result should look like this:

After we set up our account we create a new scenario
Let’s add/drag a Custom Webhook component

After you click the create webhook and give it a name the component is ready to receive data, but first hitting edit on the webhook and then enabling advanced settings should allow us to set the JSON data to pass through, it looks like this

Next, we will add some JSON parsing of the data by adding a JSON Parse component

And a JSON Create component

Note #1: The last part redirect_to is our Framer URL, you can get this after you hit publish on your Framer project.
Note #2: For the values to appear on these inputs we need to first send data once, the webhook will capture it and then they will be available on the rest of the components, so a good technique is to first run the scenario with the first two components (Webhook and JSON Parse) and then connect the rest so we can have the values available when we click the inputs here
For the Sender component we simply add/drag a Sender component from the toolbar, add your API key to create a connection, and then add the data we need to send to Sender.

Finally, we add our HTTP Request component and add our Supabase credentials (project URL and anon key) we can find them on our API settings section on Supabase

The Make.com component looks like this

This will send the necessary information to Supabase and create a new user.
Optionally we can close the flow with a Webhook response

Grab the webhook URL from the first component and have the scenario run.
We will use the webhook URL on our Framer form to connect to our scenario, simply click the form and from the right menu add the webhook URL on the Send To

Run your page and you should be able to register a new user.
Keep in mind that this user will also receive an email to verify their account (for security purposes), by default Supabase redirects to localhost:3000 which is not a valid URL, to make them navigate to our /signupconfirmation we should allow this URL on Supabase.

We can perform this action here

We add our root Framer URL and allow all the other pages that the emails will need to redirect to (remember we added a redirect_to url on our JSON create component)
You can remix the Framer project here: https://framer.com/projects/new?duplicate=CB1Jy1PUAwlQfv6xDvNk
In our next article, we will explore how to work with user sign-in and user invitations for onboarding. Stay tuned!
Enjoy!
Ultimate guide on Framer forms, Supabase, and Make for user registration was originally published in Level Up Coding on Medium, where people are continuing the conversation by highlighting and responding to this story.
This content originally appeared on Level Up Coding - Medium and was authored by Michalis Dobekidis
Michalis Dobekidis | Sciencx (2025-01-17T18:28:46+00:00) Ultimate guide on Framer forms, Supabase, and Make for user registration. Retrieved from https://www.scien.cx/2025/01/17/ultimate-guide-on-framer-forms-supabase-and-make-for-user-registration/
Please log in to upload a file.
There are no updates yet.
Click the Upload button above to add an update.