
This content originally appeared on Level Up Coding - Medium and was authored by Mina
When working with distributed systems like Apache Kafka or other data pipelines, ensuring smooth communication between producers and consumers is crucial. This is where Apache Avro, its schemas, and the concept of schema evolution come into play.

In this guide, I will cover:
- What is Avro?
- What is a schema, and why do you need it?
- How schema evolution ensures compatibility and simplifies data changes.
- Tools and plugins for integrating Avro into your build process.
- What are schema registries?
- How to upload schemas to AWS Glue and implement them in your application.
You can find the source code in this GitHub repository: spring-kafka-avro-demo.
What is Avro?
Apache Avro is an open-source data serialization system designed for efficient data exchange between systems and programming languages. Created by Doug Cutting, the founder of Hadoop, Avro is lightweight, schema-based, and perfect for handling large-scale data.
It serializes data into a compact binary format, making it fast for transmission and storage. Its schemas are written in JSON, allowing producers and consumers to define and agree on the data structure.
Avro works with many programming languages, including Java, Python, C++, and more.
Why Use Avro?
Avro simplifies data handling and communication in distributed systems by offering:
- Compact Binary Format: Reduces data size for efficient storage and transmission.
- Schema-Based: Each piece of data comes with a schema, ensuring clarity and consistency.
- Schema Evolution: As your data needs change, Avro handles those changes seamlessly, allowing your systems to evolve without breaking compatibility.
- Cross-Language Compatibility: Supports Java, Python, C++, and other languages, enabling smooth integration across diverse systems.
- Efficiency and Simplicity: Avoids repetitive field names, optimizes performance, and works without requiring pre-generated code.
What is a Schema, and Why Do You Need It?
In Avro, a schema is a JSON file (commonly .avsc) that defines the structure of your data. It serves as a blueprint, describing the fields, data types, and rules that both producers and consumers must follow when exchanging data.
Example Avro Schema (User.avsc):
{
  "type": "record",
  "name": "User",
  "fields": [
    { "name": "id", "type": "int" },
    { "name": "name", "type": "string" },
    { "name": "email", "type": ["null", "string"], "default": null }
  ]
}
Why Do You Need a Schema?
- Consistency: Ensures that producers and consumers agree on the structure and types of data.
- Validation: Validates that data conforms to the schema before serialization or deserialization.
- Compact Encoding: Avro encodes only the data (not field names) during serialization, relying on the schema to decode it.
Why Is Schema Management Important in Kafka?
Managing data schemas in Kafka ensures smooth communication between producers and consumers, especially as data structures evolve.
Without schema management, you face several challenges:
- Risk of Failure: Consumers may struggle to process messages if the schema changes unexpectedly.
- Increased Maintenance: Every schema update would require you to manually update and redeploy both the producer and consumer.
Example: Consider a producer sending product updates to a Kafka topic, while a consumer uses that data to update inventory records in a database. If the producer adds a new field, such as “productDescription,” and the consumer isn’t aware of the change, the consumer might fail to process the data correctly.
Schema management helps ensure that both the producer and consumer understand the data, even as the schema changes over time.
What is Schema Evolution?
Schema evolution allows you to change your data structure (schema) over time while maintaining compatibility between producers and consumers.
There are three main types of schema compatibility:
Backward Compatibility
✅ New producers → Old consumers (Works)
Old consumers can still read data from new producers, ensuring they don’t break.
Example: Adding a new optional field won’t affect older consumers since they’ll simply ignore it.
Forward Compatibility
✅ Old producers → New consumers (Works)
New consumers can still read data from old producers, ensuring they can process older data.
Example: Adding a default value for a new field allows newer consumers to handle missing values from older producers.
In short:
- Backward compatibility focuses on producers evolving the schema without breaking old consumers.
- Forward compatibility focuses on consumers handling older schemas from legacy producers.
Full Compatibility
✅ Backward + Forward Compatibility (Both Work)
Any change must ensure that older consumers and older producers can still interact with newer versions of the schema.
This means adding optional fields with defaults and avoiding breaking changes like removing fields.
How Does Avro Enable Schema Evolution?
Avro supports schema evolution through:
- Default Values: New fields can be added with default values to avoid breaking older consumers.
- Nullable Fields: Union types like ["null", "string"] make fields optional or nullable.
- Flexible Field Order: Field order changes are allowed as long as names are consistent.
- Field Removal: Fields can be removed if consumers don’t rely on them.
Example: Handling Changes Without Breaking Compatibility
- Initial Schema:
{
  "type": "record",
  "name": "Product",
  "fields": [
    { "name": "id", "type": "int" },
    { "name": "name", "type": "string" },
    { "name": "price", "type": "double" }
  ]
}
This schema defines a Product with an id, name, and price.
Now, suppose we need to make some changes:
- Add a new field (category) without breaking older consumers.
- Rename an existing field (price → productPrice) while maintaining compatibility.
Here’s the updated schema:
{
  "type": "record",
  "name": "Product",
  "fields": [
    { "name": "id", "type": "int" },
    { "name": "category", "type": ["null", "string"], "default": null },
    { "name": "productPrice", "type": "double", "aliases": ["price"] }
  ]
}
What Changed?
1. New Field Added::
category was added with a default value of null.
This is backward-compatible because old consumers will ignore it, and new consumers can handle missing values.
2. Renaming a Field with Aliases (Safe Renaming in Avro):
The field price was renamed to productPrice.
Adding "aliases": ["price"] ensures older consumers expecting price can still read the data.
Without aliases, older consumers would break since they wouldn’t recognize productPrice.
Avro maps old records using price to productPrice, making this a backward-compatible change.
Now Let’s create a project to see how we can use Avro schema: https://github.com/minarashidi/authentication
Project setup
Start by creating a new Spring Boot project using Spring Initializr, selecting the following dependencies. Import the project into your preferred IDE.
Here in my pom.xml, added the avro dependency:
 <dependency>
      <groupId>org.apache.avro</groupId>
      <artifactId>avro</artifactId>
      <version>1.11.3</version>
 </dependency>
Difference Between Gradle and Maven with Avro
Whether you’re using Gradle or Maven, you’ll need a plugin to simplify and automate working with Apache Avro. Here’s why:
Why You Need an Avro Plugin
- Code Generation:
The plugin automatically generates Java classes from Avro schemas (.avsc). These schemas define your data's structure, and the plugin ensures you get ready-to-use Java classes without manual effort. - Seamless Build Integration:
- Works effortlessly with the build process.
- Detects .avsc files in predefined directories.
- Includes generated sources automatically in the compilation process.
3. Simplifies Configuration:
The plugin manages dependencies on Avro tools and runtime libraries for you. No need to set up or configure these manually.
Without the plugin, you’d need to handle Avro code generation manually — running the compiler yourself, managing generated files, and integrating them into your build process. That’s extra work and introduces more chances for errors. The plugin saves time and reduces boilerplate.
Gradle vs. Maven for Avro
Both Gradle and Maven support Avro through plugins, but they differ slightly in approach:
Maven
Maven uses the Avro Maven Plugin. You add it to the build section of your pom.xml and configure goals like generate-sources manually.
Example Maven configuration:
<build>
    <plugins>
      <plugin>
        <groupId>org.springframework.boot</groupId>
        <artifactId>spring-boot-maven-plugin</artifactId>
      </plugin>
      <plugin>
        <groupId>org.apache.avro</groupId>
        <artifactId>avro-maven-plugin</artifactId>
        <version>${avro.version}</version>
        <executions>
          <execution>
            <phase>generate-sources</phase>
            <goals>
              <goal>schema</goal>
            </goals>
            <configuration>
              <sourceDirectory>src/main/resources/avro</sourceDirectory>
              <outputDirectory>${project.basedir}/src/main/java/com/mina/dev/kafka/avro</outputDirectory>
            </configuration>
          </execution>
        </executions>
      </plugin>
    </plugins>
 </build>
Gradle
With Gradle, you can use the com.github.davidmc24.gradle.plugin.avro plugin, which integrates naturally into Gradle’s build lifecycle.
Example Gradle configuration:
plugins {
    id 'java'
    id 'com.github.davidmc24.gradle.plugin.avro' version '1.8.0'
}

avro {
    // Customize configuration (optional)
    stringType = "String" // Use Java String instead of Utf8
    enableDecimalLogicalType = true
}

dependencies {
    implementation 'org.apache.avro:avro:1.11.2'
}
When you apply this plugin, it sets up the default source directory for Avro files (src/main/avro), automatically compiles Avro schemas, and adds the generated classes to the source directory.
Create the Avro Schema
Create the Avro schema at src/main/resources/avro/product.avsc:
{
  "type": "record",
  "name": "ProductAvroDto",
  "fields": [
    { "name": "id", "type": ["null", "string"], "default": null },
    { "name": "name", "type": ["null", "string"], "default": null },
    { "name": "price", "type": ["null", "double"], "default": null },
    { "name": "currency", "type": ["null", "string"], "default": null },
    { "name": "category", "type": ["null", "string"], "default": null },
    { "name": "subCategory", "type": ["null", "string"], "default": null },
    { "name": "createdAt", "type": ["null", "string"], "default": null },
    { "name": "updatedAt", "type": ["null", "string"], "default": null }
  ]
}
Convert Product Object to Avro DTO
Next, we create a class that converts a Product object to an Avro DTO.
package com.mina.dev.kafka.avro;

import com.mina.dev.kafka.domain.Product;
import java.time.LocalDateTime;
import java.time.format.DateTimeFormatter;
import lombok.experimental.UtilityClass;

@UtilityClass
public class AvroDataFactory {

  private static final DateTimeFormatter DATE_TIME_FORMATTER = DateTimeFormatter.ofPattern("yyyy-MM-dd'T'HH:mm:ss.SSSSSS'Z'");

  public static ProductAvroDto createProductAvroDto(Product product) {

    return ProductAvroDto.newBuilder()
        .setId(String.valueOf(product.getId()))
        .setName(product.getName())
        .setPrice(product.getPrice())
        .setCurrency(product.getCurrency())
        .setCategory(product.getCategory())
        .setSubCategory(product.getSubCategory())
        .setCreatedAt(product.getCreatedAt() != null ? formatDateTime(product.getCreatedAt()) : null)
        .setUpdatedAt(product.getUpdatedAt() != null ? formatDateTime(product.getUpdatedAt()) : null)
        .build();
  }

  private static String formatDateTime(String dateTime) {
    // Assuming dateTime is in ISO-8601 format
    return DATE_TIME_FORMATTER.format(LocalDateTime.parse(dateTime));
  }
}
Kafka Producer
Now, let’s create a Kafka producer that sends the Avro DTO.
package com.mina.dev.kafka.avro;

import com.mina.dev.kafka.domain.Product;
import lombok.AllArgsConstructor;
import lombok.extern.slf4j.Slf4j;
import org.apache.avro.specific.SpecificRecordBase;
import org.apache.kafka.clients.producer.ProducerRecord;
import org.springframework.kafka.core.KafkaTemplate;


@AllArgsConstructor
@Slf4j
public class AvroProductEventProducer {

  private final KafkaTemplate<String, Object> kafkaTemplate;
  private final String productAvroTopic;

  /**
   * Converts a Product object to an Avro DTO and sends it to the Kafka topic asynchronously.
   *
   * @param product The product data to be sent.
   */
  public void sendProductEvent(Product product) {
    log.info("Preparing to send product to Kafka: {}", product);
    ProductAvroDto dto = AvroDataFactory.createProductAvroDto(product);
    sendAsync(productAvroTopic, dto, product.getId());
  }

  /**
   * Sends a record asynchronously to a Kafka topic.
   *
   * @param topic     The Kafka topic to send the message to.
   * @param data      The Avro data object.
   * @param productId The product ID, used as the key for the message.
   */
  private void sendAsync(String topic, SpecificRecordBase data, Long productId) {
    try {
      ProducerRecord<String, Object> producerRecord = new ProducerRecord<>(topic, null, String.valueOf(productId), data);
      kafkaTemplate.send(producerRecord).whenComplete((result, failure) -> {
        if (failure == null) {
          log.info("Successfully sent product event for productId {}", productId);
        } else {
          log.error("Failed to send product event for productId {}", productId, failure);
        }
      });
    } catch (Exception e) {
      log.error("Unable to send product event for productId {}", productId, e);
    }
  }
}
Also we needed to initialize avroProductEventProducer bean with the KafkaTemplate in our config file.
 @Bean
  public AvroProductEventProducer avroProductEventProducer(KafkaTemplate<String, Object> avroKafkaTemplate,
      KafkaProperties kafkaProperties) {
    return new AvroProductEventProducer(avroKafkaTemplate, kafkaProperties.producer().topic()
    );
  }

  @Bean
  KafkaTemplate<String, Object> avroKafkaTemplate(KafkaProperties kafkaProperties) {
    var props = new HashMap<String, Object>();
    props.put(ProducerConfig.BOOTSTRAP_SERVERS_CONFIG, kafkaProperties.bootstrapServers());
    props.put(ProducerConfig.ENABLE_IDEMPOTENCE_CONFIG, true); // Ensure safe producer behavior
    props.put(ProducerConfig.KEY_SERIALIZER_CLASS_CONFIG, StringSerializer.class.getName());
    props.put(ProducerConfig.VALUE_SERIALIZER_CLASS_CONFIG, KafkaAvroSerializer.class.getName()); // Use Avro Serializer

    var producerFactory = new DefaultKafkaProducerFactory<>(props);
    return new KafkaTemplate<>(producerFactory);
}
REST API for Testing
Finally, create a REST API endpoint to test the producer:
package com.mina.dev.kafka.controller;

import com.mina.dev.kafka.avro.AvroProductEventProducer;
import com.mina.dev.kafka.domain.Product;
import org.springframework.beans.factory.annotation.Autowired;
import org.springframework.web.bind.annotation.PostMapping;
import org.springframework.web.bind.annotation.RequestBody;
import org.springframework.web.bind.annotation.RestController;

@RestController
public class EventController {

  @Autowired
  private AvroProductEventProducer producer;

  @PostMapping("/events")
  public String sendMessage(@RequestBody Product product) {
    producer.sendProductEvent(product);
    return "event published!";
  }
}
Run the application:
./mvnw spring-boot:run
Test with Postman:
- Set method to POST and URL to http://localhost:8080/events.
- Add this JSON in the body:
{
   "id":123,
   "name":"Sample Product",
   "price":19.99,
   "currency":"USD",
   "category":"Electronics",
   "subCategory":"Mobile",
   "createdAt":"2025-01-21T12:00:00",
   "updatedAt":"2025-01-21T12:00:00"
}
The response should be: "Event published!"
Role of a Schema Registry
A Schema Registry is a central service that stores and manages Avro schemas. It ensures that producers and consumers are using compatible schemas and and tracks schema versions.
Benefits of a Schema Registry:
- Validation: Ensures that producers and consumers use compatible schemas, so consumers can process messages even when the schema evolves.
- Versioning: Tracks different schema versions and their compatibility.
- Simplified Management: Centralizes schema storage and eliminates duplication.
How It Works:
The producer serializes the data using Avro, registers the schema in the registry, and sends the schema ID with each message. The consumer retrieves the schema by ID from the registry and deserializes the message, ensuring compatibility.
How It Works in Practice
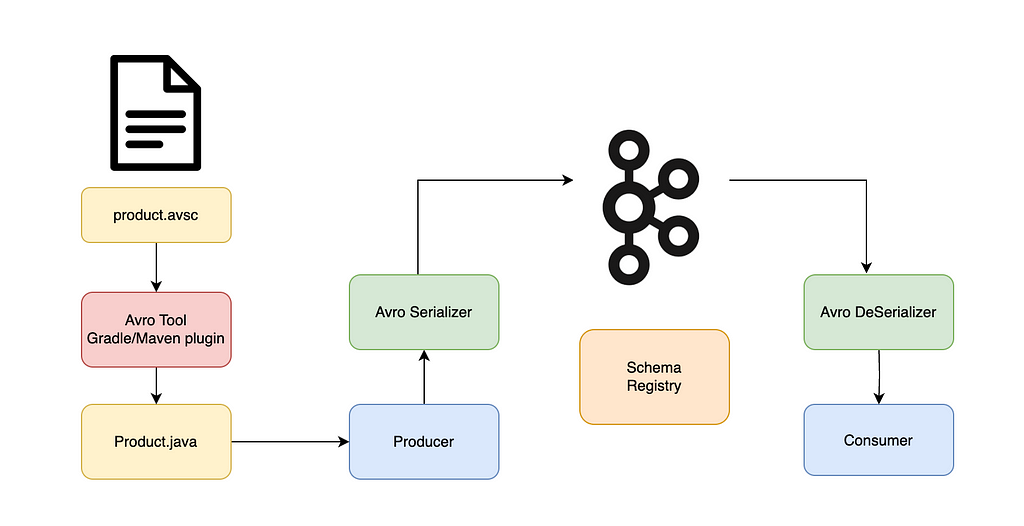
Producer:
- Serializes the product data using the Avro schema.
- Registers the schema in the schema registry, which assigns a unique schema ID.
- Sends the serialized data along with the schema ID to Kafka.
Consumer:
- Reads the schema ID from the Kafka message.
- Fetches the corresponding schema from the schema registry.
- Deserializes the message using the schema, ensuring compatibility.
Some of Popular Schema Registry Options:
- AWS Glue Schema Registry: Integrates with AWS services like Kinesis and MSK.
- Confluent Schema Registry: Designed for Kafka; supports Avro, JSON, and Protobuf.
- Azure Schema Registry: Works with Azure Event Hubs and Kafka.
How to Upload Your Schema to AWS Glue Schema Registry
Step 1: Set Up Your AWS Glue Schema Registry
- Go to the AWS Console and open the Glue Schema Registry: https://aws.amazon.com/glue/
2. Create a New Schema Registry:
- Click on the Create registry button.
- Provide a name for the schema registry, for example, MyAvroRegistry.
- Set the compatibility level to FULL or BACKWARD based on your needs.
- Click Create.
Step 2: Upload Avro Schema to AWS Glue Schema Registry
You can upload your schema to AWS Glue using the AWS Glue SDK or through the AWS Console.
Option 1: Using AWS Console
- Go to the Schema Registry section in AWS Glue.
- Select the schema registry you just created.
- Click on Add schema and select AVRO as the format.
- Paste the Avro schema definition into the provided field (you can use the schema from your project).
- Click Save.
Option 2: Using AWS SDK for Java
Here’s a Java class to upload an Avro schema to AWS Glue Schema Registry:
package com.mina.dev.kafka.avro;

import jakarta.annotation.PostConstruct;
import jakarta.annotation.PreDestroy;
import java.util.Map;
import lombok.AllArgsConstructor;
import lombok.extern.slf4j.Slf4j;
import software.amazon.awssdk.services.glue.GlueClient;
import software.amazon.awssdk.services.glue.model.CreateSchemaRequest;
import software.amazon.awssdk.services.glue.model.EntityNotFoundException;
import software.amazon.awssdk.services.glue.model.GetSchemaRequest;
import software.amazon.awssdk.services.glue.model.RegisterSchemaVersionRequest;
import software.amazon.awssdk.services.glue.model.RegistryId;
import software.amazon.awssdk.services.glue.model.SchemaId;
import software.amazon.awssdk.services.glue.model.SchemaVersionStatus;

@Slf4j
@AllArgsConstructor
public class GlueSchemaUploader {

    private final GlueClient client;
    private final String registryName;
    private final Map<String, String> schemas;

    @PreDestroy
    public void closeClient() {
        if (client != null) {
            try {
                client.close();
                log.info("Glue client closed successfully.");
            } catch (Exception e) {
                log.warn("Failed to close Glue client.", e);
            }
        }
    }

    @PostConstruct
    public void uploadSchemas() {
        schemas.forEach(this::uploadSchema);
    }

    private void uploadSchema(String schemaName, String schemaDefinition) {
        log.info("Uploading schema: {}", schemaName);

        Long version = getSchemaVersion(schemaName);
        if (version == null) {
            log.info("Schema {} not found. Creating a new schema.", schemaName);
            createSchema(schemaName, schemaDefinition);
        } else {
            log.info("Schema {} already exists with version {}. Checking for updates.", schemaName, version);
            uploadSchemaDefinition(schemaName, version, schemaDefinition);
        }
    }

    private void createSchema(String schemaName, String schemaDefinition) {
        var response = client.createSchema(CreateSchemaRequest.builder()
            .schemaName(schemaName)
            .dataFormat("AVRO")
            .compatibility("FULL")
            .schemaDefinition(schemaDefinition)
            .registryId(RegistryId.builder().registryName(registryName).build())
            .build()
        );

        log.info("Created schema: {} | Version: {} | Status: {}",
            schemaName, response.latestSchemaVersion(), response.schemaStatus());
    }

    private void uploadSchemaDefinition(String schemaName, Long existingVersion, String schemaDefinition) {
        var response = client.registerSchemaVersion(RegisterSchemaVersionRequest.builder()
            .schemaId(schemaId(schemaName))
            .schemaDefinition(schemaDefinition)
            .build()
        );

        if (response.status() == SchemaVersionStatus.FAILURE) {
            log.error("Failed to upload schema definition for schema: {}\nDefinition: {}\nAWS Response: {}",
                schemaName, schemaDefinition, response);
            return;
        }

        if (existingVersion.equals(response.versionNumber())) {
            log.info("No changes detected for schema: {}", schemaName);
        } else {
            log.info("Updated schema: {} | New Version: {} | Status: {}",
                schemaName, response.versionNumber(), response.status());
        }
    }

    private Long getSchemaVersion(String schemaName) {
        try {
            return client.getSchema(GetSchemaRequest.builder()
                    .schemaId(schemaId(schemaName))
                    .build())
                .latestSchemaVersion();
        } catch (EntityNotFoundException e) {
            log.info("Schema {} not found in registry {}.", schemaName, registryName);
            return null;
        }
    }

    private SchemaId schemaId(String schemaName) {
        return SchemaId.builder()
            .registryName(registryName)
            .schemaName(schemaName)
            .build();
    }
}
Step 3: Configure Kafka Producer with AWS Glue Schema Registry
To send Avro messages with your schema, you need to configure your Kafka producer to use the AWS Glue Schema Registry serializer.
This ensures that the producer serializes messages using the schema stored in the registry.
Add the following configuration to your config class:
  @Bean
  public AvroProductEventProducer avroProductEventProducer(KafkaTemplate<String, Object> avroKafkaTemplate,
      KafkaProperties kafkaProperties) {
    return new AvroProductEventProducer(avroKafkaTemplate, kafkaProperties.producer().topic()
    );
  }

  @Bean
  KafkaTemplate<String, Object> avroKafkaTemplate(KafkaProperties kafkaProperties, GlueProperties glueProperties) {
    var props = new HashMap<String, Object>();
    props.put(ProducerConfig.BOOTSTRAP_SERVERS_CONFIG, kafkaProperties.bootstrapServers());
    props.put(ProducerConfig.ENABLE_IDEMPOTENCE_CONFIG, false);
    props.put(AWSSchemaRegistryConstants.AWS_REGION, glueProperties.region());
    props.put(AWSSchemaRegistryConstants.DATA_FORMAT, "AVRO");
    props.put(AWSSchemaRegistryConstants.SCHEMA_AUTO_REGISTRATION_SETTING, "false");
    props.put(AWSSchemaRegistryConstants.REGISTRY_NAME, glueProperties.registryName());

    var producerFactory = new DefaultKafkaProducerFactory<>(props, StringSerializer::new, GlueSchemaRegistryKafkaSerializer::new);
    return new KafkaTemplate<>(producerFactory);
  }

  @Bean
  public GlueSchemaUploader schemaUploader(KafkaProperties kafkaProperties, GlueProperties glueProperties) {
    // Validate GlueProperties
    if (glueProperties.region() == null || glueProperties.registryName() == null) {
      throw new IllegalArgumentException("Glue region and registry name must be configured.");
    }

    var avroProductEvents = kafkaProperties.producer();
    log.info("Initializing GlueSchemaUploader for topic: {}", avroProductEvents.topic());

    // Create the GlueClient with proper region and credentials
    var glueClient = GlueClient.builder()
        .region(Region.of(glueProperties.region()))
        .credentialsProvider(WebIdentityTokenFileCredentialsProvider.create())
        .httpClient(UrlConnectionHttpClient.create()) // Default HTTP client
        .build();

    // Map topic names to Avro schema definitions
    var schemaMap = Map.of(
        avroProductEvents.topic(), ProductAvroDto.getClassSchema().toString()
    );

    log.info("Schema map initialized: {}", schemaMap);
    return new GlueSchemaUploader(glueClient, glueProperties.registryName(), schemaMap);
  }
Step 4: Sending Avro Messages to Kafka
Once the schema is uploaded to AWS Glue and the producer is configured, you can start sending Avro-encoded messages to Kafka. The GlueSchemaRegistryKafkaSerializer will ensure that the message is serialized according to the schema you uploaded to the Glue Schema Registry.
In this guide, we learned about Avro and how to upload and manage Avro schemas using AWS Glue Schema Registry, and how to integrate them into your Kafka application.
For full code examples, check out the GitHub repository: https://github.com/minarashidi/spring-kafka-avro-demo.git.
I hope you found it helpful! Feel free to share your thoughts or ask questions.
Mastering Kafka with Avro Schemas was originally published in Level Up Coding on Medium, where people are continuing the conversation by highlighting and responding to this story.
This content originally appeared on Level Up Coding - Medium and was authored by Mina
Mina | Sciencx (2025-01-31T14:03:14+00:00) Mastering Kafka with Avro Schemas. Retrieved from https://www.scien.cx/2025/01/31/mastering-kafka-with-avro-schemas/
Please log in to upload a file.
There are no updates yet.
Click the Upload button above to add an update.