
This content originally appeared on Level Up Coding - Medium and was authored by Nicolaos Moscholios

Introduction
At Sortlist we connect thousands of service providers with clients looking for their next business partner. To make sure providers get discovered we serve a SEO optimised marketplace app which is visited by millions of users every month. In this context, even small features can cause changes in conversions, meaning we need to make sure our code changes have the right effect before releasing them to the whole traffic. Here is where A/B tests come into play!
Traditional A/B testing methods often rely on dynamic rendering on the server or client-side evaluation. While these techniques work well at small scale, they become bottlenecks when traffic grows:
- Every user request needs backend computation, increasing server load and consequently higher costs
- Pages become difficult to cache, causing slower load times
- Client-side A/B testing can introduce “flicker” effects, hurting UX and conversion rates, especially when your site is server-side rendered
At millions of monthly visitors, these approaches no longer scale efficiently. We needed a new way to serve experiments — one that solved all of the above problems.
In this article we’ll explore multiple topics, ranging from the theory behind A/B testing to a hands on implementation using Next.js and Cloudflare workers.
Now is this guide relevant for you? Well, find out for yourself:
- Does your application content need to be server side rendered for SEO purposes?
- Do your use Cloudflare to manage your domain?
- Does your product team need to perform analysis on a feature’s impact before rolling out to all of your traffic?
- Do you use Next.js for your frontend? (pages router)
If any of the points above apply to you, then this might be an interesting read 😉
What is A/B testing?
In simple terms, A/B testing is the practice of serving different variations of your product to your customers, analysing their behaviour and the impact of each variant on your business (e.g. revenue), and making a decision based on those numbers. This is done in contrast to deploying a feature to 100% of your traffic and reacting to numbers later on.
What happens under the hood is that each visitor or user should be uniquely identified and “assigned” to one or more variations of a feature. What they are shown should also be persisted, this way they have the same experience for the duration of the experiment.
You can read more about A/B testing in these excellent articles:
- https://medium.com/@alienoghli/the-essential-guide-to-a-b-testing-a84b853c16e0
- https://medium.com/jonathans-musings/ab-testing-101-5576de6466b
For this example, let’s just use the requirements that our app must be able to render different variations of a feature based on some arbitrary distribution.
Data collection & analysis
One of the key things you have to do if you want to deploy an A/B testing strategy is ensuring that you are tracking user behaviour correctly. The method in which the data is collected is not important, however what and when you collect it is what matters. For instance at Sortlist we use the Google Pub/Sub SDK to send messages to a queue for every user action that interests us, and these messages are then inserted into a BigQuery table, which we query to analyse the data.
You only need 2 events to properly track users in the context of an A/B test:
- When the user first arrives on your app
- When the user sees a particular variant of a feature or page
And each visitor should be assigned a unique ID so that it can always be served the same values. It’s also good to track additional things that you can use to link between your other tracking events or data. Take this small simplified example where we display two versions of a provider profile page.
The current version control👇
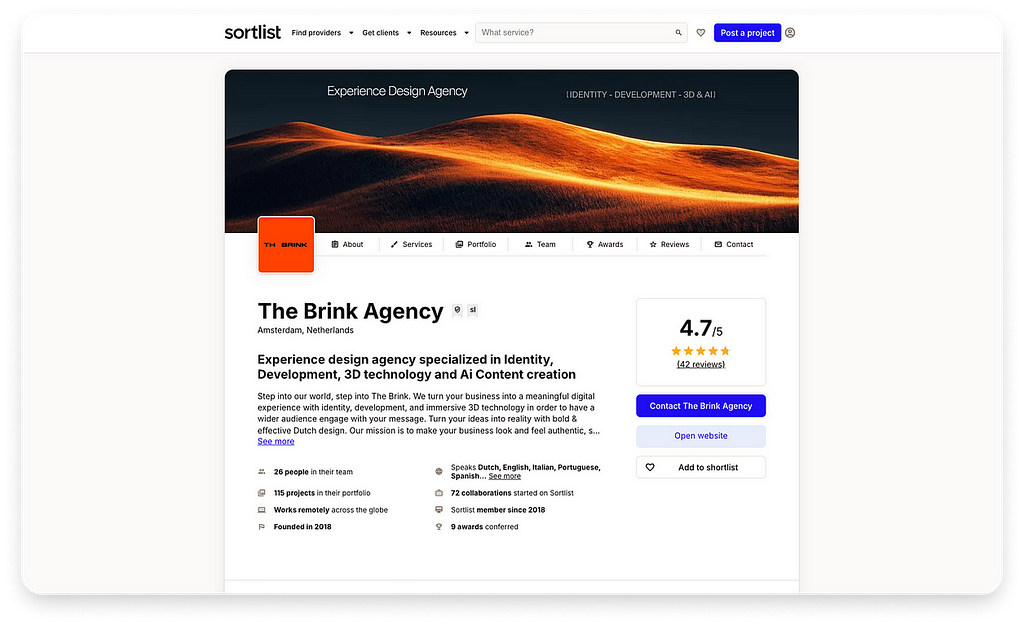
The new variation variation-1👇

What we want to test:
Does a different layout and bigger “Contact” button improve conversion rate of visitors?
const { track } = useTrack();

// User lands on the app (can be on any page)
useEffect(() => {
  if (isNewUser) {
    const uuid = uuid();
    track({ eventName: "experimentAssigned", uuid, url });
    // Persist uuid somewhere e.g. cookies
  }
}, []);

// On the profile page
const Profile = () => {
  const { variation } = useExperiment();

  useEffect(() => {
     track({ eventName: "experimentViewed", uuid, url });
  }, []);

  return variation === 'control' ? <Content /> : <NewProfileDesign/>
}

// In Content/NewProfileDesign
const Content = () => {
  return (
    <Button onClick={() => track({ eventName: "contactProvider", uuid, url })}>Contact</Button>
  );
}
Going into the flow:
- experimentAssigned is an event that defines the moment a user is given a uuid in the context of an experiment (this UUID can be the user’s internal ID if you wish) — at this moment any “active” experiment variations are assigned to the user — meaning we already know ahead of time which variation this user will see throughout the app
- experimentViewed is an event that tell us the user is actually seeing a specific variation — why do we need this? Well, users that are assigned variation 1 or control (the default) have essentially no impact on our experiment unless they see one or the other variation
- contactProvider is a custom event that just helps us build a better user journey — you might already do this with tools like Segment or Google Analytics, but in this case it tells us a user has contacted a provider on their profile
This last event is not strictly needed — you could also check in your database if a visitor with the given uuid has contacted the provider. From here, we can already perform a very simple analysis:
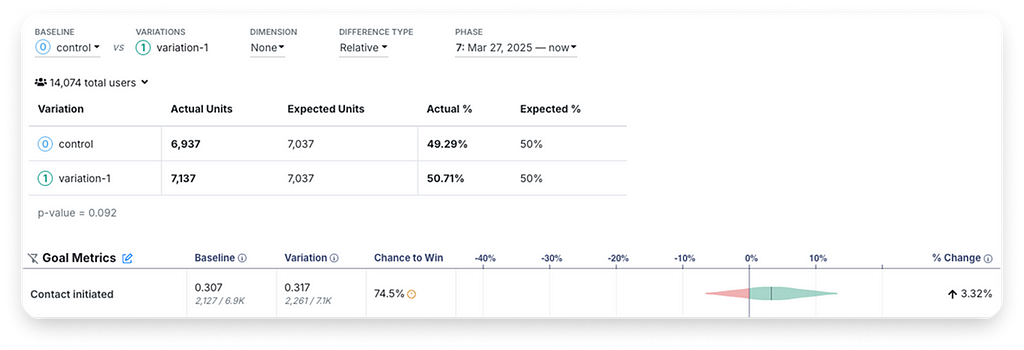
We can see that from the two versions, the variation has slightly better conversion (3+%) for the “contact initiated” metric — which is a 1–1 match with the contactProvider event shown in the code.
What it means, is that from the 7k visitors that saw the experiment (i.e. that triggered the experimentViewed event), 31% clicked on the contact provider vs the 30% in the baseline (control). As such, we can say that our experiment was successful since the new version performs better, even if marginally.
A note on Feature Flags
While not the focus of this article, it’s important to understand the distinction between what we call “experiments” and “feature flags”.
In the A/B testing context:
- A feature flag is like a switch that determines if a feature is activated, disabled or if one particular variation is active. This object is often long-lived and is used to safely toggle feature on or off without needing to deploy or revert code
- An experiment is used to measure the impact of a specific feature or change on the users. It’s also short-lived (normally until you gather enough data to make a decision) and is often linked to an existing feature flag
For example, in order to have some control over what is feature flagged in the code, and to enable type safety, we have the following configuration:
export const config = {
  'new-contact-page': {
    defaultValue: 'control',
    variants: ['control', 'variation-1', 'variation-2'],
    experiment: {
      key: 'new-contact-page-test',
    },
  },
  'ai-recommendation': {
    defaultValue: 'control',
    variants: ['control', 'variation-review'],
    experiment: {
      key: 'ai-recommendation-test-1',
      aboveTheFold: true,
    },
  },
}
Then to make this consumable in a React way we have a simple hook that helps us easily show a variant in the code:
const ContactPage = () => {
  const { variant } = useIsFeatureActive('new-contact-page');

  return variant === 'control' ? <Contact /> : <NewContact />;
}
By default the value returned is equivalent to the defaultValue , however when an experiment is running that value may be overridden and users may be assigned any of the possible variants.
This is what is happening inside the hook:
// useMergedFeatureFlagConfig returns the merged config from multiple sources:
// - environment
// - local storage
// - URL params
// - Cookies (Experiments)
const featureFlagConfig = useMergedFeatureFlagConfig();
const currentConfig = featureFlagConfig[featureName];

// A feature is considered active if it's either true, or something other than
// control is enabled (AB test).
const isActive = isValueActive(currentConfig.defaultValue);
const variant = getVariant(currentConfig);
const experiment = getExperiment(currentConfig);
The merged config allows us to “override” the default configuration based on multiple conditions, namely the cookies that contain the ongoing experiments and the variant of the flag assigned to the user.
URL params and local storage are mostly for development or when dealing with end-to-end tests — where you might want to manually force a value while running a test.
Handling Server Side rendering
In the example we saw above with the profile page, not only is that page indexable, meaning that the server should return the full page content so that it can be crawled, but the variants are also visible above the fold.
What is above the fold?
Above the fold content is the part of a web page shown before scrolling. Any content you’d need to scroll down to see, would be considered ‘below the fold’. The ‘fold’ is where the browser window ends, but the content continues underneath.
This brings some additional challenges.
Single Page App vs Server Side Rendered
In an SPA, things are relatively easy. You load the page on the browser (the DOM content is essentially empty at first), and before the page is hydrated, you can check which variation of the UI to show. This should not cause hydration errors because well, the server simply sent an empty document at first.
In a SSR app however, the server needs to know which variation it should display before returning the page. If it does not and returns the default or “control” version, but in the browser we then render “variation-1”, the user will see flickering between the two and show hydration errors.
To avoid this we should:
- Determine the variation the user requesting the page should see
- Persist this variation when the browser renders the page and the app is hydrated
- Persist this variation across sessions / a predefined timeframe (meaning the server should know about it on the next visit)
One way to do this intuitively is to assign a cookie to the user on the server that contains the variant information, return it in the response and persist it in the browser. Next time the user makes a new request, the cookie is forwarded to the server so it knows which variant to render.
What about caching?
Indeed one of the problems with this method is that most likely, your server will have some caching layer to avoid making requests to the origin server for every user. Meaning that unless we take into account the user cookies to create a custom cache key, users will still be served the control!
Take this example scenario:
- User A arrives on www.sortlist.com/branding — the page is not yet cached
- The server or middleware determines User A will see variant-1
- The page is returned and cached, User A receives the page
- User B arrives on the same page — the page is now cached
- The middleware determines User B will see variant-2
- But there is a cache hit for www.sortlist.com/branding ! So not only will User B not see his assigned variant, but the whole traffic will now be served variant-1 instead of control until the cache is invalidated 😱
Here is where we can create custom cache keys to ensure each variation / url combination has its unique cache key. Any user that is assigned a specific variant for the URL they request is ensured to receive the right response.
Note that if you run an SPA, you most likely don’t have a caching layer for the frontend since the whole UI is rendered on the browser.
Using Cloudflare Workers
All our traffic goes through Cloudflare, meaning we have out of the box support for Caching and Workers for each domain.
Because the cache layer lives here, it’s important that the user assignment for every experiment happens here as well. This is where workers come into play.
A worker is essentially just code that “runs in the edge of the Cloudflare network in between the user and the rest of the Internet”. So think of it as a middleware for your site, before it even reaches your server. In our case, the worker does the following:
async function handler(request, env, ctx) {
  const { abTestCookieValue, uuid, shouldAddAbTestCookies } = await evaluateExperiments(request);
  const cacheKey = buildCacheUrl(request.url, abTestCookieValue);

  let response = await cache.match(cacheKey);

  if (!response) {
    response = await fetchAndCache(request, cacheKey, env, ctx, abTestCookieValue, uuid, shouldAddAbTestCookies);
  } else {
    // ommitted revalidate logic here
  }

  if (shouldAddAbTestCookies) {
    response.headers.append('Set-Cookie', `${AB_TESTS_COOKIE_NAME}=${abTestCookieValue}; path=/`);
    response.headers.append('Set-Cookie', `${UUID_COOKIE_NAME}=${uuid}; path=/`);

    track({ eventName: "experimentAssigned", uuid });
  }

  return response;
}

async function fetchAndCache(request, cacheKey, env, ctx, abTestCookieValue, uuid, shouldAddAbTestCookies) {
  if (shouldAddAbTestCookies) {
    currentCookies[AB_TESTS_COOKIE_NAME] = abTestCookieValue;
    currentCookies[UUID_COOKIE_NAME] = uuid;

    const cookieString = buildCookieString(currentCookies);
    request.headers.set('Cookie', cookieString);
  }

  // Make request to origin server with new Cookies
  const freshResponse = await fetch(request);

  if (freshResponse.ok) {
    cache.put(cacheKey, freshResponse);
    return cachedResponse;
  }

  return freshResponse;
}
Note: the code above has been greatly simplified for illustrative purposes.
Let’s break it down:
- The function evaluateExperiments takes care of checking if the request already has some experiment-related cookies. If it doesn’t it creates a UUID and calls the Growthbook third party to know which experiments should be assigned to this UUID (this is just one of many third parties that exist to manage experiments, you can also handle this with a custom solution)
- We then build a cacheKey based on the provided cookies and request URL and check for a match in the cache
- If there is a match, we return the page, otherwise we make a call to the origin server to give us the content
- We forward the cookies to the origin server (in our case a Next.js app) which will render the right content on the page
A possible value for those cookies might be:
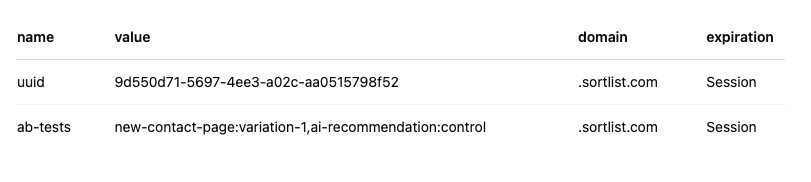
So we can see that the ab-tests cookie contains two experiments assigned to the user: new-contact-page and ai-recommendation . Combined with the variations the generated cache key will be:
https://www.sortlist.com/agency/my-provider/ai-recommendation/control/new-contact-page/variation-1
Meaning any other user that has the same ab-tests cookie will get the same cached result.
Fallback strategies and Client-only experiments
It’s probably time to address the elephant in the room: if every experiment E and their variants V contributes to the cache-key, then the number of cache keys will be E * V * [pages] (all experiment keys are sorted alphabetically).
For instance if we have 8 experiments and each has 3 variants that’s already 24 different cache keys — then multiplied by the number of pages on the site we could be looking at hundreds or thousands of caches, decreasing the chance most users will ever get a hit.
Circling back to our initial config from “A note on Feature Flags” section, you might have noticed a aboveTheFold boolean property. This is what helps us know if an experiment should be cached at all! As we saw above, only if the content of the page is visible on the first render then it should be rendered on the server, otherwise we can safely do this on the client side. Thanks to this, only experiments marked as aboveTheFold will contribute to the cache key or require server side rendering.
Let’s illustrate the behaviour to understand a little better:

So yes, the experiment evaluation happens both on the cache layer but also on the client side. This gives us a lot of flexibility to ensure we only mark some experiments as “cacheable”, and leave the rest to be evaluated on the browser. Technically, since we’re working with a Next.js app, we have our origin server that performs the rendering. Meaning we actually have 3 places where the evaluation happens:
- On the cache worker
- In the Next.js middleware — in case the cache is bypassed
- In the browser
This is all performed in the evaluateExperiments function which is actually reused in all 3 places, making the code more maintainable and testable.
Putting it all together
Here is a simplified version of the code on the Next.js side that handles the experiments as described above:
// _app.tsx
const App = (props) => {
  const { abTestCookie, currentUrl } = props;

  const router = useRouter();
  // This configOverride will modify the config to change the defaultValue
  // of the feature flags that match running experiments
  const { configOverride } = useExtractFeatureFlagOverrides(router.query, currentUrl, abTestCookie);

  return (
    <FeatureFlagsProvider enableExperiments configOverride={configOverride}>
      <Component />
    </FeatureFlagsProvider>
  );
}

App.getInitialProps = async (context: { ctx: GetServerSidePropsContext }) => {
  const abTestCookie = extractAbTestsFromCookies(context.ctx.req);
  const origin = extractOrigin(context.ctx.req);

  return {
    abTestCookie,
    currentUrl: `${origin}${context.ctx.req.url}`,
  };
};

// FeatureFlagsProvider
const FeatureFlagsProvider = (override) => {
  const { abTestCookie, uuidCookie, setCookie } = useCookie();

  useEffect(() => {
    const clientSideExperimentEval = () => {
      if (uuidCookie == null) {
        const uuid = createUuid();
        const experiments = evaluateExperiments();

        setCookie(uuid);
        setCookie(experiments.toCookieString());
      }
    }

    clientSideExperimentEval();
  }, [uuidCookie]);

  return <Provider>{children}</Provider>;
}

// /pages/homepage.tsx
const Homepage = () => {
  const { variant } = useIsFeatureActive('my-feature-flag');

  // + Tracking here as needed

  return variant === 'control' ? <Home /> : <NewHome />;
}
Breaking it down:
- The getInitialProps gets the cookies from the incoming request and passes them as props to the page — this is because when the page is server rendered, we cannot access the browser cookies, or they may not be assigned just yet
- useExtractFeatureFlagOverrides creates a new updated config taking into account the cookie values, URL params etc… and passes the value to the provider
- The FeatureFlagsProvider also takes care of assigning the variants and the cookies on the client side should the server not have done it, making sure that client-only experiments are handled
- Finally in the app code we read the value from the useIsFeatureActive hook which may return the overridden config or default value if an experiment is running or not
Final thoughts
By assigning experiments with Cloudflare workers and building predictable cache keys, we can serve A/B variations without slowing down the page or overloading our servers.
Above the fold experiments are handled server-side, everything else falls back to the client, and caching stays efficient even under heavy traffic.
Of course, this is required because of our use case — as mentioned earlier, if your app is purely client-side, then you can most likely be ok with doing all of this in the browser. Some third party integrations also provide their own solutions e.g. https://docs.growthbook.io/lib/edge/cloudflare or https://docs.developers.optimizely.com/feature-experimentation/docs/get-started-edge-functions , however we wanted more control over the experiment assignment and caching behaviour which lead us to this point.
If you enjoyed this guide and would like to see other topics explored more in depth, such as:
- How to track user assignment, where to store the data and how to process it (e.g. using Growthbook)
- How to architecture a custom but easy to use useIsFeatureActive hook to consume in your codebase
- How to create custom caching strategies and request filtering with Cloudflare Workers
They might be coming soon, stay tuned 📻
A/B Testing at Scale: How We Serve Variations to Millions with Cloudflare Workers and Next.js was originally published in Level Up Coding on Medium, where people are continuing the conversation by highlighting and responding to this story.
This content originally appeared on Level Up Coding - Medium and was authored by Nicolaos Moscholios
Nicolaos Moscholios | Sciencx (2025-04-23T16:31:42+00:00) A/B Testing at Scale: How We Serve Variations to Millions with Cloudflare Workers and Next.js. Retrieved from https://www.scien.cx/2025/04/23/a-b-testing-at-scale-how-we-serve-variations-to-millions-with-cloudflare-workers-and-next-js/
Please log in to upload a file.
There are no updates yet.
Click the Upload button above to add an update.