
This content originally appeared on Level Up Coding - Medium and was authored by Dmitry Glazunov

In the world of crypto, there’s a saying: “Not your keys, not your coins.”
And it’s more than just a meme — it’s a design principle.
Most popular wallets and exchanges today are custodial, meaning your private keys — and therefore your assets — are stored and managed by someone else. While this setup offers convenience, it comes with trade-offs: less control, potential lockouts, and increased risk if the custodian is compromised. A self-hosted (or self-custodial) crypto wallet, on the other hand, puts the control back where it belongs: with the user. Private keys are generated and stored directly on the device, transactions are signed locally, and no third-party ever touches your seed phrase. This approach prioritizes security, decentralization, and true ownership.
In this article, I’m sharing how I approached building a self-hosted crypto wallet in a mobile app, specifically for Android and iOS. I’ll walk through the key parts of the implementation. It’s not a full deep dive into every edge case, but it covers the main steps and decisions that matter in practice.
Why build a self-hosted crypto wallet in your app
Integrating with third-party wallets (MetaMask, Trust Wallet) is convenient, but:
- You depend on their UX
- You can’t fully customize security behavior
- You can’t operate offline
- You can’t embed Web3 deeply into your mobile flow
Sometimes, the better solution is to own the entire wallet stack, especially if:
- You’re building a custom DeFi app
- You want a fully embedded wallet
- Your app works offline
- You plan to support multiple networks or key derivation
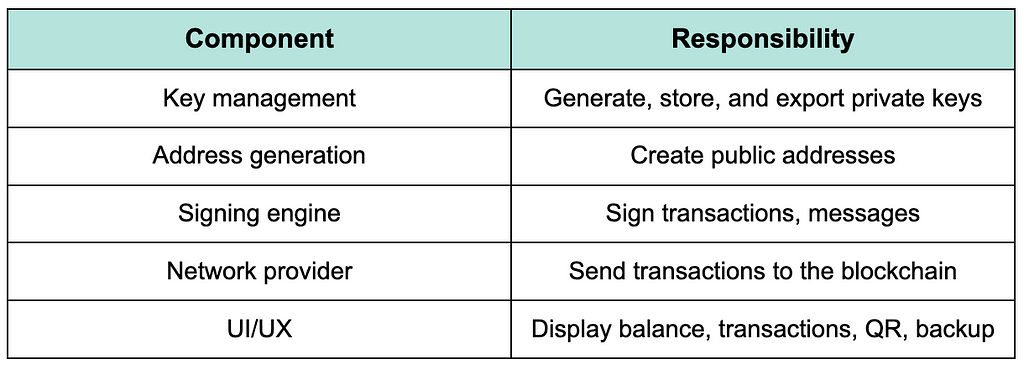
Core components of a self-hosted wallet
The private key is the foundation of a crypto wallet’s security. It must be unique, random, and generated in a cryptographically secure way. Let me show you how I approached private key generation on Android and iOS — using both system-level APIs and crypto libraries built for Web3.. The libraries will be used for Android — Web3j, iOS — web3.swift
Android
val ecKeyPair = Keys.createEcKeyPair()
val privateKey = ecKeyPair.privateKey.toString(16)
val publicKey = ecKeyPair.publicKey.toString(16)
Web3j not only simplifies key generation, but also supports key pair handling and Ethereum address derivation out of the box.
iOS
import web3swift

let keystore = try! EthereumKeystoreV3(password: "strong_password")
let keyData = try! JSONEncoder().encode(keystore!.keystoreParams)
let address = keystore!.addresses!.first!.address
This generates a new Ethereum-compatible private key and wraps it in a Keystore JSON format, compatible with MetaMask and other tools.
Key takeaways
- A secure private key must be exactly 256 bits (32 bytes) and generated using cryptographically strong algorithms.
- Never use Random(), UUID(), or other non-crypto-safe methods to generate keys.
Secure storage of private keys
Android — using Android Keystore
The Android Keystore System provides a container to securely generate and store cryptographic keys. While it doesn’t allow you to store arbitrary data like private keys directly, you can generate a symmetric key in the Keystore and use it to encrypt and decrypt your private key securely.
Generate an AES key in the Keystore
val keyGen = KeyGenerator.getInstance(
    KeyProperties.KEY_ALGORITHM_AES, "AndroidKeyStore"
)
keyGen.init(
    KeyGenParameterSpec.Builder(
        "wallet_key_alias",
        KeyProperties.PURPOSE_ENCRYPT or KeyProperties.PURPOSE_DECRYPT
    )
        .setBlockModes(KeyProperties.BLOCK_MODE_GCM)
        .setEncryptionPaddings(KeyProperties.ENCRYPTION_PADDING_NONE)
        .build()
)
val secretKey = keyGen.generateKey()
Encrypt the private key
val cipher = Cipher.getInstance("AES/GCM/NoPadding")
cipher.init(Cipher.ENCRYPT_MODE, secretKey)
val iv = cipher.iv // save this for decryption
val ciphertext = cipher.doFinal(privateKeyBytes)
You can now store ciphertext and iv in EncryptedSharedPreferences or a local encrypted database.
iOS — using Secure Enclave + Keychain
On iOS, the Secure Enclave is a coprocessor that provides cryptographic operations isolated from the main processor. Keys generated inside the Secure Enclave cannot be accessed directly, which makes it ideal for storing private keys or wrapping them securely.
There are two main approaches:
- Use Secure Enclave to generate and store an asymmetric key pair.
- Use Keychain to store encrypted private key data (e.g., as hex or JSON).
Storing raw key data in Keychain (wrapped with biometric protection)
let key = "private_key_hex".data(using: .utf8)!
let query: [String: Any] = [
    kSecClass as String: kSecClassGenericPassword,
    kSecAttrAccount as String: "wallet_private_key",
    kSecValueData as String: key,
    kSecAttrAccessible as String: kSecAttrAccessibleWhenUnlockedThisDeviceOnly,
    kSecUseAuthenticationUI as String: kSecUseAuthenticationUIAllow
]

SecItemAdd(query as CFDictionary, nil)
You can enable Face ID / Touch ID by using kSecAccessControl with biometryCurrentSet.
Generating a private key directly in the Secure Enclave
let attributes: [String: Any] = [
    kSecAttrKeyType as String: kSecAttrKeyTypeECSECPrimeRandom,
    kSecAttrKeySizeInBits as String: 256,
    kSecAttrTokenID as String: kSecAttrTokenIDSecureEnclave,
    kSecAttrIsPermanent as String: true,
    kSecAttrLabel as String: "com.myapp.secureKey"
]

var error: Unmanaged<CFError>?
let privateKey = SecKeyCreateRandomKey(attributes as CFDictionary, &error)
This key is non-exportable. You can use it for signing via SecKeyCreateSignature, but you’ll never see the raw key bytes.
Best practices
- Never store private keys in plain text (even in internal storage or SharedPreferences).
- Use hardware-backed storage whenever possible (e.g., StrongBox, Secure Enclave).
- Add biometric access where appropriate, especially on iOS.
- Always store IVs and other encryption metadata alongside the encrypted key.
- Back up encrypted keys only with user permission, or encourage seed phrase export.
Connecting to the Blockchain
Once your app can generate and securely store private keys, the next essential step is enabling it to interact with the blockchain — whether to fetch balances, sign messages, or send transactions.
Running your own Ethereum node is rarely practical for mobile apps due to performance and maintenance overhead. Instead, most apps rely on remote JSON-RPC providers like Infura or Alchemy.
In this article, I’ll be using Infura to connect to the Ethereum network for several reasons:
- Free and easy to get started
- Supports mainnet and testnets (Goerli, Sepolia)
- Secure HTTPS and WebSocket support
- No need to maintain your own full node
- Well-supported in mobile libraries like web3j and web3.swift
To use Infura, sign up at infura.io, create a project, and copy your HTTPS RPC URL, which will look like this:
https://mainnet.infura.io/v3/YOUR_INFURA_PROJECT_ID
Infura enforces rate limits, but the free tier is sufficient for most mobile apps.
For development and testing, you can use the Sepolia testnet:
https://sepolia.infura.io/v3/YOUR_PROJECT_ID
WebSocket endpoints (wss://...) are also available if you need to listen to on-chain events.
Android — Using Web3j
Wallet generation
Generate a new wallet file using a password and store it securely. Then, load credentials from that file to extract the wallet address.
val walletDirectory = File(context.filesDir, "wallets")
val password = "strong_password"

// Generates a new wallet file encrypted with the given password
val walletFileName = WalletUtils.generateNewWalletFile(password, walletDirectory)

// Loads the wallet credentials from file
val credentials = WalletUtils.loadCredentials(password, File(walletDirectory, walletFileName))

val address = credentials.address
println("Wallet address: $address")
- The wallet is saved as a Keystore V3 JSON file, encrypted with the provided password. It’s compatible with MetaMask, Trust Wallet, and other standard Ethereum wallets.
- The file is stored in the app’s internal storage (context.filesDir), which is sandboxed — but you should still encrypt backups or exported copies.
- The password is not recoverable — if lost, the wallet cannot be decrypted. You should prompt the user to choose it carefully and offer a way to back up the keystore file.
- WalletUtils.loadCredentials(...) is a blocking call — avoid running it on the main thread in production. Use withContext(Dispatchers.IO) when calling from a coroutine.
- The returned credentials.address is in checksum format (e.g., 0xAbc...123), ready to use for querying balances or sending transactions.
Get balance
Create a Web3j client connected to Infura and request the current balance for the loaded wallet address.
// Create a Web3 client using Infura as the JSON-RPC provider
val web3 = Web3j.build(HttpService("https://mainnet.infura.io/v3/<API_KEY>"))

// Request the current balance of the wallet address (in Wei)
val ethGetBalance = web3.ethGetBalance(
    credentials.address,                     // Ethereum address of the wallet
    DefaultBlockParameterName.LATEST         // Query the latest block
).send()                                     // Send the request (blocking call)

// Extract the balance as a BigInteger (value in Wei)
val balance = ethGetBalance.balance

// Convert from Wei to Ether and print the result
println("Balance: ${Convert.fromWei(balance.toString(), Convert.Unit.ETHER)} ETH")
- The result is returned in Wei, which is the smallest denomination in Ethereum (1 ETH = 10 ¹⁸ Wei).
- The .send() method is synchronous — it blocks the current thread. In production, make sure to run this on a background thread or use Kotlin coroutines with Dispatchers.IO.
Sign and send the transaction
Manually build and sign a transaction using the loaded credentials. Then convert it to hex and send it to the network.
// Create a raw Ethereum transaction object (for sending Ether)
val transaction = RawTransaction.createEtherTransaction(
    nonce,              // Nonce: number of transactions sent from the sender address
    gasPrice,           // Gas price in Wei (price per unit of gas)
    gasLimit,           // Gas limit for the transaction (e.g., 21000 for basic ETH transfer)
    recipientAddress,   // Address you're sending ETH to
    amountInWei         // Amount to send, in Wei (BigInteger)
)

// Sign the transaction using the sender's credentials (private key)
val signedTx = TransactionEncoder.signMessage(transaction, credentials)

// Convert the signed transaction to a hex string ready to be broadcast
val hexValue = Numeric.toHexString(signedTx)

// Send the signed transaction to the Ethereum network via Infura
val response = web3.ethSendRawTransaction(hexValue).send()

// Print the transaction hash returned by the Ethereum node
println("Transaction hash: ${response.transactionHash}")
- Make sure that nonce, gasPrice, and gasLimit are correctly fetched and estimated beforehand:
- Use ethGetTransactionCount(...) to get the nonce.
- Use ethGasPrice() or estimate via ethEstimateGas(...) if needed.
- TransactionEncoder.signMessage(...) works offline — the private key never leaves the device.
- If the transaction is valid, ethSendRawTransaction(...) returns a transaction hash immediately — the transaction will then be mined.
iOS — Using web3.swift
Wallet generation
Generate a BIP39 mnemonic and initialize a keystore. The keystore can be exported and stored securely in the iOS Keychain.
import web3swift
import TrustKeystore

// Generate a new 12-word mnemonic phrase (128 bits of entropy)
let mnemonic = try! BIP39.generateMnemonics(bitsOfEntropy: 128)!

// Create a BIP-32 hierarchical deterministic wallet from the mnemonic
let keystore = try! BIP32Keystore(
    mnemonics: mnemonic,         // The generated mnemonic phrase
    password: "StrongPass123",   // Encryption password for the keystore
    mnemonicsPassword: ""        // Usually empty unless passphrase is used (BIP-39 extension)
)

// Extract the first Ethereum address associated with the wallet
let address = keystore?.addresses?.first?.address

// Print the Ethereum wallet address to verify it was generated successfully
print("Wallet address: \(address ?? "N/A")")
- The BIP39.generateMnemonics(...) call returns a human-readable seed phrase, which the user can back up.
- The BIP32Keystore uses this seed phrase to derive a hierarchical deterministic (HD) wallet, fully compatible with MetaMask, Trust Wallet, etc.
- The resulting wallet is encrypted with the provided password ("StrongPass123") and can be exported as a Keystore V3 JSON file.
- This approach gives you both:
— A secure, password-encrypted keystore
— A mnemonic phrase for backup and recovery
Get balance
Use web3.swift to connect to Infura and fetch the balance for the wallet address. All units are in wei, so further formatting is optional.
// Create a Web3 instance connected to the Ethereum mainnet via Infura
let web3 = Web3.InfuraMainnetWeb3()

// Add the keystore (with private key) to the Web3 instance
//  This allows web3 to sign transactions or access account info securely
web3.addKeystoreManager(KeystoreManager([keystore!]))

// Query the ETH balance for the wallet address (in Wei)
let balanceResult = try web3.eth.getBalance(
    address: EthereumAddress(address!)!  // Convert the address string to EthereumAddress
)

// Print the balance (in Wei units) to the console
print("Balance: \(balanceResult.quantity) wei")
- Web3.InfuraMainnetWeb3() sets up the connection using the default Infura Mainnet endpoint. You can customize this by providing your own Infura project URL if needed.
- getBalance(...) returns the balance in Wei — to convert it to Ether, you can use Web3.Utils.formatToEthereumUnits(...).
- This code assumes you already have a valid keystore object and address.
Sign and send the transaction
Use the preconfigured Web3 object to send ETH. The transaction is signed using the attached keystore manager.
// Define the recipient Ethereum address
let toAddress = EthereumAddress("0xRecipient")!

// Create default transaction options (gas, value, sender, etc.)
var options = TransactionOptions.defaultOptions

// Set the amount of ETH to send (converted to BigUInt from string)
options.value = Web3.Utils.parseToBigUInt("0.01", units: .eth)

// Set the sender address (must match an address in the keystore)
options.from = EthereumAddress(address!)

// Send the transaction - this signs and broadcasts it using the keystore
let tx = try web3.eth.sendETH(
    to: toAddress,                 // Recipient address
    amount: "0.01",                // Amount in ETH (as string)
    extraData: Data(),             // Optional data field (empty in this case)
    transactionOptions: options    // Includes sender, gas, and value
)

// Print the resulting transaction hash
print("Transaction hash: \(tx.transaction.txhash)")
- This code automatically signs the transaction using the keystore added to web3 earlier.
- The transaction is broadcast to the Ethereum mainnet (via Infura, since we’re using Web3.InfuraMainnetWeb3()).
- If you want to send a transaction on testnet (e.g., Sepolia), just use:
let web3 = Web3(provider: Web3HttpProvider(URL(string: "https://sepolia.infura.io/v3/<YOUR_PROJECT_ID>")!)!)
- You can also customize gas price, gas limit, or include data payloads for contract calls using the TransactionOptions.
Testing & Security
Building a crypto wallet isn’t just about generating keys and sending transactions — it’s also about making it secure and reliable in the real world. That means:
- testing in safe environments,
- validating inputs,
- and protecting against common attacks.
Using Ethereum testnets
Before you send any real ETH, it’s critical to test all functionality on a testnet. This ensures:
- Key generation and storage works correctly
- Transactions are signed and sent successfully
- The app handles balances, fees, and errors as expected
Where to get test ETH?
You can request free ETH for testing from public faucets:
Once you connect to a testnet (e.g. Sepolia via Infura), you can interact with the blockchain exactly as you would on mainnet — without risking real funds.
Error handling & Security practices
Your app must gracefully handle not just happy paths, but also edge cases and failures — from network outages to invalid addresses or out-of-gas errors.
Common issues you should handle:
- Network errors (IOException, timeouts)
- Insufficient balance for the transaction
- Incorrect gas estimation or underpricing
- Transaction signature failure
- Wrong password when decrypting the keystore
- Invalid wallet address format or empty input
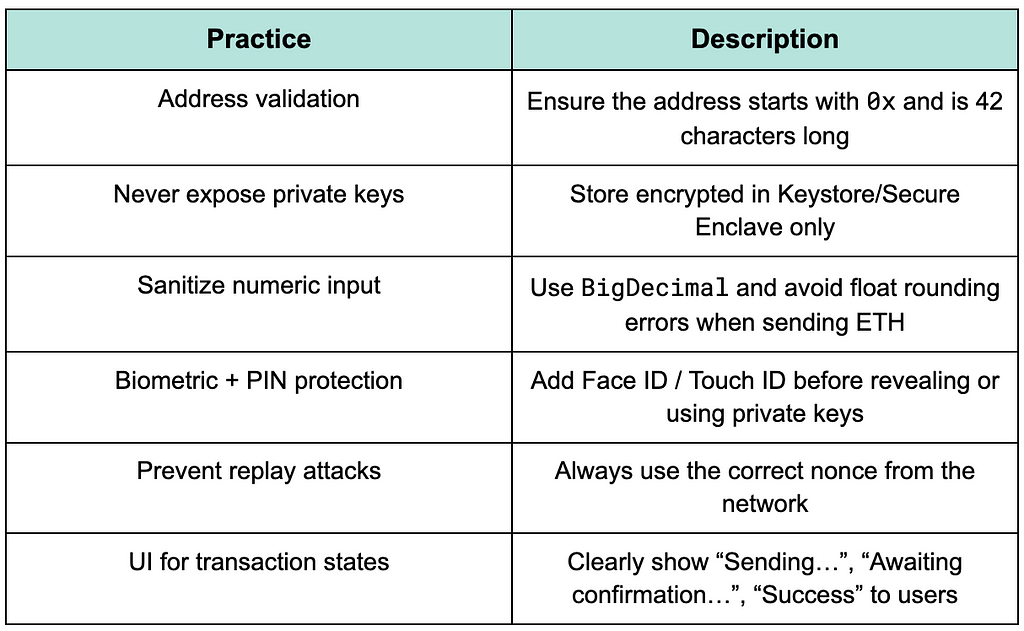
Core security recommendations
User Interface
A good crypto wallet UI is more than just a send button and an address field. It should be:
- intuitive even for beginners,
- responsive to network status and errors,
- and secure, without overwhelming the user.
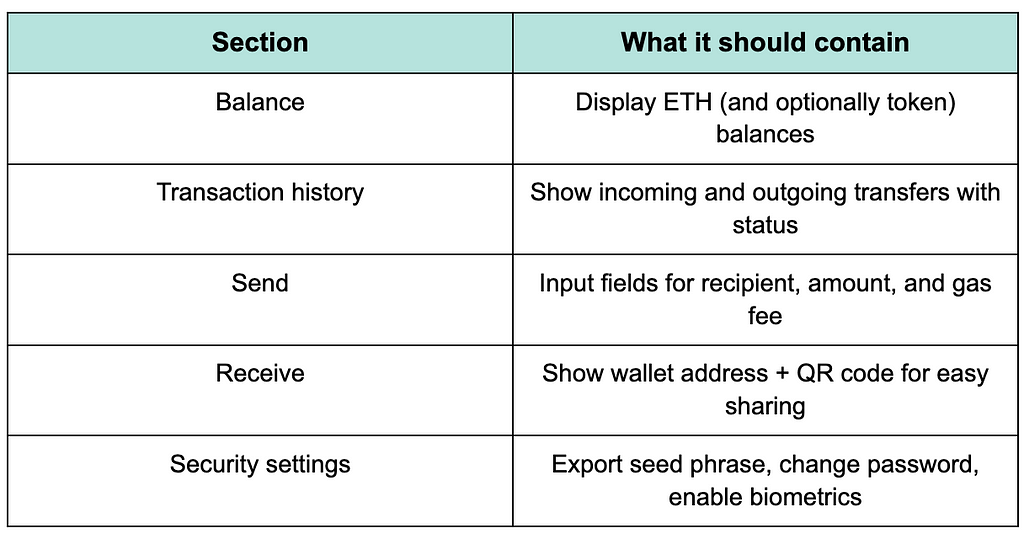
Interface design
Key screens to include:
UX enhancements
Notifications
- Local push notification when a new incoming transaction is detected
- Confirmation message with transaction hash after successful send
Confirmations
- Show a pre-send confirmation screen with recipient, amount, and gas fee
- Optional biometric prompt (Face ID / Touch ID) before signing a transaction
QR code support
- Allow scanning recipient addresses via QR
- Show your own wallet address as QR for easier receiving
Developer mode (optional)
- Display advanced data like gas limit, nonce, and transaction hash
- Allow switching between mainnet and testnet (e.g. Sepolia)
Conclusion
Building a self-hosted crypto wallet in a mobile app may seem complex at first — but it’s absolutely doable with the right tools and approach. By keeping everything on-device and giving users full control over their keys, you create something that’s not only functional, but also aligned with the core principles of Web3.
If you’re building something in this space — whether it’s a simple wallet, a DeFi onboarding flow, or a Web3-powered app — I’d love to hear about it. Share your progress, your questions, or just ideas you’re exploring. Let’s keep pushing the boundaries of what’s possible on mobile.

Hands-on insights into mobile development, architecture, and team leadership.
📬 Follow me on Medium
How to build a self-hosted crypto wallet in your mobile app was originally published in Level Up Coding on Medium, where people are continuing the conversation by highlighting and responding to this story.
This content originally appeared on Level Up Coding - Medium and was authored by Dmitry Glazunov
Dmitry Glazunov | Sciencx (2025-06-25T17:13:31+00:00) How to build a self-hosted crypto wallet in your mobile app. Retrieved from https://www.scien.cx/2025/06/25/how-to-build-a-self-hosted-crypto-wallet-in-your-mobile-app/
Please log in to upload a file.
There are no updates yet.
Click the Upload button above to add an update.