
This content originally appeared on Level Up Coding - Medium and was authored by George Zefkilis
Building a Personal Finance Management App: Secure API Authentication — A Practical Guide

In previous posts (data model, Rest API) I started building a personal finance tracker — implementing the frontend, designing the data model, setting up database migrations, and creating a backend server that exposed a RESTful API to connect the database with the frontend dashboard. This initial setup worked well for local development and prototyping.
However, as I considered sharing the app with friends or making it publicly accessible, I wanted to experiment with securing user data. Authentication quickly became the next logical step — ensuring that only authorized users can access, modify, or view their own financial records
In this post, I’ll walk you through how I added secure, JWT-based API authentication to the finance tracker — turning a working prototype into a more secure and production-ready application.
Note: I’m not a security expert, and this project is primarily for learning purposes — so some areas may still need improvement or corrections :)
🔍 API Authentication: The Landscape
There are several common approaches to API authentication:
- Session-based authentication: The server keeps track of logged-in users via sessions and cookies. This is traditional but less suited for modern SPAs and mobile apps.
- Token-based authentication: The server issues a token (like a JWT) after login, and the client includes this token in each request. This is stateless and ideal for REST APIs.
- OAuth: Used for delegated access (e.g., “Login with Google”), often for third-party integrations.
🧠 Why JWT (JSON Web Token) Authentication
For this project, we chose JWT-based authentication because:
- Statelessness: The backend doesn’t need to store session data, making the API scalable and easy to deploy in containers (eg. Docker).
- Frontend-backend decoupling: The frontend (React) and backend (Node.js/Express) can be developed and deployed independently.
- Security: JWTs are cryptographically signed, ensuring data integrity and authenticity.
- Simplicity: JWTs are easy to use with modern frontend frameworks and mobile apps.
Note: For more details about JWTs you can check here
🖼 System Architecture: Before and After Authentication
📌 Before Authentication
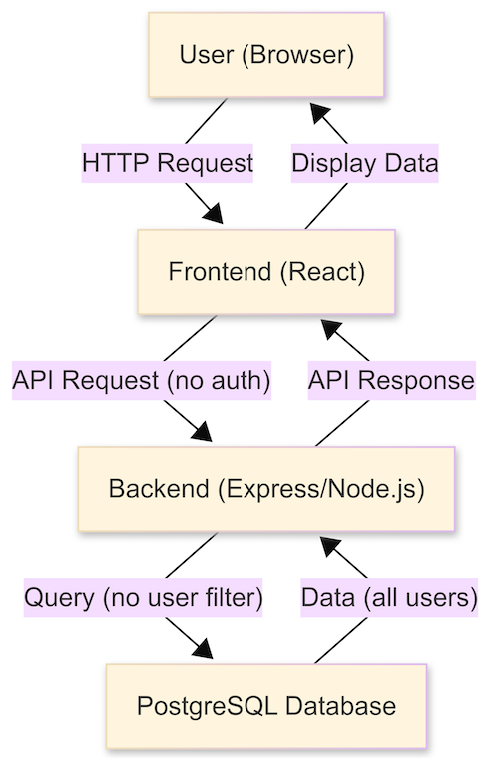
Explanation:
- Any user could access the frontend and make API requests.
- The backend did not verify user identity.
- All data was accessible, and queries were not filtered by user.
- No way to prevent unauthorized access or data leaks.
✅ After Authentication
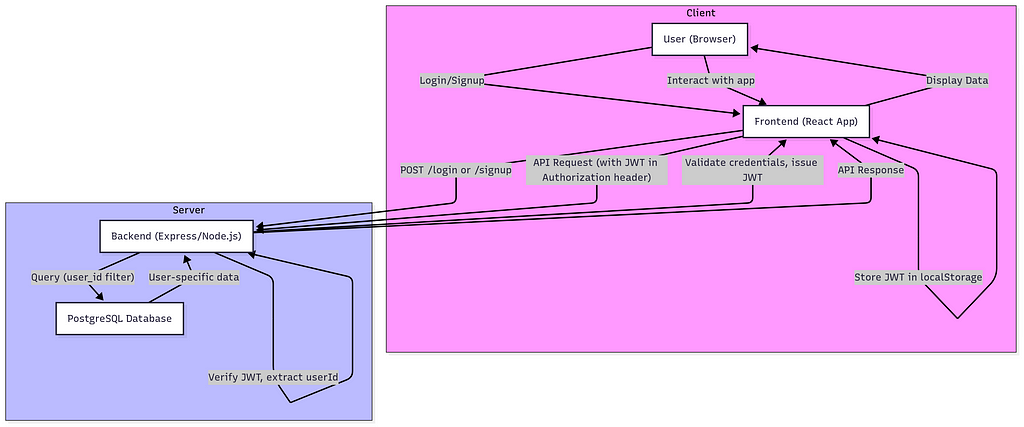
Explanation:
- Users must log in or sign up to receive a JWT.
- Frontend stores and uses the token in every request.
- Backend verifies the token, extracts the userId.
- All queries are filtered to return only that user’s data.
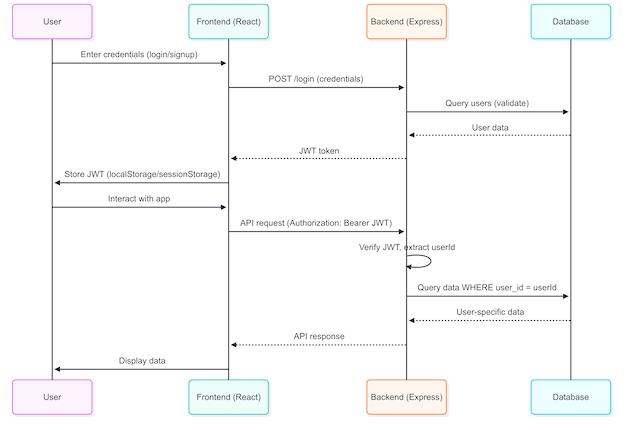
🔁 JWT Authentication Flow
Here’s how the authentication flow works after integrating JWT.
🧠 What Changed with Authentication
Before Auth
- No user identity: Anyone could access any data.
- No data isolation: All users’ data was visible to any request.
- No session or token management: No way to know who was making requests.
After Auth
- User identity established: Every request is tied to a specific user via JWT.
- Data isolation: All queries are filtered by user_id, so users only see their own data.
- Stateless authentication: No server-side sessions; JWTs are self-contained and verified on each request.
- Automatic logout: Expired or invalid tokens result in a 401, triggering auto-logout on the frontend.
🔧 Backend Authentication: How It Works
1. User Registration
- Users sign up with a username, email, and password.
- Passwords are hashed using bcryptjs before being stored in the PostgreSQL database.
- The users table stores user credentials and metadata.
📄 Example: Registration Flow (for full code check the repo)
// src/services/auth.service.ts
import bcrypt from 'bcryptjs';

export const createUser = async (email: string, password: string) => {
    const hashedPassword = await bcrypt.hash(password, 12);
    const result = await query(
        'INSERT INTO users (email, password_hash) VALUES ($1, $2) RETURNING id, email',
        [email, hashedPassword]
    );
    return result.rows[0];
};

export const findUserByEmail = async (email: string) => {
    const result = await query('SELECT * FROM users WHERE email = $1', [email]);
    return result.rows[0];
};
2. User Login and JWT Issuance
- Users log in with their credentials.
- The backend verifies the password using bcryptjs.compare.
- If valid, a JWT is generated containing the user’s ID and an expiration time.
- The JWT is signed with a secret stored in an environment variable.
📄 Example: JWT creation (for full code check the repo)
// src/controllers/auth.controller.ts
import jwt from 'jsonwebtoken';

export const login = async (req: Request, res: Response, next: NextFunction) => {
    try {
        const { email, password } = userSchema.parse(req.body);

        const user = await authService.findUserByEmail(email);
        if (!user) {
            return res.status(401).json({ message: 'Invalid credentials.' });
        }

        const isEqual = await bcrypt.compare(password, user.password_hash);
        if (!isEqual) {
            return res.status(401).json({ message: 'Invalid credentials.' });
        }

        const secret = process.env.JWT_SECRET;
        if (!secret) {
            throw new Error('JWT_SECRET is not set in environment variables.');
        }

        const token = jwt.sign(
            {
                userId: user.id,
                email: user.email,
            },
            secret,
            { expiresIn: '1h' }
        );

        return res.status(200).json({ token, userId: user.id });

    } catch (error) {
        next(error);
        return;
    }
};
3. Protecting Routes with Middleware
- All protected routes use an is-auth middleware.
- The middleware checks for the JWT in the Authorization header.
- If the token is valid, the user’s ID is attached to the request object.
- If the token is missing, invalid, or expired, the backend returns a 401 Unauthorized.
📄 Example: is-auth Middleware (for full code check the repo)
// src/middleware/is-auth.ts
import jwt from 'jsonwebtoken';

export default (req: AuthenticatedRequest, res: Response, next: NextFunction) => {
    const authHeader = req.get('Authorization');
    if (!authHeader) {
        res.status(401).json({ message: 'Not authenticated.' });
        return;
    }
    const token = authHeader.split(' ')[1];
    let decodedToken;
    try {
        const secret = process.env.JWT_SECRET;
        if (!secret) {
            throw new Error('JWT_SECRET is not set in environment variables.');
        }
        decodedToken = jwt.verify(token, secret);
    } catch (err) {
        res.status(401).json({ message: 'Token verification failed.' });
        return;
    }
    if (!decodedToken || typeof decodedToken !== 'object') {
        res.status(401).json({ message: 'Not authenticated.' });
        return;
    }
    req.userId = (decodedToken as { userId: string }).userId;
    next();
    return;
};
4. User-Specific Data Access
- All service and database queries are filtered by the authenticated user’s ID.
- This ensures users can only access their own data.
📄 Example: Filtering by userId (for full code check the repo)
// src/services/feed.service.ts
const transactions = await db.query(
  'SELECT * FROM transactions WHERE user_id = $1',
  [req.userId]
);
5. Environment Variables and Secrets
- JWT secrets and other sensitive config are never hardcoded.
- Secrets are managed via .env and injected via docker-compose.yaml.
📄 Example: docker-compose.yaml (for full code check the repo)
# docker-compose.yaml
services:
  backend:
    environment:
      - JWT_SECRET=${JWT_SECRET}
🌐 Frontend Authentication Flow
- On login, the frontend receives a JWT and stores it (e.g., in localStorage or sessionStorage).
- For every API request to protected endpoints, the frontend includes the JWT in the Authorization header as a Bearer token.
- If the backend returns a 401 or 403 or 500, the frontend logs the user out and redirects to login.
📄 Example: Centralized API Fetch Helper (for full code check the repo)
// src/utils/apiFetch.ts
import { AuthContext } from '../context/AuthContext';

export async function apiFetch(
  url: string,
  options: RequestInit = {},
  authContext: React.ContextType<typeof AuthContext>
) {
  const response = await fetch(url, options);

  if (response.status === 401 || response.status === 403 || response.status === 500) {
    if (authContext && authContext.logout) {
      authContext.logout();
    }
    throw new Error('Session expired. Please log in again.');
  }

  return response;
}
⚠️ Security Considerations
🔐 Where you store tokens matters!
Storing JWTs in localStorage is a popular choice in single-page applications (SPAs) due to its simplicity and persistence across page reloads. However, it's important to understand that localStorage is vulnerable to cross-site scripting (XSS)attacks. If malicious JavaScript is injected into our app, it could potentially access and exfiltrate the token.
For personal projects or lower-risk applications, this approach is generally acceptable — as long as we follow strict XSS mitigation practices. But for highly sensitive applications, a more secure approach is recommended.
Safer Alternatives:
- Store JWT in HttpOnly, Secure, SameSite cookies
- Or use in-memory storage (tokens reset on reload)
Mitigation:
- Use a Content Security Policy (CSP)
- Sanitize all user input
- Validate backend headers and origins
✅ Conclusion
JWT-based authentication provides a secure, scalable, and modern solution for protecting user data in web applications. In this personal finance tracker, it ensures that every API request is tied to a verified user and that all data access is filtered by userId—so users can only view their own records.
By following best practices — like password hashing, short-lived tokens, environment-based secrets, and proper error handling — we’ve built an authentication system that enhances both privacy and maintainability. Combined with stateless tokens and middleware-based protection, this approach keeps the backend lean while enabling smooth frontend integration.
There’s still more to be done to make the app fully secure and feature-complete — but one step at a time.
Future improvements could include:
- 🔄 Refresh-token flow for seamless re-authentication
- 🔐 Role-based access control (RBAC) for admins vs. regular users
- 🌐 OAuth2 login (e.g., Google, GitHub) to reduce signup friction
- 📜 Audit logging to track user activity and data change
I hope you found this guide helpful and that it gives you a solid foundation for adding secure authentication to your own apps.
Thanks for reading!
Your feedback is always appreciated and helps improve these posts.
📦 Check out the code in the GitHub repository
🤝 Feel free to connect with me on LinkedIn
Referrences
JSON Web Token (JWT) - GeeksforGeeks
https://curity.io/resources/learn/jwt-best-practices/
Building a Personal Finance Management App: Secure API Authentication — A Practical Guide was originally published in Level Up Coding on Medium, where people are continuing the conversation by highlighting and responding to this story.
This content originally appeared on Level Up Coding - Medium and was authored by George Zefkilis
George Zefkilis | Sciencx (2025-06-30T01:32:05+00:00) Building a Personal Finance Management App: Secure API Authentication — A Practical Guide. Retrieved from https://www.scien.cx/2025/06/30/building-a-personal-finance-management-app-secure-api-authentication-a-practical-guide/
Please log in to upload a file.
There are no updates yet.
Click the Upload button above to add an update.