
This content originally appeared on Telerik Blogs and was authored by Héctor Pérez
C# Markup can simplify the creation of interfaces using C# through the chaining of extension methods.
In this article, I will guide you on using C# Markup to simplify graphical interface creation with C# using .NET MAUI instead of XAML code, thanks to the .NET MAUI Community Toolkit. Let’s get started!
What Is C# Markup and How to Install It in Your Project?
Have you ever wanted to create .NET MAUI interfaces with C# code, but the resulting code is very complex and tangled? To help with this issue, the team behind the .NET MAUI Community Toolkit created a set of helper methods and classes called C# Markup, which simplify the creation of graphical interfaces using C# code instead of XAML code.
Installing C# Markup is very straightforward by following these steps:
- Install the
CommunityToolkit.Maui.MarkupNuGet package. - Navigate to the MauiProgram.cs file and add the
UseMauiCommunityToolkitMarkup()method, as shown below:
public static class MauiProgram
{
    public static MauiApp CreateMauiApp()
    {
        var builder = MauiApp.CreateBuilder();
        builder
            .UseMauiApp<App>()
            .UseMauiCommunityToolkitMarkup()
            ...
}
With this, you are ready to create your first graphical interface using C# Markup.
Simplifying Code with C# Markup
To see C# Markup in action, let’s start by creating a new ContentPage class in the project called MarkupPage.cs. Now, suppose you want to convert the following XAML code into its C# equivalent:
<Grid HorizontalOptions="Center" RowDefinitions="0.333*,0.333*,0.333*">

    <Label
        Grid.Row="0"
        FontSize="16"
        Text="Text 1"
        TextColor="#333"
        VerticalOptions="Center" />

    <Label
        Grid.Row="1"
        FontSize="16"
        Text="Text2"
        TextColor="#333"
        VerticalOptions="Center" />

    <Label
        Grid.Row="2"
        FontSize="16"
        Text="Text 3"
        TextColor="#333"
        VerticalOptions="Center" />
</Grid>
The result of the conversion into C# code would be the following:
public class MarkupPage : ContentPage
{
    public MarkupPage()
    {
        var label1 = new Label
        {
            VerticalOptions = LayoutOptions.Center,
            FontSize = 16,
            Text = "Text 1",
            TextColor = Color.FromArgb("#333")
        };

        var label2 = new Label
        {
            VerticalOptions = LayoutOptions.Center,
            FontSize = 16,
            Text = "Text 2",
            TextColor = Color.FromArgb("#333")
        };

        var label3 = new Label
        {
            VerticalOptions = LayoutOptions.Center,
            FontSize = 16,
            Text = "Text 3",
            TextColor = Color.FromArgb("#333")
        };

        var grid = new Grid
        {
            HorizontalOptions = LayoutOptions.Center,
            RowDefinitions =
            {
                new RowDefinition { Height = new GridLength(0.333, GridUnitType.Star) },
                new RowDefinition { Height = new GridLength(0.3333, GridUnitType.Star) },
                new RowDefinition { Height = new GridLength(0.333, GridUnitType.Star) }
            }
        };

        grid.Add(label1, 0, 0);
        grid.Add(label2, 0, 1);
        grid.Add(label3, 0, 2);

        Content = grid;
    }
}
It is important to note that it is not necessary to use C# Markup to create graphical interfaces with C# as I have shown you before, although using it provides utilities to simplify the code and make it more compact.
For example, if you visit the section on Grid extensions in the documentation, you’ll see that the toolkit offers various ways to create the same functionality in a simpler manner.
One of these ways is the use of the Define method, which is part of the Columns and Rows classes. This method takes, in one of its overloads, a params ReadOnlySpan type with a GridLength generic, meaning that we can create all rows and columns using the terms Auto, Star, Stars(starValue), and any absolute value that defines a width or height.
With the knowledge above, we could simplify the creation of the Grid as follows:
var grid = new Grid
{
    HorizontalOptions = LayoutOptions.Center,
    RowDefinitions = Rows.Define(Stars(0.333), Stars(0.3333), Stars(0.333))
};
Another set of very useful methods can be found in the Element extensions, which are a collection of extension methods for configuring properties such as padding, effects, font attributes, dynamic resources, text, text color, etc.
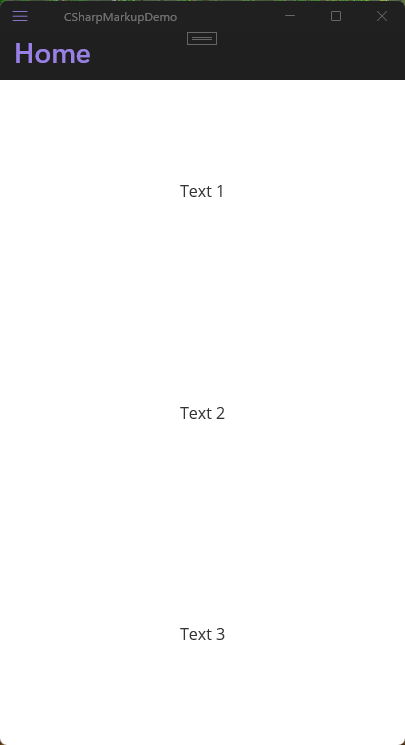
Moreover, the TextAlignment extensions allow you to quickly position elements throughout layouts. Combining several of the extension methods allows us to use method chaining to recreate Label-type controls in a simplified way:
var label1 = new Label()
    .FontSize(16)
    .TextColor(Color.FromArgb("#333"))
    .Text("Text 1")
    .CenterVertical();

var label2 = new Label()
    .FontSize(16)
    .TextColor(Color.FromArgb("#333"))
    .Text("Text 2")
    .CenterVertical();

var label3 = new Label()
    .FontSize(16)
    .TextColor(Color.FromArgb("#333"))
    .Text("Text 3")
    .CenterVertical();
The result of running the application is as follows:
Data Binding Using C# Markup
Another set of useful methods are those that help you perform data binding. For example, suppose you have a view like the following:
<Border
    Background="LightBlue"
    HeightRequest="500"
    StrokeShape="RoundRectangle 12"
    WidthRequest="250">
    <Grid HorizontalOptions="Center" RowDefinitions="*,*,*,*">
        <Entry
            Grid.Row="0"
            FontSize="16"
            HorizontalTextAlignment="Center"
            Text="{Binding Number1}"
            TextColor="#333"
            VerticalOptions="Center" />

        <Entry
            Grid.Row="1"
            FontSize="16"
            HorizontalTextAlignment="Center"
            Text="{Binding Number2}"
            TextColor="#333"
            VerticalOptions="Center" />

        <Entry
            Grid.Row="2"
            FontSize="16"
            HorizontalTextAlignment="Center"
            Text="{Binding Result}"
            TextColor="#333"
            VerticalOptions="Center" />

        <Button
            Grid.Row="3"
            Command="{Binding AddNumbersCommand}"
            FontSize="16"
            Text="Calculate"
            TextColor="#333"
            VerticalOptions="Center" />
    </Grid>
</Border>
The code above is bound to the following View Model:
public partial class MainViewModel : ObservableObject
{
    [ObservableProperty]
    int number1 = 25;
    [ObservableProperty]
    int number2 = 25;
    [ObservableProperty]
    int result = 50;

    [RelayCommand]
    public void AddNumbers()
    {
        Result = Number1 + Number2;
    }
}
Now then, converting the XAML code to C# code using C# Markup for object creation results in the following:
public MarkupPage()
{
    var viewModel = new MainViewModel();
    var entry1 = new Entry()
        .FontSize(16)
        .TextCenterHorizontal()
        .TextColor(Color.FromArgb("#333"))
        .CenterVertical();
    entry1.SetBinding(Entry.TextProperty, new Binding(nameof(MainViewModel.Number1), source: viewModel));

    var entry2 = new Entry()
        .FontSize(16)
        .TextCenterHorizontal()
        .TextColor(Color.FromArgb("#333"))
        .CenterVertical();
    entry2.SetBinding(Entry.TextProperty, new Binding(nameof(MainViewModel.Number2), source: viewModel));

    var entryResult = new Entry()
        .FontSize(16)
        .TextCenterHorizontal()
        .TextColor(Color.FromArgb("#333"))
        .CenterVertical();
    entryResult.SetBinding(Entry.TextProperty, new Binding(nameof(MainViewModel.Result), source: viewModel));

    var calculateButton = new Button()
        .FontSize(16)
        .Text("Calculate")
        .TextColor(Color.FromArgb("#333"))
        .CenterVertical();
    calculateButton.SetBinding(Button.CommandProperty, new Binding(nameof(MainViewModel.AddNumbersCommand), source: viewModel));

    var grid = new Grid
    {
        HorizontalOptions = LayoutOptions.Center,
        RowDefinitions = Rows.Define(Star, Star, Star, Star)
    };

    grid.Children.Add(entry1);
    Grid.SetRow(entry1, 0);

    grid.Children.Add(entry2);
    Grid.SetRow(entry2, 1);

    grid.Children.Add(entryResult);
    Grid.SetRow(entryResult, 2);

    grid.Children.Add(calculateButton);
    Grid.SetRow(calculateButton, 3);

    var border = new Border()
    {
        StrokeShape = new RoundRectangle { CornerRadius = 12 },
        Content = grid
    }
    .BackgroundColor(Colors.LightBlue)
    .Height(500)
    .Width(250);

    Content = new StackLayout()
    {
        Children = { border }
    }
    .CenterVertical()
    .CenterHorizontal();

    BindingContext = viewModel;
}
You can see that the bindings are being applied once the object has been created. C# Markup allows us to concatenate the Bind method to create bindings during the object creation, as follows:
var viewModel = new MainViewModel();
var entry1 = new Entry()
    .FontSize(16)
    .TextCenterHorizontal()
    .TextColor(Color.FromArgb("#333"))
    .CenterVertical()
    .Bind(Entry.TextProperty,
        source: viewModel,
        getter: static (MainViewModel vm) => vm.Number1,
        setter: static (MainViewModel vm, int value) => vm.Number1 = value);

var entry2 = new Entry()
    .FontSize(16)
    .TextCenterHorizontal()
    .TextColor(Color.FromArgb("#333"))
    .CenterVertical()
    .Bind(Entry.TextProperty,
        source: viewModel,
            getter: static (MainViewModel vm) => vm.Number2,
        setter: static (MainViewModel vm, int value) => vm.Number2 = value);

var entryResult = new Entry()
    .FontSize(16)
    .TextCenterHorizontal()
    .TextColor(Color.FromArgb("#333"))
    .CenterVertical()
    .Bind(Entry.TextProperty,
        source: viewModel,
        getter: static (MainViewModel vm) => vm.Number2,
        setter: static (MainViewModel vm, int value) => vm.Number2 = value);
entryResult.SetBinding(Entry.TextProperty, new Binding(nameof(MainViewModel.Result), source: viewModel));
In the case of the Command, we can bind it in a similar way by using the Bind method:
var calculateButton = new Button()
    .FontSize(16)
    .Text("Calculate")
    .TextColor(Color.FromArgb("#333"))
    .CenterVertical()
    .Bind(Button.CommandProperty,
        source: viewModel,
        getter: static (MainViewModel vm) => vm.AddNumbersCommand,
        mode: BindingMode.OneTime);
Now, you might think that creating bindings feels just as laborious as defining the binding in the first way. However, the Bind method contains several overloads for performing operations such as defining Converters, Multiple Bindings, Gesture Bindings, etc. For instance, imagine that you’ve defined a Converter that returns a color based on an input value:
internal class BackgroundConverter : IValueConverter
{
    public object? Convert(object? value, Type targetType, object? parameter, CultureInfo culture)
    {
        int number = (int)value!;
        if(number < 100)
        {
            return Colors.DarkRed;
        }
        else if (number < 200)
        {
            return Colors.DarkOrange;
        }
        else if (number < 300)
        {
            return Colors.DarkGreen;
        }
        else
        {
            return Colors.DarkBlue;
        }
    }
    ...
}
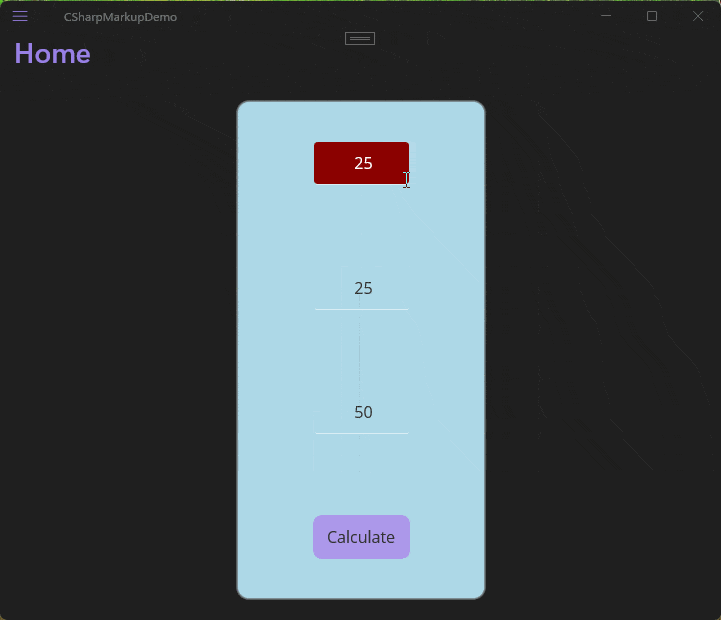
If you wanted to add the converter to the Entries, all you need to do is use the Bind method again to bind to the BackgroundColor property using BackgroundConverter, as follows:
var entry1 = new Entry()
    .FontSize(16)
    .TextCenterHorizontal()
    .TextColor(Color.FromArgb("#333"))
    .CenterVertical()
    .Bind(Entry.TextProperty,
        source: viewModel,
        getter: static (MainViewModel vm) => vm.Number1,
        setter: static (MainViewModel vm, int value) => vm.Number1 = value)
    .Bind(Entry.BackgroundColorProperty,
        source: viewModel,
        path: nameof(MainViewModel.Number1),
        converter: new BackgroundConverter());
After executing the above application, we will get the full functionality of the bindings as shown in the following example:
Other Interesting Methods Using C# Markup
The methods I’ve shown you above are only a part of the total set of methods available in the Community Toolkit. We have methods for working with layouts available in AbsoluteLayout Extensions, BindableLayout Extensions and FlexLayout Extensions.
You can also find extension methods for working with themes and resources in DynamicResourceHandler Extensions and Style Extensions.
Finally, methods are also available for working with controls in Image Extensions, ItemsView Extensions, Label Extensions, Placeholder Extensions and VisualElement Extensions.
Conclusion
Throughout this article, you’ve seen how C# Markup can simplify the creation of interfaces using C# through the chaining of extension methods. You’ve seen comparisons between creating UIs using XAML code, standard C# code and C# Markdown, which has given you a better perspective on its usage.
This content originally appeared on Telerik Blogs and was authored by Héctor Pérez
Héctor Pérez | Sciencx (2025-07-01T14:14:19+00:00) Using C# Markup to Create Graphical Interfaces in .NET MAUI. Retrieved from https://www.scien.cx/2025/07/01/using-c-markup-to-create-graphical-interfaces-in-net-maui/
Please log in to upload a file.
There are no updates yet.
Click the Upload button above to add an update.