
This content originally appeared on Telerik Blogs and was authored by Dhananjay Kumar
This series introduces developers to NestJS. Part 2 shows how to set up a SQL Azure database, create endpoints and perform CRUD operations.
This is the second part of the NestJS learning series. Part 1 covered setting up the Nest project.
In this part, we will cover the following topics:
- Connecting to the SQL Azure database
- Setting up Connection String
- Endpoints for CRUD operations
Setting Up the Database
MySQL Azure has a database called nomadcoder. In this article, we will connect to this database and perform CRUD operations on a company table. We will create the book table from the code itself.
To connect to SQL Azure, you’ll need a connection string, which can be found on the database’s overview page.

Click on Connection Strings, then go to the ODBC tab to find the connection string for the Nest API.
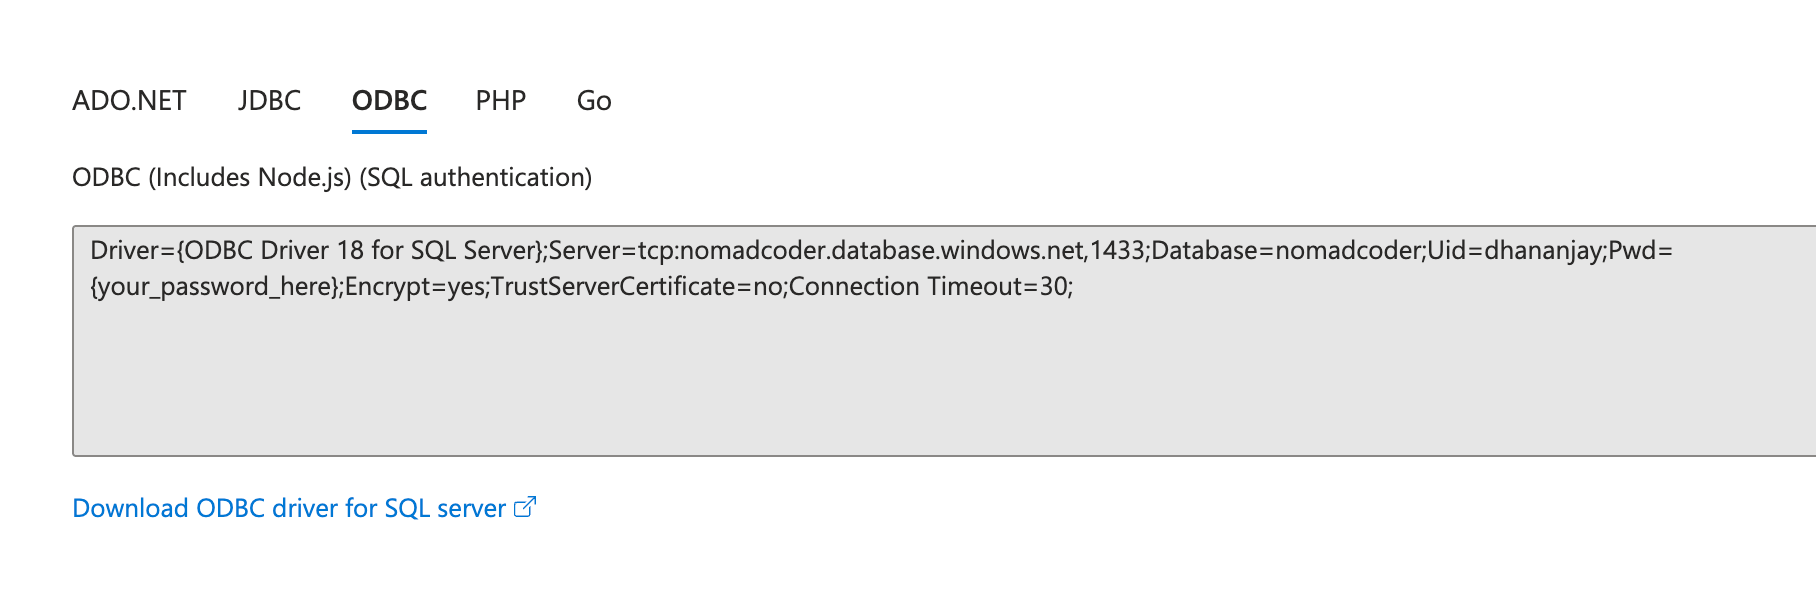
To connect to SQL Azure, you must install the ODBC driver on your computer. If it’s not installed, you can download it.
Installing Required Dependencies
We will use TypeORM to connect to SQL Azure, so install the dependencies listed below in your project.
npm install @nestjs/typeorm
npm install typeorm mssql
Configuring TypeORM
To set up TypeORM in the project, update the app.module.ts file below. Include the TypeOrmModule in the module’s imports array.
@Module({
  imports: [
     TypeOrmModule.forRoot({
      type: 'mssql',
      host: '<your-sql-azure-server>.database.windows.net',
      port: 1433,
      username: '<your-username>',
      password: '<your-password>',
      database: '<your-database>',
      entities: [__dirname + '/**/*.entity{.ts,.js}'],
      synchronize: true,
      options: {
        encrypt: true,
      },
    }),
  ],
Update the following values:
- Host: Set to your SQL Azure database server
- Username: Set to your SQL Azure database username
- Password: Set to the password for that user
- Database: Set to the name of your database
- Synchronize: Use true for development and false for production
Creating Entity
We first need to define an entity corresponding to a database table to implement CRUD endpoints. Since Nest CLI doesn’t provide a command to generate entities, we will create them manually.
We will migrate the books array from the previous post to an Azure SQL database. To start, create a new file named book.entity.ts inside the book folder.
When working with TypeORM, the entity file needs to be named with the .entity.ts extension. We can create the Company entity class as shown below:
book.entity.ts
import { Entity, PrimaryGeneratedColumn, Column } from 'typeorm';

@Entity()
export class Book {
  @PrimaryGeneratedColumn()
  id: number;

  @Column()
  title: string;

  @Column()
  author: string;
}
TypeORM will use the Book class as an entity. Entities in TypeORM represent tables in a database, and each class instance corresponds to a row in that table.
The @Entity() decorator marks the class as a database entity, so TypeORM knows to create a table for it. Each property in the class is decorated with either @PrimaryGeneratedColumn() or @Column(), which tells TypeORM how to map these properties to columns in the database table.
Once the Book entity has been added to the project, include it in the imports array of the AppModule as shown below.
 @Module({
  imports: [
     TypeOrmModule.forRoot({
      type: 'mssql',
      host: 'nomadcoder.database.windows.net',
      port: 1433,
      username:’’,
      password: '',
      database: 'nomadcoder',
      entities: [__dirname + '/**/*.entity{.ts,.js}'],
      synchronize: true, // Disable in production
      options: {
        encrypt: true,
      },
    }),
    TypeOrmModule.forFeature([Book]),

  ],
At this point, when you run the application, a book table with no data will be created in the Azure SQL database.
Inserting a Record
We will implement the logic to insert a book record within the BookService class. To perform database operations, import the Repository from TypeORM and inject it into the service’s constructor.
import { Book } from './book.entity';
import { Repository } from 'typeorm';
@Injectable()
export class BookService {
  constructor(
    @InjectRepository(Book)
    private readonly bookRepository: Repository<Book>,
  ) {}
}
To insert a book record, use the create function of the repository class as shown below:
async create(bookData: Partial<Book>): Promise<Book> {
    const book = this.bookRepository.create(bookData);
    return this.bookRepository.save(book);
  }
BookRepository.create(bookData) is called inside the asynchronous create method. This creates a new Book entity instance using the provided data.
The following line is bookRepository.save(book), which saves the newly created entity to the database and returns the saved Book object. The save method is asynchronous and returns a promise that resolves to the persisted entity.
In the BookController, add a POST endpoint to insert a new book.
@Post()
    async create(@Body() bookData: Partial<Book>, @Res() res: Response) {
        try {
            const book = await this.bookService.create(bookData);
            return res.status(HttpStatus.CREATED).json(book);
        } catch (error) {
            return res.status(HttpStatus.INTERNAL_SERVER_ERROR).json({ message: 'Error creating book' });
        }
    }
The asynchronous create method accepts two parameters: @Body() bookData: Partial<Book> and @Res() res: Response.
The @Body() decorator extracts and maps the request body to the bookData. As the bookData type is partial, the client can send an object with some or all of the Book properties.
The @Res() decorator injects the raw response object, allowing manual control over the HTTP response.
Inside the method, a try-catch block handles errors. The code attempts to create a new book by calling bookService.create(bookData).
If successful, it sends a response with HTTP status code 201 (Created) and the newly created book as JSON. If an error occurs during the process, the catch block sends a 500 (Internal Server Error) response with an error message.
When you send a POST request to http://localhost:3000/book with a book object in the request body, a new row should be inserted into the book table.
{
  "id": 1,
  "title": "The Great Gatsby",
  "author": "F. Scott Fitzgerald"
}
Fetching Records
To fetch data from the SQL Azure book table, we will use TypeORM’s repository functions.
   async findAll(): Promise<Book[]> {
        return this.bookRepository.find();
    }

    async findOne(id: number): Promise<Book | null> {
        return this.bookRepository.findOneBy({ id });
    }
We are using TypeORM’s repository pattern methods. The bookRepository.find() function retrieves all book records from the database, while bookRepository.findOneBy({ id }) fetches a specific book by its ID. If a matching book is found, it’s returned; otherwise, the method returns null.
In the BookController, add GET endpoints to fetch books or a particular book.
@Get()
    async findAll(@Res() res: Response) {
        try {
            const books = await this.bookService.findAll();
            return res.status(HttpStatus.OK).json(books);
        } catch (error) {
            return res.status(HttpStatus.INTERNAL_SERVER_ERROR).json({ message: 'Error fetching books' });
        }
    }
- The
findAll()method is asynchronous and takes one parameter@Res() res: Responsefor custom response handling. - It uses
bookService.findAll()function to fetch all books from the database. - The method responds with HTTP status 200 (OK) and the book data in JSON format.
- If any error occurs during the process, the catch block sends a 500 (Internal Server Error) response with an appropriate error message.
To fetch a particular book with the ID, add the endoint as below.
@Get(':id')
    async findOne(@Param('id') id: string, @Res() res: Response) {
        try {
            const book = await this.bookService.findOne(Number(id));
            if (book) {
                return res.status(HttpStatus.OK).json(book);
            } else {
                return res.status(HttpStatus.NOT_FOUND).json({ message: 'Book not found' });
            }
        } catch (error) {
            return res.status(HttpStatus.INTERNAL_SERVER_ERROR).json({ message: 'Error fetching book' });
        }
    }
- The
findOne()method is asynchronous and takes two parameters:@Param('id') id: stringand@Res() res: Response. - The
@Param('id')decorator extracts the id value from the URL and@Res()for custom response handling. It usesbookService.findOne()function to fetch a particular book from the database. - The method responds with HTTP status 200 (OK) and the book data in JSON format if a book is found.
- If no book is found, it responds with HTTP status 404 (Not Found) and a message indicating that the book was not found.
- If any error occurs during the process, the catch block sends a 500 (Internal Server Error) response with an appropriate error message.
When you send a GET request to http://localhost:3000/book, you should get all books. And when you send a GET request to http://localhost:3000/book/1, you should get the particular book with ID 1.
Deleting a Record
To delete data from the book table, we will use TypeORM’s repository functions.
async remove(id: number): Promise<DeleteResult> {
        return this.bookRepository.delete(id);
    }
We are using the TypeORM bookRepository.delete() function to delete the record with the given ID from the book table.
In the BookController, add DELETE endpoints to delete a book with the given Id as shown below:
  @Delete(':id')
    async remove(@Param('id') id: string, @Res() res: Response) {
        try {
            const result = await this.bookService.remove(Number(id));
            if (result.affected && result.affected > 0) {
                return res.status(HttpStatus.NO_CONTENT).send();
            } else {
                return res.status(HttpStatus.NOT_FOUND).json({ message: 'Book not found' });
            }
        } catch (error) {
            return res.status(HttpStatus.INTERNAL_SERVER_ERROR).json({ message: 'Error deleting book' });
        }
    }
- The
remove()method is asynchronous and takes two parameters:@Param('id') id: stringand@Res() res: Response. - The
@Param('id')decorator extracts the id value from the URL and@Res()for custom response handling. It usesbookService.remove()function to delete a particular book from the database. - If no book is found, it responds with HTTP status 404 (Not Found) and a message indicating that the book was not found.
- If any error occurs during the process, the catch block sends a 500 (Internal Server Error) response with an appropriate error message.
To delete a particular book with the ID 1, perform a DELETE operation on the endpoint http://localhost:3000/book/1.
Updating a Record
To update data in the book table, we will use TypeORM’s repository function update.
async update(id: number, updateData: Partial<Book>): Promise<Book | null> {
        await this.bookRepository.update(id, updateData);
        return this.bookRepository.findOneBy({ id });
    }
We are using the TypeORM bookRepository.update() function to update the record with the given ID from the book table, and then fetching that particular updated record.
In the BookController, add PUT endpoints to update a book with the given ID as shown below:
  @Put(':id')
    async update(
        @Param('id') id: string,
        @Body() updateData: Partial<Book>,
        @Res() res: Response
    ) {
        try {
            const updatedBook = await this.bookService.update(Number(id), updateData);
            if (updatedBook) {
                return res.status(HttpStatus.OK).json(updatedBook);
            } else {
                return res.status(HttpStatus.NOT_FOUND).json({ message: 'Book not found' });
            }
        } catch (error) {
            return res.status(HttpStatus.INTERNAL_SERVER_ERROR).json({ message: 'Error updating book' });
        }
    }
- The
update()method is asynchronous and takes three parameters:@Param('id') id: string,updateDatato update the book and@Res() res: Response. - The
@Param('id')decorator extracts the id value from the URL and@Res()for custom response handling. It usesbookService.update()function to update a particular book from the database. - If no book is found, it responds with HTTP status 404 (Not Found) and a message indicating that the book was not found.
- If any error occurs during the process, the catch block sends a 500 (Internal Server Error) response with an appropriate error message.
To update a particular book with the ID 1, perform a PUT operation on the endpoint http://localhost:3000/book/1.
Summary
In this part of the multi-part NestJS learning series, you developed an API capable of performing CRUD operations on a SQL Azure table. I hope you found this section helpful—thanks for following along!
This content originally appeared on Telerik Blogs and was authored by Dhananjay Kumar
Dhananjay Kumar | Sciencx (2025-07-21T13:02:21+00:00) Learning NestJS Part 2: Connecting to Database. Retrieved from https://www.scien.cx/2025/07/21/learning-nestjs-part-2-connecting-to-database/
Please log in to upload a file.
There are no updates yet.
Click the Upload button above to add an update.