
This content originally appeared on DEV Community and was authored by DEV Community
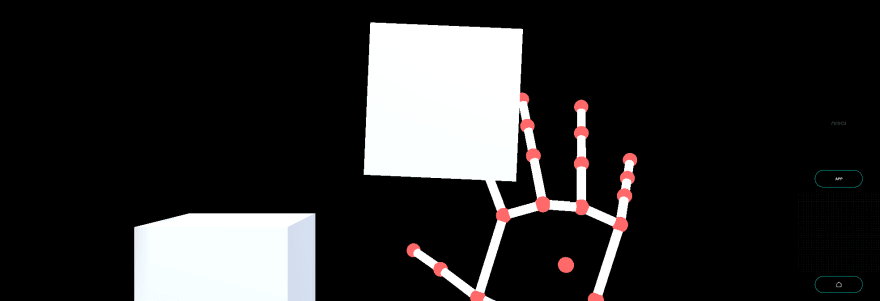
Touch the object with the index finger of your right hand.
Sample Repository
Run the sample
- Clone Sample Repository, Change current directory to
UCanTouchThis. And Open with Unity. - (If you don’t have NRSDK) Download NRSDK 1.7.0 from https://nreal-public.nreal.ai/download/NRSDKForUnityAndroid_1.7.0.unitypackage
- Open
Build Setting, change Platform toAndroid - Open
Project, selectAssets>import package>Custom Packageand importNRSDKForUnityAndroid_1.7.0.unitypackage. - Check
Build Settings>Player Settingsby referring to Configure Build Settings - Press
BuildformBuild Settingspanel - Install *.apk on Android or DevKit.
Tutorial
1. Setting up the project for Nreal development
- See Quickstart for Android - NRSDK Documentation and configure the build settings.
- (If you don’t have NRSDK) Download NRSDK 1.7.0 from https://nreal-public.nreal.ai/download/NRSDKForUnityAndroid_1.7.0.unitypackage
- Open
Project, selectAssets>import package>Custom Packageand importNRSDKForUnityAndroid_1.7.0.unitypackage.
2. Setting for HandTracking to NRInput
- Select
NRInput, and changeInput Source TypetoHands - Put
NRHand_RfromAssets>NRSDK>Prefabs>HandstoNRInput>Righton the Scene. - Put
NRHand_LfromAssets>NRSDK>Prefabs>HandstoNRInput>Lefton the Scene.
3. Disable NRHandPointer_R
- Select
NRHandPointer_RfromNRInput>Right>NRHand_Ron the Scene. - Disable
NRHandPointer_Rfrom Inspector Panel. - Do the same settings for the Left hand (
NRHandPointer_L) .
4. Create empty game objects
- Create an empty game object in the Scene with the name "HandController".
- Also, create an empty game object in the Scene with the name "Target".
- Set each GameObject's positions to 0.
-
Pos X: 0,Pos Y: 0,Pos Z: 0
-
5. Make Alpha material
- Create Material on
Assets - Change name to “AlphaMaterial”
- Change
Rendering Modeitem toFade.
6. Create Sphere for hand tracking
- Put
SphereinHandController.- Change name to “Hand_R_IndexTip”
-
Pos X: 0,Pos Y: 0,Pos Z: 0 -
Scale-
X: 0.03 ,Y: 0.03 ,Z: 0.03
-
- Add component
Ridgitbody.- Uncheck
Use Gravity
- Uncheck
- Set a material “AlphaMaterial” to
MaterialsfromAssets.
7. Create C# script for hand tracking extension
- Create
C# Scriptin the asset with the file name "HandController.cs". - Write the code as follows.
using NRKernal;
using System.Collections;
using System.Collections.Generic;
using UnityEngine;

/// <summary>
/// Hand Controller for Tip
/// </summary>
public class HandController : MonoBehaviour
{
    /// <summary>
    /// IndexTip GameObject
    /// </summary>
    public GameObject hand_R_IndexTip;

    // Start is called before the first frame update
    void Start()
    {
    }

    // Update is called once per frame
    void Update()
    {
        // Get Right Hand
        HandState handState = NRInput.Hands.GetHandState(HandEnum.RightHand);
        // Get Index Tip Position of right hand
        Vector3 handStateThumbTipPosition = handState.GetJointPose(HandJointID.IndexTip).position;
        // Set Hand R IndexTip Sphere position
        hand_R_IndexTip.transform.position = handStateThumbTipPosition;
    }
}
8. Attach the C# script on “HandController”
- Attach "HandController.cs" to “HandController” game object
- Set
hand_R_IndexTiponInspectorpanel to “Hand_R_IndexTip” game object from the scene.
- Set
9. Create Cube as a target object
- Put
SphereinTarget.- Change name to “TargetCube1”
-
Pos X: 0.1,Pos Y: -0.05,Pos Z: 0.8 -
Scale-
X: 0.1 ,Y: 0.1 ,Z: 0.1
-
- Add component
Ridgitbody.- Uncheck
Use Gravity
- Uncheck
10. Create C# script for target game object
- Create
C# Scriptin the asset with the file name "TargetCube.cs". - Write the code as follows.
using NRKernal;
using System.Collections;
using System.Collections.Generic;
using UnityEngine;
using UnityEngine.EventSystems;
using UnityEngine.UI;

/// <summary>
/// Target Cube Script
/// </summary>
public class TargetCube: MonoBehaviour
{
    // Start is called before the first frame update
    void Start()
    {
    }

    // Update is called once per frame
    void Update()
    {
    }

    /// <summary>
    /// Display event log using console
    /// </summary>
    /// <param name="collision"></param>
    void OnCollisionEnter(Collision collision)
    {
        Debug.Log("Hit!");
    }
}
11. Attach the C# script on “Target”
- Attach "TargetCube.cs" to “TargetCube1” game object.
12. Build
- Press
BuildformBuild Settingspanel - Install *.apk on Android or DevKit.
This content originally appeared on DEV Community and was authored by DEV Community
Print
Share
Comment
Cite
Upload
Translate
Updates

There are no updates yet.
Click the Upload button above to add an update.
APA
MLA
DEV Community | Sciencx (2022-02-25T08:11:10+00:00) U Can Touch This – MR Tutorial for Nreal light. Retrieved from https://www.scien.cx/2022/02/25/u-can-touch-this-mr-tutorial-for-nreal-light/
" » U Can Touch This – MR Tutorial for Nreal light." DEV Community | Sciencx - Friday February 25, 2022, https://www.scien.cx/2022/02/25/u-can-touch-this-mr-tutorial-for-nreal-light/
HARVARDDEV Community | Sciencx Friday February 25, 2022 » U Can Touch This – MR Tutorial for Nreal light., viewed ,<https://www.scien.cx/2022/02/25/u-can-touch-this-mr-tutorial-for-nreal-light/>
VANCOUVERDEV Community | Sciencx - » U Can Touch This – MR Tutorial for Nreal light. [Internet]. [Accessed ]. Available from: https://www.scien.cx/2022/02/25/u-can-touch-this-mr-tutorial-for-nreal-light/
CHICAGO" » U Can Touch This – MR Tutorial for Nreal light." DEV Community | Sciencx - Accessed . https://www.scien.cx/2022/02/25/u-can-touch-this-mr-tutorial-for-nreal-light/
IEEE" » U Can Touch This – MR Tutorial for Nreal light." DEV Community | Sciencx [Online]. Available: https://www.scien.cx/2022/02/25/u-can-touch-this-mr-tutorial-for-nreal-light/. [Accessed: ]
rf:citation » U Can Touch This – MR Tutorial for Nreal light | DEV Community | Sciencx | https://www.scien.cx/2022/02/25/u-can-touch-this-mr-tutorial-for-nreal-light/ |
Please log in to upload a file.
There are no updates yet.
Click the Upload button above to add an update.