
This content originally appeared on Zell Liew and was authored by Zell Liew
Gulp is a build tool that helps you automate your development workflow. In this article, we will dive deep into Gulp to show you how to use it effectively to create a simple workflow.
Let’s get started.
Note: This article is outdated. The latest version can be found here
Installing Gulp
We’ll start off the process by installing Gulp onto your computer. Gulp requires you to have Node.js and Node Package Manager (NPM) installed on your system, so if you haven’t gotten them yet, just head over to Node.js’s website and download the installer.
Once you’re done installing Node.js and NPM, you can install Gulp by typing the following command in the command line:
$ sudo npm install gulp -g
# Note: Only Mac users require the `sudo` keyword
Oh btw, you can opt not to use the sudo keyword by following these instructions
This command installs gulp globally and allows you to use the gulp command anywhere on your computer.
We’re now done with installing Gulp and we can move on to create a new project that uses Gulp.
Creating a Gulp Project
Let’s create a folder named project as we work through this article. Once you have created the folder, you’ll want to run npm init in it.
$ npm init
This npm init command asks you a few questions and creates a package.json file to store information about dependencies that you’ll use in this project.
The first dependency in our project is Gulp since we’re using it as our build tool. You’ll have to install gulp within the project folder by augmenting the install code slightly:
$ npm install gulp --save-dev
See that we have removed sudo from the command and replaced the -g flag with the --save-dev flag?
This --save-dev flag tells NPM to install gulp locally in (a dev term for within) the project, and save this dependency information in the package.json file.
Since we’re installing a package locally, we don’t have a need for administrator rights and hence the sudo was dropped. Removing this sudo is important and could potentially cause errors if you don’t.
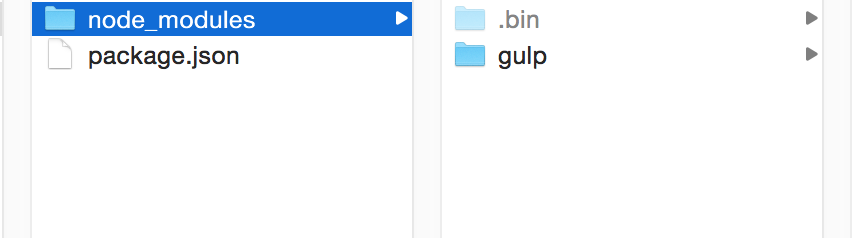
Now, if you take a look at your package.json file, you should see that Gulp has been added as a dev dependency.

You should also see a gulp folder within the new node_modules folder that was created when you ran the npm install gulp --save-dev command.
Next, we’ll have to create a gulpfile.js file to store all our Gulp configurations.
There’s one more thing to do before we start configuring Gulp to create a workflow. We have to make sure we’re clear on how the project is structured.
Determining Project Structure
Let’s start off with a generic structure for a webapp:
project/
  |- app/
      |- css/
      |- fonts/
      |- images/
      |- index.html
      |- js/
      |- scss/
  |- dist/
  |- gulpfile.js
  |- node_modules/
  |- package.json
In this structure, the app folder will store all our written code, and the dist folder will be used to store code that’s production-ready.
Don’t worry if your actual projects has a structure that’s different from the current one we’re using right now. Once you’ve gotten the hang of Gulp, you’ll see how to tweak the gulpfile to work with your structure easily. So let’s work with this structure for now.
Once you’ve created the project structure with the corresponding folders, we can proceed on to writing your first Gulp task.
Writing Your First Task
To configure Gulp, you’ll first have to require gulp within your gulpfile.js:
// Requiring Gulp
var gulp = require('gulp');
This require statement tells Node.js to look under the node_modules folder, find a package named gulp and pass it to the gulp variable.
Once we have this gulp variable, we can use it to write different Gulp tasks. Here’s the basic syntax of a gulp task.
// Basic Gulp task syntax
gulp.task('task-name', function () {
  // Stuff here
})
Let’s write a task named ‘hello’ for a start, and let the task do a log that says “Hello Zell!”.
// Basic Gulp task syntax
gulp.task('hello', function () {
  console.log('Hello Zell!');
})
The task name is important since you’ll be able to use the task anywhere else in the Gulpfile to run the task.
You can also use run a task with the command line by using gulp plus the name of the task.
$ gulp hello
You should see a log from the terminal saying “Hello Zell!” once you ran the code in the terminal.

In reality, gulp tasks are slightly more complex that what we have written so far. You’ll have to use two other gulp methods, gulp.src and gulp.dest.
Creating a Real Task
Here’s what a real task may look like:
gulp.task('task-name', function () {
  gulp.src('src') // Get source files with gulp.src
    .pipe(somePlugin()) // Sends it through a gulp plugin
    .pipe(gulp.dest('dest')) // Outputs the file in the destination folder
})
Let’s put this template to use with a real example where we compile Sass to CSS. I’ll explain how to set up the task while we’re at it.
First, we’ll need to install a gulp plugin, gulp-sass, to compile Sass to CSS. We can install it with the npm install command with the --save-dev flag like what we did above.
$ npm install gulp-sass --save-dev
We will then need to require this plugin in the gulpfile.
var gulp = require('gulp');
// Requires the gulp-sass plugin
var sass = require('gulp-sass');
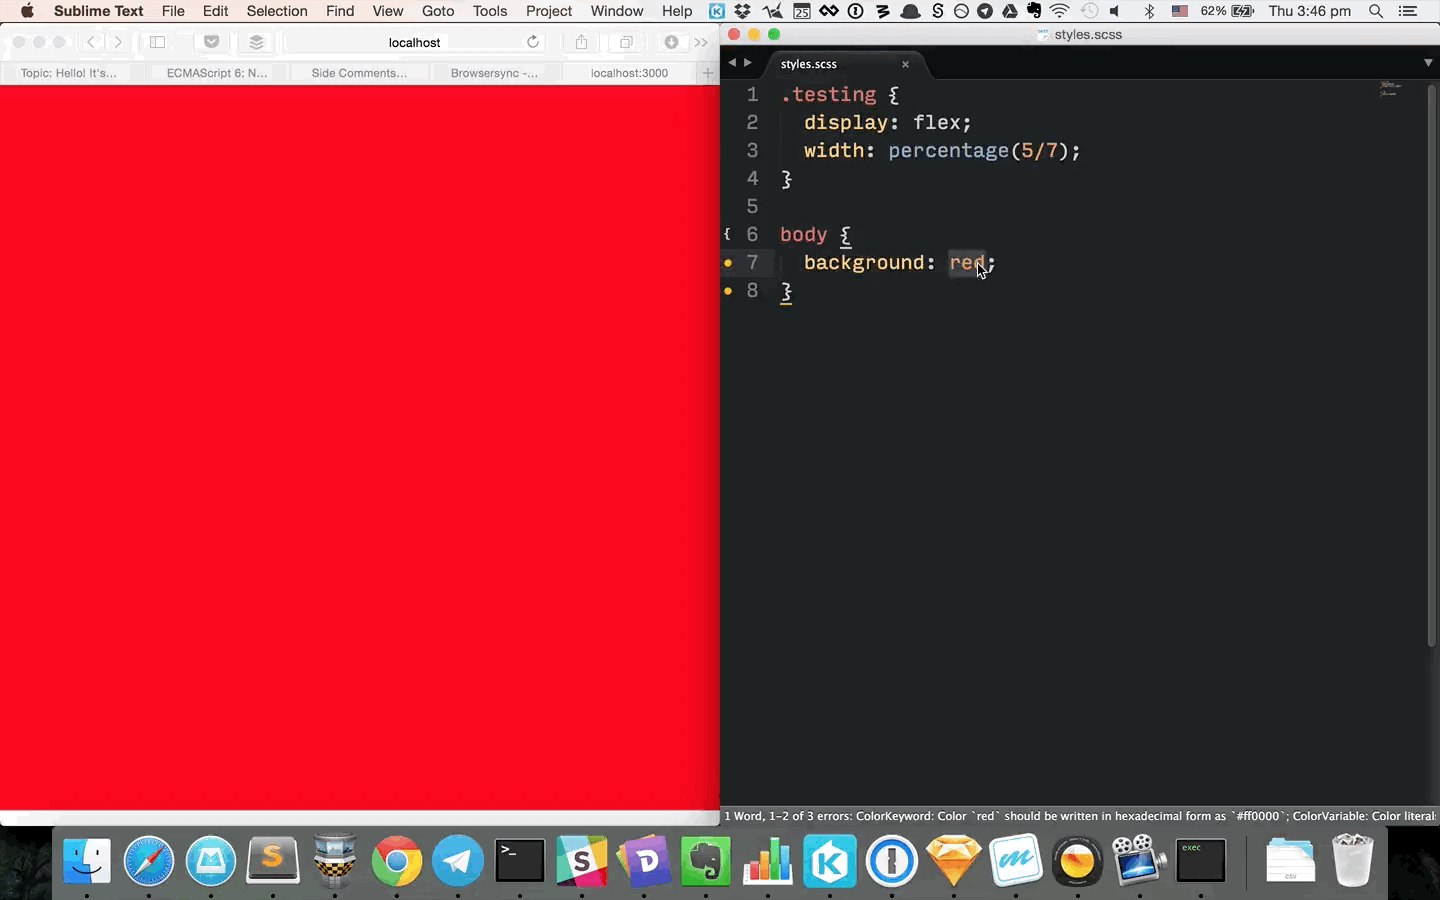
Now, create a styles.scss file within the app/scss folder and give it some styles to convert from Sass to CSS.
// Scss
.testing {
  display: flex;
  width: percentage(5/7);
  // Percentage is a Sass function that will be evaluated to CSS when compiled
}
This styles.scss file will be converted into CSS by passing through the gulp-sass plugin we installed. After passing through the plugin, it’ll be created as styles.css in the app/css folder.

Here’s how the task would look like:
gulp.task('sass', function() {
  gulp.src('app/scss/styles.scss') // Gets the styles.scss file
    .pipe(sass()) // Passes it through a gulp-sass task
    .pipe(gulp.dest('app/css')) // Outputs it in the css folder
});
We can test this sass task by running it in the command line.
$ gulp sass
Now, if you take a look at the styles.css file in app/css, you’ll see that the percentage() function has been evaluated into the following code:
.testing {
  display: flex;
  width: 71.42857%; }
This means our styles.scss file has successfully been compiled into CSS.
Adding more functionality to the sass task
Just compiling from Sass to CSS isn’t good enough. Sometimes it makes more sense to add more plugins to make thing simpler for us. One of the best plugins that you’ll ever use when converting from Sass to CSS is autoprefixer,which helps you write vendor prefixes according to caniuse.
Let’s try adding autoprefixer to our sass task.
To do so, we’ll have to install the gulp plugin for autoprefixer.
$ npm install gulp-autoprefixer --save-dev
Then we’ll have to require autoprefixer.
var gulp = require('gulp');
var sass = require('gulp-sass');
// Requiring autoprefixer
var autoprefixer = require('gulp-autoprefixer');
Autoprefixer is usually placed after Sass is compiled into CSS. In Gulp, we’ll want to add another .pipe() so the resultant CSS gets passed through autoprefixer before it’s created as styles.css in app/css.

The modified code is hence:
gulp.task('sass', function() {
  gulp.src('app/scss/styles.scss')
    .pipe(sass())
    .pipe(autoprefixer()) // Passes it through gulp-autoprefixer
    .pipe(gulp.dest('app/css'))
})
Now if you run gulp sass again, you’ll notice that the output in the styles.css file has changed to include vendor prefixes for the display flex property:
.testing {
  display: -webkit-box;
  display: -webkit-flex;
  display: -ms-flexbox;
  display: flex;
  width: 71.42857%; }
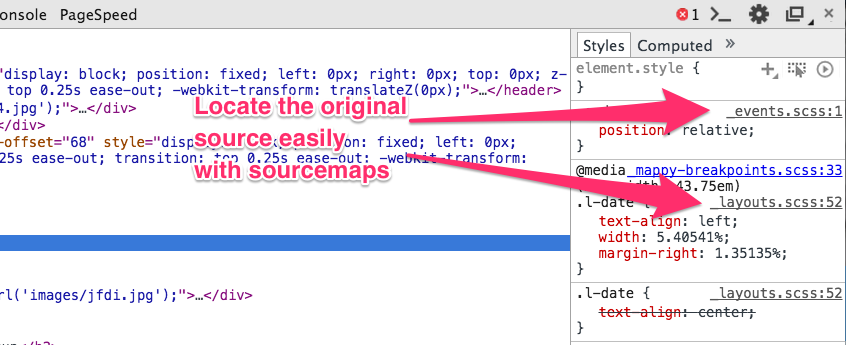
Another task that’ll help you out during development is to add sourcemaps.
A sourcemap is a string of information that tells the browser where different sections of the code is stored. With a CSS sourcemap, you can easily locate the original source code of specific lines of CSS just by checking out the inspector.
To add sourcemaps to the sass task, we’ll have to install the gulp-sourcemaps plugin.
$ npm install gulp-sourcemaps --save-dev
// Requiring Sourcemaps
var sourcemaps = require('gulp-sourcemaps');
The process to adding sourcemaps to our sass task is slightly different from adding autoprefixer. We’ll have to add two pipes instead of one.
First, we’ll need to initialize the sourcemap plugin right after getting source files from gulp.
Then, we’ll have to let the files pass through gulp-sass and gulp-autoprefixer before writing the sourcemaps at the end of the css file.

gulp.task('sass', function() {
  gulp.src('app/scss/styles.scss') // Gets the styles.scss file
    .pipe(sourcemaps.init()) // Initialize sourcemap plugin
    .pipe(sass())
    .pipe(autoprefixer())
    .pipe(sourcemaps.write()) // Writing sourcemaps
    .pipe(gulp.dest('app/css'))
})
Now if you run gulp sass on the terminal, you should be able to see that Gulp has written a sourcemap at the end of your CSS file.
.testing {
  display: -webkit-box;
  display: -webkit-flex;
  display: -ms-flexbox;
  display: flex;
  width: 71.42857%; }

/*# sourceMappingURL=data:application/json;base64,eyJ2ZXJzaW9uIjozLCJzb3VyY2VzIjpbInN0eWxlcy5zY3NzIl0sIm5hbWVzIjpbXSwibWFwcGluZ3MiOiJBQUFBO0VBQ0UscUJBQWM7RUFBZCxzQkFBYztFQUFkLHFCQUFjO0VBQWQsY0FBYztFQUNkLGlCQUFpQixFQUZUIiwiZmlsZSI6InN0eWxlcy5jc3MiLCJzb3VyY2VzQ29udGVudCI6WyIudGVzdGluZyB7XG4gIGRpc3BsYXk6IGZsZXg7XG4gIHdpZHRoOiBwZXJjZW50YWdlKDUvNyk7XG59Il0sInNvdXJjZVJvb3QiOiIvc291cmNlLyJ9 */
Automatically update the CSS file when you save
Now it’s quite some work to run the gulp sass task whenever we want to compile Sass to CSS. Wouldn’t it be awesome if Gulp would run it automatically?
Gulp can do that! You’ll just have to let Gulp check whether the styles.scss file was changed when you save it. This checking process is called watching in programming terms.
Gulp does this watching by providing us with a watch method that allows you to run any task whenever a file is changed.
// Gulp watch syntax
gulp.watch('files-to-watch', ['tasks', 'to', 'run']);
Instead of just watching the Sass files alone, you’ll often want to watch many types of files and run different tasks during a development process. In order to achieve that, we can create a watch gulp task that watches different files.
gulp.task('watch', function() {
  gulp.watch('app/scss/styles.scss', ['sass']);
  // ... Other watchers
});
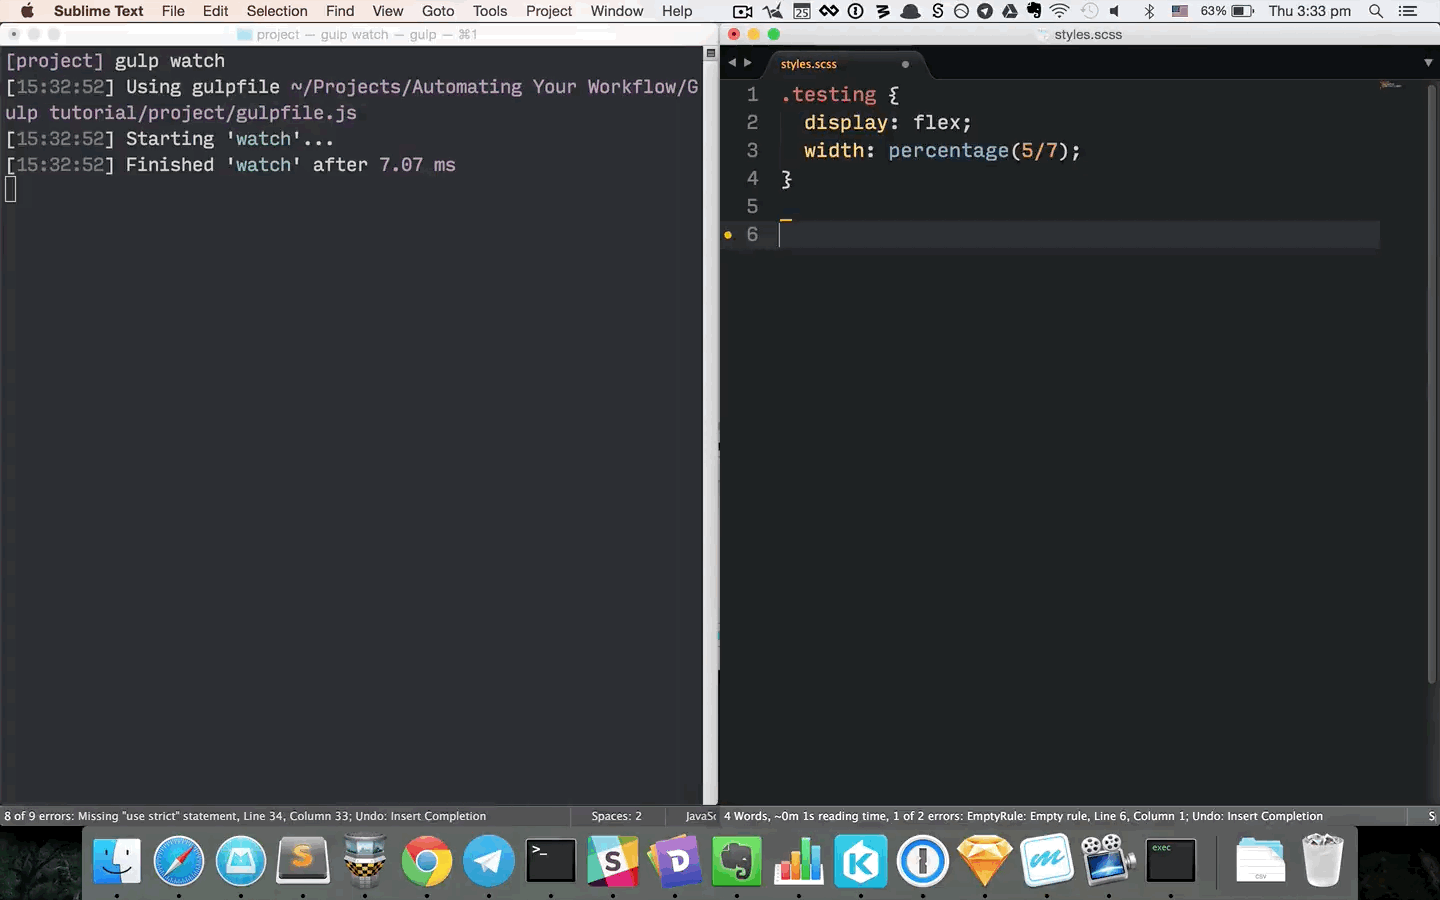
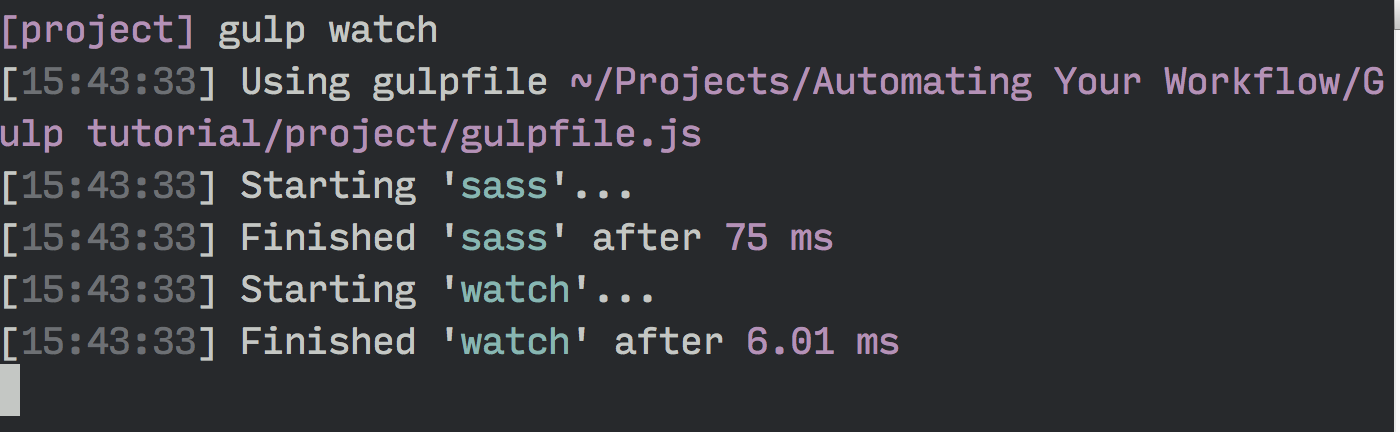
Now if you run the watch command you’ll see that gulp immediately starts watching your files for changes.

And if you change a line in styles.scss, Gulp will automatically run the sass task.
There’s only one thing that’s lacking here. Gulp didn’t run the sass task first before running watch, which means the CSS might not be the most updated one. Hence, we’ll want to make sure the watch task runs after the sass task.
We can do so by adding a second parameter to the watch task. This second parameter is an array of tasks that must be completed before Gulp runs watch.
gulp.task('watch', ['sass'], function() {
  gulp.watch('app/scss/styles.scss', ['sass']);
  // ... Other watchers
});
Now if you run the watch task, you’ll see that Gulp tells the command line to first run the sass task, followed by the watch task.
Since we’re already watching and recompiling Sass files when it’s changed, why not bring it further and reload the browser each time the file is saved?
Automatically Refreshing the Browser when you save
Having the browser automatically refreshing when you save a file is a task that saves you lots of time and hand-ache.
The best project for refreshing the browser right now is Browser Sync, and we can use with Gulp easily.
First, we’ll have to install Browser Sync.
$ npm install browser-sync --save-dev
You’ll notice that there’s no more gulp- prefix when installing Browser Sync. This is because Browser Sync can be made to work with Gulp right out of the box; you don’t need a Gulp plugin.
We’ll have to require Browser Sync, as usual.
var browserSync = require('browser-sync');
Browser Sync spins up a local server to load static HTML files. We’ll have to provide it with some initial configurations so it knows where to find our index.html file.
Let’s make a browserSync task for spinning up this server.
// Start browserSync server
gulp.task('browserSync', function() {
  browserSync({
    server: {
      baseDir: 'app'
    }
  })
})
Next, we’ll need to change the sass task slightly to allow Browser Sync to inject new CSS into the HTML. To do so, we’ll hav eto add a return before gulp.src and we’ll have to .pipe() a Browser Sync reload method.
gulp.task('sass', function() {
  return gulp.src('app/scss/styles.scss') // added return
    .pipe(sourcemaps.init())
    .pipe(sass())
    .pipe(autoprefixer())
    .pipe(sourcemaps.write())
    .pipe(gulp.dest('app/css'))
    // Reloading the stream
    .pipe(browserSync.reload({
      stream: true
    }));
});
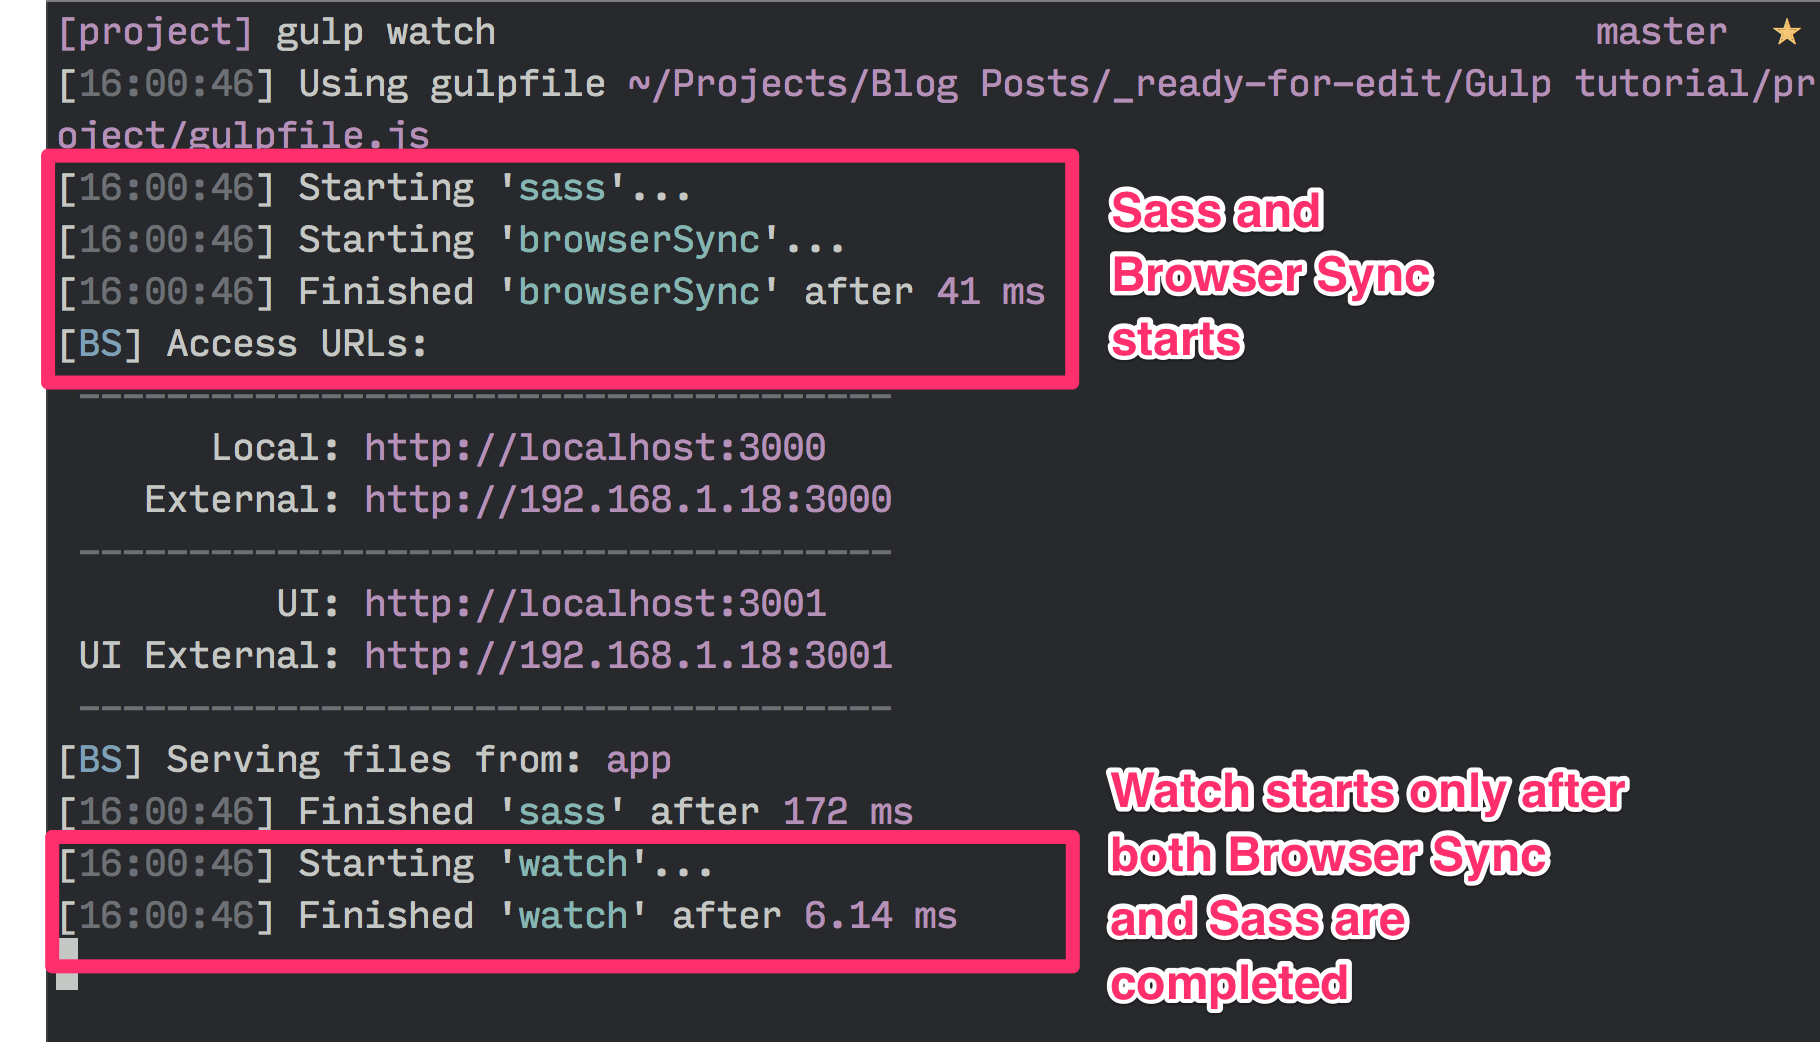
We’ll also have to make sure the browserSync task runs before the watch task.
gulp.task('watch', ['browserSync', 'sass'], function() {
  gulp.watch('app/scss/styles.scss', ['sass']);
});
If you run gulp watch in the terminal now, you’ll see that browserSync and sass runs concurrently, followed by watch. In addition, a browser pops up to show you the current index.html file.
So if you change the styles.scss file and save…
Viola! :)
Since we’re already watching for changes and refreshing the browser when we save styles.scss, why not do it for index.html as well?
gulp.task('watch', ['sass'], function() {
  gulp.watch('app/scss/styles.scss', ['sass']);
  gulp.watch('app/index.html', browserSync.reload);
});
Now that’s an example of a decent workflow that converts Sass to CSS. Of course, there’s a lot of improvements you can make to it. For instance, you can configure options for each of the plugins used, and you can also watch more files with some node globbing knowledge.
We’ll cover those in the next article :)
Now let’s do a quick summary.
Wrapping Up
So in this article we learned how to install Gulp and we learn to set up a basic task with Gulp.
Then we went ahead and setup a real task by adding different gulp plugins to the mix.
Eventually, we made it much better by watching the files for change and refreshing the browser whenever possible.
There’s still a whole lot more to configuring Gulp, but we’ll pause here for now. Let’s continue in the next article.
What is one thing you’ve learned about Gulp in this tutorial? Let me know in the comments below!
This content originally appeared on Zell Liew and was authored by Zell Liew
Zell Liew | Sciencx (2015-07-01T00:00:00+00:00) A Gulp.js Tutorial. Retrieved from https://www.scien.cx/2015/07/01/a-gulp-js-tutorial/
Please log in to upload a file.
There are no updates yet.
Click the Upload button above to add an update.