
This content originally appeared on Full Stack Training and was authored by Tamas Piros
The internet loves memes and memes love the internet. These are solid facts, and creating, sharing and laughing at memes is inevitably something that many of us have done in the past. In recent weeks a new, viral meme has arrived - the Dolly Parton challenge.
If you are not familiar with Dolly Parton listen to one of her most popular songs according to Billboard on YouTube
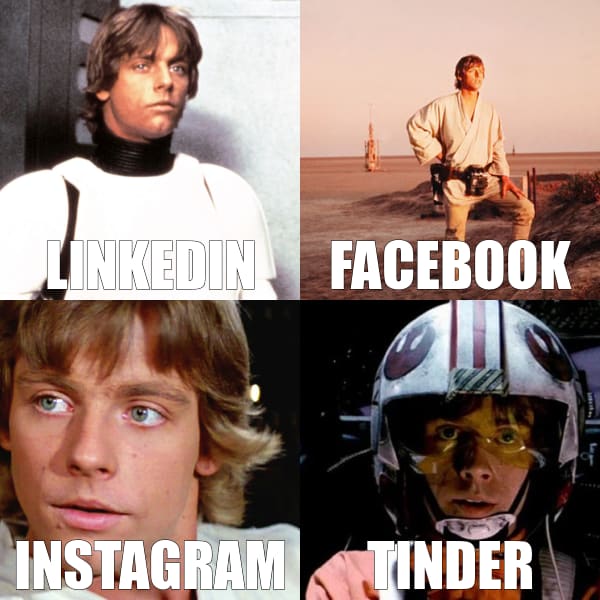
The origin of the meme was an Instagram post by Dolly Parton who shared the below post.
As you can see the post is a collage of 4 images, each showing a different image for a different social media channel. On LinkedIn, we all want to seem very professional; on Facebook, we are trying to show our cool-side. On Instagram, we try to be hip and last but not least on Tinder ... well, you know ... "attractive".
Memes via URL manipulation
There are lots of tools to create memes online, but in this article, we'll review an approach that utilises Cloudinary and just by manipulating an image URL we'll learn how to build a meme for the Dolly Parton challenge.
To get started, I have uploaded the following four images to Cloudinary of Mark Hamill:


Adding a text overlay
So far, so good. Cloudinary allows us to create overlays (overlaying images), as well as to add text to images.
Let's talk about the former first. If I wish to add a text overlay for the first image, I need to specify the l_text option followed by some options such as the font size, style and family, like so: ``
Let's try this on the first image:
https://res.cloudinary.com/tamas-demo/image/upload/f_auto,q_auto,w_250/l_text:Impact_60_stroke:LINKEDIN/mark-hamill-1.jpg

The above looks okay, but we could do with different font colour and a different position for the text. To achieve the former, we can use gravity which in our case will be south since we want the text to appear in the south (co_white represents the font colour): l_text:Impact_60_stroke:LINKEDIN,co_white,g_south
https://res.cloudinary.com/tamas-demo/image/upload/f_auto,q_auto,w_250/l_text:Impact_60_stroke:LINKEDIN,co_white,g_south/mark-hamill-1.jpg

Exactly what we wanted.
Creating a collage
Now comes the tricky bit. How can we create a collage of 4 images, making them a 2x2 grid? Think of these grids as layers again. Just like how in the previous examples we managed to position the text within a single image to the south, we can add three more layers - each of these layers will be images, having layers within them showing the text.
What we need to work out is the location for each of these images, but that will be easy. We know that the text layer for each image is going to look like this: l_text:Impact_60_stroke:FACEBOOK,co_white,g_south.
We also need to make sure to make the images the same size, and we can achieve this by utilising the w, h and crop parameters: w_250,h_250,c_fill.
For further resizing and crop options, please check the Cloudinary docs.
Putting this together we now have the following options for each image: w_250,h_250,c_fill/l_text:Impact_60_stroke:LINKEDIN,co_white,g_south for each image.
To understand the grid system take a look at the following drawing:
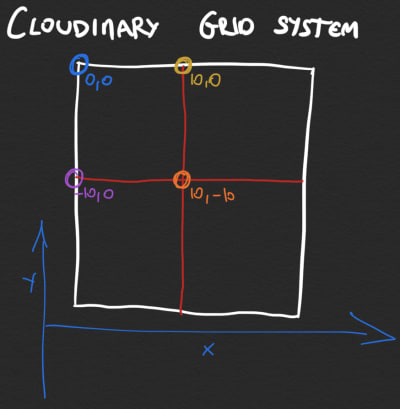
Each image has a position, so we need to stitch images together considering this. The first image will be at location "0, 0", while the next one will be at "250, 0" because the first image has a width of 250.
This can be represented by the following options: w_250,h_250,c_fill/l_text:Impact_60_stroke:LINKEDIN,co_white,g_south/x_250,l_mark-hamill-2/l_text:Impact_60_stroke:FACEBOOK,co_white,g_south/
Notice x_250,l_mark-hamill-2 in the above sample. This is the key - we are placing the second image on the x-axis, 250 pixels ("positions") away from the starting point. We can now apply resizing and crop options to this image as well. Furthermore, we also need to remember to move the next overlay, so an option of x_125 needs to be added for the text overlay as well.
Putting all of this together, we are currently at the following:
https://res.cloudinary.com/tamas-demo/image/upload/f_auto,q_auto,w_250/l_text:Impact_60_stroke:LINKEDIN,co_white,g_south/x_250,l_mark-hamill-2,w_250,c_fill/l_text:Impact_60_stroke:FACEBOOK,co_white,g_south,x_125/mark-hamill-1.jpg

Not too shabby, now using the same approach let's add the rest of the two images - remember to resize the image and to position the text overlay as well using the x and y axis - with a negative value when necessary - also remembering to do the maths for positioning the image. Keep on adjusting, but eventually, you should get to this stage:
https://res.cloudinary.com/tamas-demo/image/upload/q_auto,f_auto/c_fill,w_250,h_250/l_text:Impact_60_stroke:LINKEDIN,co_white,g_south/c_fill,l_mark-hamill-2,w_250,h_250,x_250/l_text:Impact_60_stroke:FACEBOOK,co_white,g_south,x_125/c_fill,l_mark-hamill-3,w_250,h_250,x_-125,y_250/l_text:Impact_60_stroke:INSTAGRAM,co_white,g_south,x_-125/c_fill,l_mark-hamill-4,w_250,h_250,x_125,y_125/l_text:Impact_60_stroke:TINDER,co_white,g_south,x_125/bo_5px_solid_white/mark-hamill-1

As you can see, the result is not perfect so let's keep on adjusting it. Clearly, the Instagram text is too large, so we could either increase the size of the image or decrease the font size. Let's go with the latter. All we need to do is to increment the size values and make some necessary adjustments in our positioning:
https://res.cloudinary.com/tamas-demo/image/upload/q_auto,f_auto/c_fill,w_300,h_300/l_text:Impact_60_stroke:LINKEDIN,co_white,g_south/c_fill,l_mark-hamill-2,w_300,h_300,x_300/l_text:Impact_60_stroke:FACEBOOK,co_white,g_south,x_150/c_fill,l_mark-hamill-3,w_300,h_300,x_-150,y_300/l_text:Impact_60_stroke:INSTAGRAM,co_white,g_south,x_-150/c_fill,l_mark-hamill-4,w_300,h_300,x_150,y_150/l_text:Impact_60_stroke:TINDER,co_white,g_south,x_150/mark-hamill-1

And let's add some final touches. Since the text is also a layer, we can adjust its position since it's too low - we can utilise the coordinate system and add a small space in the positioning of the text by adding y_10: l_text:Impact_60_stroke:LINKEDIN,co_white,g_south,y_10.
https://res.cloudinary.com/tamas-demo/image/upload/q_auto,f_auto/c_fill,w_300,h_300/l_text:Impact_60_stroke:LINKEDIN,co_white,g_south,y_10/c_fill,l_mark-hamill-2,w_300,h_300,x_300/l_text:Impact_60_stroke:FACEBOOK,co_white,g_south,x_150,y_10/c_fill,l_mark-hamill-3,w_300,h_300,x_-150,y_300/l_text:Impact_60_stroke:INSTAGRAM,co_white,g_south,x_-150,y_10/c_fill,l_mark-hamill-4,w_300,h_300,x_150,y_150/l_text:Impact_60_stroke:TINDER,co_white,g_south,x_150,y_10/mark-hamill-1

This now looks a lot less congested.
Finding a face
Using the c_fill crop option may not always be the best solution. If we observe the photo for LinkedIn, we can see that the tip of Mark's head has been cut off in a weird way (and this is almost true for the other images a well). Luckily for us, Cloudinary has an option g_face which allows for cropping based on face detection.
All we need to do is to apply g_face to the desired images:
https://res.cloudinary.com/tamas-demo/image/upload/q_auto,f_auto/g_face,c_fill,w_300,h_300/l_text:Impact_60_stroke:LINKEDIN,co_white,g_south,y_10/c_fill,l_mark-hamill-2,w_300,h_300,x_300/l_text:Impact_60_stroke:FACEBOOK,co_white,g_south,x_150,y_10/c_fill,l_mark-hamill-3,w_300,h_300,x_-150,y_300/l_text:Impact_60_stroke:INSTAGRAM,co_white,g_south,x_-150,y_10/c_fill,l_mark-hamill-4,w_300,h_300,x_150,y_150/l_text:Impact_60_stroke:TINDER,co_white,g_south,x_150,y_10/mark-hamill-1
Adding a border
One last, final touch could be to draw a border around the image, we can do that by adding bo_3px_solid_white to the image layers where bo is short for "border", and the rest are parameters to manipulate the border itself. This is the final result:
https://res.cloudinary.com/tamas-demo/image/upload/q_auto,f_auto/bo_3px_solid_white,c_fill,w_300,h_300,g_face/l_text:Impact_60_stroke:LINKEDIN,co_white,g_south,y_10/bo_3px_solid_white,c_fill,l_mark-hamill-2,w_300,h_300,x_300/l_text:Impact_60_stroke:FACEBOOK,co_white,g_south,x_150,y_10/bo_3px_solid_white,c_fill,l_mark-hamill-3,w_300,h_300,x_-150,y_300/l_text:Impact_60_stroke:INSTAGRAM,co_white,g_south,x_-150,y_10/bo_3px_solid_white,c_fill,l_mark-hamill-4,w_300,h_300,x_150,y_150/l_text:Impact_60_stroke:TINDER,co_white,g_south,x_150,y_10/mark-hamill-1
Take it to the next level
Let's take a look at another example - keeping the Star Wars spirit. What if a stormtrooper would like to do this meme? Well, it would be a bit boring since it would look like this:
https://res.cloudinary.com/tamas-demo/image/upload/q_auto,f_auto/bo_3px_solid_white,c_fill,w_300,h_300/l_text:Impact_60_stroke:LINKEDIN,co_white,g_south,y_10/bo_3px_solid_white,c_fill,l_stormtrooper,w_300,h_300,x_300/l_text:Impact_60_stroke:FACEBOOK,co_white,g_south,x_150,y_10/bo_3px_solid_white,c_fill,l_stormtrooper,w_300,h_300,x_-150,y_300/l_text:Impact_60_stroke:INSTAGRAM,co_white,g_south,x_-150,y_10/bo_3px_solid_white,c_fill,l_stormtrooper,w_300,h_300,x_150,y_150/l_text:Impact_60_stroke:TINDER,co_white,g_south,x_150,y_10/stormtrooper

How could we spice this up? By using colour replace!
Colour replacement
This is a built-in Cloudinary effect which allows us to work with three parameters. The first is the colour that we want to apply, the second is the threshold, and finally the last is the colour to use. Since this is an effect we can apply it by using the e_ prefix: e_replace_color:white:10:pink.
In light of this, we can achieve the following:
https://res.cloudinary.com/tamas-demo/image/upload/q_auto,f_auto/bo_3px_solid_white,c_fill,w_300,h_300,e_replace_color:pink:20:BCBEC5/stormtrooper

And applying the colour replace each layer couldn't be easier:
https://res.cloudinary.com/tamas-demo/image/upload/q_auto,f_auto/bo_3px_solid_white,c_fill,w_300,h_300,e_replace_color:purple:50:BCBEC5/l_text:Impact_60_stroke:LINKEDIN,co_white,g_south,y_10/bo_3px_solid_white,c_fill,l_stormtrooper,w_300,h_300,x_300,e_replace_color:green:20:BCBEC5/l_text:Impact_60_stroke:FACEBOOK,co_white,g_south,x_150,y_10/bo_3px_solid_white,c_fill,l_stormtrooper,w_300,h_300,x_-150,y_300,e_replace_color:orange:20:BCBEC5/l_text:Impact_60_stroke:INSTAGRAM,co_white,g_south,x_-150,y_10/bo_3px_solid_white,c_fill,l_stormtrooper,w_300,h_300,x_150,y_150,e_replace_color:pink:20:BCBEC5/l_text:Impact_60_stroke:TINDER,co_white,g_south,x_150,y_10/stormtrooper

And that's all - enjoy creating your Dolly Parton memes!
Thank you to my colleague Dan for the idea & inspiration.
This content originally appeared on Full Stack Training and was authored by Tamas Piros
Tamas Piros | Sciencx (2020-01-28T14:02:34+00:00) Creating memes with Cloudinary. Retrieved from https://www.scien.cx/2020/01/28/creating-memes-with-cloudinary/
Please log in to upload a file.
There are no updates yet.
Click the Upload button above to add an update.