
This content originally appeared on JavaScript January and was authored by Emily Freeman
Hey, friends! I’m Lauren Schaefer, a Developer Advocate for MongoDB. I’d love to connect with you on LinkedIn and Twitter.
Did you resolve to stick to a budget in 2020? Have you already broken that resolution? Fear not! In this article, I’ll walk you step-by-step through creating an application that will track the prices of items you’re interested in purchasing and send you an email when the prices drop. I know, I know—it’s way more fun to buy things as soon as you realize you want to purchase them.
By the end of this article, you’ll have a tool that will help you make good purchasing choices and you’ll have had some fun working with JavaScript, MongoDB Stitch, and the Amazon Simple Email Service.
Here is a summary of what we’ll cover today:
- Store Product Information in MongoDB Atlas
- Get Prices Using MongoDB Atlas Functions and Triggers
- Send Email Notifications Using the Amazon Simple Email Service
- Wrapping Up
Store Product Information in MongoDB Atlas
Let’s kick things off by storing information about products you’re interested in purchasing in a database. We’ll use this information later to retrieve the prices of those products.
Goods ‘n Stuff
Before we go any further, I need to profess my love for the TV show Parks and Recreation. It is—quite possibly—the best TV show ever created.
In honor of Parks and Recreation, I’ve created a website for a fake online retailer: Goods ‘n Stuff. It’s a place where you can buy goods and stuff. More specifically, the retailer currently sells three items:
- Ron’s Custom Canoe whose price rotates between $250 and $500
- Ron’s Gingerbread House whose price rotates between $5 and $15
- April’s Marshmallow Ron whose price rotates between $15 and $25
In order to enable you to test pricing changes, Goods n’ Stuff automatically updates the prices of all three items every five to ten minutes.
As you’re testing your price tracking application, you can use products from Goods ‘n Stuff or your own favorite online retailer.
Create a Free Atlas Cluster
Today we’ll use MongoDB to store information about the products we want to track. In order to get up and running quickly and also to minimize our database management efforts, we’ll use MongoDB Atlas. Atlas is MongoDB’s fully managed database-as-a-service. It has a generous, perpetually free tier that we’ll use today. If you decide you want to move up to a paid Atlas tier later, you can use the promo code Lauren200 for $200 off.
- Navigate to Atlas.
- If you already have an account, sign in. Otherwise, click Start free and follow the prompts to create an account.
- Next we’ll create a cluster. At a high level, a cluster is a set of nodes where copies of your database will be stored. Select the option to create a free cluster.
- On the Create a Starter Cluster page, select the region that is closest to you. Ensure the page still indicates the cluster is free and click Create Cluster.
Your free cluster will be created over the next few minutes.
Create a Database User
Now that we have a cluster created, we need to create a database user.
- In the Security section of the left navigation pane, click Database Access.
- In the Database Access pane on the right, click ADD NEW USER.
- In the Add New User window, input a new username and password, ensure Read and write to any database is selected, and click Add User.
The changes with your new user’s information will be automatically deployed.
Create a Database and Collection
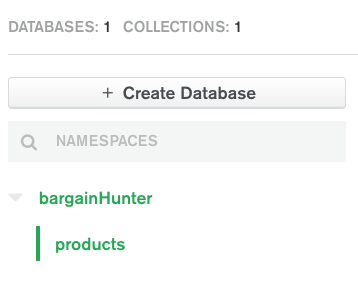
Now we are ready to create the database where we will store product information. We’ll create a database named bargainHunter.
Inside of our database, we’ll create one collection named products. If you’re not familiar with collections, collections are where you store related documents (we’ll discuss what documents are in the next section). For those with a SQL background, you can think of a collection as being roughly equivalent to a table.
- In the Atlas section of the left navigation pane, click Clusters.
- In the Clusters pane on the right, click COLLECTIONS.
- Click Add my own data.
- In the Create Database window, input bargainHunter as the database name, products as the collection name, and click Create.
Store Product Information in the Collection
Now that we have a database and a collection, let’s store some information!
MongoDB stores data in [BSON documents][0]. BSON is a binary representation of JSON (JavaScript Object Notation) documents. MongoDB documents consist of field and value pairs. If you have a SQL background, you can think of a document as being roughly equivalent to a row.
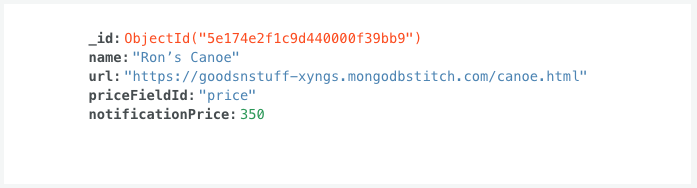
Let’s create a document for each of the products we want to track. We’ll store four pieces of information for each product:
- name: the name of the product
- url: the url of the product
- priceFieldId: the id associated with the html element where the price is stored on the webpage
- notificationPrice: the price threshold that indicates when we want to receive an email notification
- Click Insert Document in the Collections pane on the right. The Insert to Collection window is displayed.
- Hover over the first row that contains the _id. Click + and select Add Field After _id. A new row appears in the document.
- In the field input area to the left of the colon, input name.
- In the field input area to the right of the colon, input Ron’s Canoe.
- Set the field type to String.
- Repeat steps two through five above to add fields and values to this document with the following settings:
- priceFieldId: price, String
- notificationPrice: 350, Decimal128
- Click Insert.
Now you have your first document created! Let’s add two more documents for the other two products we want to track.
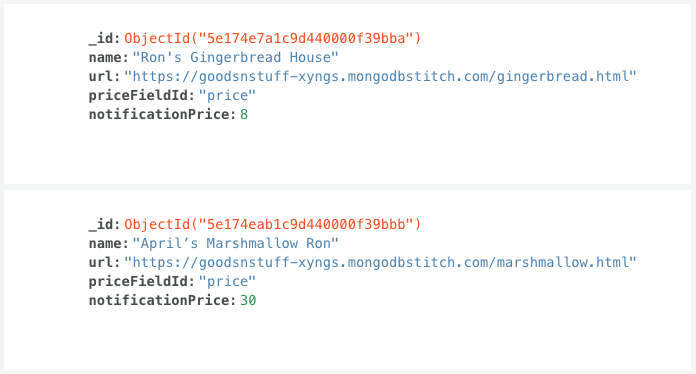
- Repeat the steps above to create a document for Ron’s Gingerbread House with the following settings:
- name: Ron's Gingerbread House
- url: https://goodsnstuff-xyngs.mongodbstitch.com/gingerbread.html, String
- priceFieldId: price, String
- notificationPrice: 8, Decimal128
- Repeat the steps above to create a document for April’s Marshmallow Ron with the following settings:
- name: April’s Marshmallow Ron
- url: https://goodsnstuff-xyngs.mongodbstitch.com/marshmallow.html, String
- priceFieldId: price, String
- notificationPrice: 30, Decimal128
Now we have the information about the products we want to track stored in our database. It’s time to start tracking!
Get Prices Using MongoDB Atlas Functions and Triggers
That’s enough set up. Let’s start coding! In this section we’ll write JavaScript functions to retrieve prices every five minutes.
Create a MongoDB Stitch App
Rather than writing an application that we’ll have to figure out where to host, let’s use MongoDB Stitch's serverless functions. MongoDB Stitch is a serverless platform that is integrated into Atlas, which will allow us to easily interact with the database we just created. Plus, we won’t have to worry about hosting or scaling functions ourselves. We’ll write the serverless functions using JavaScript.
Let’s begin by creating a Stitch application.
- In the Services section of the left navigation pane, click Stitch.
- Click Create New Application. The Create a new application window appears.
- Input BargainHunter as the application name and click Create.
Your Stitch application will be created.
Upload the Beautiful-dom Dependency
In order to parse a product page’s html to search for the price, we will use the Beautiful-dom npm module. A new beta feature in Stitch allows us to upload external dependencies so we can use them in our functions.
- Follow the instructions in the Stitch documentation to upload the beautiful-dom npm module to your Stitch application: https://docs.mongodb.com/stitch/functions/upload-external-dependencies.
Create a Function to Retrieve a Product’s Price
Let’s write a serverless Stitch function that will scrape a product’s webpage and retrieve the price.
- In the Build section of the left navigation pane, click Functions.
- Click Create New Function.
- In the Settings pane, input getPrice as the name and click Save. The Function Editor appears. Let’s build the function line by line.
- In the Function Editor, replace the existing code with the following:
    exports = async function(url, priceFieldId){
    };
We are creating an asynchronous function with two arguments: the url of the product page we want to scrape and the html id associated with the price field.
5. Inside of the function, let’s include the Beautiful-dom module:
6. Next, let’s get the html of the product webpage by using Stitch’s built-in HTTP client.
const response = await context.http.get({ url });
7. Now we can use the response to get the dom:
const dom = new BeautifulDom(response.body.text());
8. Now we can parse the dom to look for the html element with the given id. If you are using an online retailer that does not have an id set for the price field, you will need to adjust this line to look for the appropriate element.
const priceElement = dom.getElementById(priceFieldId);
9. Once we have the price element, we can pull the price out of it by getting its inner text and then converting it to a float:
const price = parseFloat(priceElement.innerText);
10. The last thing we need to do in this function is return the price:
return price;
11. Click Save. After all of that pasting, your function should now look like the following:
exports = async function(url, priceFieldId){
  const BeautifulDom = require('beautiful-dom');
  const response = await context.http.get( );
  const dom = new BeautifulDom(response.body.text());
  const priceElement = dom.getElementById(priceFieldId);
  const price = parseFloat(priceElement.innerText);
  return price;
};
Create a Function to Retrieve Prices for All Products
In the last section, we created the getPrice function that retrieves the price of a specific product. Let’s write a function that will call getPrice for every product in our products collection.
- In the Build section of the left navigation pane, click Functions.
- Click Create New Function.
- In the Settings pane, input getAllPrices as the name and click Save. The Function Editor appears. Let’s build the function line by line.
- In the Function Editor, replace the existing code with the following:
exports = async function(){

};
We are creating an asynchronous function with no arguments.
Inside of the function, let’s begin by accessing our products collection. We can use Stitch’s service client to access the cluster that contains our collection.
const collection = context.services.get("mongodb-atlas").db("bargainHunter").collection("products");
Now let’s retrieve all of the documents in our collection. Remember that each document stores information about one product that we’re tracking. In our case, we don’t have many documents, so we’ll use the handy toArray() function to put all of our docs in an array. If we had a large number of documents and were concerned about passing around a huge array, we could instead traverse the documents using a Cursor.
const docs = await collection.find({}).toArray();
Let’s loop through each of the documents in the array and execute an anonymous function as we do:
docs.forEach(async function(doc) {

});
We want to call the getPrice function for every product. Inside of the anonymous function we just created, call getPrice:
const currentPrice = await context.functions.execute("getPrice", doc.url, doc.priceFieldId);
After we get the price, we need to store it. In this case, we’ll store the prices in an array named prices inside of the existing product document. We’ll use MongoDB’s $push operator to create the array if it does not exist and then add the price to the array. Continuing to work in the anonymous function, store the price in your collection:
collection.updateOne(
  { _id: doc._id },
  { $push:
   {
     prices: {
       "timestamp": new Date(),
       price: currentPrice
     }
   }
  }
Click Save. After all of that pasting, your function should now look like the following:
exports = async function(){

  const collection = context.services.get("mongodb-atlas").db("bargainHunter").collection("products");

  const docs = await collection.find({}).toArray();

  docs.forEach(async function(doc) {
    const currentPrice = await context.functions.execute("getPrice", doc.url, doc.priceFieldId);

    collection.updateOne(
      { _id: doc._id },
      { $push:
        {
          prices: {
            "timestamp": new Date(),
            price: currentPrice
          }
        }
      }
    );

  });

};
Create a Trigger to Retrieve Prices Every Five Minutes
Now that we have a function to retrieve all of the prices of the products we want to track, we need to call it. We could choose to call it manually. However, it’s much more convenient for the function to be called automatically.
In this section, we’ll create a Stitch Trigger to call getPrices every five minutes.
- In the Build section of the left navigation pane, click Triggers.
- Click Add a Trigger. The Add Trigger pane is displayed.
- Stitch has three trigger types: database (which automatically respond to database changes), authentication (which automatically respond to authentication events), and scheduled (which execute on a regular schedule similar to how a cron job does).
- Select Scheduled.
- In the Schedule Type section, update the schedule to run every 5 minutes.
- In the Function section, select getAllPrices.
- Click Save.
- At the top of the page, click REVIEW & DEPLOY CHANGES. All of the changes you have made to the Stitch application—including the two functions and the trigger—will be displayed. Click Deploy.
The trigger will fire at the next minute that evenly divides by five (for example, 12:00, 12:05, 12:10, etc).
View Prices in the Database
Now that we’re automatically retrieving prices and storing them, let’s view them in the database!
- Click Back to Atlas in the upper left corner of the Stitch UI.
- In the Clusters pane on the right, click COLLECTIONS.
- After the trigger fires for the first time, the new prices array will be displayed in each of the product documents. You may need to click Refresh in order for the array to be displayed.
- Expand the prices array in each document to see the prices you’ve retrieved.
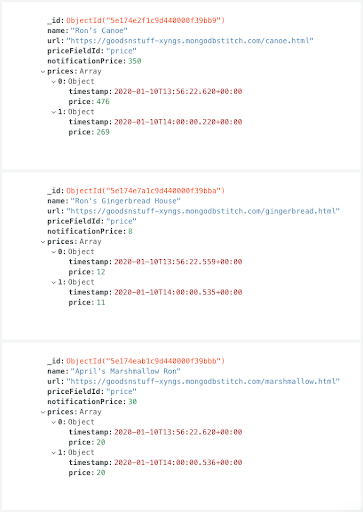
Woo hoo! We’ve successfully retrieved the prices of the products we’re watching by writing two serverless functions in JavaScript and creating a scheduled trigger.
Send Email Notifications Using the Amazon Simple Email Service
At this point, we could be done. If we wanted to, we could manually log in to Atlas to view the prices of the items we’re watching to determine if it’s a good time to buy.
But let’s take things a step further. Let’s create email notifications that will alert us when the price of an item we’re watching drops below a given price.
Configure Amazon Simple Email Service
Today we’ll use the Amazon Simple Email Service (Amazon SES) to send our email notifications, so we don’t have to deal with the hassle of setting up and managing a mail server.
- Create an account or sign in to the AWS Management Console. You can use the free Basic Plan.
- Next you will need to create an IAM user and an access key. You will use this access key later when you interact with Amazon SES from a Stitch function, so be sure to store both the access key ID and secret. For best practices and instructions on how to create an IAM user and an access key, see the Amazon documentation.
- Verify the email address you intend to send emails from. If your account is in the Amazon SES sandbox (which it probably is if you just signed up), you will also need to verify the email address you intend to send emails to. Follow the instructions in the Amazon documentation to verify your email address(es).
Create an AWS Service in Stitch
Now that we have credentials to access Amazon services, let’s connect to the Amazon SES from Stitch.
- Navigate to your BargainHunter app in Stitch.
- In the Build section of the left navigation pane, click 3rd Party Services.
- Click Add a Service.
- Select AWS.
- Input SES as the Service Name.
- Input the Access Key ID associated with your AWS access key.
- Input AWS as the name of your new secret.
- Input the Secret Access Key associated with your AWS access key.
- Click Add Service.
Now that we’ve created our service, we need to create a rule that will enable and configure the capabilities of the service.
- Input SES as the Rule Name.
- Select the SES rule to configure it.
- Click Add Action.
- In the API selection box, select ses.
- Click Save.
With that, we are ready to use our AWS SES to send notification emails!
Create a Function
Let’s write a serverless function that determines if a price drop notification email should be sent and then sends one if appropriate.
- In the Build section of the left navigation pane, click Functions.
- Click Create New Function.
- In the Settings pane, input sendPriceNotificationEmail as the name and click Save. The Function Editor appears. Let’s build the function line by line.
- In the Function Editor, replace the existing code with the following:
exports = function(changeEvent){

};
We are creating a function with a single argument: a change event. When a product document is updated, we will send a change event to this function.
The first thing we will do inside of the function is use destructuring to pull the document that was updated out of the change event:
const { fullDocument } = changeEvent;
Next, let’s define three variables to store price related information: prices to store the prices array, newPrice to store the newest price in the array, and notificationPrice to store the price threshold at which we should send an email notification.
let prices;
let newPrice;
let notificationPrice;
Let’s retrieve the values for those variables inside of a try/catch statement. If we encounter any errors, let’s log the error and return.
try {

} catch (error) {
  console.log("An error occurred while getting the prices. An email could not be sent.", error);
  return;
}
Let’s work inside of the try statement to set the values for the price variables we created above. fullDocument contains the updated prices array, so let’s store that in prices.
prices = fullDocument.prices;
The new price is stored as the last element in the array, so let’s store that in newPrice.
newPrice = prices[prices.length-1].price;
Finally, let’s retrieve the notification price from the document and store it in notificationPrice.
notificationPrice = fullDocument.notificationPrice;
We want to send the email if the new price is less than or equal to the notification price we stored in the product document. Let’s create an if/else statement for that logic beneath the try/catch statement.
 if ( newPrice <= notificationPrice ) {

    } else {
      console.log("The price of " + fullDocument.name + " is not below the notification price, so no email will be sent.");
    }
Let’s work inside of the if statement to write the code to send the email. We’ll begin by accessing the Amazon SES. Just as we did in an earlier function where we accessed the MongoDB Atlas cluster, we can use Stitch’s service client to access the Amazon SES.
const ses = context.services.get("SES").ses();
Now we are ready to prepare our email. Paste the code below inside of your if statement. Be sure to replace FROM@EXAMPLE.COM and TO@EXAMPLE.COM with your email addresses.
const email = {
  Destination: {
    ToAddresses: ["TO@EXAMPLE.COM"]
  },
  Message: {
    Body: {
      Html: {
        Data: "It's a good time to buy " + fullDocument.name + ". The price has dropped to $" + newPrice + ". " + fullDocument.url
      }
    },
    Subject: {
      Data: "The price of " + fullDocument.name + " has dropped!"
    }
  },
  Source: "FROM@EXAMPLE.COM"
};
Finally, we need to try to send the email and handle any errors. Paste the code inside of the if statement below your existing email definition.
try{
  ses.SendEmail(email).then(function (result) {
    console.log("Email successfully sent: " + JSON.stringify(result));
  });
} catch(error) {
  console.log("Error sending email: " + JSON.stringify(error));
}
Click Save. Your function should now look similar to the following.
exports = function(changeEvent) {
  const  = changeEvent;
  let prices;
  let newPrice;
  let notificationPrice;
  try {
    prices = fullDocument.prices;
    newPrice = prices[prices.length-1].price;
    notificationPrice = fullDocument.notificationPrice;
      }
  catch (error) {
    console.log("An error occurred while getting the prices. An email could not be sent.", error);
    return;
      }

  if ( newPrice <= notificationPrice) {
    const ses = context.services.get("SES").ses();
    const email = {
      Destination: {
        ToAddresses: ["TO@EXAMPLE.COM"] },
      Message: {
        Body: {
          Html: {
            Data: "It's a good time to buy " + fullDocument.name + ". The price has dropped to $" + newPrice + ". " + fullDocument.url
          }
        },
        Subject: {
          Data: "The price of " + fullDocument.name + " has dropped!"
        }
      },
      Source: "FROM@EXAMPLE.COM" };
    try{ ses.SendEmail(email).then(function (result) {
      console.log("Email successfully sent: " + JSON.stringify(result));
    });
       } catch(error) {
         console.log("Error sending email: " + JSON.stringify(error)); }
  } else {
    console.log("The price of " + fullDocument.name + " is not below the notification price, so no email will be sent.");
  }
};
Create a Trigger for Every Price Update in the Database
Let’s create one final trigger. Instead of creating a scheduled trigger as we did earlier, let’s create a database trigger. Our database trigger will fire every time an update is made to a document in the products collection. This will enable us to watch for pricing changes and send email notifications accordingly.
- In the Build section of the left navigation pane, click Triggers.
- Click Add a Trigger. The Add Trigger pane is displayed.
- Select Database as the Trigger Type.
- Input SendEmailOnPriceDrops as the name of the trigger.
- In the Cluster Name section, select mongodb-atlas.
- In the Database Name section, select bargainHunter.
- In the Collection Name section, select products.
- In the Operation Type section, select Update.
- In the Full Document section, select ON.
- In the Function section, select sendPriceNotificationEmail.
- Click Save.
- At the top of the page, click REVIEW & DEPLOY CHANGES. All of the changes you have made to the Stitch application—including the SES service, the function, and the trigger—will be displayed. Click Deploy.
You’ve now created a trigger that will fire whenever new prices are stored in your database.
Check Your Email
Now that you’ve configured your email notifications, check your email. The next time your app checks prices, you should receive at least one email notification.

Wrapping Up
We covered a lot of ground today, so let’s recap what we did:
- We stored information about products in a database
- We created serverless JavaScript functions that retrieve the prices of those products
- We created a trigger that automatically fires every five minutes to call those functions
- We created email notifications to alert us when the product prices drop below a given threshold
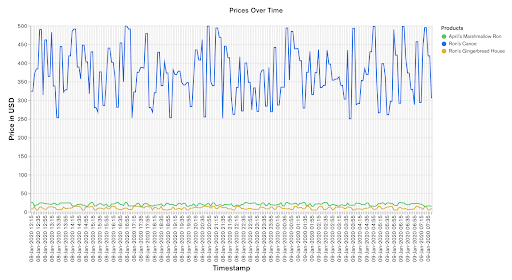
So what’s next? Perhaps you want to chart the price data to give you a better perspective on when it’s a good time to buy. I whipped up the chart below using MongoDB Charts in just a few minutes:
You could also create a web app to allow you to input information about the products you want to track in a handy dandy form instead of having to manually create the documents in Atlas.
Whatever you do, sit back, relax, and “treat yo self” to some online shopping. You’ve earned it!
This content originally appeared on JavaScript January and was authored by Emily Freeman
Emily Freeman | Sciencx (2020-01-31T10:52:00+00:00) Bargain Hunting with JavaScript, MongoDB Stitch, & Amazon Simple Email Service. Retrieved from https://www.scien.cx/2020/01/31/bargain-hunting-with-javascript-mongodb-stitch-amazon-simple-email-service/
Please log in to upload a file.
There are no updates yet.
Click the Upload button above to add an update.