
This content originally appeared on SitePoint and was authored by Wern Ancheta

As developers, we’re always looking for tools, libraries, and frameworks that will make our lives easier. It’s no different for Laravel developers. That’s the reason why we love this framework to begin with, as everything is made easy for us — allowing us to focus on building awesome applications instead of getting bogged down with how to implement stuff.
In this tutorial, we’ll be looking at another tool which can make your life easier as a Laravel developer. Specifically, we’ll be looking into Livewire, a full-stack framework for Laravel that allows us to build dynamic interfaces without writing a whole lot of JavaScript. Everything is essentially done with tools you’re already familiar with as a Laravel developer.
What is Livewire?
Livewire is a library that allows us to build reactive and dynamic interfaces using Blade and a little bit of JavaScript. I say “a little” because we’re only going to write JavaScript to pass data around via browser events and responding to them.
You can use Livewire to implement the following functionality, without the page reload:
- pagination
- form validation
- notifications
- file uploads preview
Note that Livewire isn’t limited to the above functionality. You can use it for so much more. The features above are just the most common one you might like to implement in your apps.
Livewire vs Vue
Vue has always been the preferred front-end framework for Laravel developers to add interactivity to their apps. If you’re already using Vue to power your apps, Livewire is optional for you to learn. But if you’re fairly new to doing front end in Laravel, and you’re looking into Livewire as a Vue replacement, then yes, you can use Livewire as a replacement for Vue. The learning curve
won’t be as steep as learning Vue, since you’ll mostly be using Blade to write your template files.
For more information on how Livewire and Vue compare, check out “Laravel Livewire vs Vue”.
App overview
We’re going to create a live CRUD app. So it’s basically a CRUD app without the page reloads. Livewire will handle all the AJAX requests required to update the UI. This includes filtering the results via the search field, sorting via the column header, and a simple pagination (previous and next). Creating and editing users will make use of Bootstrap Modals.
You can view the source code of this project on its GitHub repo.
Prerequisites
This tutorial assumes that you have experience with PHP application development. Experience in Laravel is helpful but not required. You can still follow along if you only know plain PHP or another PHP framework.
This tutorial assumes that you have the following software installed on your machine:
If you’re on a Mac, a more convenient option instead of installing MySQL and NGINX would be to install DBngin and Laravel Valet instead.
Setting Up the Project
You can now create a new Laravel project:
composer create-project laravel/laravel livecrud
Navigate inside the livecrud folder that it will generate. This will be the root project folder where you execute all of the commands throughout this tutorial.
The next step is to create a MySQL database using your database management tool of choice. Name the database as livecrud.
Install the back-end dependencies
We only have one dependency for the back end and that’s Livewire. Install it with the following command:
composer require livewire/livewire:2.3
Note: we’re installing the specific version I’ve used in creating the demo. If you’re reading this in the future, it’s recommended that you install the most recent version. Don’t forget to check the project’s changelog on their GitHub repo to make sure you’re not missing anything.
Setting up the database
Update the default migration for creating the users table and add the custom fields that we’re going to use:
// database/migrations/<timestamp>_create_users_table.php
public function up()
{
    Schema::create('users', function (Blueprint $table) {
        $table->id();
        $table->string('name');
        $table->string('email')->unique();
        $table->enum('user_type', ['admin', 'user'])->default('user'); // add this
        $table->tinyInteger('age'); // add this
        $table->string('address')->nullable(); // add this
        $table->timestamp('email_verified_at')->nullable();
        $table->string('password');
        $table->rememberToken();
        $table->timestamps();
    });
}
Next, update the database/factories/UserFactory.php file and supply values to the custom fields that we’ve added:
// database/factories/UserFactory.php
public function definition()
{
    return [
        'name' => $this->faker->name,
        'email' => $this->faker->unique()->safeEmail,
        'email_verified_at' => now(),
        'password' => '$2y$10$92IXUNpkjO0rOQ5byMi.Ye4oKoEa3Ro9llC/.og/at2.uheWG/igi', // password
        'remember_token' => Str::random(10),

        // add these
        'user_type' => 'user',
        'age' => $this->faker->numberBetween(18, 60),
        'address' => $this->faker->address,
    ];
}
Lastly, open the database/seeders/DatabaseSeeder.php file and uncomment the call to create dummy users:
// database/seeders/DatabaseSeeder.php
public function run()
{
    \App\Models\User::factory(100)->create();
}
Don’t forget to update your .env file with the test database you’re going to use. In this case, I’ve named the database as livecrud. Once that’s done, run the migrations and the seeder to populate the database:
php artisan migrate
php artisan db:seed
Setting up front-end dependencies
To simplify things, we’re going to use Laravel scaffold for Bootstrap. To use that, you first need to install the laravel/ui package:
composer require laravel/ui
Next, install Bootstrap 4. This adds the config on your webpack.mix.js file and creates the resources/js/app.js and resources/sass/app.scss files:
php artisan ui bootstrap
Next, add Font Awsome to the resources/sass/app.scss file. By default, there should already be the fonts, variables, and bootstrap imports in there:
// Fonts
@import url("https://fonts.googleapis.com/css?family=Nunito");

// Variables
@import "variables";

// Bootstrap
@import "~bootstrap/scss/bootstrap";

// add these:
@import "~@fortawesome/fontawesome-free/scss/fontawesome";
@import "~@fortawesome/fontawesome-free/scss/brands";
@import "~@fortawesome/fontawesome-free/scss/regular";
@import "~@fortawesome/fontawesome-free/scss/solid";
Once that’s done, install all the dependencies:
npm install @fortawesome/fontawesome-free
npm install
Create the Livewire Component
You can use the make:livewire command to create a new Livewire component:
php artisan make:livewire LiveTable
This will create the following files:
app/Http/Livewire/LiveTable.php— the controller for the componentresources/views/livewire/live-table.blade.php— the view file for the component
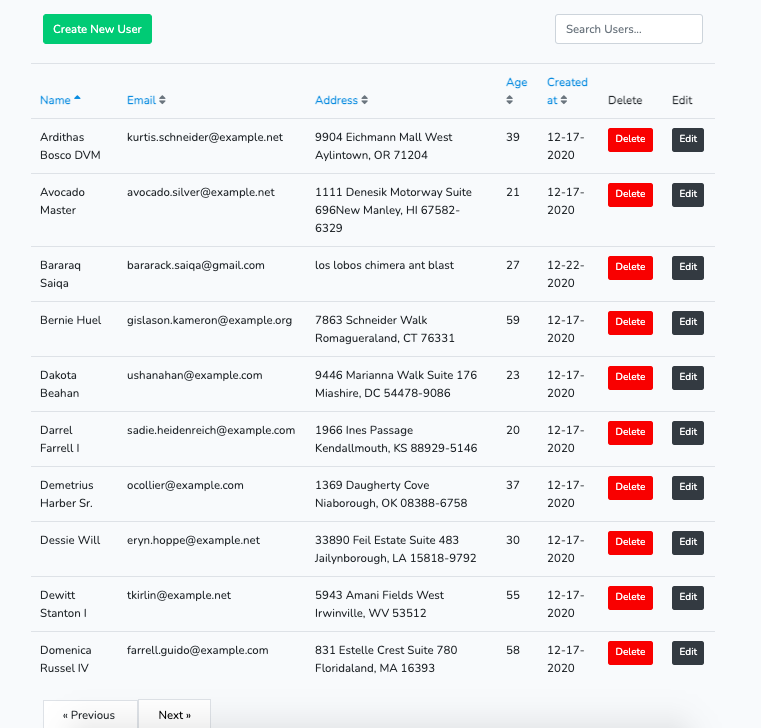
Open the resources/views/livewire/live-table.blade.php file and add the following:
<div>
    <div class="row mb-4">
        <div class="col-md-12">
          <div class="float-right mt-5">
              <input wire:model="search" class="form-control" type="text" placeholder="Search Users...">
          </div>
        </div>
    </div>

    <div class="row">
        @if ($users->count())
        <table class="table">
            <thead>
                <tr>
                    <th>
                        <a wire:click.prevent="sortBy('name')" role="button" href="#">
                            Name
                            @include('includes.sort-icon', ['field' => 'name'])
                        </a>
                    </th>
                    <th>
                        <a wire:click.prevent="sortBy('email')" role="button" href="#">
                            Email
                            @include('includes.sort-icon', ['field' => 'email'])
                        </a>
                    </th>
                    <th>
                        <a wire:click.prevent="sortBy('address')" role="button" href="#">
                            Address
                            @include('includes.sort-icon', ['field' => 'address'])
                        </a>
                    </th>
                    <th>
                        <a wire:click.prevent="sortBy('age')" role="button" href="#">
                            Age
                            @include('includes.sort-icon', ['field' => 'age'])
                        </a>
                    </th>
                    <th>
                        <a wire:click.prevent="sortBy('created_at')" role="button" href="#">
                        Created at
                        @include('includes.sort-icon', ['field' => 'created_at'])
                        </a>
                    </th>
                    <th>
                        Delete
                    </th>
                    <th>
                        Edit
                    </th>
                </tr>
            </thead>
            <tbody>
                @foreach ($users as $user)
                    <tr>
                        <td>{{ $user->name }}</td>
                        <td>{{ $user->email }}</td>
                        <td>{{ $user->address }}</td>
                        <td>{{ $user->age }}</td>
                        <td>{{ $user->created_at->format('m-d-Y') }}</td>
                        <td>
                            <button class="btn btn-sm btn-danger">
                            Delete
                            </button>
                        </td>
                        <td>
                            <button class="btn btn-sm btn-dark">
                            Edit
                            </button>
                        </td>
                    </tr>
                @endforeach
            </tbody>
        </table>
        @else
            <div class="alert alert-warning">
                Your query returned zero results.
            </div>
        @endif
    </div>

    <div class="row">
        <div class="col">
            {{ $users->links() }}
        </div>
    </div>
</div>
That’s a lot of code, so let’s break it down from top to bottom. First, we have the search field for searching for users. We want the users to be able to see the results of their query as they type. The way we implement that is by using wire:model. This allows us to pass in the name of the variable from the component class (LiveTable). Whatever the user types in this field will then be synced to the value for that variable. In this case, we’re binding the search variable:
<input wire:model="search" class="form-control" type="text" placeholder="Search Users...">
Later on in the code for the LiveTable component class, you’ll see the bound variable like in the below code. These are called properties in Livewire. If you’re coming from Vue, then this is the equivalent of the state. Only public properties can be accessed directly from the front end:
// app/Http/Livewire/LiveTable.php
<?php
class LiveTable extends Component
{
  public $search = ''; // don't add this yet
}
Next, we have the table headers. Here we’re using wire:click.prevent to listen for click events in the link element. These are called actions in Livewire. They essentially allow you to listen for browser events but respond to it using methods in the back end. Using .prevent prevents the default browser action. The value you supply to this is the name of the method you want to execute in the component class. In this case it’s sortBy. Then we’re passing in the name of the column we want to sort:
<th>
  <a wire:click.prevent="sortBy('name')" role="button" href="#">
      Name
      @include('includes.sort-icon', ['field' => 'name'])
  </a>
</th>
Here’s what the corresponding method in the component class looks like. We’ll add the code for this later:
// app/Http/Livewire/LiveTable.php
public function sortBy($field)
{
  //
}
In the above code, we’ve included another view file called sort-icon. Create a resources/views/includes/sort-icon.blade.php file and add the following. This will render the current sorting icon based on the current sort selected by the user:
@if ($sortField !== $field)
    <i class="text-muted fas fa-sort"></i>
@elseif ($sortAsc)
    <i class="fas fa-sort-up"></i>
@else
    <i class="fas fa-sort-down"></i>
@endif
That’s pretty much it for the markup. The rest of the code is basically the same as your standard Blade template. So we still use the links() method to show the pagination and the @if directive to conditionally show something.
We now move on to the component class. Open the app/Http/Livewire/LiveTable.php file and update it so it contains the following code:
<?php

namespace App\Http\Livewire;

use Livewire\Component;
use Livewire\WithPagination;
use App\Models\User;

class LiveTable extends Component
{
    use WithPagination;

    public $sortField = 'name'; // default sorting field
    public $sortAsc = true; // default sort direction
    public $search = '';

    public function sortBy($field)
    {
        if ($this->sortField === $field) {
            $this->sortAsc = !$this->sortAsc;
        } else {
            $this->sortAsc = true;
        }

        $this->sortField = $field;
    }

    public function render()
    {
        return view('livewire.live-table', [
            'users' => User::search($this->search)
                ->orderBy($this->sortField, $this->sortAsc ? 'asc' : 'desc')
                ->simplePaginate(10),
        ]);
    }
}
As mentioned earlier, we’ve bound the value of the search variable to a specific text field in the client-side via the wire:model. So every time the user types something, the search variable is also updated. And when it’s updated, the component is also re-rendered. This is because in the render() function we’re depending on the value of the search variable to fetch user data. So for each keystroke, we’re actually fetching data from the database by supplying the user’s query and selected sort (we’ll take a look at how to improve this later in the Optimizations section):
User::search($this->search)
                ->orderBy($this->sortField, $this->sortAsc ? 'asc' : 'desc')
                ->simplePaginate(10)
The sortBy() method is what we use to update the field for sorting the users table. Each field can be sorted by either ascending or descending order. By default, clicking on a sorting field will sort it by ascending. Clicking it again will simply do the opposite:
public function sortBy($field)
{
    if ($this->sortField === $field) {
        $this->sortAsc = !$this->sortAsc; // if field is already sorted, use the opposite instead
    } else {
        $this->sortAsc = true; // sort selected field by ascending by default
    }

    $this->sortField = $field;
}
When filtering the users table, we use the search() method. But we haven’t added that yet. Update the app/Models/User.php file to include the search() method. This filters the user table to only return users of type user. Then the rest of the conditions will be the fields we want to use for filtering the search field:
protected $casts = [
    //
];

public static function search($query)
{
    return empty($query) ? static::query()->where('user_type', 'user')
        : static::where('user_type', 'user')
            ->where(function($q) use ($query) {
                $q
                    ->where('name', 'LIKE', '%'. $query . '%')
                    ->orWhere('email', 'LIKE', '%' . $query . '%')
                    ->orWhere('address', 'LIKE ', '%' . $query . '%');
            });
}
Continue reading Getting Started with Laravel Livewire on SitePoint.
This content originally appeared on SitePoint and was authored by Wern Ancheta
Wern Ancheta | Sciencx (2021-01-19T14:00:34+00:00) Getting Started with Laravel Livewire. Retrieved from https://www.scien.cx/2021/01/19/getting-started-with-laravel-livewire/
Please log in to upload a file.
There are no updates yet.
Click the Upload button above to add an update.