
This content originally appeared on Mark's Dev Blog and was authored by Mark's Dev Blog
Introduction
Git has become the standard tool for software development version control. Other VCS tools exist, and some work better than Git for certain scenarios, but most of today's development world relies on using Git. So, becoming comfortable with Git and knowing how to use it effectively is a key skill for any software developer.
I'd like to pass along some of the most useful Git concepts and tips that I've learned over the last few years. In addition, I've covered background info on how Git works and common operations, and there's some specific usage patterns I've found to be especially valuable when working with a team and trying to understand a codebase.
As usual, none of the info or advice in this post is completely new or original, and there's many other sites that cover the same topics (and probably explain them better). I'm just trying to provide an overview of the relevant material and provide enough details that you can do further research and learning from there.
This post is largely based on my slideset Git Under the Hood: Internals, Techniques, and Rewriting History, and I talked about rewriting repo history in my post Rewriting Your Git History and JS Source for Fun and Profit
Table of Contents
- Introduction
- Git Fundamentals
- Git Tools
- Git Techniques
- Git Patterns and Best Practices
- Code Archeology with Git
- Final Thoughts
- Further Information
Git Fundamentals
Git is notoriously difficult to work with, especially using the command line. The CLI commands and options are confusing, mismatched, and hard to remember. There's phrases and warnings like "detached HEAD". Git, frankly, is not easy to learn and kinda scary.
The good news is that once you understand how Git works, it becomes an extremely powerful tool that offers a lot of flexibility.
Git Terms and Concepts Overview
While I'm not going to turn this into a complete "Git tutorial from scratch", it's worth reviewing some of the key concepts.
Git Basics
Git is a tool for tracking changes to file content over time. A Git repository is a folder that has a .git folder inside. The .git folder contains all the metadata and stored history of the project's changes.
The working copy is all other folders and files in the repository folder that Git is storing and tracking. Any newly created files start out untracked. Git knows that the files are there, but you haven't told Git to save them.
To tell Git to start tracking a file, you add the file (git add some-file). Git then saves a copy of the file in an internal section called the staging area. Staged files are not being saved permanently, yet. Instead, they represent the set of files and contents that will be saved when you actually tell Git to save them.
Once you've added one or more files to the staging area, you can save them by committing them. "Commit" is both a verb and a noun here: we "commit" files to save them, and every time we save them, we make a "commit".
Git commits contain a certain set of files and their contents, at a specific point in time. They also contain metadata, including the author's name and email address, and a commit message that you write to describe the changes that were saved.
After a file has been added at least once, making further changes to that file will cause Git to mark it as modified. That means that Git knows the contents are different, but you haven't told Git to save the new changes yet. Once you add that file to the staging area again, Git sees that its latest copy of the file is the same as what's on disk, so it describes the file as unchanged.
Sharing Data Between Repositories
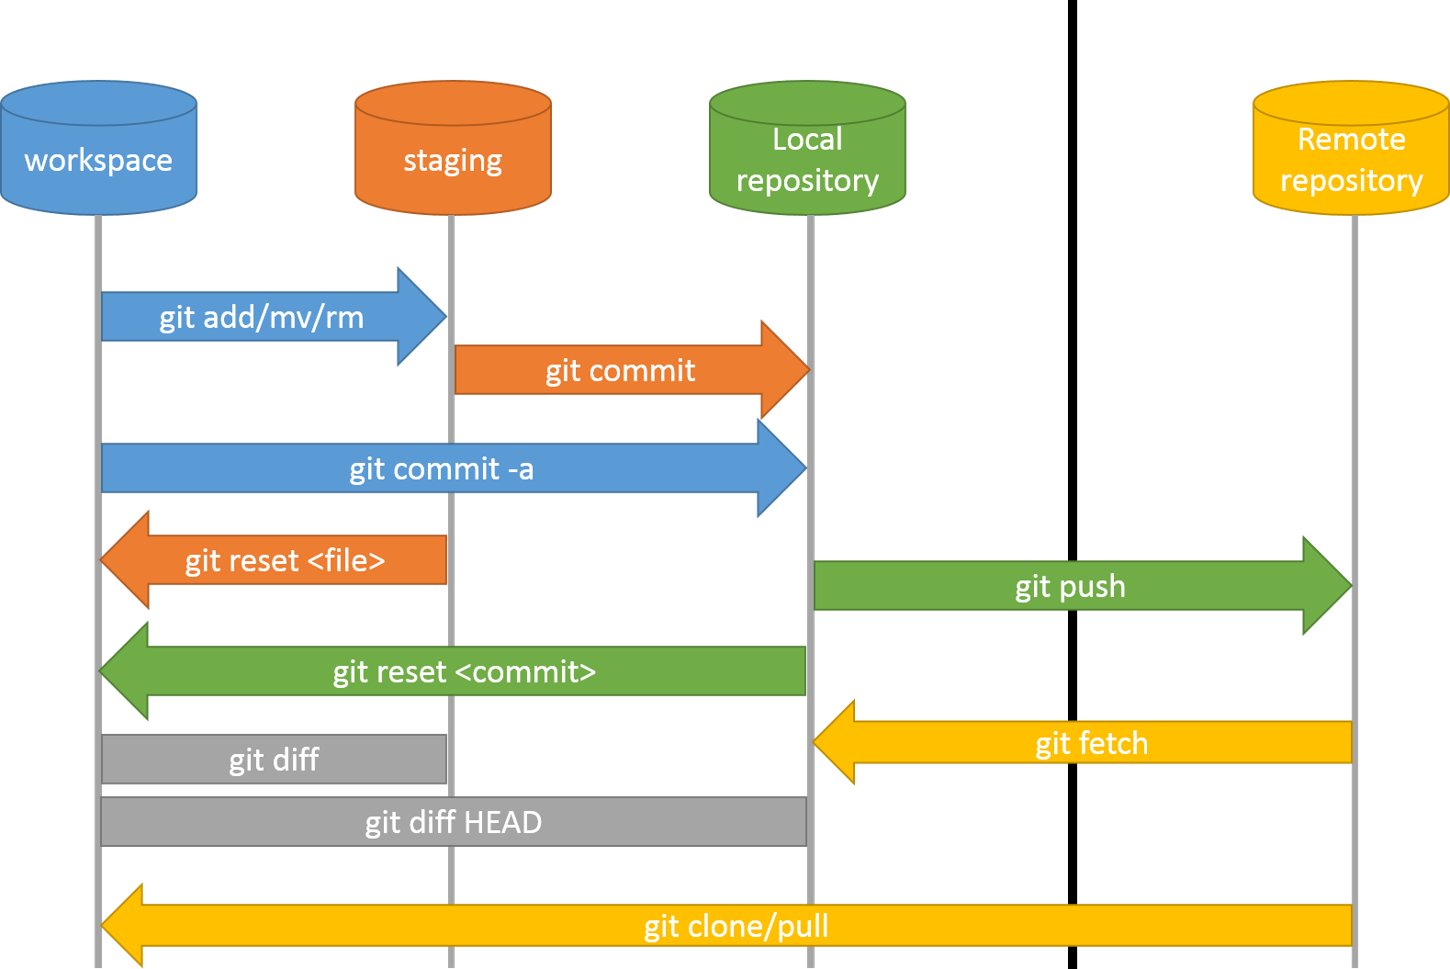
Each Git repository folder is standalone. However, Git repositories can be shared across folders, computers, and networks, allowing developers to collaborate on the same codebase. A Git repo can be configured with the URL of another repo, allowing the two repos to send commits back and forth. Each URL entry is called a remote. Downloading commit data from a remote repo is a fetch or a pull (with slight differences in behavior), and uploading commit data from local to remote is a push. Downloading a complete repo from scratch is making a clone of that repo.
Repositories normally have a default remote repo they point to, called the origin. Whenever you clone a repo, the new local repo points to the remote source as the origin, but that entry can be changed later. Repos can be configured to talk to many other repos at once, and can push and pull data from any remote.
Branches
Git commits are tracked using branches. A branch is like a pointer to the latest commit in a specific series of commits. Any time you make a new commit, Git bumps that branch pointer to point to the newest commit. You can make many branches within a repo, and most devs create a new branch for each task they work on. You can also make tags, which also point to a specific commit, but don't get moved or changed automatically. Tags are normally used to identify checkpoints and releases, so you can easily jump back and see how the code was at that point in time.
Changes from multiple branches can be brought together using a merge process. If some of the changes apply to the same lines of code, there is a merge conflict, and it's up to you as the developer to look at the mismatched changes and resolve the conflict by picking out what the right contents are.
Historically, most repos use a branch called master as the primary development branch. More recently, the community has started switching to use a primary branch named main instead. But, you can configure Git to use any branch name as the "default development branch" if you want.
Git uses the term checking out to refer to updating the working copy files on disk, based on previously committed values. Typically you check out a branch, which overwrites the files on disk to match the files as they exist in the latest commit of the branch. However, you can check out other versions of files as well
Uncommitted changes can be copied and saved for later by creating a stash. A stash is kind of like an unnamed commit - it again points to specific files at a certain point in time, but it doesn't exist in a branch. Stashed changes can later be applied on top of your working copy.
Overall, the Git data workflow looks like this:
Understanding Git Internals
I really feel that understanding Git's internal data structures is critical to understanding how Git works and how to use it correctly.
Git tracks all content using SHA1 hashes of byte data. Running any specific sequence of bytes through the hashing function calculates a specific hex string as a result:
from hashlib import sha1

sha1("abcd").hexdigest()
'81fe8bfe87576c3ecb22426f8e57847382917acf'

sha1("abce").hexdigest()
'0a431a7631cabf6b11b984a943127b5e0aa9d687'

readme = open("README.md", "rt").read()
sha1(readme).hexdigest()
'45257c0245c56a4d5990827b044f897c674c8512'
Git hashes files and data structures, then stores them inside the .git folder based on the hash:
/my-project
  /.git
    /objects
      /00
      /01
      ...
      /81
        81fe8bfe87576c3ecb22426f8e57847382917acf
      /82
      ...
      /fe
      /ff
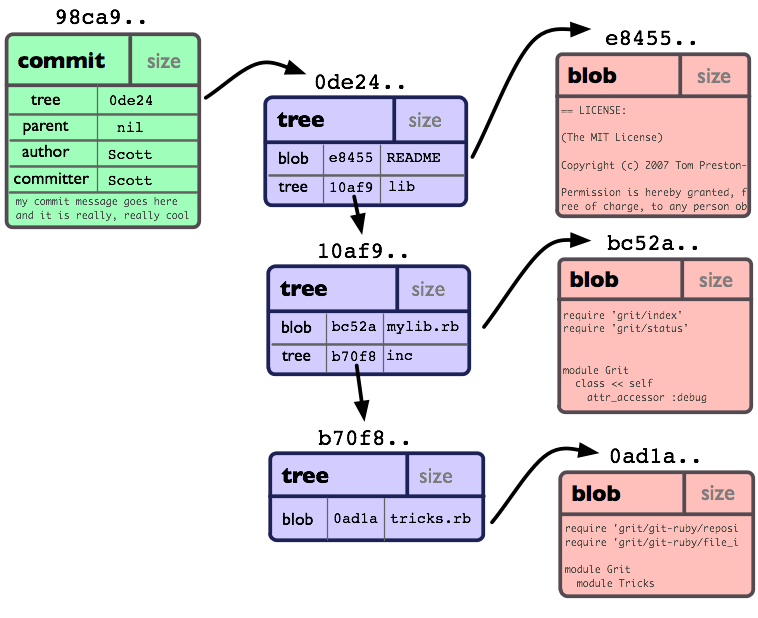
Git has three primary internal data structures:
- blobs are file contents, and identified by a hash of the file's bytes
- file trees associate folder and file names with file blobs, and are identified by a hash of the file tree data structure
- commits contain metadata (author, timestamp, message), point to a specific file tree, and are identified by a hash of the commit data structure
| Type | Contains | Identified By | |
|---|---|---|---|
| Blob | File contents | Hash of the file's bytes | 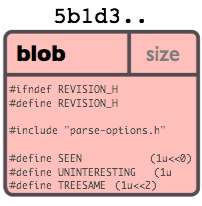 |
| File tree | Associates names and folder definitions with file blobs | Hash of the file tree data structure | 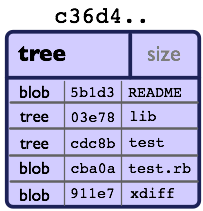 |
| Commit | Metadata for author, commit timestamps, and message | Hash of the commit data structure | 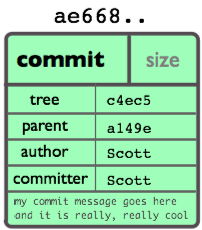 |
A file tree may point to multiple other file trees for subfolders:
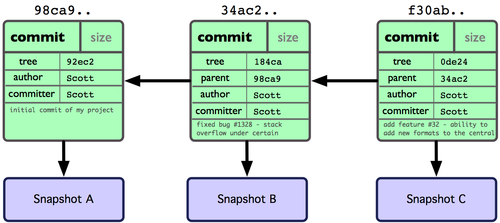
Commit objects themselves form a linked list, which points backwards to earlier commits based on their hashes: A <- B <- C <- D.
A Git "ref" is a name label that points to a specific commit. Branches are names associated with a given ref, where each time a new commit is made, the ref is updated to point to that latest commit. So, you can start from the branch ref pointer, then walk backwards through the chain of commits to see the history.
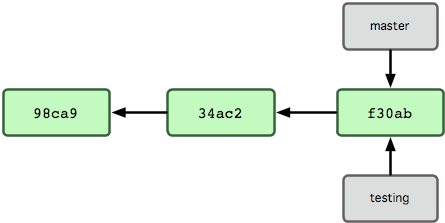
HEAD is a ref that points to "whatever the current active commit" is. Normally this is the same as the current branch pointer, but if you check out a specific earlier commit, you get the ever-popular warning about a "detached HEAD". This just means that HEAD is pointing to a specific commit instead of a branch, and if you make any new commits, they won't be part of any branch.
Because commits are a linked list based on hashes, and the hashes are based on byte contents of files and other structures, changing any one bit in an earlier commit would have a ripple effect - every hash of each commit after that would be different.
Git commit objects are immutable - once created, they cannot actually be changed. This means that you can't change history, exactly - you can only create an alternate history.
Git Tools
I've seen a lot of arguments about whether it's better to use a Git GUI tool, or use Git from the command line. To those people, I say: why not both? :)

I find that having a Git GUI tool is absolutely invaluable. It makes visualizing the state of the repository and its branches much easier, and many operations are way simpler via a GUI. For example, I can view the diffs for many pieces of a file at once, and selectively add specific changes to the staging area by clicking "Add Hunk" or CTRL-clicking a few lines to select them and clicking "Add Lines". This is much simpler and more intuitive than trying to use Git's "patch editing" text UI to manipulate pieces of changes. Interactive rebasing is also much easier to do via a GUI. I can't remember what the different options like "pick" mean, but it's straightforward to use a GUI listview with arrow buttons that lets you reorder commits and squash them together.
On the other hand, it's often faster to create or switch branches from the CLI. You can add all changed files to the staging area with a single command of git add -u. And of course, if you are using a remote system via SSH, you probably do only have the Git CLI available.
So, I use both a Git GUI, and the CLI, based on what tasks I'm doing.
I primarily use Atlassian SourceTree (Win, Mac). It's very powerful, with a lot of options, and has a good built-in UI for interactive rebasing. It also happens to be free. The biggest downside is that it doesn't have a way to view the contents of the repo file tree as of a given commit.
Other Git tools I've used in some form include:
- Git Extensions for Windows (Win): integrates with Windows Explorer to let you perform Git operations from the filesystem. I mostly use this to do a quick view of a given file's history if I happen to be browsing the folder contents of the repo.
- Git Fork (Win, Mac): excellent UI design, and does have an interactive rebase UI. Recently switched from being free to $50, but likely worth paying for.
- Sublime Merge (Win, Mac, Linux): from the makers of Sublime Text. Fewer options and tool integrations, but very snappy. Tells you what CLI operations it's doing when you try to push or pull, so it expects familiarity with the CLI. $100, but will run for a while with nag messages.
There's also Tower (Win, Mac) and Git Kraken (Win, Mac, Linux), which have slick UIs but require yearly subscriptions, and a laundry list of other smaller Git GUIs. There's even "text-based UI" tools like lazygit, gitui, and bit.
All major IDEs have Git integration. JetBrains IDEs like IntelliJ and WebStorm have excellent Git capabilities. VS Code has adequate Git integration, but really needs additional extensions like Git History and GitLens to be useful.
I also really prefer using external diff tools for comparing complete files, or fixing merge conflicts. I personally use Beyond Compare as my external diff tool, and DiffMerge as my conflict resolution diffing tool.
Git Techniques
Improving CLI Logging
The default git log output is ugly and hard to read. Whenever I start using Git on a new machine, the very first thing I do is browse to https://coderwall.com/p/euwpig/a-better-git-log and copy-paste the instructions for creating a git lg alias to set up a much pretter CLI logging view that shows the branch and commit message history:
git config --global alias.lg "log --color --graph --pretty=format:'%Cred%h%Creset -%C(yellow)%d%Creset %s %Cgreen(%cr) %C(bold blue)<%an>%Creset' --abbrev-commit"
That gives us this view whenever we run git lg:
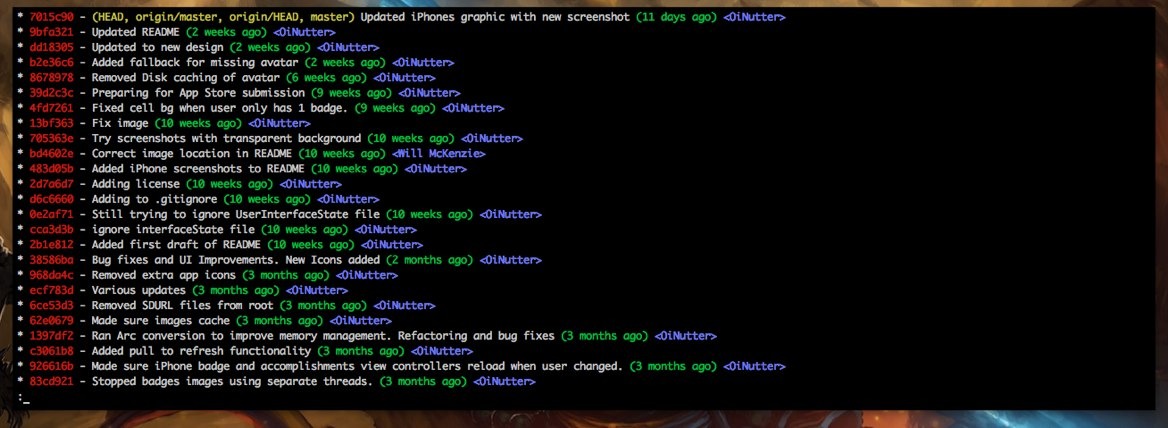
Note that git log accepts a variety of filtering options, including text strings, dates, branches, etc.
Preparing Commits in Pieces
I've seen comments that complain that the Git staging area is confusing. To me, the staging area is one of the most valuable features of Git - it lets me carefully craft commits that contain only the code that belongs together.
When I work on a task, I frequently end up modifying multiple files before I'm ready to make a commit. However, the changes might logically belong in several smaller commits instead of one big commit. If I do git add some-file, it adds all the current changes in the file to the staging area. Instead, I often want to stage just a couple sections from file A, and a couple sections from file B, and maybe all of file C, because those are the changes that should go together in one commit.
You can do this from the commandline using the git add -p flag, which brings up a text UI that lets you view each "hunk" of changes in a file, and decide whether to stage that hunk or not. However, I strongly recommend using a Git GUI tool like SourceTree for adding pieces of files, because it's easier to click "Add Hunk" or CTRL-click a couple lines and click "Add Lines" than it is try to decipher what the command abbreviations in the text UI actually mean:
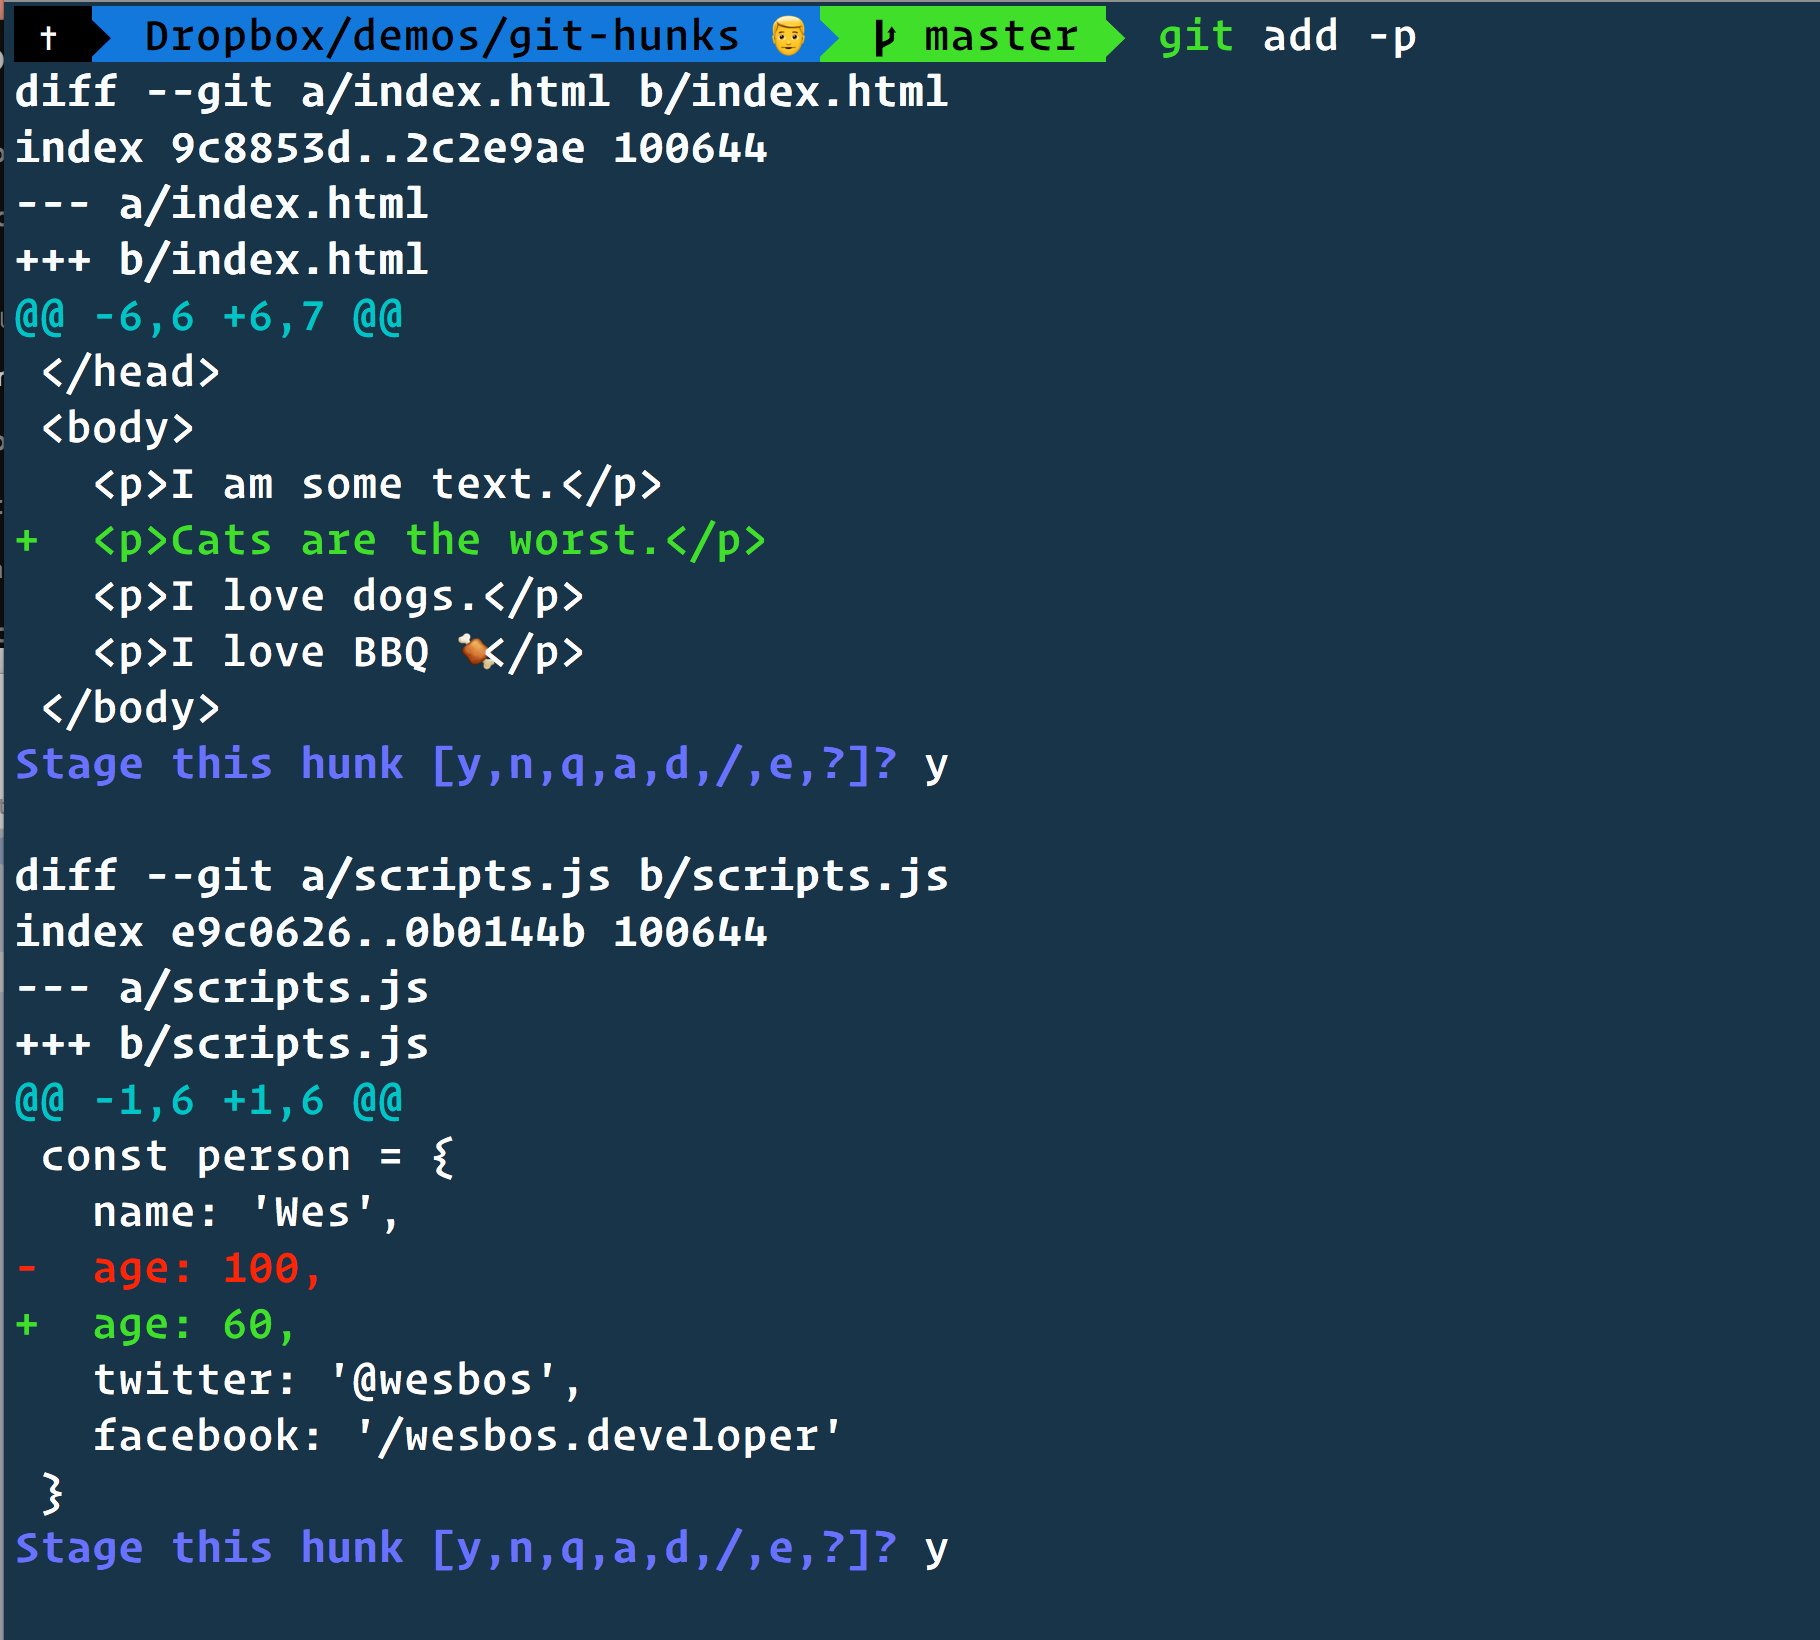
Once you've got these pieces added, you can make a commit with just chose changes, and repeat the process for the next commit. This is a key part of the "making small commits" practice that I cover below.
On the flip side, sometimes you do just want to add everything that's been changed at once. In that case, the fast way is to run git add -u from the command line, which adds all modified files to the staging area.
Stashing Changes
Stashes are most useful when you've got some modified files that aren't committed, and need to set those aside to work on a different branch for a while. Git's list of stashes acts like a stack data structure, but you can also supply names for stash entries when you create them. Creating stash entries normally resets the modified files back to the latest commit, but you can choose to leave the modifications in place.
From the CLI, the main options are:
git stash: save a copy of local changes for later reuse, and clears the working directory/indexgit stash push: creates a new stash entrygit stash popapplies changes from the top stash entry and removes itgit stash apply stash@{2}: applies changes from the third stash entrygit stash -p: choose specific pieces to stashgit checkout stash@{2} -- someFile: retrieve a specific file contents from the stash
But, this is another situation where it's particularly useful to use a GUI instead. It's easier to just click a "Stash" button in a toolbar and type in a name for the entry to create one, or to expand a "Stashes" section of a treeview, right-click an entry, and "Apply Stash" to apply a stash.
Working with Branches
Creating and Switching Branches
Git has a bunch of different commands for working with branches. The most common way to create a branch is actually with git checkout -b NAME_OF_NEW_BRANCH. That creates a new branch, starting from the latest commit on the current branch, and switches to it.
You can also use git checkout NAME_OF_EXISTING_BRANCH (without the -b flag) to switch to an existing branch.
There's many other branching commands - see the Git docs and other pages like this Git branching cheatsheet for lists of commands and options.
Fetching, Pushing, and Pulling Branches
Most Git network operation commands accept the name of the remote repo to talk to, but assume that you want to talk to the origin remote repo by default if you don't specify a remote name.
git fetch tells Git to contact another repo, and download copies of all commits that the local repo doesn't have stored. This includes information on branches in the remote repo as well.
Once your repo has downloaded the list of remote branches, you can create a local branch based on the remote branch's name, with git checkout NAME_OF_REMOTE_BRANCH. Git will create a new branch that points to the same commit. It also sets up the local branch to track the remote branch, which means that any pushes from the local branch will update the remote branch.
Later, you can update the remote branch with the new commits you made locally, with git push. You can also push local branches taht the remote repo doesn't know about yet.
If the remote branch has commits you don't have in your local branch, git pull will both fetch the set of new commits into your local repo, and update your local branch to contain those commits.
If you rewrite history on your local branch so that it's different than the remote branch, a git push attempt will fail with an error. You can force push , which will hard-update the remote branch to use these commits instead. Force pushing is semi-dangerous, depending on workflow. If someone else pulled the old history, and you force-push, now they have a conflict to deal with. Force pushing is a valuable tool if you need it, and can be a legitimate solution to fixing problems or repeatedly updating a PR, but should be used cautiously. Think of it as a chainsaw - if you need it, you need it, you just have to be very careful when using it :)
Merging Branches
Merging allows you to take changes and history that exist on branch B, and combine them into the changes on your current branch A. The assumption is that both branches have a common set of ancestor commits, and two different sets of changes (either to different files, or even the same files). Merging creates a new "merge commit" on the current branch that has all of the changes together in one spot. This is used to let developers collaborate by writing code separately, but combine their changes together.

Merging is done with git merge OTHER_BRANCH_NAME, which tells Git to merge from the other branch into the current branch.
If the changes on the two branches interfere with each other, there's a merge conflict. Git will mark the file with text strings indicating the two mismatched sections. It's up to you to fix the problem, save the corrected file, add it, and finish the merge commit. I like using SourceGear DiffMerge as a GUI tool for fixing conflicts, but VS Code also does a nice job of highlighting conflict markers in files and offering hover buttons to pick one side or the other.
Feature Branch Strategies
Most teams use some kind of a "feature branch" strategy for development. They have a primary development branch such as main, master, or develop. Any time a developer starts work on a new task, they create a new branch based on the primary branch, and often using the name and ID of a task/issue as the branch name: git checkout -b feature/myapp-123-build-todos-list.
The developer works on their feature for a while. Once the work is complete, they push the branch up to the team's central repository, other team members review the changes, the developer makes any needed fixes from the review, and then the feature branch is merged back into the primary development branch.
Developers may need to pull down changes that have been added to the primary branch, then "merge down" from the primary branch into their feature branch. Merging the feature branch back into the primary branch is referred to as "merging up".
Pull Requests
If you've worked with Git at all, you've probably heard the term "pull request" (also know as a "PR" for short, or occasionally "merge request") before. Strictly speaking, a "pull request" isn't even a Git concept - it's a merging workflow that is built on top of Git by repository hosting sites and tools like Github, Gitlab, and Bitbucket.
Pull Requests are an approach to doing code reviews and handling merging at the central Git repo/server level. This is typically associated with using feature branches. A developer pushes up their completed feature branch, and creates a PR that will merge some-feature into main. Other devs can look at the page for the PR, see the file diffs, and leave comments on specific lines suggesting changes. The feature dev makes more commits based on those suggestions, pushes them up, and the PR is updated to reflect the changes. After other team members approve, the PR can be merged and the feature branch can be deleted.
Updating Branches in the Background
Normally, the main way to update a local copy of a branch is to git checkout some-branch and then git pull. But, if I'm working on a feature branch, I often have unsaved changes and don't want to switch over to the main branch just to do a pull.
There's a really useful trick for doing a "background pull" of a branch without checking it out:
git fetch <remote> <remoteBranch>:<localBranch>
So, say I'm on features/some-feature, and I want to update my main branch without switching to it. Typically the local branch and remote branch have the same name. So, I can run:
git fetch origin main:main
and Git will download any new commits on the remote origin/main branch, then update my local main branch to have those commits too.
Rewriting Git History
There's a variety of ways to alter the history in a Git repository. Each technique is useful in different situations, and these are often valuable for fixing earlier problems. As mentioned earlier, Git commits are immutable, so you can never actually modify them - you can only replace commits with new ones. So, when we "rewrite history", we're actually creating an "alternate history" instead.
It's critical that you should only ever rewrite history that is still local to your own repository and has never been pushed up to another repository! As long as commits haven't been pushed, no one else cares about them, and you can rewrite them to your heart's content. But, once they've been pushed, someone else's Git repo clone may be relying on the old history, and changing that history will likely cause conflicts for them.
Amending Commits
The easiest technique for rewriting history is to "amend" the latest commit.
Amending a commit really means replacing it with a slightly different one. This can be done via git commit --amend, or a corresponding option in a GUI tool:
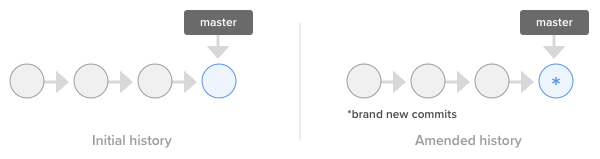
Technically, the old commit still exists in Git's storage, but the current branch ref now points to the newly created commit instead.
Resetting Branches
Since branch refs are pointers to a given commit, we can reset a branch by updating the ref to point to an earlier commit. This is typically used to roll back some of the commits you made.
When you reset a branch, you have three options for what happens to the files on disk and in the staging area:
git reset: move a branch pointer to point to a different commit--soft: keep the current files on disk and in the staging area--mixed: keep the current files on disk, but clear the staging area--hard: clear the staging area and make the working directory look exactly like this specific commit
So, git reset --soft is fairly "safe" to do, because it doesn't change any files on disk. git reset --hard is "dangerous", because it will wipe out any files that were changed during these commits or that haven't been committed yet, and replace them all with the files from this exact commit.
git reset requires a commit identifier as an argument. This could be a specific commit hash ( git reset ABCD1234 ), or some other revision identifier. You can even update your current branch to point to the same commit as a different branch ( git reset --hard some-other-branch ).

Rebasing Branches
"Rebasing" is a technique that is an alternative to merging for updating one branch with another's changes. Instead of combining the two sets of changes directly, rebasing rewrites history to act as if the current branch was created now, off the latest commits on the source branch, instead of starting from the earlier commits. Similar to merging, this is done with git rebase OTHER_BRANCH_NAME.
Imagine that the main branch has commits A <- B to start with, and we make a feature branch starting from commit B. Now, someone else merges some more work into main, giving it commits A <- B <- C <- D. If we rebase our feature branch against main, it's kind of like cutting off the line of our feature branch, transplanting it to the end, and pretending we really started this branch after commit D instead of B:

Reverting Commits
Resetting a branch effectively throws away the newer commits. What if we want to undo the changes in an earlier commit, but keep the history since then?
Reverting a commit with git revert creates a new commit that has the opposite changes of the commit you specified. It doesn't remove the original commit, so the history isn't actually modified - it just inverts the changes.

Cherry-Picking
Cherry-picking allows you to copy the changes in specific commits, and apply those as new commits onto a different branch. For example, maybe there's an urgent patch that has to be created directly onto a hotfix branch and deployed to production, but you need to also make sure that main has that commit as well. You can cherry-pick the individual commit from the hotfix branch over onto main.
git cherry-pick accepts either a single commit reference, or a commit range. Note that the range excludes the first commit you list. if I run git cherry-pick A..E, then it will copy commits B,C,D,E over onto this branch. This creates new commits with new hashes (because the timestamps and parent commits are different), but preserves the diffs and commit metadata.

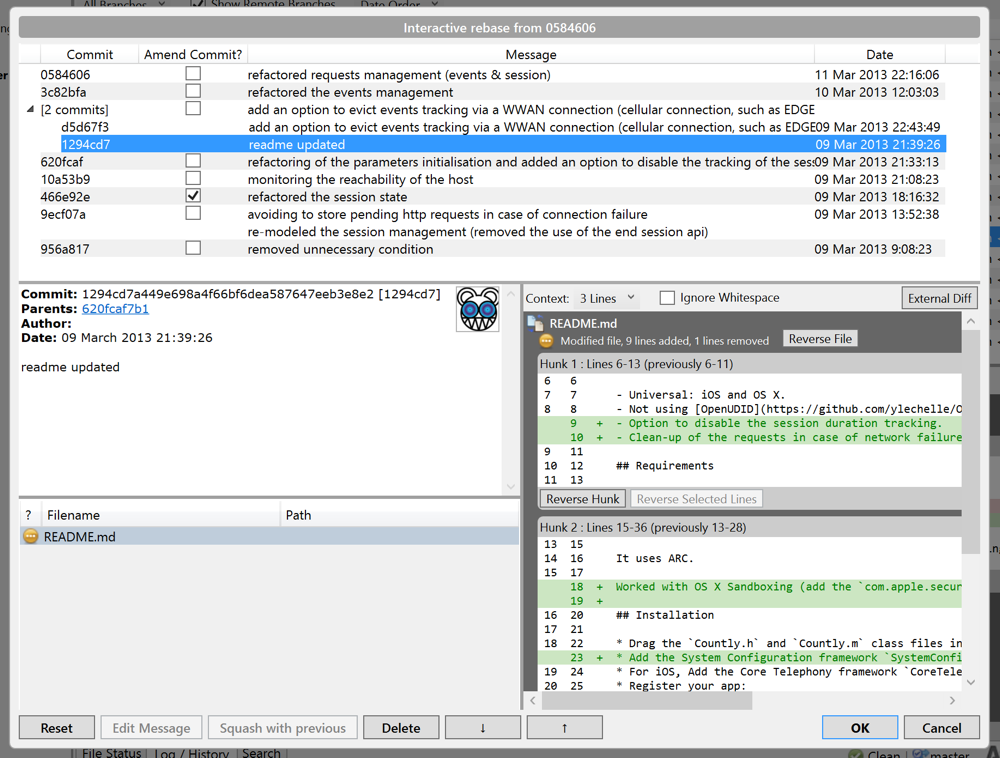
Interactive Rebasing
"Rebasing" involves rewriting the entire history of a branch. There is a variation on this called "interactive rebasing", which allows you to selectively modify earlier commits on a branch. This is done with git rebase -i STARTING_COMMIT.
Interactive rebasing lets you perform several different types of modifications. You can:
- Edit the message for a commit
- Reorder commits
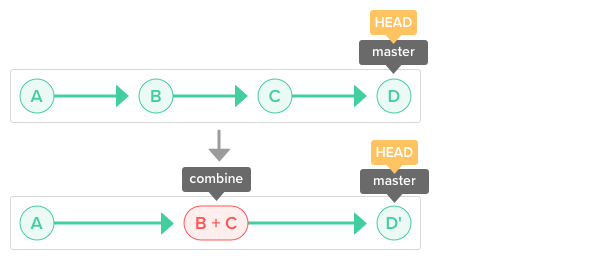
- Squash multiple commits together
- Remove commits
After you specify the desired changes to the commit history, Git will execute the modifications you listed, and update all commits after the starting point accordingly. As with other history rewriting operations, this always produces a new set of commits after any changed commit, with new hashes even if the rest of the contents haven't changed due to the parent commits changing.
Running an interactive rebase from the CLI brings up a list of all commits after the starting commit in your text editor, along with a column of odd command names like "pick" and "squash". You rework the commits by actually modifying the text in the file, and then saving and exiting. For example, if you want to swap a couple commits, you'd cut one of the text lines and paste it in a different location.
I find this very unintuitive to work with, so I strongly recommend using a Git GUI for any interactive rebase operations. SourceTree and Fork have pretty good UIs for performing interactive rebasing.

Reflog
It's actually very hard to completely wipe out your Git commits and permanently lose work. Even if you do a git reset --hard and the commits appear to have vanished, Git still has a copy of those commits saved internally.
If you do end up in a situation where you can't see those commits referenced from any tag or branch, you can use the Git reflog to look back and find them again. The reflog shows all commits, no matter what branch they're on or whether there's still a meaningful pointer to that commit. That way you can check them out again, create a new tag or branch pointing to those commits, or at least see the diffs.

Advanced History Rewriting
Finally, Git supports some very advanced tools for rewriting history at the whole repository level. In particular, git filter-branch lets you perform tasks like:
- rewriting file names and paths in the history (example: changing files in
./srcso that they now appear to be in the repo root) - creating a new repo that contains just certain folders from the original, but with all their history
- rewriting actual file contents in many historical commits
git filter-branch is notoriously slow, so there's other external tools that can perform similar tasks. While I haven't used it, https://github.com/newren/git-filter-repo claims to be able to run the same kinds of operations much more quickly, and is apparently now even recommended by the actual Git docs.
Sometimes repos end up with very large files cluttering the history, and you want to rewrite the history to pretend those files never existed. A tool called the BFG Repo Cleaner does a good job of that.
If these existing tools don't do what you need, you can always write your own. I once wrote a set of Python-based tools to rewrite the JS source for for an entire repository with multiple years of history, including optimizing it to run in just a few hours.
These tools are very powerful and should not be something you use for day-to-day tasks. Think of them as fire extinguishers. You hope you never need to use them, but it's good to have it sitting around in case something happens.
Git Patterns and Best Practices
So now that we've covered a bunch of commands and technical details, how do you actually use Git well? Here's the things that I've found to be most helpful:
Write Good Commit Messages
It's critical to write good commit messages. It's not just a chore to satisfy the Git tools. You're leaving notes to any future developers on this project as to what changes were made, or even more importantly, why those changes were made. Anyone can look at a set of diffs from a commit and see the changed lines, but without a good commit message, you may have no idea what the reason was to make those changes in the first place.
There's lots of good articles out there discussing rules for writing commit messages, with plenty of good advice. I personally don't care so much about things like "max 72 characters per line" or "use present tense for the top line and past tense for other lines", although there's valid reasons to do those things. To me, the critical rules are:
- Always start the commit message with a relevant issue tracker ID number if there is one. That way you can always go back to the issue tracker later to see more details on what the specific task was supposed to be.
- First line should be a short high-level summary of the intent of the changes. This line of the message is what will be shown in any Git history log display, so it needs to both fit in one line, and clearly describe the commit overall. Aim more for the purpose of the changes than a specific list of "what changed" in this line.
- If you have any further details, add a blank line, then write additional paragraphs or bullet points. Write as much as you want here! This section will usually be collapsed by default in a Git UI, but can be expanded to show more details. I've seen some excellent commit messages that were multiple paragraphs long, and they provided important context for why changes were being made.
A typical example of this format would look like:
MYAPP-123: Rewrite todos slice logic for clarity

- Added Redux Toolkit
- Replaced handwritten reducer with `createSlice`.  This simplified the logic considerably,
  because we can now use Immer and it auto-generates the action creators for us.
- Updated `TodosList` to use the selectors generated by the slice.
Make Small, Focused Commits
This goes hand-in-hand with the advice to write good commit messages.
Commits should be relatively small and self-contained, conceptually. One commit might touch several files, but the changes in those files should be closely related to each other. There's multiple reasons for this:
- It makes it easier to describe the changes in the commit
- It's easier to look at that one commit and see what changes it includes
- If the commit needs to be reverted later, there's fewer other changes that would be affected
- When someone looks at the line-by-line history, there will be more specific comments associated with each line ("Fixed bug X" instead of "Made a bunch of changes", etc)
- It's easier to bisect the commit history and narrow down what changes might have caused a particular bug
For example, say I'm adding a new JS library to a project. I would make one commit that just updates package.json and yarn.lock, then put the initial code changes using that library into a separate commit. You can see an example of this commit approach in the commits for the "Redux Fundamentals" tutorial example app I wrote.
To me, the commit history should "tell a story" of how a given task was accomplished. Someone should be able to read through the series of commits, whether it be during the PR review process or years down the road, and be able to understand my thought process for what changes I made and why I made them.
Clean Up Commit History Before Pushing
I frequently have to make "WIP" commits as I'm working on a task. Maybe I've just made a bunch of edits, the code is now mostly working, and I want to record a checkpoint before I keep going. Or, maybe I forgot to commit a particular bit of code, added it in another commit later, but it doesn't really belong as part of the "story" that I'm telling.
I often use interactive rebase to clean up my commits before I push a branch for a PR. Just because I have some junk commits in my history locally doesn't mean that the rest of the world needs to know or care that was part of my actual progress for this task. The "story" that I'm telling with my commits is sort of the idealized version - ie, "let's pretend that I did this task perfectly without any mistakes along the way".
Only Rewrite Unpushed History
As mentioned earlier: as long as a branch is still local and hasn't been pushed, it's fair game - rewrite it all you want! Once it's been pushed, though, you should avoid rewriting it.
The one main exception to that is if the branch is still up for PR, and you redo the history. At that point, most likely no one depends on it yet, so you can get away with force-pushing the branch to update the PR. (The React team does this frequently.)
Keep Feature Branches Short-Lived
There's no hard rule about how many lines of code or commits can be in a branch. In general, though, try to keep feature branches relatively short-lived. That way the size of the changes to merge in a PR is smaller, and it's less likely that you'll need to pull down changes from someone else.
Some people argue about whether it's better to merge feature branches back into the primary branch, or rebase them when they're done to keep the main branch history "clean and linear". I kinda like having merge commits, personally - I prefer seeing when things got merged in. The important thing is to pick a convention as a team and stick with it.
Code Archeology with Git
So why do all these good commit practices matter?
Say you're working in a codebase with multiple years of history. One day, you're assigned a task to work on some portion of the codebase. Maybe it's fixing a bug that just popped up, or adding a new feature. You open up a file, and there's hundreds of lines of code inside. You read through it, and it's kind of ugly - there's a bunch of extra conditions in the logic, and you're really not sure how it ended up this way.
Reading through that file tells you what the code does, now. Unless the file has a lot of good comments, there may not be much information for why the code is like that, or how it got that way. We naturally have a tendency to assume that "whatever code is there currently must be correct", but that's not always true :)
That's where having a good Git history is critical. Digging through a file's history can show you:
- Who wrote each line of code
- When that code was changed, and what other code changed at the same time
- What task the changes were part of
- What the intent was behind the change
- What the author was thinking at the time
- When a bug was introduced
These can all be extremely valuable pieces of information when tracking down a bug or working on a feature.
Displaying Historical File Changes
There's a variety of ways to view the history of changes to a file.
git log lets you look at the commits that affected a specific file. IDEs and Git GUIs let you explore the history of a file as well, showing each commit its diffs, often including the ability to diff two arbitrary versions of a file. Some Git GUIs also let you explore the entire repo file tree as of a specific commit.
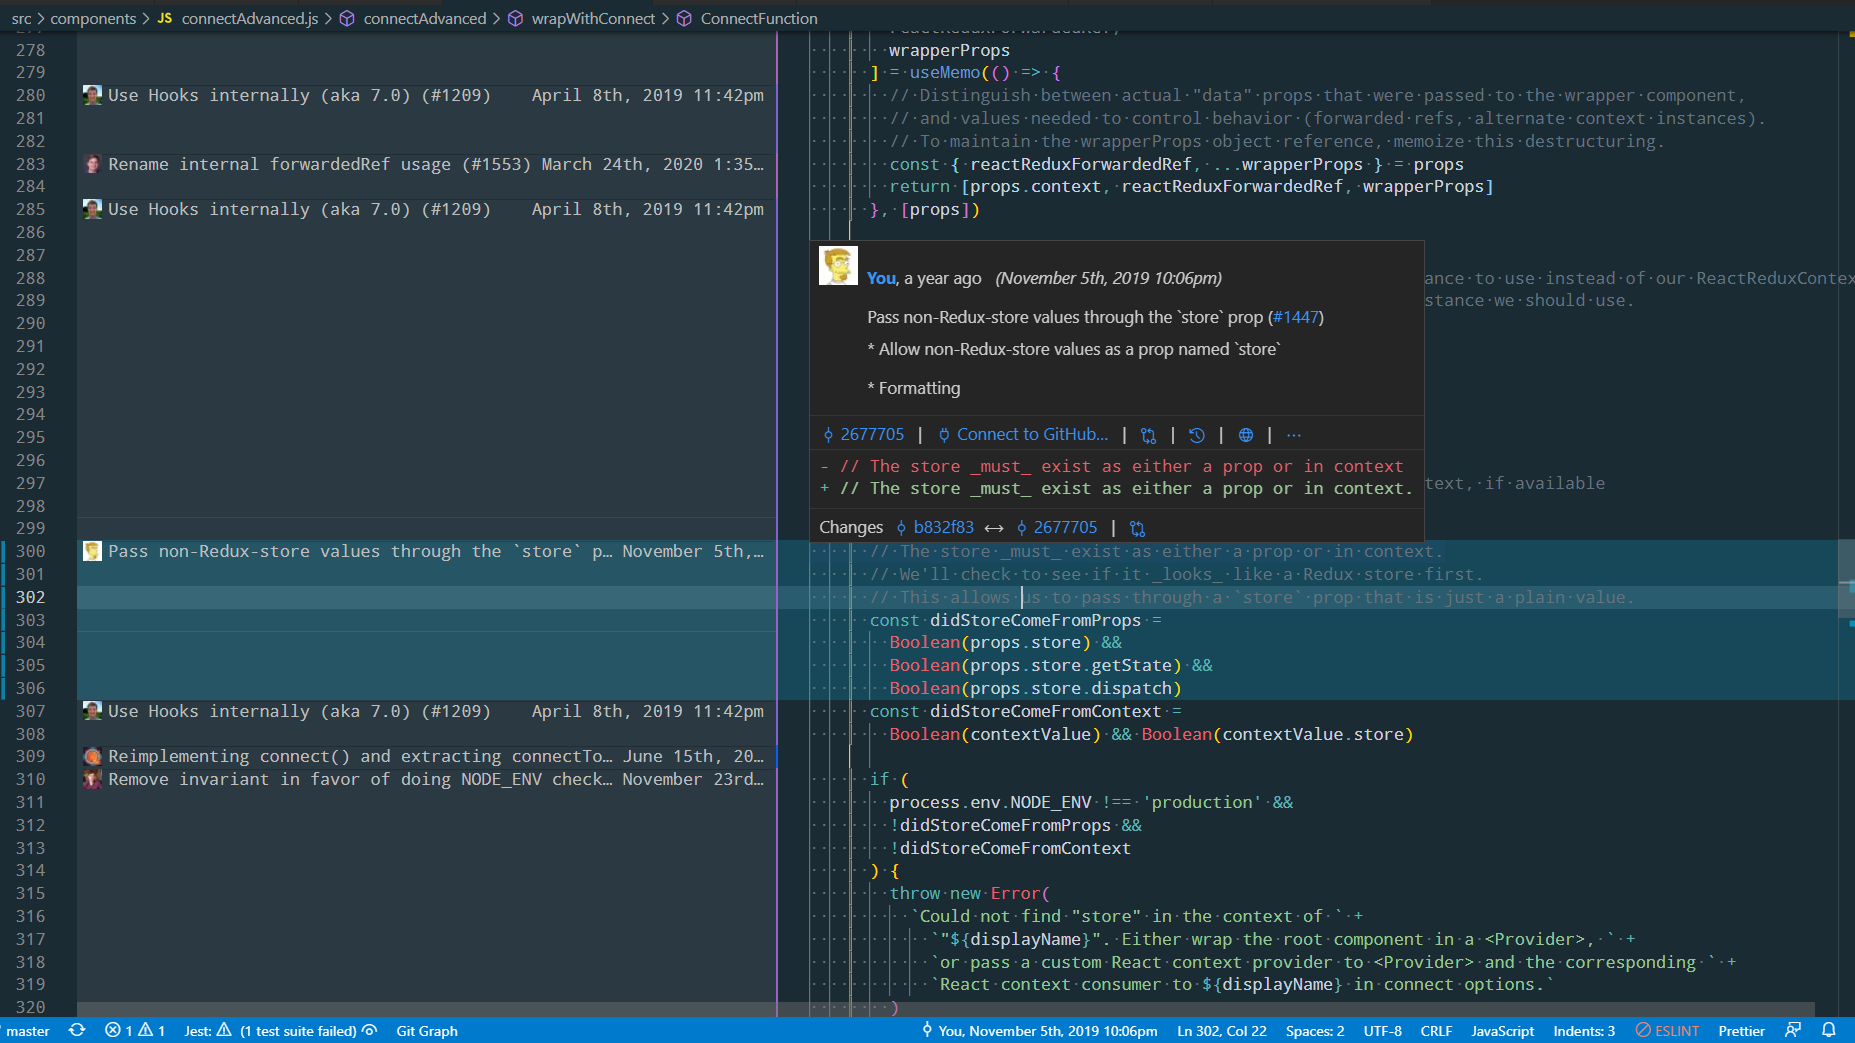
Git has a feature called git blame, which prints the commit ID, author, and timestamp for each line. The CLI output is hard to read, but every good IDE has the ability to show file blame information next to the actual code in a file. IDEs typically enhance the blame information to show you more details on the author, the commit message, and the commits before and after this one:
Github offers a "blame" view as well, and makes it easy to jump back to view an earlier version of the repo. Github also lets you browse specific file versions and trees. For example, https://github.com/reduxjs/react-redux/tree/v7.1.2 shows the React-Redux codebase as of tag v7.1.2, and https://github.com/reduxjs/react-redux/blob/5f495b23bcf3f03e0bee85fa5f7b9c2afc193457/src/components/connectAdvanced.js shows that exact file version. (Press y while browsing a file on Github to change the URL to the exact file hash.)
Bisecting Bugs
Git has a really neat command called git bisect, which you can use to help find the exact commit where a bug was introduced. When you run git bisect, you can give it a commit range where you think the problem started. Git will then check out one commit, let you run whatever steps you need to with the app to determine if the bug is present or not, and then say git bisect good or git bisect bad. It then jumps to another commit and lets you repeat the process. It follows a splitting pattern that lets you narrow down the potential problem commit in just a few steps.
Final Thoughts
As software developers, we use lots of tools. Everyone has their own preferences for things like text editors and such, but everyone on a team is going to use the same version control system. In today's world, that's inevitably Git.
Given how critical Git is to modern development, anything you can do to use it more effectively will pay dividends down the road, and anyone reading your commits will appreciate the effort you put into clearly describing what changes are happening and why. It might be a teammate reading your PR, an intern exploring the codebase next year, or even yourself revisiting code that you wrote many years ago.
Ultimately, good Git practices are a key part of long-term codebase maintainability.
Further Information
- Git Tutorials
- Git Internals
- Commit Messages
- Operations
- Cheat Sheets
- A Visual Git Guide
- Tower Git Cheat Sheet
- akras14 Git Cheat Sheet
- DevHints Git cheat sheets: revision syntax, log syntax, branching commands
- Other Resources
This content originally appeared on Mark's Dev Blog and was authored by Mark's Dev Blog
Mark's Dev Blog | Sciencx (2021-01-27T15:00:00+00:00) Coding Career Advice: Using Git for Version Control Effectively. Retrieved from https://www.scien.cx/2021/01/27/coding-career-advice-using-git-for-version-control-effectively/
Please log in to upload a file.
There are no updates yet.
Click the Upload button above to add an update.