
This content originally appeared on DEV Community and was authored by johannchopin
Hey devs ?
Today I wanted to share how you can easily develop a Nextjs web application that consumes a REST API with the help of Restapify.
If you didn't heard about Restapify before, I really encourage you to read the article Quickly and easily mock a REST API with Restapify first.
So for this example, I will build an "Animal shelter" app where the user will be able to check a list of all the shelter residents, read more about a specific animal, be able to adopt one if possible and login/logout. To easily manage my layout and not recreate UI components I will use the React Bootstrap library. The app will get the data from a REST API that is not yet created so I will create a mocked version of it with the API mocker library: Restapify. With this one I only need to define some API endpoints with simple JSON files. Theses are stored in the folder mockedApi so like the app file structure look like this:
? app
┣ ? components
┣ ? lib
┃ ┗ ? userContext.js
┣ ? mockedApi
┣ ? pages
┃ ┗ ? _app.js
┃ ┗ ? index.js
┣ ? next.config.js
Next thing to implement is a store for an axios instance to make our http request to the API which will be served from http://localhost:6767/api. So we create the file /app/axiosStore.js:
import axios from 'axios'

const instance = axios.create({
  baseURL: `http://localhost:6767/api`
})

export default instance
We can then continue with the implementation of the animals page which is a list of all animals. This page will be served from the route /animals:
? app
┣ ? pages
┃ ┣ ? animals
┃ ┃ ┗ ? index.js
This page is going to fetch the endpoint GET /animals and render a list of all animals object which contain an id and a name:
import React from 'react'
import Link from 'next/link'

import { ListGroup, ListGroupItem, Form, Row, Col } from 'react-bootstrap';

import api from '../../axiosStore'

const Animals = () => {
  const [animals, setAnimals] = React.useState(null)

  const fetchAnimals = () => {
    api.get('/animals').then((response) => {
      setAnimals(response.data)
    })
  }

  const renderAnimals = () => {
    return (
      <ListGroup className="px-3">
        {animals.map((animal) => {
          return (
            <Link key={animal.id} href={`/animals/${animal.id}`} style={{cursor: 'pointer'}}>
              <ListGroupItem action>{animal.id}. {animal.name}</ListGroupItem>
            </Link>
          )
        })}
      </ListGroup>
    )
  }

  React.useEffect(() => {
    fetchAnimals()
  }, [])

  return (
    <>
      <Row className='mb-3 p-3'>
        <Col><h1>Our Residents</h1></Col>
      </Row>
      {!animals
        ? <p>Loading...</p>
        : renderAnimals()
      }
    </>
    )
}

export default Animals
The interface is now ready so lets mock the API to serve /animals with Restapify so that we get back an array of 25 animals. For that, we just need to create a file /mockedApi/animals/_.json that contains the following JSON:
[
  "#for i in range(25)",
  {
    "id": "n:[i]",
    "name": "[#faker:name:firstName]"
  },
  "#endfor"
]
Then we can serve the API using restapify serve mockedApi/ and we directly see the result:
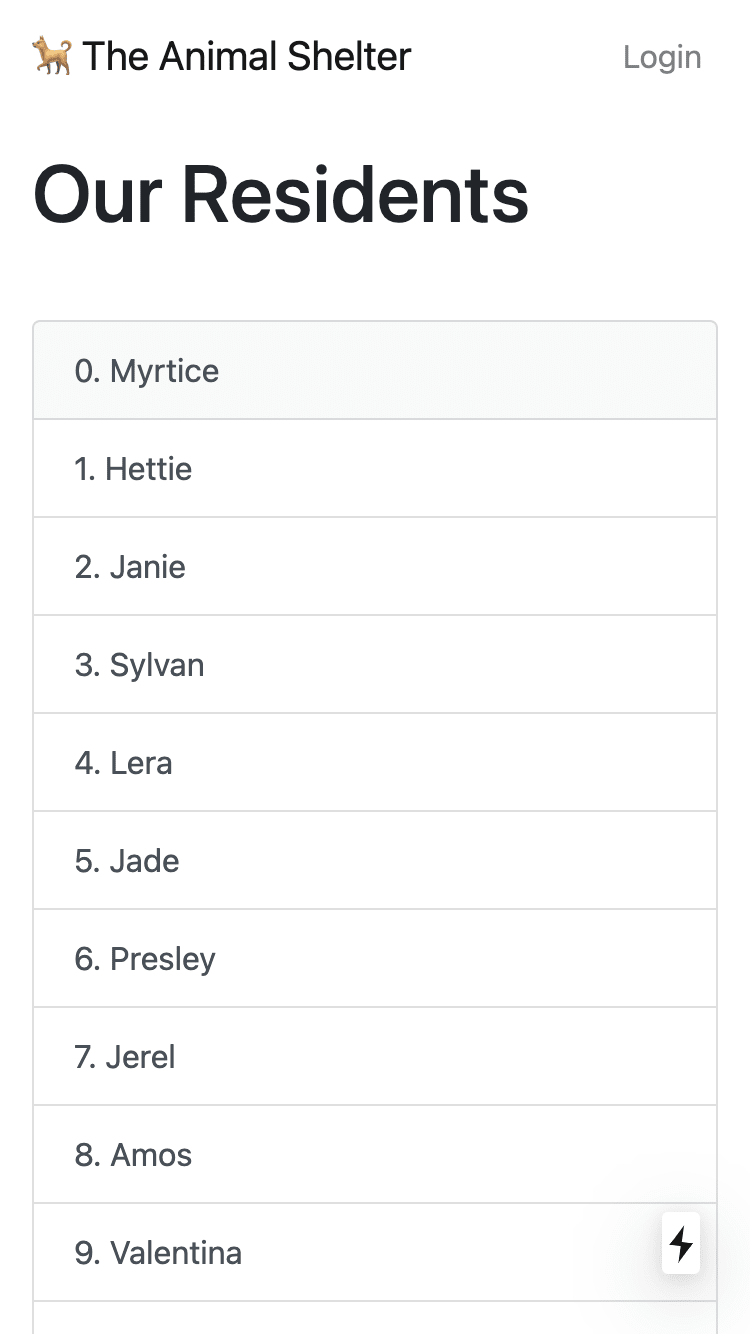
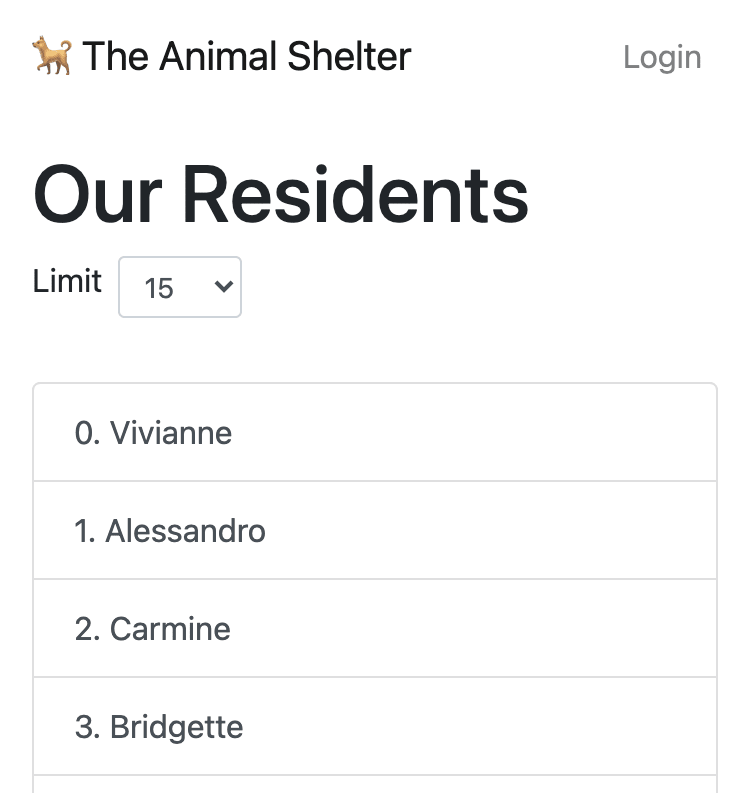
It's working fine for 25 animals but what if you want to show more or less animals in the list using the request GET /animals?limit=x. With Restapify you can mock this by using the route's query string variables limit instead of the hard written 25 number. So replace "#for i in range(25)" with "#for i in range([q:limit])" or "#for i in range([q:limit|25])" to have 25 as the default value. Now if you request GET /animals?limit=42, you will get back 42 animals.
We can now easily add a Select component to define and update the amount of animals to see in the interface:
const Animals = () => {
  // ...

  const fetchAnimals = (limit) => {
    api.get(`/animals?limit=${limit}`).then((response) => {
      setAnimals(response.data)
    })
  }

  // ...

  React.useEffect(() => {
    fetchAnimals(15)
  }, [])

  return (
    <>
      <Row className='mb-3 p-3'>
        <Col><h1>Our Residents</h1></Col>
        <Col lg="2" style={{display: 'flex'}}>
          Limit
          <Form.Control
            className="ml-2 align-items-center"
            as="select"
            size="sm"
            style={{width: 'fit-content'}}
            onChange={e => { fetchAnimals(e.target.value) }}
          >
            {[15, 25, 50, 100].map(limit => (
              <option key={limit}>{limit}</option>
            ))}
          </Form.Control>
        </Col>
      </Row>
     // ...
If you click on one of the list item you are redirect to the detail page of an animal so lets create the corresponding page /pages/animals/[animalid].js:
import { useRouter } from 'next/router'
import { Card, Row, Col, Button } from 'react-bootstrap';

import api from '../../axiosStore'

export default function Animal() {
  const router = useRouter()
  const { animalid } = router.query

  const [animal, setAnimal] = React.useState(null)

  const fetchAnimal = (id) => {
    api.get(`/animals/${id}`).then((response) => {
      setAnimal(response.data)
    })
  }

  const renderAnimal = () => {
    return (
      <Card style={{ width: '22rem', margin: 'auto' }}>
        <Card.Img variant="top" src={animal.avatar} />
        <Card.Body>
          <Card.Title>{animal.name}</Card.Title>
          <Card.Text>{animal.description}</Card.Text>
          <Button variant="primary">Adopt me</Button>
        </Card.Body>
      </Card>
    )
  }

  React.useEffect(() => {
    if (animalid) fetchAnimal(animalid)
  }, [animalid])

  return (
    <>
      <Row>
        <Col>
          {!animal
            ? <p>Loading...</p>
            : renderAnimal()
          }
        </Col>
      </Row>
    </>
  )
}
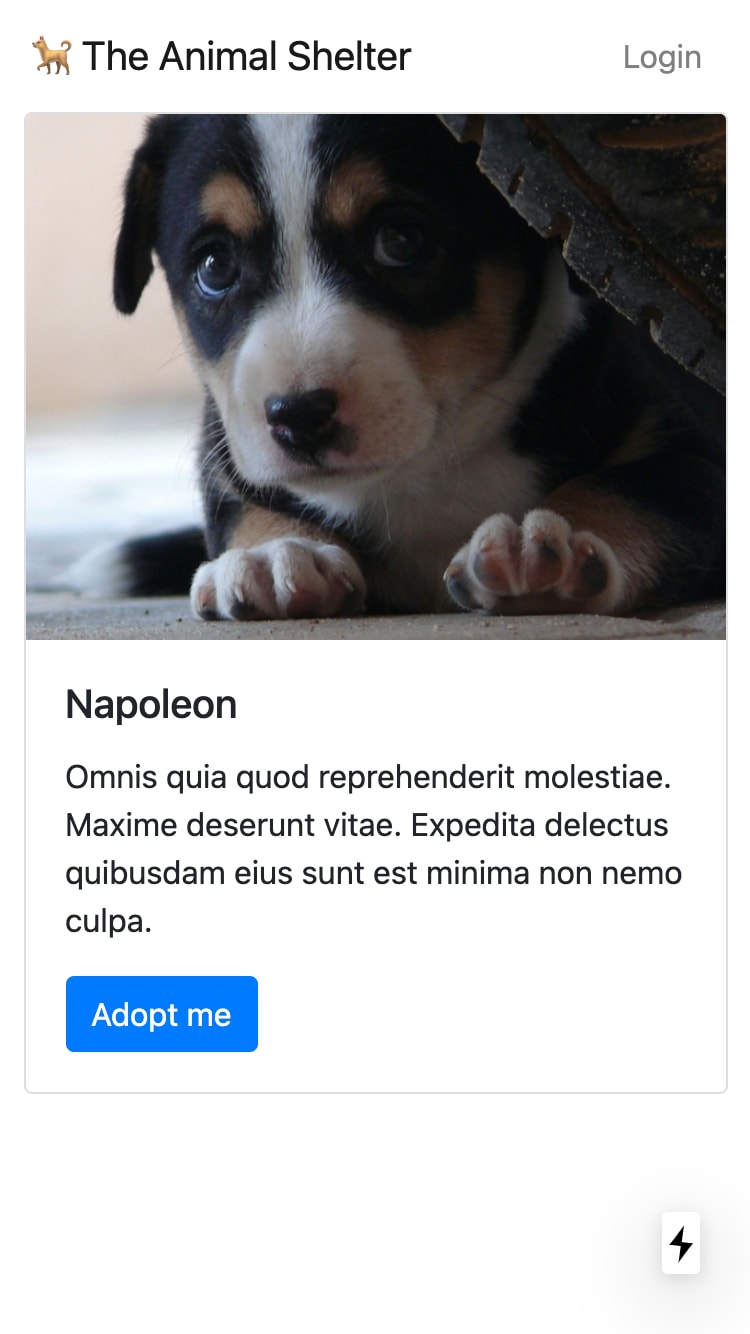
We just also need to mock the API endpoint GET /animals/:id by creating the file /mockedApi/animals/[animalid]/_.json:
{
    "id": "n:[animalid]",
    "name": "[#faker:name:firstName]",
    "avatar": "[#faker:image:animals]",
    "description": "[#faker:lorem:paragraph]"
}
So when you navigate to /animals/42 you will see your UI populated with some mocked data:
Lets continue with the adoption feature. When an user click on Adopt me, the request PUT /animals/:id/adopt should be send. The response can be a 204 No Content if the adoption succeed or a 404 Not Found if it's not possible to adopt him. So we can implement it in the frontend by using simple alert messages:
export default function Animal() {

  // ...

  const adopt = () => {
    api.put(`/animals/${animal.id}/adopt`).then((response) => {
      if (response.status === 204) {
        alert(`You have adopted ${animal.name}`)
      }
    }).catch(({ response }) => {
      if (response.status === 404) alert(`Not possible to adopt ${animal.name}`)
    })
  }

  const renderAnimal = () => {
    return (
      <Card style={{ width: '22rem', margin: 'auto' }}>
        <Card.Img variant="top" src={animal.avatar} />
        <Card.Body>
          <Card.Title>{animal.name}</Card.Title>
          <Card.Text>{animal.description}</Card.Text>
          <Button variant="primary" onClick={adopt}>Adopt me</Button>
        </Card.Body>
      </Card>
    )
  }

  // ...
}
The again we just need to mock the PUT /animals/:animalid/adopt endpoint. So the default response will be a 204 No Content so we can add the file /mockedApi/animals/[animalid]/adopt.PUT.204.json that contain only [null] because it doesn't respond anything (see the no content response documentation). Then we need to create another state that mock a response 404 Not Found. Just create for that the file /mockedApi/animals/[animalid]/adopt.PUT.404.{ADOPTED}.json that only contains [null].
So if you click on the Adopt me button you will see the alert message You have adopted . To now see how the interface handle the case where the animal can't be adopted just go the restapify dashboard web application (it should open in the browser after serving the API with Restapify) and select the state ADOPTED for the route PUT /animals/:animalid/adopt:

If you now retry to adopt the animal, you should see the alert message Not possible to adopt .
Using states with the dashboard is a really nice flow to test your interface for all cases in a snap.
You can find the complete example of it on GitHub if you want to play with it by your own: https://github.com/johannchopin/restapify-examples/tree/main/nextjs-animal-shelter-app. It also implement an user Authentication form that is mocked in the same way than the adopt feature.
If you have some question or some ideas about Restapify feel free to open a discussion or an issue ?
If you like the process of mocking an REST API with Restapify and want to support it's development just leave a ⭐ on the GitHub repo.
 johannchopin
/
restapify
johannchopin
/
restapify
Quickly and easily deploy a mocked REST API by using an intuitive and developer friendly JSON file structure
Restapify
? Restapify is a tool that allows you to quickly and easily deploy a local REST API by using an intuitive and developer friendly JSON file structure.
Summary
Why Restapify
When you start a new frontend project when the backend is not yet ready, you quickly come to the question of how to retrieve the data to be displayed. There are then many solutions that come with advantages but also some inconveniences. It's possible to use a tool like postman but it's not 100% free and require an account, to simply fetch local JSON data but it only supports a GET request or use a mocker library like json-server, mocker-api or http-fake-backend.
The problem of most of this libraries is the way you have to define your API endpoints (a single file for all the routes, javascript files that took…
This content originally appeared on DEV Community and was authored by johannchopin
johannchopin | Sciencx (2021-03-13T17:24:45+00:00) Build Nextjs app with a Restapify mocked API. Retrieved from https://www.scien.cx/2021/03/13/build-nextjs-app-with-a-restapify-mocked-api/
Please log in to upload a file.
There are no updates yet.
Click the Upload button above to add an update.