
This content originally appeared on Level Up Coding - Medium and was authored by Rajtilak Pal

Welcome to the 5th part of this series. In the last tutorial, we focused on building our UI, designing our layout, and adding minimal functionalities to our app. Now that we have our UI ready, we can think of making the UX better.
Previous Tutorial
If you are reading this part first, you should definitely check out Part 4 of this series to catch up.
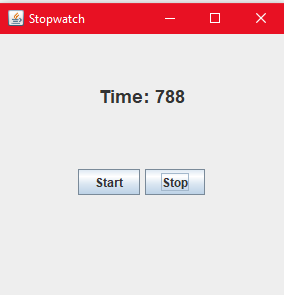
Right now, our app looks like this:
We have to give the users the functionality for Start, Pause, Resume and Stop. We do have our Start and Stop buttons ready. So that’s a plus. But we don’t want to make two more buttons for Pause and Resume. That will make our app look very very ugly. What we can do is: when the user presses start, change the functionality of the Start button to Pause. This is because the user doesn’t need the start button just after starting the stopwatch. Similarly, when the Pause button is pressed, we can change the functionality of our button to Resume. The Stop button will always be there to help the user Reset the Stopwatch.
Let’s get a clearer picture of this thing:
- When our app first starts, it looks like this.

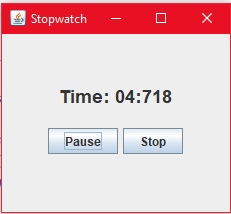
- When the user presses Start, the stopwatch will start and the Start button’s name will change to Pause.
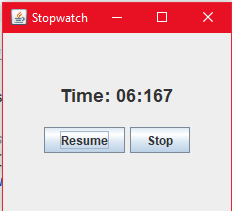
- When the user presses Pause, the Stopwatch pauses and the Pause button’s name changes to Resume.
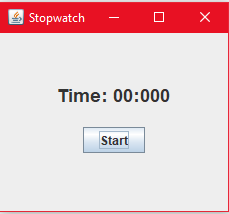
- Anytime after starting the stopwatch if the user presses the Stop button, the “timerDisplay” will become zero and the app will go back to its initial state.
Note: In fact, when the user is in the initial state, we don’t need the Stop button. Of course, the user will not try to stop an already reset Stopwatch. Therefore, we are going to remove the Stop button from the initial state too. Our initial state will look like this:
Notice what is happening here. As the user presses any button, the state of the app is changing. Based on this, I have prepared a State Diagram. Take a look at this:
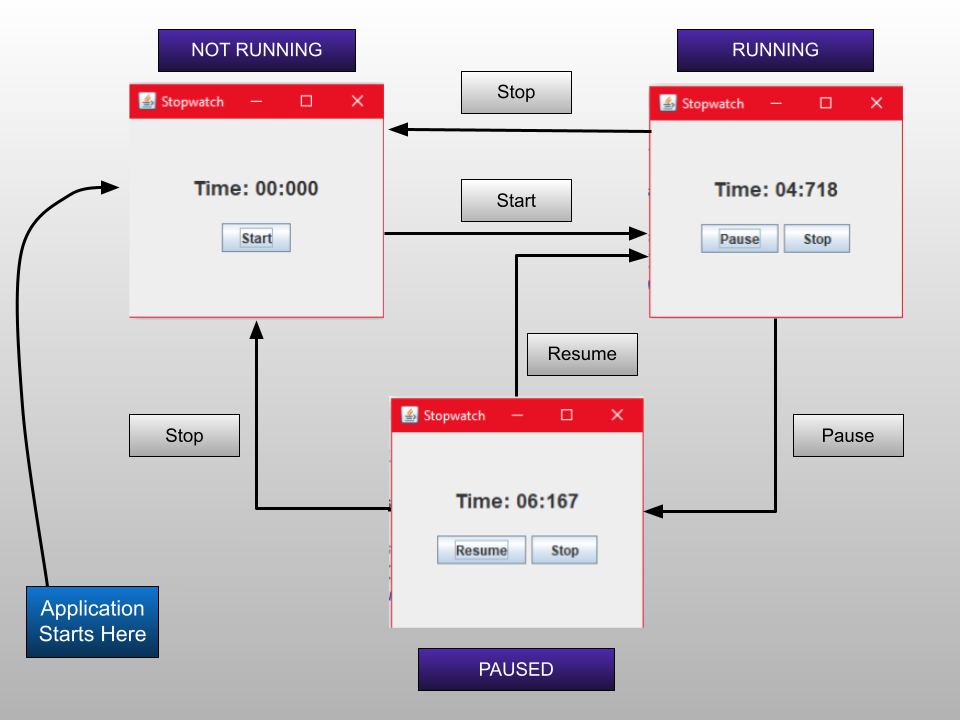
This state diagram shows the complete state transitions of our app. There are three states:
- NOT RUNNING: This is the initial state of the stopwatch which is not yet started.
- RUNNING: State when the Stopwatch is running.
- PAUSED: State when the Stopwatch is paused.
Let’s start coding it out. We will start by adding these states to our app first. The states will be normal integers with some values. There will also be a “currentState” variable to hold the current state of the stopwatch. Open StopwatchSwing.java and add these integers:
public class StopwatchSwing implements Observer {

    ...
    final int NOT_RUNNING=0, RUNNING=1, PAUSED=2;
    int currentState;
    ....
}
Notice the final keyword here. The final states that we cannot change the values of our states after they are initialized. This is completely okay since we will only need to identify our states by the names only.
When the app starts, the currentState should be in the NOT RUNNING state. Therefore, in the constructor, we have to make the currentState to be in NOT RUNNING state.
StopwatchSwing()
{
    currentState=NOT_RUNNING;
    ...


}
The main problem is when the user presses the start button. When the user presses the Start button, the state constantly changes with many changes in the UI as well as the Stopwatch. Therefore in the handleStartPress() method we have to deal with all kinds of problems. The first one is to identify the current state. Then take some actions according to it. And then, change the state. Identifying the state is easy: currentState is already holding the current state of the app and we can match it to any of our states. We can write this.
private void handleStartPress() {
    if(currentState==NOT_RUNNING)
    {
    }
    else if(currentState==RUNNING)
    {
    }
    else if(currentState==PAUSED)
    {
    }

}
This will identify the currentState properly and execute the appropriate block. The next thing is to fill up each of the blocks.
private void handleStartPress() {
    if(currentState==NOT_RUNNING)
    {
        sw =  new Stopwatch();
        sw.registerObserver(this);
        sw.start();
        start.setText("Pause");
        stop.setVisible(true);
        currentState=RUNNING;
    }
    ....

}
When the user is in the NOT RUNNING state:
- We are creating a new Stopwatch object and registering an observer (Might seem a little suspicious because we have already created a stopwatch in the constructor but you will understand why we are doing this when we write the handleStopPress() method).
- Then, we are updating the name of our button from Start to Pause by using it’s setText() method. We are also making the Stop button visible now. The Stop button was not visible till now since the user did not need that in the NOT RUNNING state.
- At last, we change the state to RUNNING.
private void handleStartPress() {
    ...
    else if(currentState==RUNNING)
    {
        sw.stop();
        start.setText("Resume");
        currentState=PAUSED;
    }
    ...

}
When the user is in the RUNNING state and presses Pause (or, Start):
- We pause the stopwatch using the Stopwatch’s stop method. Remember we can resume the stopwatch anytime by calling its start() method later.
- We change the name of our button to Resume.
- At last, we change the state to PAUSED.
private void handleStartPress() {
    ...
    else if(currentState==PAUSED)
    {
        sw.start();
        start.setText("Pause");
        currentState=RUNNING;
    }

}
When the user is in the PAUSED state and presses Resume (or, Start):
- We resume the stopwatch by calling its start() method.
- We change the name of the Start button from Resume to Pause
- At last, we change the state to RUNNING.
Can you think about how we are going to handle the Stop press? The only way we can reset the stopwatch is by creating a new object of it. At any point of the application, when the Stop button is pressed, we will discard the current stopwatch and make a new one.
private void handleStopPress(){
    if(sw!=null)
        sw.stop();
    sw = null;
    timerDisplay.setText("Time: 000");
    start.setText("Start");
    stop.setVisible(false);
    currentState=NOT_RUNNING;
}
When the user presses the Stop button:
- We are discarding the stopwatch first (sw=null). If the stopwatch is available, we are calling its stop() method. This is important because the stopwatch runs on a background thread. If we do not stop it explicitly, the thread will continue running and will not stop until the application is closed. Therefore, before discarding a stopwatch we have to call its stop() method to stop its background thread.
- Next, we are initializing the text of the timerDisplay and setting it to 000.
- Next, we are changing the text of the start button to Start. We are hiding the stop button because the user is not going to need it anymore. (it will come back when the user presses the Start button again).
- At last, we are changing the state to NOT RUNNING.
That’s it! We are going to do a couple of clean-up stuff and then we will be good to go.
Remember to hide the Stop button just after creating it otherwise, the user will see it when the application starts.
StopwatchSwing()
{
    ....
    stop = new JButton("Stop");
    stop.setVisible(false);
    ...

}
For too long, we had been delaying the time formatter function. Time to write it. If you have written your own, good work. Just take a look at mine.
String formatTime(long time)
{
    int time1 = (int)time;
    int milis=0, secs = 0, minutes = 0, hours = 0;
    String formattedTime="";

    milis = time1%1000;
    time1 = time1 / 1000;
    secs = time1 % 60;
    time1 = time1 / 60;
    minutes = time1 % 60;
    time1 = time1 / 60;
    hours = time1 % 60;

    formattedTime = String.format("%02d", secs) + ":" +String.format("%03d", milis);
    if(minutes>0)
        formattedTime = String.format("%02d", minutes) + ":" + formattedTime;
    if(hours>0)
        formattedTime = String.format("%02d", hours) + ":" + formattedTime;
    return formattedTime;

}
Now that we have the formatter function, we can use it while updating the time in the timerDisplay JLabel.
In the constructor, replace the “timerDisplay” JLabel creation line with this:
timerDisplay = new JLabel("Time: "+formatTime(0L));In the update() method, replace the timerDisplay setText() method to this:
timerDisplay.setText("Time: "+formatTime(time));In the handleStopPress() method, update the setText() method to this:
timerDisplay.setText("Time: "+formatTime(0L));That’s it! Now Run the Application and see whether all the functionalities are working properly or not.
I want to you to look at this code one last time:
if(currentState == NOT_RUNNING)
{
    sw = new Stopwatch();
    sw.registerObserver(this);
    sw.start();
    start.setText("Pause");
    stop.setVisible(true);
    currentState=RUNNING;
}
else if(currentState == RUNNING)
{
    sw.stop();
    start.setText("Resume");
    currentState=PAUSED;
}
else if(currentState == PAUSED)
{
    sw.start();
    start.setText("Pause");
    currentState=RUNNING;
}
Doesn’t this look ugly? Too many if-else statements and within them we have all our code which is jaggered around. All of the statements are not consistent. All we want in Structured programs is consistency and there is no consistency in this code at all. This tells me that there is room for improvement. Moreover, we are going to struggle hard when we try to scale this app by adding more features to it. Can we use some cool OOP features to make this code consistent? Fortunately, we have another pattern who can rescue us from here: The STATE Pattern. We will see what this is in the next tutorial. Meet you there!
Next Tutorial:
Implementing the State Pattern
Full Code
StopwatchSwing.java
import javax.swing.*;
import java.awt.*;
import java.awt.event.ActionEvent;
import java.awt.event.ActionListener;

public class StopwatchSwing implements Observer {

    Stopwatch sw;
    JFrame frame;
    JPanel panel1, panel2;
    JLabel timerDisplay;
    JButton start, stop;
    final int NOT_RUNNING=0, RUNNING=1, PAUSED=2;
    int currentState;

    StopwatchSwing()
    {
        currentState=NOT_RUNNING;
        sw = new Stopwatch();
        sw.registerObserver(this);

        // Initializing the JFrame
        frame = new JFrame("Stopwatch");
        frame.setSize(300,300);
        frame.setMinimumSize(new Dimension(300,300));
        frame.setLayout(new GridLayout(2,1));
        frame.setDefaultCloseOperation(JFrame.EXIT_ON_CLOSE);

        // Setting Up Panels
        panel1 = new JPanel();
        panel1.setLayout(new FlowLayout(FlowLayout.CENTER, 0, 50));

        timerDisplay = new JLabel("Time: "+formatTime(0L));
        Font font = timerDisplay.getFont();
        timerDisplay.setFont(new Font(font.getFontName(), font.getStyle(), 18));

        panel1.add(timerDisplay);


        panel2 = new JPanel();
        panel2.setLayout(new FlowLayout(FlowLayout.CENTER));
        start = new JButton("Start");
        stop = new JButton("Stop");
        stop.setVisible(false);
        panel2.add(start);
        panel2.add(stop);

        frame.add(panel1);
        frame.add(panel2);

        frame.setVisible(true);


        // Adding Listeners to the Buttons

        start.addActionListener(new ActionListener() {
            @Override
            public void actionPerformed(ActionEvent e) {
                handleStartPress();
            }
        });

        stop.addActionListener(new ActionListener() {
            @Override
            public void actionPerformed(ActionEvent e) {
                handleStopPress();
            }
        });


    }

    private void handleStartPress() {
        if(currentState==NOT_RUNNING)
        {
            sw =  new Stopwatch();
            sw.registerObserver(this);
            sw.start();
            start.setText("Pause");
            stop.setVisible(true);
            currentState=RUNNING;
        }
        else if(currentState==RUNNING)
        {
            sw.stop();
            start.setText("Resume");
            currentState=PAUSED;
        }
        else if(currentState==PAUSED)
        {
            sw.start();
            start.setText("Pause");
            currentState=RUNNING;
        }

    }
    private void handleStopPress(){
        if(sw!=null)
            sw.stop();
        sw = null;
        timerDisplay.setText("Time: "+formatTime(0L));
        start.setText("Start");
        stop.setVisible(false);
        currentState=NOT_RUNNING;
    }

    public static void main(String[] args) {
        SwingUtilities.invokeLater(new Runnable() {
            @Override
            public void run() {
                new StopwatchSwing();
            }
        });
    }

    String formatTime(long time)
    {
        int time1 = (int)time;
        int milis=0, secs = 0, minutes = 0, hours = 0;
        String formattedTime="";

        milis = time1%1000;
        time1 = time1 / 1000;
        secs = time1 % 60;
        time1 = time1 / 60;
        minutes = time1 % 60;
        time1 = time1 / 60;
        hours = time1 % 60;

        formattedTime = String.format("%02d", secs) + ":" +String.format("%03d", milis);
        if(minutes>0)
            formattedTime = String.format("%02d", minutes) + ":" + formattedTime;
        if(hours>0)
            formattedTime = String.format("%02d", hours) + ":" + formattedTime;
        return formattedTime;

    }
    @Override
    public void update(long time) {
        timerDisplay.setText("Time: "+formatTime(time));
    }
}
References:
- Book: Head First Design Patterns, by Eric Freeman, Elisabeth Robson, Bert Bates, Kathy Sierra.
Adding Start, Pause, Resume and Stop to our App (Part 5) was originally published in Level Up Coding on Medium, where people are continuing the conversation by highlighting and responding to this story.
This content originally appeared on Level Up Coding - Medium and was authored by Rajtilak Pal
Rajtilak Pal | Sciencx (2021-03-26T12:22:52+00:00) Adding Start, Pause, Resume and Stop to our App (Part 5). Retrieved from https://www.scien.cx/2021/03/26/adding-start-pause-resume-and-stop-to-our-app-part-5/
Please log in to upload a file.
There are no updates yet.
Click the Upload button above to add an update.