
This content originally appeared on DEV Community and was authored by Sujay Kundu
Hello everyone ! ?
In this article, I would like to share on how you can create a website easily using Devlopr- A Jekyll built for Developers - devlopr-jekyll (built by me !), and you can host it for free using Github Pages or Netlify by using only 5 simple steps. Since devlopr is Open Source. One can easily contribute in improving it too :)

Devlopr Jekyll Theme (Demo) - https://devlopr.netlify.com
Step 1. Fork the repo - click here

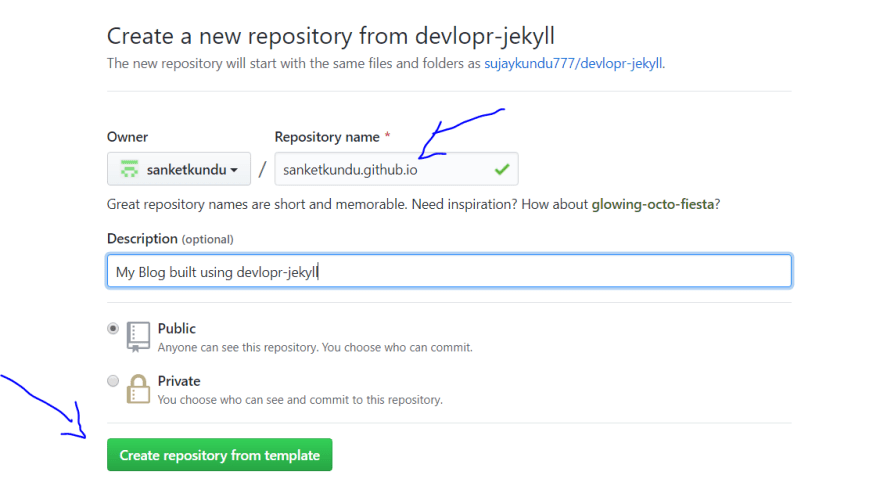
Step 2. Use your-github-username.github.io as the new repo ( Replace your-github-username with yours). Remember if you use the name other than your-github-username.github.io , your blog will be built using gh-pages branch.
Step 3. Clone the repo Locally :
Using browser, go to your repo and copy the clone url :

 $ git clone https://github.com/yourusername/yourusername.github.io
 $ cd yourusername.github.io
 $ code .
Step 4. Edit _config.yml file (Configuration Settings)
Updating Config Settings :
This is a sample config settings, replace the values for your Blog (accordingly):
_config.yml
title: My Blog  # Title of the Blog goes here
subtitle: Blog built using devlopr  # Sub-title of the Blog goes here
description: >- # Description goes here

url: "" # the base hostname & protocol for your site, e.g. https://example.github.io or https://example.com
baseurl: "" # the subpath of your site, e.g. /blog

urls:     # Navigation Links
    - text: About
      url: /about
    - text: Blog
      url: /blog
    - text: Gallery
      url: /gallery
    - text: Shop
      url: /shop
    - text: Contact
      url : /contact


# Author Details
author_logo: profile.png  # Author Logo
author: John Doe # Author Name
author_bio: Hi, my name is John Doe. # Author Bio
author_email: "mail@johndoe.com"  # Author Email
author_location: India # Author Location
author_website_url: "https://johndoe.com" # Author Website URL
typewrite-text: Hi, Welcome to my Blog # Homepage Type Text
author_work_experiences: # Experiences  (Companies you have worked with)
            - company_name: Google
              company_logo: google.png
              company_url: https://google.com
              designation: Software Engineer
              description: Worked on various Google Products
              visibility: true
            - company_name: Microsoft
              company_logo: microsoft.png
              company_url: https://microsoft.com
              designation: Azure Developer
              description: Worked on various Azure Cloud Products
              visibility: true
author_education_details: # Education Details Goes here
              - college_logo: mit.png
                college_name: MIT
                college_url: https://mit.org
                college_degree: CS Engineer
                description: Bachelor of Technology
                visibility: true
author_project_details: # Project Details Goes Here
              - project_thumbnail: gamershub.png
                project_title: Gamers Hub
                project_description: A Platform built for Gamers and Game Devs
                project_url: https://gamershub.in
                visibility: true
              - project_thumbnail: hack4r.PNG
                project_title: Hack4r
                project_description: A Platform built for Hackers and Penetration Testers
                project_url: https://hack4r.com
                visibility: true

# social links
twitter_username: johndoe
github_username:  johndoe
facebook_username: johndoe
linkedin_username: johndoe
behance_username: johndoe
instagram_username: johndoe
medium_username: johndoe
telegram_username: johndoe
dribbble_username: johndoe
flickr_username: johndoe

#for comments ( we got Disqus and Hyvor Commenting, uncomment the one you want to use )
disqus_shortname: john-doe
hyvor_talk_website_id: 244

# wakatime username (for coding activity tracking)
wakatime_username: johndoe

# mailchimp embedded form url (newsletter):
mailchimp_form_url: https://johndoe.us10.list-manage.com/subscribe/post?u=asfsaagd

# formspree (contact form)
formspree_email: johndoe@gmail.com

# syntax highlighter
markdown: kramdown
highlighter: rouge
permalink: pretty

# Choose what to show ( can be true or false)
show_author_work_experiences: true
show_author_education_details: true
show_author_project_details: true

# pagination of posts
paginate: 4
per_page: 4
paginate_path: "/blog/page/:num/"

# minify
# compress_html:
#   clippings: all
#   comments: ["<!-- ", " -->"]
#   endings: all
#   ignore:
#     envs: ['development']

# Archives
# jekyll-archives:
#   enabled:
#     - categories
#   layout: archive
#   permalinks:
#     category: '/category/:name/'

# Shop   (Snipcart settings)
collections:
 - products

# Gallery
defaults:
  -
    scope:
      path: "gallery"
    values:
      permalink: /:path/:basename:output_ext

# Build settings
plugins:
  - jekyll-paginate
  - jekyll-gist
  - jekyll-seo-tag
  - jekyll-sitemap
  - jekyll-menus


# Exclude from processing.
# The following items will not be processed, by default.
# Any item listed under the `exclude:` key here will be automatically added to
# the internal "default list".
#
# Excluded items can be processed by explicitly listing the directories or
# their entries' file path in the `include:` list.
#
exclude:
  - .sass-cache/
  - .jekyll-cache/
  - gemfiles/
  - Gemfile
  - Gemfile.lock
  - node_modules/
  - vendor/bundle/
  - vendor/cache/
  - vendor/gems/
  - vendor/ruby/

destination: ./build  # setting build as default
Once you have done all the changes, its time to push the changes - commit to Github with config setting changes :
 $ git add .
 $ git commit -m "my new blog using devlopr-jekyll"
 $ git push origin master
Step 5 - Enable Github Pages for Deployment
Visit your Github Repo settings ! Enable master branch as Github Pages Branch :
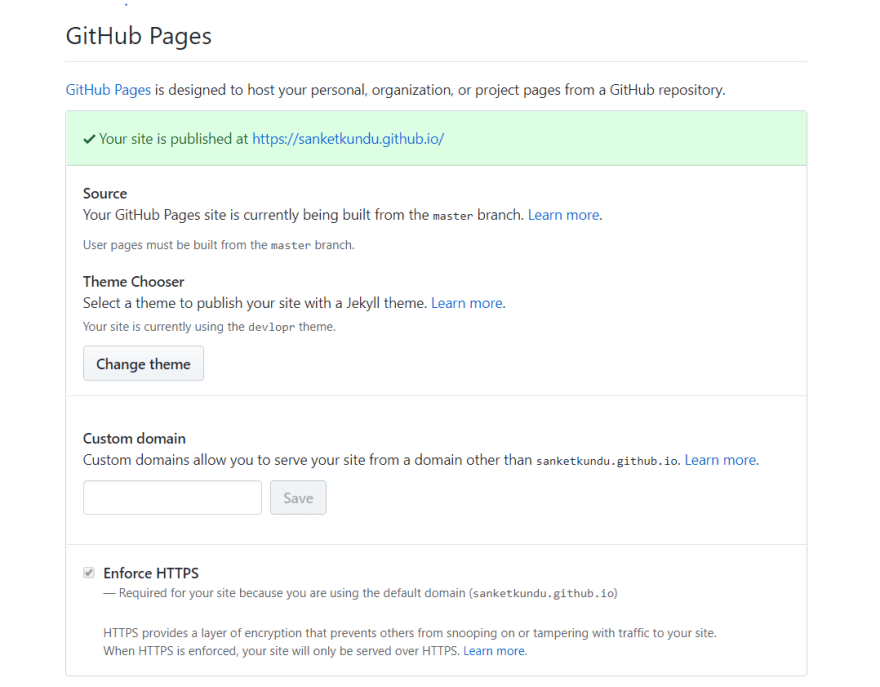
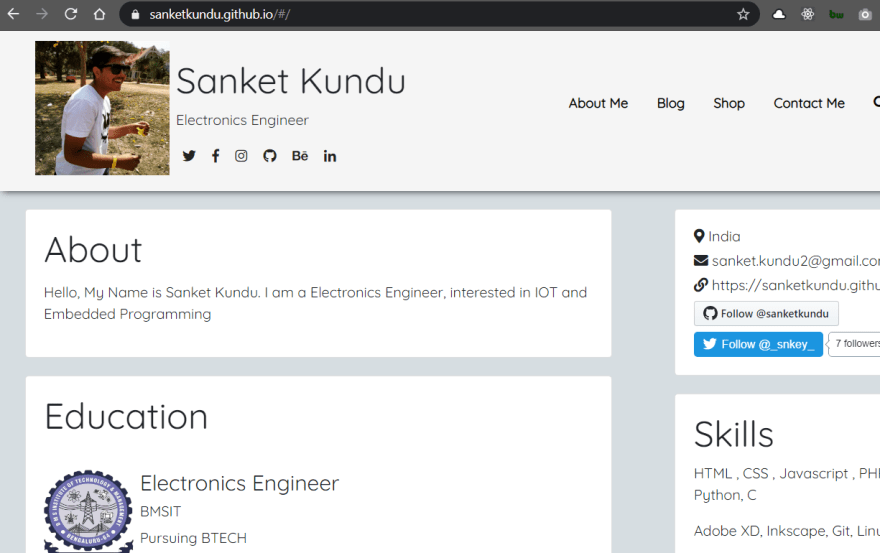
Your new blog will be ready in few minutes ! You can visit your site using [https://yourusername.github.io].
Guide - Managing Website Locally - Install the development requirements:
Set up local development environment
We need ruby and bundler to build our site locally. After installation check if its working:
For ruby :
$ ruby -v
ruby 2.5.1p57 (2018-03-29 revision 63029) [x86_64-linux-gnu]
For bundler :
$ gem install bundler
$ bundler -v
Bundler version 2.1.4
Add jekyll :
$ bundle add jekyll
This command will add the Jekyll gem to our Gemfile and install it to the ./vendor/bundle/ folder.
You can check the jekyll version
$ bundle exec jekyll -v
jekyll 4.0.0
Step 6. Install the gem dependencies by running the following command
$ bundle update
$ bundle install
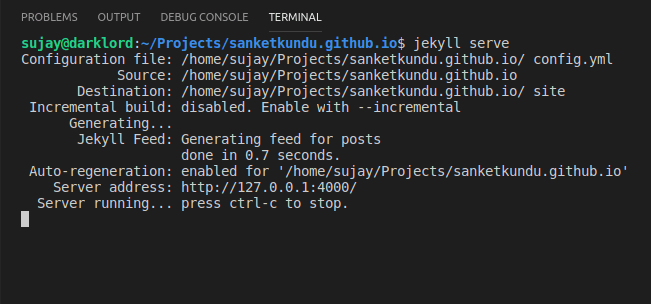
Step 7. Serve the site locally by running the following command below:
$ bundle exec jekyll serve --watch
or you can also serve using :
$ jekyll serve
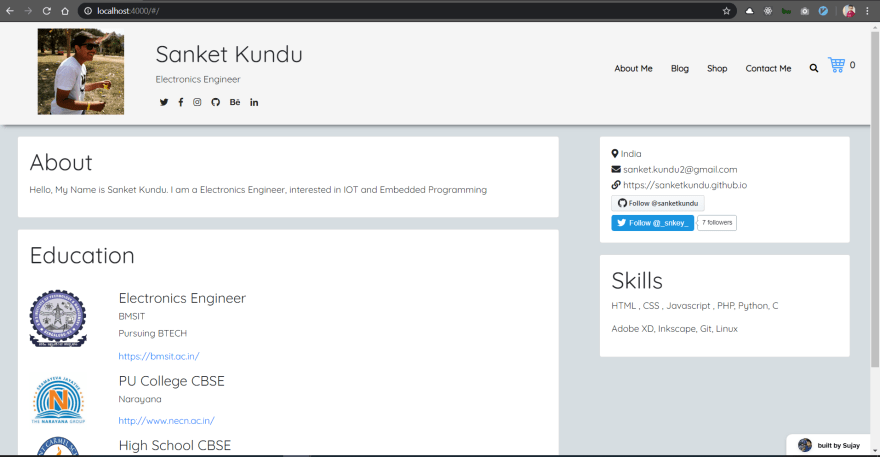
Visit http://localhost:4000 for development server
Creating Blog Posts
Start populating your blog by adding your .md files in _posts. devlopr-jekyll already has a few examples.
YAML Post Example:
---
layout: post
title: "Sample Post"
author: Sujay Kundu
date: '2019-05-21 14:35:23 +0530'
category:
        - jekyll
summary: This is the summary for the sample post
thumbnail: sample.png
---

Hi ! This is sample post.
YAML Page Example:
--------
layout: page
title: Sample Page
menus: header
permalink: /sample-page/
--------

Hi ! This is sample page.
Editing stylesheet - Customizations
You’ll only work with a single file to edit/add theme style: assets/css/main.scss.
Deploy your Changes
Once happy with your blog changes. Push your changes to master branch and in few minutes your Blog is up and running !
This content originally appeared on DEV Community and was authored by Sujay Kundu
Sujay Kundu | Sciencx (2021-05-15T15:21:41+00:00) Create a Portfolio/Blog/Website using Devlopr. Retrieved from https://www.scien.cx/2021/05/15/create-a-portfolio-blog-website-using-devlopr/
Please log in to upload a file.
There are no updates yet.
Click the Upload button above to add an update.