
This content originally appeared on Bits and Pieces - Medium and was authored by Chameera Dulanga
How to Choose Between Cookies and Tokens in Web Authentication.

With the increasing number of threats, the stability of the authentication mechanism has become vital for all applications. However, choosing one isn’t easy since there are many methods with different capabilities.
So, in this article, I will discuss the features, pros, cons and compare token-based authentication vs. cookie-based authentication to help you decide the best approach for your project.
Cookie-Based Authentication
Authentication is the process of exchanging user credentials for a piece of unique identification.
In cookie-based authentication, this unique identifier (cookie) is created on the server-side and sent to the browser.
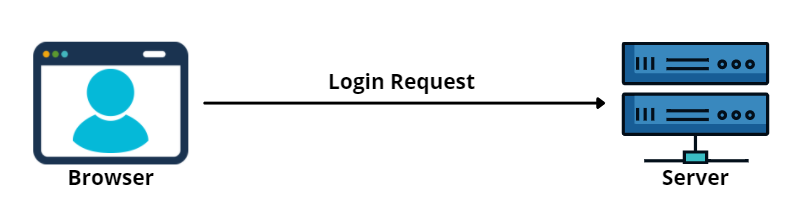
When you log in to a web application, your browser will receive a cookie from its application’s server, and the browser will store it and send that cookie with each subsequent request to verify that requests come from the same user.
To better understand how cookies work, Let’s break down this process into 5 parts.
1. User login to the application using credentials.
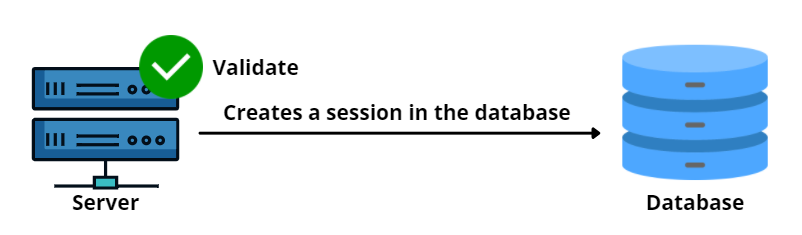
2. Server validates the credentials and creates a session in the database.
Note: Though it’s possible to create the session in memory, it’s not scalable.
3. Server responds with the cookie to the browser by including it in the Set-Cookie header.
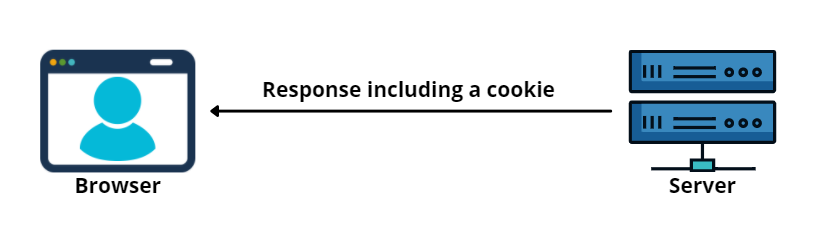
This cookie is sent as a name value pair, and it contains a unique id to identify the user.
In addition to that, a cookie can contains details like expiry date, domain, and age. Sample response with multiple Set-Cookie headers will look like this:
HTTP/2.0 200 OK
Content-Type: text/html
Set-Cookie: <cookie-name>=<cookie-value>
Set-Cookie: <cookie-name>=<cookie-value>; Expires=<date>
Set-Cookie: <cookie-name>=<cookie-value>; Max-Age=<number>
Set-Cookie: <cookie-name>=<cookie-value>; Domain=<domain>
Set-Cookie: <cookie-name>=<cookie-value>; Path=<path>
Set-Cookie: <cookie-name>=<cookie-value>; Secure
Set-Cookie: <cookie-name>=<cookie-value>; HttpOnly

[page content]
Note: You can also use a single Set-Cookie header to set multiple attributes as well (Set-Cookie: <cookie-name>=<cookie-value>; Domain=<domain>; Secure; HttpOnly).
4. Browser stores the Cookie in storage and sends it with subsequent requests.
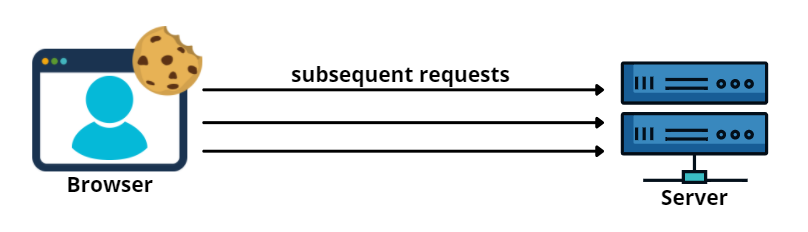
When the server receives a request with a Cookie, it will compare the session ID in the Cookie against the session in the database to validate the user.
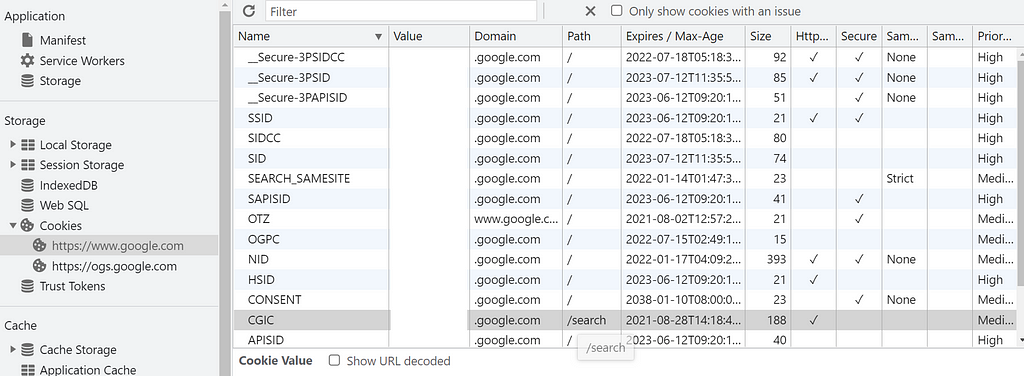
You can find all the Cookies saved in your browser in the Cookie storage under the application section using dev tools.
5. When the user logout, the server will delete the session from the database.
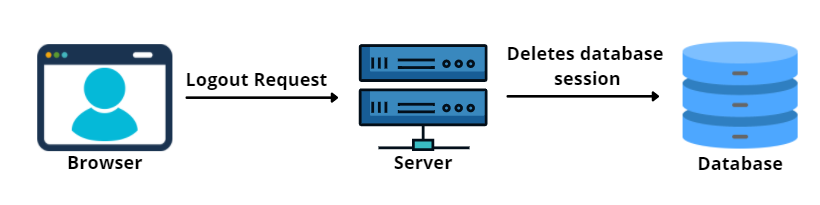
Once the user logs out from the system, the server will expire the Cookie by clearing the database session. The browser does the same by removing it from the Cookie storage.
Since now you understand how Cookie-based authentication works, let’s see the features, pros, and cons of Cookie-based authentication.
It is a fully automated process.
If you use Cookies for authentication, you don’t need to develop anything explicitly to add Cookies to requests.
The browser will take care of Cookie handling, and it will automatically add the Cookie for all the requests.
Although this automated process makes developers work easy, there are few drawbacks of this as well. For example, some requests do not need any authentication. But, with this approach Cookie will be sent in each request.
Also, CSRF attackers can take advantage of this mechanism to trick the browser into sending requests with the Cookie to false websites.
Security measurements.
By default, Cookie-based authentication does not have solid protection against attacks, and they are mainly vulnerable to cross-site scripting (XSS) and cross-site request forgery (CSRF)attacks.
But, we can explicitly modify Cookie headers to make them protected against such attacks.
For example, Cookies can be easily protected against XSS attacks by using HttpOnly attribute when setting the Cookie headers.
Set-Cookie: <cookie-name>=<cookie-value>; Secure
Set-Cookie: <cookie-name>=<cookie-value>; HttpOnly
Also, we can use SameSite attribute in the cookie header to prevent CSRF attacks effectively.
Set-Cookie: <cookie-name>=<cookie-value>; SameSite=Lax
There are 3 values that can be used for SameSite attribute.
- SameSite=Lex, will make sure that the browser will not send Cookies on cross-site requests(This is the default behavior of Cookies if you don't define SameSite attribute).
- SameSite=Strict will make sure that the browser sends the Cookie only for same-site requests.
- SameSite=Note will allow you to send Cookies with both cross-site and same-site requests.
Usually works on a single domain.
Cookies only work on a single domain unless you specially configure it.
Although from the outside it looks like a limitation, it's one of the strongest features to enforce single-origin, by default.
However, if your frontend and backend (API) are from different domains or subdomains, you need to explicitly whitelist that in the Cookie. Otherwise, the browser won’t send the Cookie along with the request.
Not suitable for APIs.
If you are building an API to expose service to Clients, Cookies isn’t the way to go. Unless the client is a browser, it will make things complex for the client.
For example, if you develop a mobile app, having Cookies will make it difficult for the mobile application to manage the Cookie, compared to a token.
There can be scalability issues.
As explained, the server is responsible for Cookie configuration, and we need to save the sessions in the database for each user.
Although there are well-established ways to handle scalability (e.g., using in-memory databases like Redis as session storage), it still adds more complexity.
But, as the number of users grows, there can be issues in scaling and managing those sessions.
Most suited for storing additional data.
Since this approach maintains separate sessions for each user, we can store data attached to the session.
With Cookies and Sessions, we can store specific data like user personalization, access control, and the session. Then, it allows us to use it for subsequent requests.
However, it’s also possible to do this with Tokens. For example, with JWT tokens, we can store the Claims data. However, since it will increase the size of the Token, keeping more would impact higher network utilization.
It might not make sense if we think of a single request, but the overheads could become visible when things aggregates and scales.
Can limit access to the Cookie at the browser.
Since Cookie provides the option HTTP-Only, we can restrict JavaScript access to it. In addition, it will prevent any access to Cookie with Cross-Site scripting attacks.
Token-Based Authentication
Token-based authentication was introduced to address several shortcomings of the Cookie-based approach.
Unlike Cookies, the token-based approach requires manual implementation, and tokens are saved on the client side.
When you log in to a web application, the server will verify your credentials and send an encrypted token to the browser. Then the browser will store this token and can be added to the authorization header of future requests.
However, standard implementations of the Token-based approaches are more complex than the flow described above. For instance, OpenID Connect introduces multiple authentications flows to address different types of use cases.
To better understand how tokens work, Let’s break down this process into 4 parts and use JWT, the most widely used token standard, as an example.
JSON Web Token (JWT) is the most used open standard in token-based authentication.
1. User login to the application using credentials.
2. The server verifies the credentials, generates a token and signs it with a secret key, and sends it back to the browser.

Typically you need to use encryption at transit like SSL to secure the channel.
At the server-side, you can use an NPM library like jsonwebtoken to generate these tokens.
// Install
npm install jsonwebtoken
// Usage
var jwt = require('jsonwebtoken');
var token = jwt.sign(
              { data: user},
              privateKey,
              { algorithm: 'RS256'},
              exp: Math.floor(Date.now() / 1000) + (60 * 60),            );
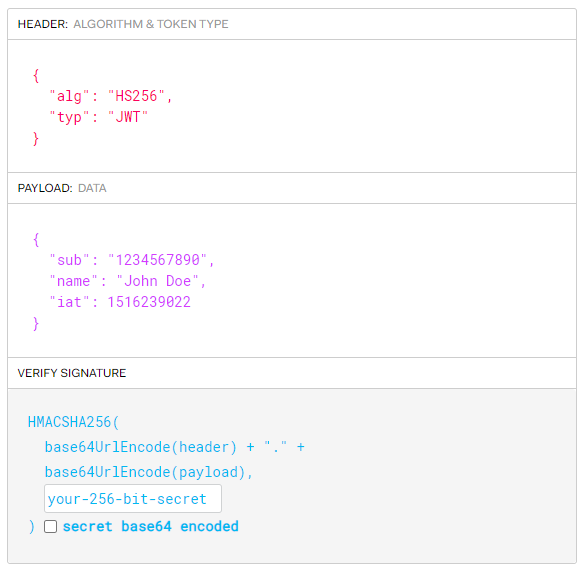
A token generated from jsonwebtoken library would look like below:
eyJhbGciOiJIUzI1NiIsInR5cCI6IkpXVCJ9.eyJzdWIiOiIxMjM0NTY3ODkwIiwibmFtZSI6IkpvaG4gRG9lIiwiaWF0IjoxNTE2MjM5MDIyfQ.SflKxwRJSMeKKF2QT4fwpMeJf36POk6yJV_adQssw5c
This token consists of 3 parts, header, payload, and signature (header.payload.signature). They are divided by a ., and you can use jwt.io website to parse the token information.
3. Store the token in the browser storage and add to subsequent requests using JavaScript.
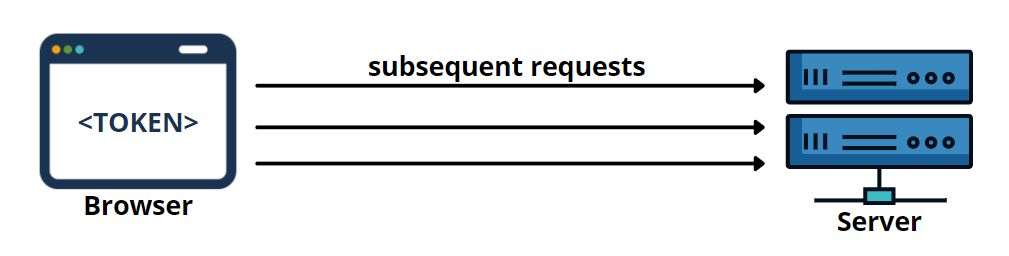
The browser can store this token in Local storage, Session storage, or Cookie storage. Then this token will be added to the authorization header of necessary requests and sent to the server-side for request validations. Therefore, adding a token to the header needs to be implemented using JavaScript.
Authorization: Bearer <token>
Also, you can use the jwt.decode() function in jsonwebtoken library to decode this token and use the payload data within the application.
5. When the user logout, you need to delete the token from its storage manually.
Once the user logs out from the system, you need to manually clear the token stored in the storage, making it unavailable for further requests.
Since now you understand how token-based authentication works, let’s see the features, pros, and cons of token-based authentication.
It is a stateless mechanism.
Unlike Cookies, the token-based approach is stateless. This means that it does not save any information about users in the database or server.
The server is only responsible for creating, validating tokens, which allows building more scalable solutions than the Cookie-based approach.
Security issues.
Although tokens try to address security issues in Cookies, it is not fully bulletproof.
Tokens saved in the browser can be vulnerable to XSS attacks if your application allows outside JavaScripts to be embedded in your application.
Besides, since the token is stateless, if exposed outside, there is no way of revoking it until it expires. So, it’s essential to keep the token little as possible. I have seen many identity services use 5 mins as the default for JWT tokens like ID tokens and Access Tokens.
Conclusion
Token-based and Cookie-based approaches are the 2 most used authentication mechanisms for web applications. In this article, I discussed how they work, their features, pros, and cons.
As we can see, non of these methods are 100% perfect, and they have several drawbacks.
So, when choosing an authentication method, I recommend you choose one based on your project requirements rather than going after the perfect one.
Thank you for Reading !!!
Develop & share JS components with Bit
Bit is an ultra-extensible tool that lets you create truly modular applications with independently authored, source-controlled, and maintained components.
Use it to build modular apps & design systems, author and deliver micro frontends, or simply share components between applications.
Learn More
- Will Bit Replace npm?
- The Importance of Integrity Checks in JavaScript
- Top 5 Auth Solutions for React Native
Web Authentication: Cookies vs. Tokens was originally published in Bits and Pieces on Medium, where people are continuing the conversation by highlighting and responding to this story.
This content originally appeared on Bits and Pieces - Medium and was authored by Chameera Dulanga
Chameera Dulanga | Sciencx (2021-07-19T21:17:11+00:00) Web Authentication: Cookies vs. Tokens. Retrieved from https://www.scien.cx/2021/07/19/web-authentication-cookies-vs-tokens/
Please log in to upload a file.
There are no updates yet.
Click the Upload button above to add an update.