
This content originally appeared on DEV Community and was authored by Gospel Darlington
What we’ll be building.
Sequel to the last article, we will be building a machine learning API that will predict whether a candidate will or will not be hired based on his or her credentials. This is part two out of a three-part series we will be developing. This part is only concerned with developing the machine learning API. If you haven't read part one of this article you should do so before this one.
Introduction
Building a machine learning model with no deployment mechanism could be frustrating unless you just want to learn. But where is the beauty in that if you can't deploy it for the whole world to see and use? for your machine learning model to be useful you need to integrate it with an API. You don't know how to build a machine learning API? Don't worry, in this tutorial you will learn step-by-step how to develop a predictive machine learning API. We will utilize the machine learning model developed in the part one of this series.
Prerequisite
To flow along in this tutorial, a good understanding of the following tools is required.
- Python
- Fast API
- Part One of this tutorial
What is a Machine Learning API

We will answer this question by defining the terminologies used here and also doing a brief coverage of the advantages associated with machine learning APIs.
What is an API
API stands for an application programing interface. To simply state, it is a piece of backend service that allows two or more computers to have communications.
Why combine machine learning with an API
It gives your model the platform to be accessed and used by millions of people all over the globe, else it will just be a piece of code sitting on your computer. Take this analogy to understand why you must combine a machine learning model with an API.
An airplane needs an airport, this is where it will operate from and also be accessed by millions of passengers that frequent the airport. Without the airport, the airplane cannot serve the passengers. This is how important an API is to a machine learning model, without an API a machine learning model cannot be used online.
What are the advantages of an API
The benefits are almost unlimited, the following are some advantages of combining a machine learning model with an API.
- It helps people to access your model online.
- It helps other applications to utilize your model.
- It brings you profits by offering it as a service.
- It helps your model to gather more data from your users.
- It helps your model to collect more diversified inputs from people online.
These and more are some advantages of integrating a machine learning model with an API.
What technologies can achieve a machine learning API
There are a few programming languages and frameworks that can help you put together a machine learning model with an API. This also depends on your choice of programming language and framework. The most popular frameworks that can help you achieve a hybrid of a machine learning model and API are django, Flask, and FastAPI. All these frameworks are built upon the Python programming language. For the sake of this tutorial, we will be using the FastAPI framework, which is fast, lightweight, and simple to use.
Building a Predictive Machine Learning API

This is the meat of this tutorial, you will be guided by the hand so ensure that you don't skip any step. Below are the procedures you need to follow to build a machine learning API.
Choosing a Development Environment
This step is important, the tools that you use will either help you accomplish your task on time or frustrates you with difficulties. For this tutorial, we will be using VScode for all the coding. This is because all the necessary toolings needed to both develop and test our API are all in one place. Below are some of the reasons we are choosing VScode for this work.
- Support for Python IntelliSense, Code Format tools, and Code Highlights.
- Support for Thunder Client Extention for testing our API.
- Support for an integrated terminal with splitting functionality.
- Support for integrated version control and more.
Installing Development Dependencies
As earlier stated, we will be using the FastAPI framework which is built upon the Python programming language to code up our API. The following are the tools and libraries we will install for our development.
- Python 3.9.7
- Fastapi 0.68.1
- Uvicorn 0.15.0
- Scikit-learn 1.0
- Thunder Client
Next, follow the below instruction to have them all installed on your computer.
- Head to the VScode site and download the appropriate version for your OS.
- Install the downloaded package on your computer.
- Head to the Python website and download Python version 3.9.7 or later.
- Install the Python package and add the path to your system variables.
- Goto the directory from part one of this tutorial where you have your model folder.
- Create a new directory called api side-by-side with the model folder, It should look like this.

-
Open the api folder in VSCode and install the following libraries using the terminal.
pip install fastapi
pip install uvicorn[standard]
pip install scikit-learn On VScode click on extensions and install Thunder Client.
Congratulations, that is all that you will need for now, here is how your VScode should look, minus the theming.

Please make sure you are on the api working directory, else just change the directory into it.
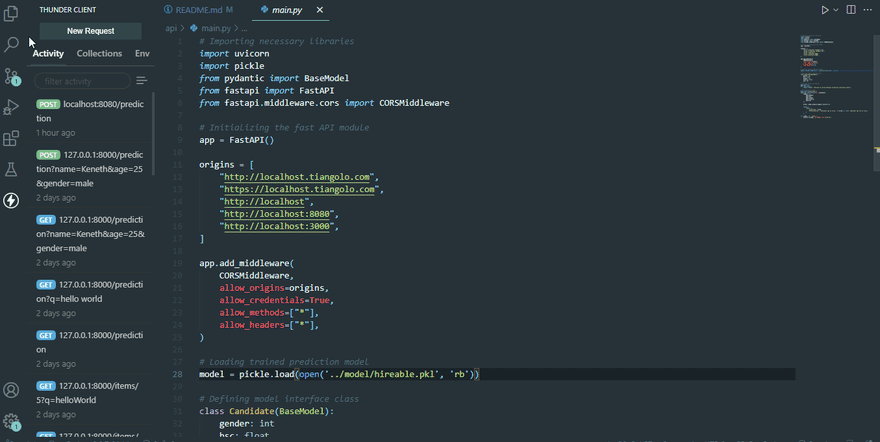
Importing Libraries
Within the api folder, create a new file named "main.py", this is where all the programming logic will reside. Once you have created this file, paste the following code snippets inside it.
# Importing necessary libraries
import uvicorn
import pickle
from pydantic import BaseModel
from fastapi import FastAPI
from fastapi.middleware.cors import CORSMiddleware
The uvicorn library is used to create a server having a host and port of your preference for communicating with our API via HTTP requests and responses.
We use the pickle library to load up our trained model from part one of this series.
The BaseModel class from the **pydantic library is used for defining our API request parameters. This is important for ensuring that we are sending the right data types to our trained machine learning model.
The FastAPI library helps us define the routes and the functions a route will run when accessed by a client. It also helps us define the responses we give for a request.
Lastly, the CORSMiddleware helps us define the domains that will get resources from our API. This is a very important configuration in a FastAPI project.
Initializing the fast API
The following code block initializes the fastAPI, whitelist the domains origins that can access our API endpoints, and configures it as a middleware.
# Initializing the fast API server
app = FastAPI()
origins = [
    "http://localhost.tiangolo.com",
    "https://localhost.tiangolo.com",
    "http://localhost",
    "http://localhost:8080",
    "http://localhost:3000",
]
app.add_middleware(
    CORSMiddleware,
    allow_origins=origins,
    allow_credentials=True,
    allow_methods=["*"],
    allow_headers=["*"],
)
Terrific job, now let’s advance to loading up our trained machine learning model from part one of this tutorial.
Loading up the Trained Model
Copy and paste the following codes on your VScode main.py file.
# Loading up the trained model
model = pickle.load(open('../model/hireable.pkl', 'rb'))
Using the pickle library, we are loading the trained model in combination with the Python open function. Take note of the path to the trained pickle model, we are accessing it from the model folder. Although, you can access your trained model from any directory provided that you specify it in the Python open function. However, for the sake of this tutorial, we should all follow the same style guide.
Defining the model input types
Again, copy and paste the codes below into your code editor.
# Defining the model input types
class Candidate(BaseModel):
    gender: int
    bsc: float
    workex: int
    etest_p: float
    msc: float
Base on the BaseModel class, we are defining a class called “Candidate”. By doing this we are instructing our model prediction route to only accept the data types that conform to the specifications in the Candidate class. This immensely helps us collect the right data types for our trained machine learning model and reduce errors.
Setting up the Home Route
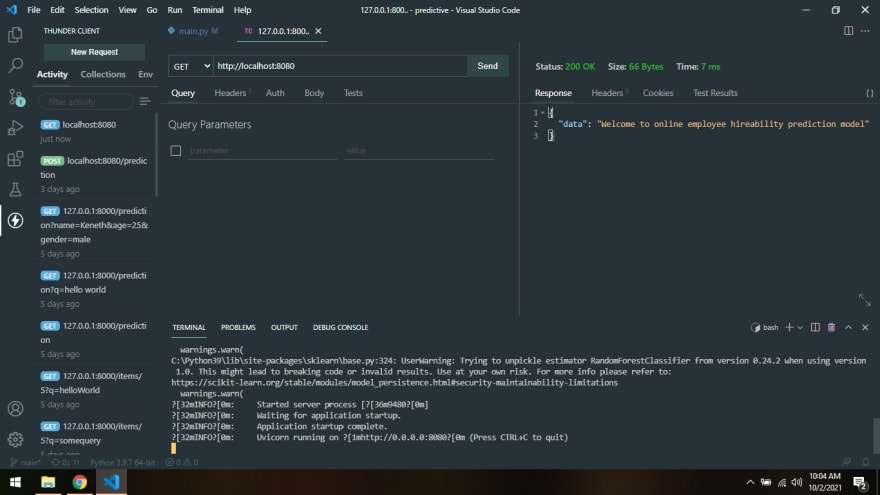
This is a route that specifies what we respond to our users when they visit the home route. For this project, we will just give them a welcome message. Paste the following codes to your code editor.
# Setting up the home route
@app.get("/")
def read_root():
    return {"data": "Welcome to online employee hireability prediction model"}
Setting up the Prediction Route
Now let's stitch all these codes together. Paste the following code on your editor and let me explain.
# Setting up the prediction route
@app.post("/prediction/")
async def get_predict(data: Candidate):
    sample = [[
        data.gender,
        data.bsc,
        data.workex,
        data.etest_p,
        data.msc
    ]]
    hired = model.predict(sample).tolist()[0]
    return {
        "data": {
            'prediction': hired,
            'interpretation': 'Candidate can be hired.' if hired == 1 else 'Candidate can not be hired.'
        }
    }
Firstly, when a user sends a post data to our prediction route, we use the Candidate class to bind it to the request body and extract the essential data we specified into a multi-dimensional array called “sample”. Secondly, we give this array to our model for prediction and save the result in another variable called “hired”. Lastly, we send a response back to the client with either “Candidate can be hired” or “Candidate can not be hired” base on the prediction of our model.
Configuring the Server Host and Port
Finally, we do a quick server configuration instructing the uvicorn library to start up our server on the specified host and port number whenever the main.py file is executed. See the codes below.
# Configuring the server host and port
if __name__ == '__main__':
    uvicorn.run(app, port=8080, host='0.0.0.0')
Congratulations, you have just built a machine learning API. Now let’s do quick testing to see if it's all good.
Testing the API Endpoints
Adhere to the following instructions to test the API endpoints.
- On the VScode interface, click on the Thunder Client.
- Create a new request.
- Select the post option.
- Enter "http://localhost:8080/prediction" on the address bar.
- Goto the body tab and supply the parameters below.
- Finally, click on send.
You will have something like this if you had done the above steps correctly.

You can also send another request to the home route but use the GET method instead. You should get something like this.
Hurray, you have just completed two out of the three-part series on how to build a predictive machine learning model. In the third and last article for this series, you will learn how to consume this API using ReactJs. You can see the full source code on my Git Repo.
Conclusion
In conclusion, preparing a deployable machine learning model in the past has been a pain on the neck but not anymore. You have seen how easy it is to do so with the FastAPI framework built upon the Python programming language. I believe that FastAPI is the first simple solution for developers to bridge the gap between machine learning and web development. In our next tutorial, we will see this in action by hooking it up with ReactJs.
About Author
Gospel Darlington is a remote Fullstack web developer, prolific with technologies such as VueJs, Angular, ReactJs, and API development. He takes a huge interest in the development of high-grade and responsive web applications.
Gospel Darlington currently works as a freelancer developing apps and writing tutorials that teach other developers how to integrate software products into their projects.
He spends his free time coaching young people on how to be successful in life. His hobbies include inventing new recipes, book writing, songwriting, and singing. You can reach me on Website, LinkedIn, Twitter, Facebook, or GitHub for any discussion.
This content originally appeared on DEV Community and was authored by Gospel Darlington
Gospel Darlington | Sciencx (2021-10-02T09:51:46+00:00) How to Build a Predictive Machine Learning Site With React and Python (Part Two: API Development). Retrieved from https://www.scien.cx/2021/10/02/how-to-build-a-predictive-machine-learning-site-with-react-and-python-part-two-api-development/
Please log in to upload a file.
There are no updates yet.
Click the Upload button above to add an update.