
This content originally appeared on DEV Community and was authored by Iaan Mesquita
After several unsuccessful attempts, I was finally able to virtualize a macOS to run tests on an iOS app I was working on.
But before proceeding, it is necessary to know that this is not a stable solution and has several performance issues, however, for my purpose I managed to do what I wanted.
We'll use QEMU to emulate a mac and inside it we'll use xCode to emulate an iOS. That process not will be lightweight.
The repository on github of Docker OSX has an explanation of how to use an iPhone via usb instead of emulating, but I don't have iPhone. xD
Summary
- What is Docker OSX
- Hardware Specifications
- Installation
- Running a app with React Native
- Running a app with Cordova
- Creating a connection of folders over SSH
- Final considerations
What is Docker OSX
The Docker OSX is a docker image that uses QEMU so that we can emulate an operating system.
Read more: What is Docker?
Hardware Specifications
My computer's specs are considered OK to do this, however, I still managed to notice some lags while using Docker OSX + xCode + Visual Studio Code + Dev Server. (I was even able to heat my room with that much stuff)
- OS: Manjaro Linux x86_64
- Kernel: 4.19.220-1-MANJARO
- Shell: zsh 5.8
- Resolution: 1440x900
- DE: GNOME 41.2
- WM: Mutter
- WM Theme: Orchis-orange-compact
- Icons: Win11-purple-dark [GTK2/3]
- Terminal: gnome-terminal
- CPU: Intel i7-3770 (8) @ 3.900GHz
- GPU: NVIDIA GeForce GTX 1050 Ti
- Memory: 4105MiB / 15985MiB
- SSD: Crucial BX500 240gb (Highly recommended SSD)
Installation
First, is necessary have docker installed on your computer. I use Manajaro, so I just opened the terminal and type:
Installation Docker
pacman -S docker
Start docker services
systemctl start docker.service
Enable docker services to boot with system
systemctl enable docker.service
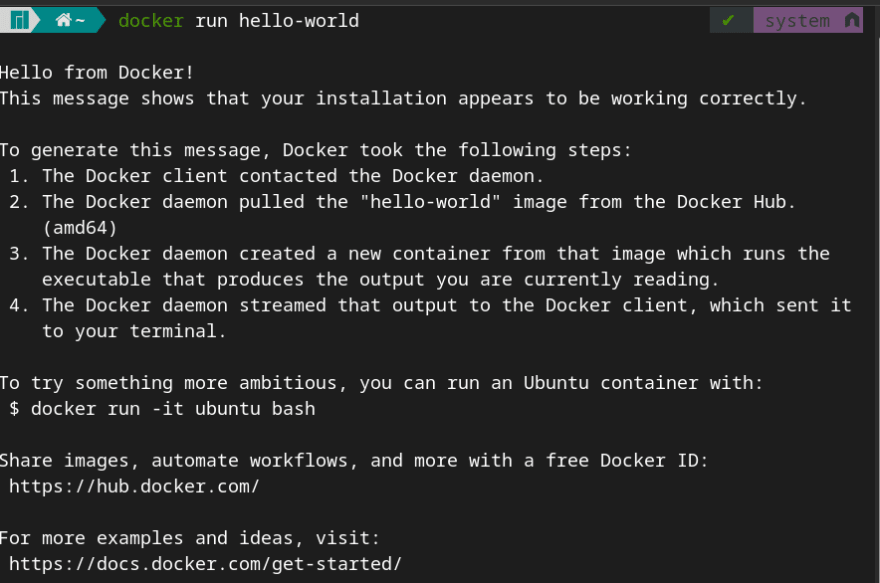
Testing docker:
docker run hello-world
Alright, now we'll download the docker osx and run using the command below:
docker run -it --device /dev/kvm -p 50922:10022 -e DEVICE_MODEL="iMacPro1,1" -e WIDTH=1440 -e HEIGHT=900 -e RAM=8 -e INTERNAL_SSH_PORT=23 -e AUDIO_DRIVER=alsa -e CORES=2 -v /tmp/.X11-unix:/tmp/.X11-unix -e "DISPLAY=${DISPLAY:-:0.0}" -e GENERATE_UNIQUE=true -e MASTER_PLIST_URL=https://raw.githubusercontent.com/sickcodes/osx-serial-generator/master/config-custom.plist sickcodes/docker-osx:big-sur
You can check what each flag means at github of docker osx.
but briefly, i specified the resolution, memory, cores of processor, version and others things.
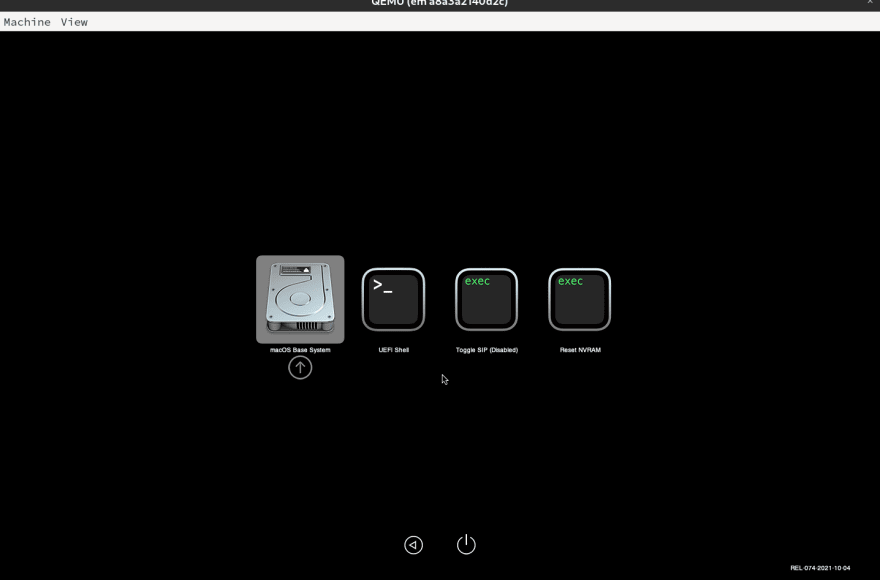
Then, the docker osx will downloaded and initialized.
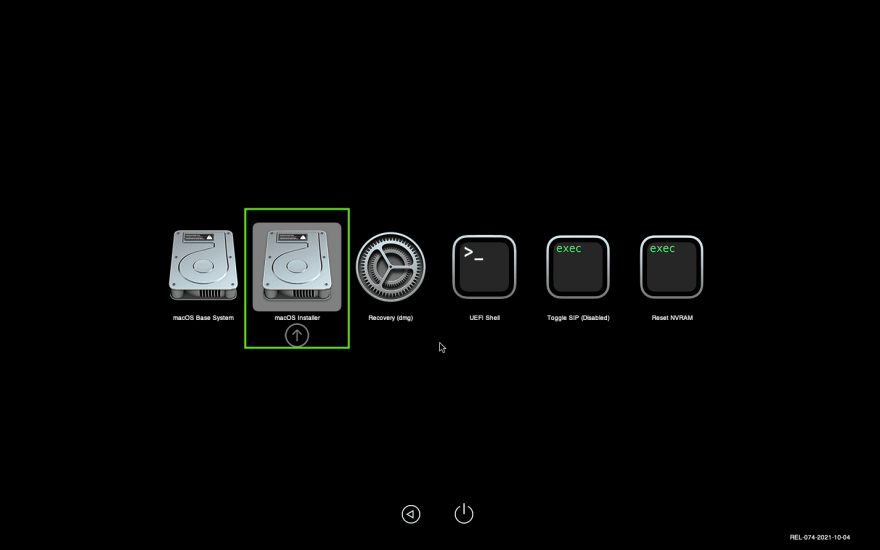
When the emulator opens, select option macOS Base System
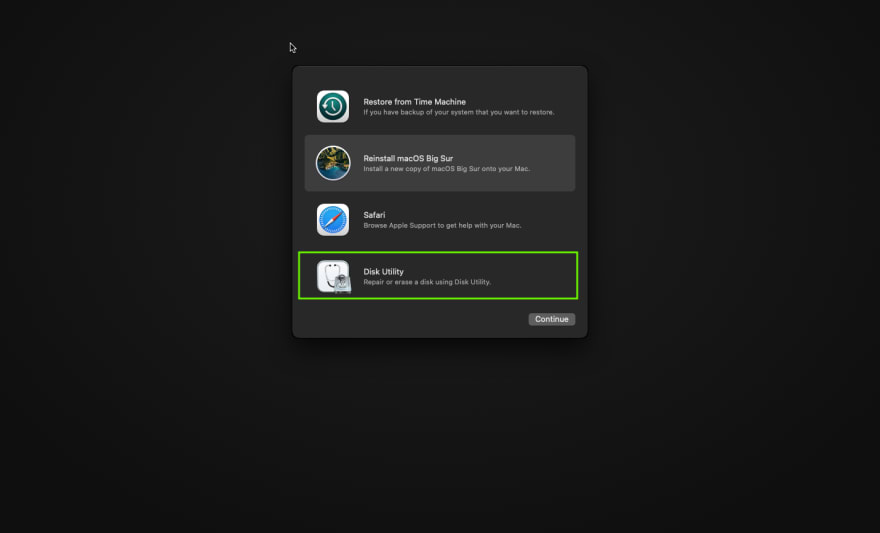
When system be booted, select Disk Utility
Now, we'll search the partition that be with most storage space and select the option Erase.
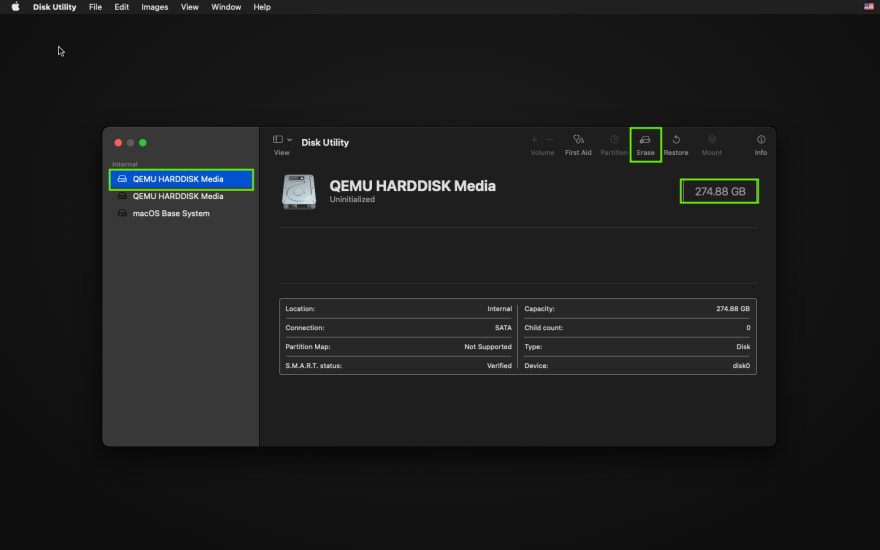
To format, the chosen options must be strictly equal to this:
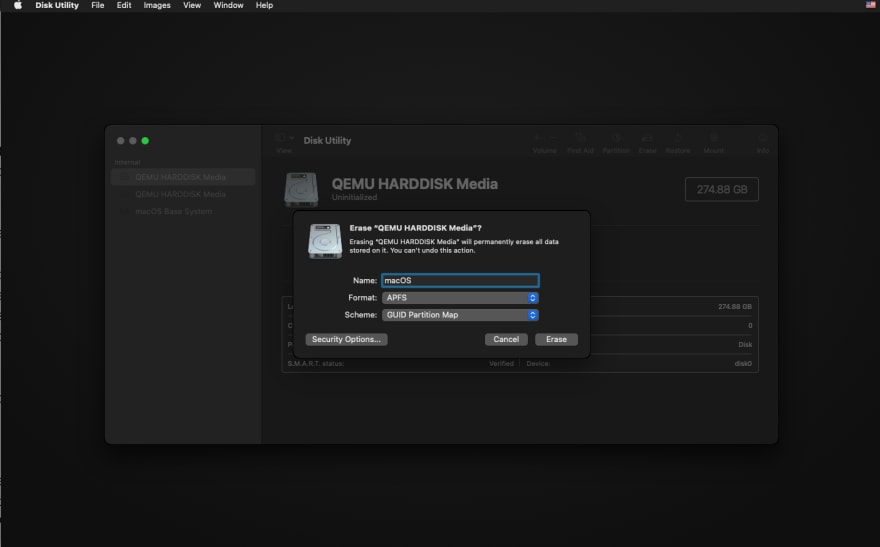
Click on Erase, wait process finish and then you can close the Disk Utility window.
Next, select the option Reinstall macOS Big Sur, accept the terms and select the partition we just created macOS and start installation. (This process can take 30 min ~ 1 hour).

So, the system must restart (or not), in my case, I had to do it manually because it didn't restart. In that case, close the QEMU window.

In terminal, we'll type:
docker ps -a
To know what is ID of our container and next we'll start typing the command below:
docker start ID

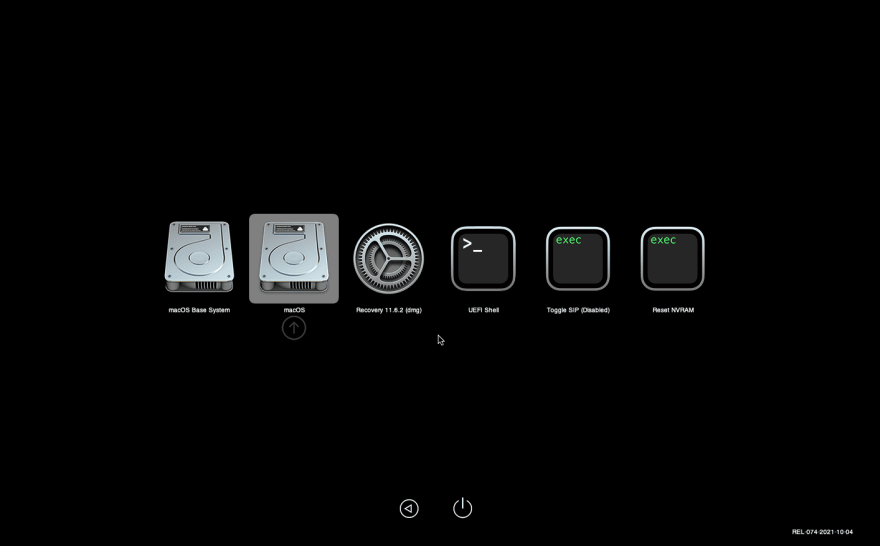
Select macOS Installer and the installation will continue.
Then, the system will restart automatically (or not), so close again the QUEMU and start again the container.

When the system boot, select option macOS Installer and wait the process finish. At end, the system will restart. (Now it's true).
Well, macOS was installed successfully. Select the option macOS.
Once that's done, it will restart again and you select the same macOS option.
Well done, welcome screen appeared. This configuration part is quite slow, but after this process finished, the system will work very well.
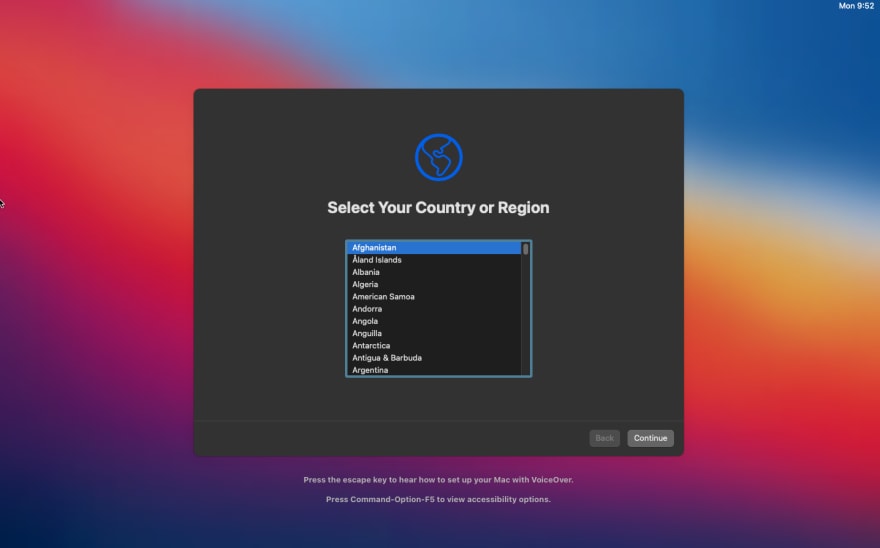
Configure the system , but don't login your AppleID at this moment.
When that process done, our desktop will appears and we'll wait until the dock appear because after this, the system will be most stable.

Now, we'll use the brew for install the packages more fast.
Open terminal in macOS and install brew with the command below:
/bin/bash -c "$(curl -fsSL https://raw.githubusercontent.com/Homebrew/install/HEAD/install.sh)"
Insert your password and wait the process finish.
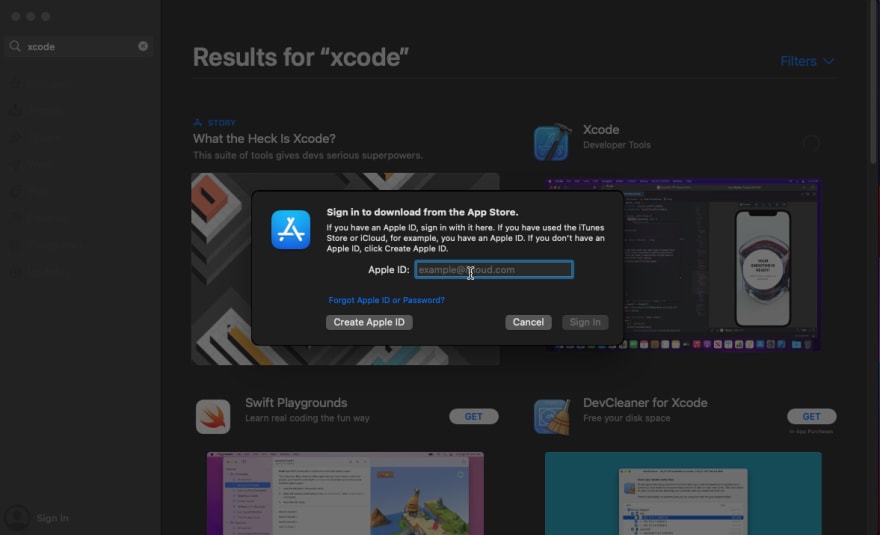
Now, we'll install xcode on Apple Store.
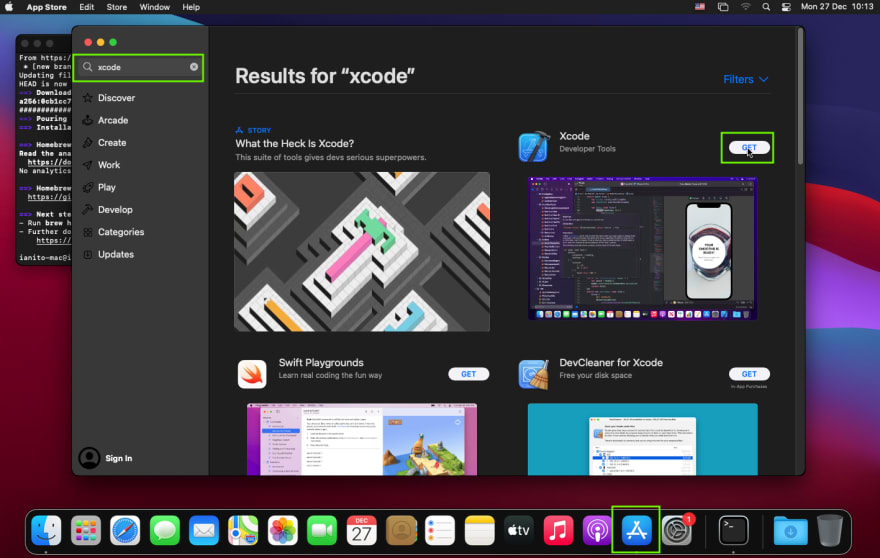
So now, we can login on AppleID.
After that, wait for the installation.
Then, open xcode and accept the terms and wait install the dependencies.
So now, go at Preferences -> Locations -> Command-Line Tools it will be blank, select the option with the xCode version.
When the installation done, we'll open the terminal again and install cocoapods with command below. It serve as packager manager of xCode.
brew install cocoapods
Done that, our macOS will be installed and configured to run the projects.
Running a app with React Native
Okay, let's start with a hello world of React Native to check if everything we've done before will work.
I'll only check iOS.
Open the terminal and type:
Install node:
brew install node
Install yarn (optional):
npm install -g yarn
Creating a project with RN:
npx react-native init teste
If ask you to install cocoapods again, select the option with brew.
Enter at the project directory:
cd teste
Enter at ios directory:
cd ios
Install dependencies:
pod install
Back to root directory:
cd ..
List all simulate availaibles: (Optional)
xcrun simctl list devices
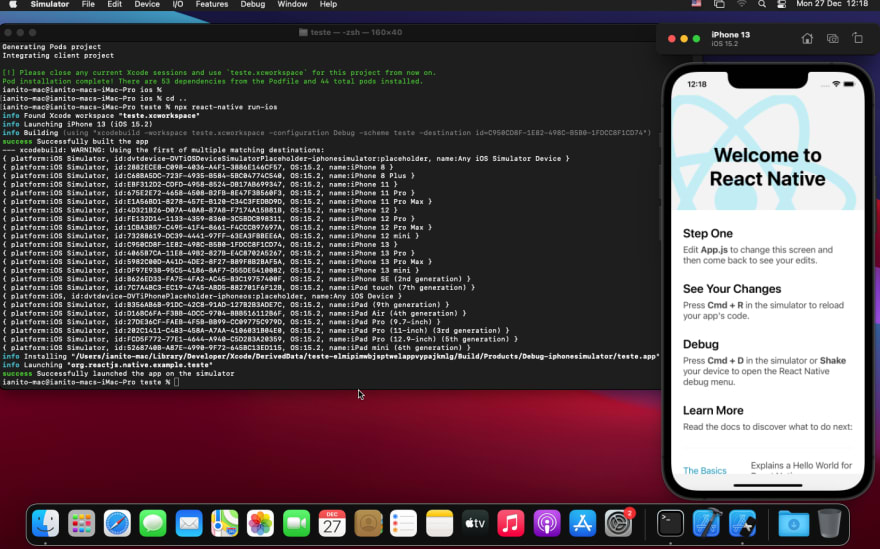
Run the project with xcode:
npx react-native run-ios --simulator="iPhone 13"
To a better experience, see section: Creating a connection of folders over SSH
Running a app with Cordova
Okay, let's start with a hello world of Quasar to check if everything we've done before will work.
I'll only check iOS.
Quasar uses Cordova/Capacitor for iOS and Android.
Install node:
brew install node
Install yarn (opcional):
npm install -g yarn
Install quasar:
yarn global add @quasar/cli
Install cordova:
yarn global add cordova
*Creating a project with Quasar:
quasar create teste
Enter in project directory:
cd teste
Add cordova in your project:
quasar mode add cordova
Enter in cordova directory:
cd src-cordova
Add iOS in project:
cordova platform add ios
Verify if everything is okay:
cordova requirements
List all simulate availables: (Opcional)
cordova emulate iOS --list
Install dependencies:
yarn
Back to root directory:
cd ..
Install dependencies:
yarn
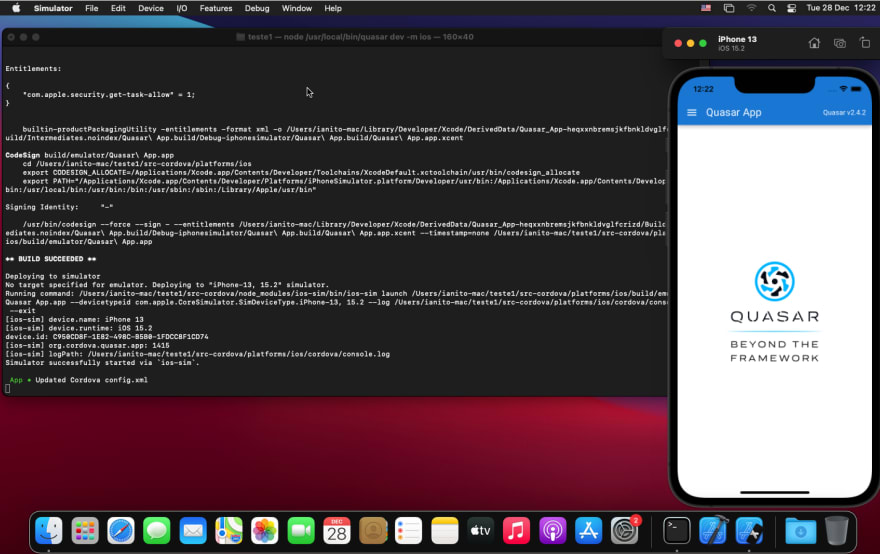
Run quasar with development mode on iOS:
quasar dev -m iOS -e "iPhone 8, 15.2"
To a better experience, see section: Creating a connection of folders over SSH
Creating a connection of folders over SSH
Now our app is already running on macOS, we have a problem: Opening our code editor or IDE inside macOS is a very bad experience because of slowdowns, crashes, keyboard mapping and so on. So I researched a solution to create a file connection using SSH.
Also, I can open the development server inside macOS and create a connection where I can change files directly from my linux or macOS so that it updates on both sides, like a two-way. This guarantees us to take advantage of some things that exist in development mode, like fast refresh.
Connection from linux to mac
First, we need to allow connection via ssh via mac login. To do this, we will open the terminal and type:
Command to open edit ssh configuration file:
sudo nano /etc/ssh/sshd_config
Search for PasswordAuthentication and put yes and remove # at beginning line.

Save file.
Go to System Preferences -> Sharing -> Remote Login and active for all users:

Command to restart ssh:
sudo launchctl stop com.openssh.sshd && sudo launchctl start com.openssh.sshd
Now, in linux terminal:
Install sshfs:
sudo pacman -S sshfs
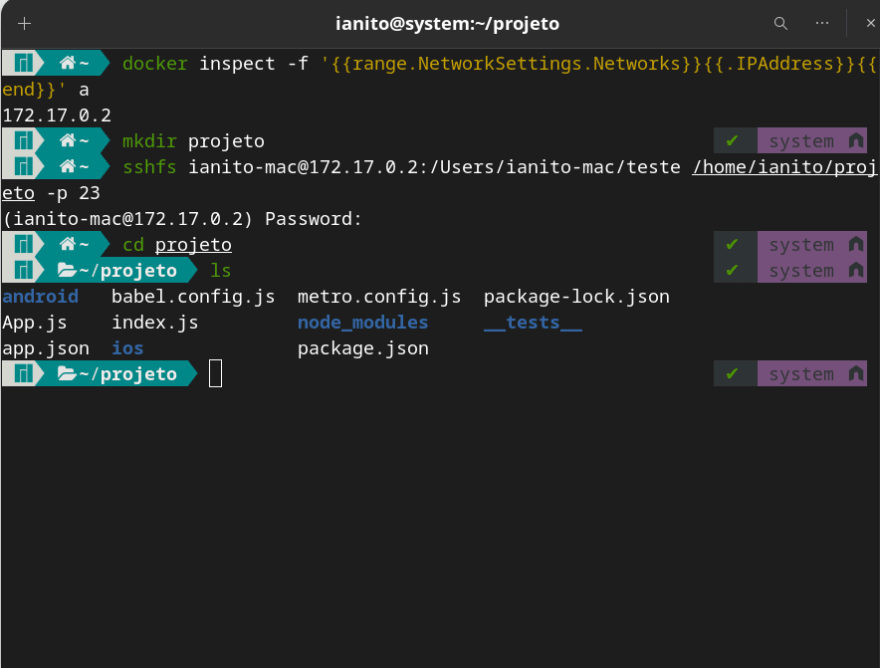
Get container IP
docker inspect -f '{{range.NetworkSettings.Networks}}{{.IPAddress}}{{end}}' ID_CONTAINER
Create a folder:
mkdir projeto
Command to open a new connection with mac:
sudo sshfs USER_MAC@IP_CONTAINER:/PATH/OF/PROJECT/ON/MAC /PATH/ON/LINUX -p 23
Example:
Alright, now we can open the VSCode on linux and update the files updating directly on mac.
If you have another computer, you can do this connection and let your computer with emulator just emulating.
Connection from Mac to Linux
Same process previously, but the sshfs package on mac can be installed using the command below:
Install sshfs
brew install --cask macfuse && brew install gromgit/fuse/sshfs-mac
On Linux:
Command to edit ssh configuration file:
sudo nano /etc/ssh/sshd_config
Search for PasswordAuthentication and put yes and remove # at beginning line.
Save the file.
Command to restart SHH on Manjaro:
sudo systemctl restart sshd.service
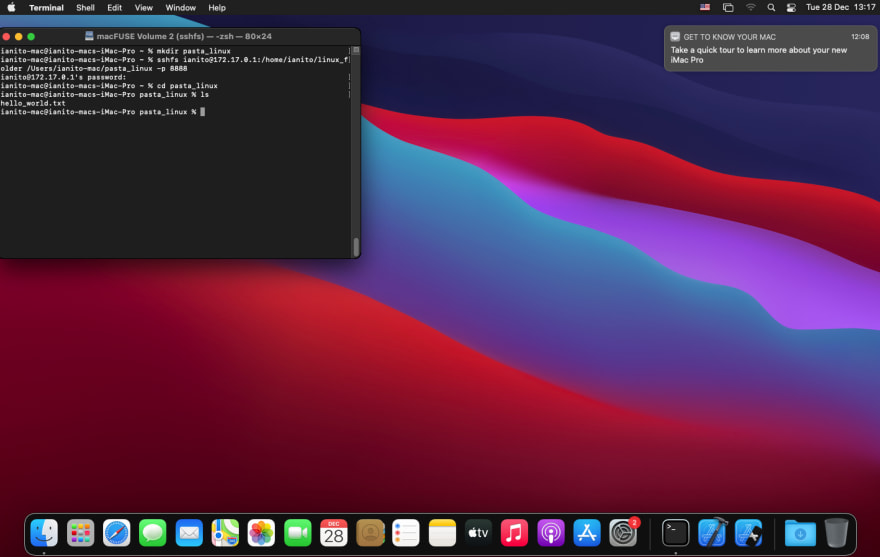
On Mac, we'll create a folder to open connection.
Create a folder:
mkdir projeto
Command to open a new connection with linux
sudo sshfs USER_LINUX@IP_HOST:/PATH/LINUX /PATH/MAC -p 23
When we type the command, an error will occur.
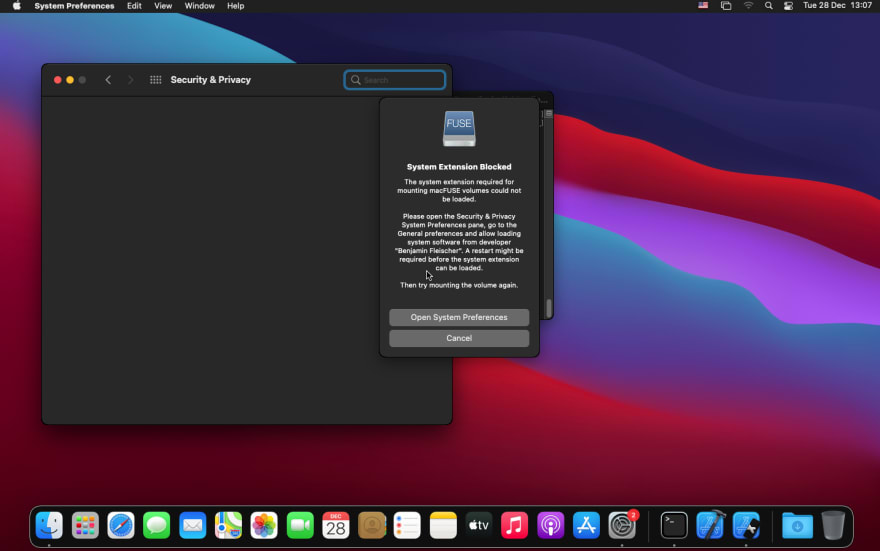
Open the preferences and click Allow
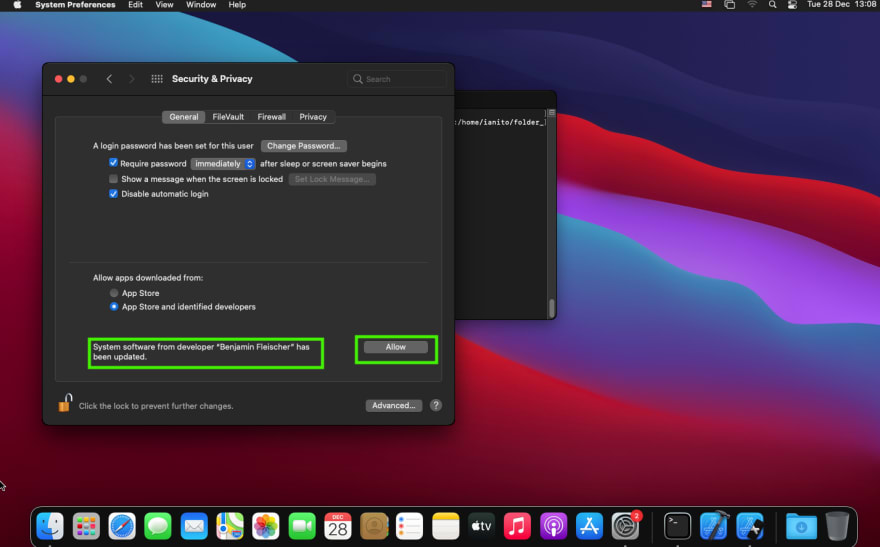
Restart your mac.
Now, we can open the connection: (My SSH is opened in a different port, but the default is 22)
Once that's done, we can update from either side which will also reflect on both.
Final considerations
Thank you very much for reading this tutorial, by the way it's the first one I've published in years. Any questions or suggestions(mostly my english) are always welcome.
Oh, never update your mac.
:)
This content originally appeared on DEV Community and was authored by Iaan Mesquita
Iaan Mesquita | Sciencx (2021-12-29T01:06:06+00:00) How to emulate iOS on Linux with Docker. Retrieved from https://www.scien.cx/2021/12/29/how-to-emulate-ios-on-linux-with-docker/
Please log in to upload a file.
There are no updates yet.
Click the Upload button above to add an update.