
This content originally appeared on DEV Community and was authored by Abbey Perini
In this part of the series, I'll demonstrate generating HTTP responses from a simple Node.js Express server and the corresponding HTTP requests in a simple React app. You can view all of the code in the Github repository.
Building an HTTP message conversation is like communicating via telegraph or secret code. Before the client can send the request message, we have to encode it and attach the information the server will need to decode it. The server receives the message and decodes it to get its instructions. Based on the request's instructions, the server encodes and returns a response. Finally, the client decodes the response to get the data it requested.
If you haven't already, check out A Beginner's Guide to HTTP - Part 1: Definitions, in which I define terms and explain concepts necessary for understanding HTTP messages in a web application. After this, in A Beginner's Guide to HTTP - Part 3: APIs, we'll have some fun with APIs other people have built!
Introduction and Table of Contents
This article assumes familiarity with basic JavaScript, command line, and the terms defined in part 1.
I wanted to give beginners a look at the whole HTTP conversation rather than splitting this into two blogs or going in depth on any one topic. I'm starting with the server/HTTP responses because you'll usually find yourself building HTTP request code around the HTTP response format you're receiving. (You'll see this pattern repeatedly in part 3.)
- A Simple Node.js Express Server
- URLs, Routes, and Endpoints
- URL Parameters
- Status Codes and Error Handling
- My Fake Yarn Database
- DELETE and Postman
- Body Parsing and Middleware
- POST and JSON
- CORS
- A Simple React App
- JSON.parse() and JSON.stringify()
- XHR
- Fetch
- Axios
A Simple Node.js Express Server
I'll be making a very simple yarn stash app, so I can keep track of all of my yarn. As you follow along, try building your own app idea, whatever it may be. You'll be surprised how much tweaking the code slightly helps you learn the concepts, and you may even go on to finish a cool app from the CRUD bones you create here. I've still got one or two apps from bootcamp that started like this that I enjoy working on.
To follow this tutorial, you'll need to install Node.js. (If at first you don't succeed, take a break and try again. There's a reason professional developers complain about setting up their development environments.)
Start by creating a main project folder. If you haven't thought of an app name yet, you can use a placeholder name or app name generator. Inside it, create a folder called server.
npm is the package manager installed with Node.js to manage and install packages/libraries of code. It is also the name of the registry from which the package manager gets said packages. The registry is free to use and you can upload your own packages. Commands you run using npm, the package manager, will start with npm.
Navigate to your server folder in a terminal, and run npm install express. We could set up a server with just Node.js, but Express is a beginner-friendly web framework library we can run in Node.js. That command will have generated some folders and files.
Within your server folder, add a file called app.js. Open app.js in a text editor, and add this code:
const express = require('express')
const app = express()
const port = 8080

app.listen(port, () => {
  console.log("Server is running on port 8080...")
})
This code instantiates or makes an instance of an Express server I've called app. Now any HTTP messages sent to http:localhost:8080 will be handled by app.
Next run node app.js in your terminal to run the server. If it works, you should see "Server is running on port 8080..." logged in your terminal. Use crtl + C to kill the server. Every time you change the server code, you'll either have to kill the server and run it again or use a tool like nodemon that watches for newly saved changes in your files and restarts the server for you.
Now that our server is running, let's talk about setting up our routes.
URLs, Routes, and Endpoints
URL stands for Uniform Resource Locator, a specific type of Uniform Resource Identifier (URI). Basically, a street address but for a client or server hosted on the web. In part 1, we talked about how a URL has a protocol (http:// or https://). I mentioned that ports were optional. If you're accessing a URL that uses HTTP or HTTPS, the port is not specified as long as the standard port is used (80 for HTTP and 443 for HTTPS). My server is running on port 8080 on my local machine, so its URL is http://localhost:8080. After the protocol, domain/host name (localhost for my server), and maybe a port number, you can pack a lot of information into a URL.
You may be familiar with the terms route, routing, and router. Much like your wifi router helps your devices access different routes on the internet, a server has a router that specifies what happens when someone types that URL into the browser. If you've already been building webpages, you've made routes. In http://localhost:3000/index.html, index.html could be called a route. As you build bigger and more complex front-ends, you may end up building and installing routers in your client too.
Let's set up our most basic route:
app.get('/', (req, res) => {
  res.send('Welcome to the yarn server!')
})
This tells the server that if an HTTP GET request message is sent to our main route (req stands for request), it should execute the arrow function. The arrow function sends back an HTTP response message (res stands for response) with the string 'Welcome to the yarn server!' in the body. The arrow function is called a route handler.
Run your server again, and this time, navigate to http://localhost:8080 in your browser. You should see 'Welcome to the yarn server!' displayed on the page. By typing that URL into the browser, you sent an HTTP GET request to your server to the route /. http://localhost:8080 is the same as http://localhost:8080/. The server then decoded your GET request and sent back a response. The browser decoded the response and displayed it for you.
Next, we'll create a route that will send back all of the yarn data, /yarn. It will look like this:
app.get('/yarn', (req, res) => {
  res.send('This is all of the yarn data!')
})
With this, if you navigate to http://localhost:8080/yarn with your server running, you'll see 'This is all of the yarn data!'.
Since my server is tiny, there are a lot of routing methods provided by Express that I won't be using. A method in this context is a function associated with an object. In the previous code, app.get() is a method. array.find() is a built-in JavaScript method. You also don't have to use arrow functions - you could pass a named function to app.get().
If I were building a complex app, say one that was concerned with yarn and knitting patterns, I could set up router files outside of my main server file. Then I could have a /yarn router that would handle any routes starting with /yarn (like /yarn/purple and /yarn/green) and a /pattern router that would handle any pattern routes (like /pattern/hats and /pattern/scarves).
From the perspective of a client wanting to request a resource from a server, /yarn in http://localhost:8080/yarn would be called an endpoint. For example, in the DEV API documentation, you can see how /articles is called the "articles endpoint" and the entire URL is https://dev.to/api/articles. If you make a GET HTTP request to https://dev.to/api/articles, DEV's server will return all the posts users create on DEV. So developers will say in conversation, "making a GET request to the articles endpoint will return all the posts users create on DEV." Meanwhile, the developer building the DEV API would probably say something like "the articles route will send back all the posts users create on DEV."
URL Parameters
If I want to make it easy to request data about one yarn instead of all the data about all the yarn, I can require the HTTP request pass an id in a URL parameter. The server route code would look like this:
app.get('/yarn/:id', (req, res) => {
  res.send(`This is the yarn data for ${req.params.id}.`)
})
Just like we used the res object passed to our route function to send a response, we use the req object to reference the request message sent to this route. With this code, we get the id from the HTTP request message's URL, and send it back in a string.
With your server running, navigate to http://localhost:8080/yarn/23 in your browser, and you should see "This is the yarn data for 23."
Status Codes and Error Handling
If you don't specify a status code when you send your response, Express uses Node.js code to send 200. If you wanted to explicitly send a status code (and the associated message), you can chain it and the .send() function like this:
app.get('/yarn/:id', (req, res) => {
  res.status(200).send(`This is the yarn data for ${req.params.id}.`)
})
Express has built in error handling. If an error is not handled by code you've written, Express will send a response with the status code 500 and the associated status message. If you wanted to specify which error status code to send within your route handler, it would look very similar:
app.get('/yarn/:id', (req, res) => {
  if (isNaN(req.params.id)) {
    res.status(404).send("No id no yarn!")
  } else {
    res.status(200).send(`This is the yarn data for ${req.params.id}.`)
  }
})
This way, if I navigate to http:localhost:8080/yarn/purple in my browser with my server running, I'll see "No id no yarn!" If I navigate to http:localhost:8080/yarn/43, I'll see "This is the yarn data for 43." The browser does not display the status code or status message for us, but I'll soon introduce a tool that will.
My Fake Yarn Database
I'm going to mock a database really quickly by using an array of objects in my server to hold data. This means any data that is not hardcoded will disappear every time I kill my server, but setting up a database is beyond the goal of this guide.
Along with yarn name, I want to record yarn weight, color, and how many meters I have, so I add this array to the top of my file:
let yarnDB = [
  {
    id: 1,
    name: "I Feel Like Dyeing Sock 75/25",
    weight: "Fingering",
    meters: 299.7
  },
  {
    id: 2,
    name: "Magpie Fibers Swanky Sock",
    weight: "Fingering",
    meters: 1097.3
  },
  {
    id: 3,
    name: "Rowan Alpaca Colour",
    weight: "DK",
    meters: 18
  },
  {
    id: 4,
    name: "Malabrigo Yarn Rios",
    weight: "Worsted",
    meters: 192
  }
]
First, I'll change my route that returns information about all the yarn in my "database."
app.get('/yarn', (req, res) => {
  let yarns = yarnDB.map(yarn => `Yarn ${yarn.id} is named ${yarn.name}. It is ${yarn.weight} weight and you have ${yarn.meters} meters.`)

  res.send(yarns)
})
Then I'll also change my /yarn/:id route handler to return information about specific yarns in the array:
app.get('/yarn/:id', (req, res) => {
  let yarn

  for (let i=0; i < yarnDB.length; i++) {
    if (yarnDB[i].id === parseInt(req.params.id)) {
      yarn = yarnDB[i]
    }
  }

  if (yarn) {
    res.send(`Yarn ${req.params.id} is named ${yarn.name}. It is ${yarn.weight} weight and you have ${yarn.meters} meters.`)
  } else {
    res.status(404).send("No yarn with that id.")
  }
})
Navigating to http://localhost:8080/yarn/3 in my browser with my server running returns "Yarn 3 is named Rowan Alpaca Colour. It is DK weight and you have 18 meters." Navigating to http://localhost:8080/yarn/5 returns "No yarn with that id." Navigating to http://localhost:8080/yarn will turn an array of yarn information strings for every yarn in the "database."
DELETE and Postman
You may have noticed - I've only made routes with the GET method so far! We have no way to add or delete yarn! That's because we can only generate GET requests using a URL in the browser. To use a POST or DELETE route, you'll need a client or a tool like Postman. We'll build our client next, but first, let's cover how to use Postman to test my DELETE route:
app.delete('/yarn/delete/:id', (req, res) => {
  let index

  for (let i=0; i < yarnDB.length; i++) {
    if (yarnDB[i].id === parseInt(req.params.id)) {
      index = i
    }
  }

  if (index === 0 || index) {
    yarnDB.splice(index, 1)
    console.log(yarnDB)
    res.send(`Yarn id ${req.params.id} deleted!`)
  } else {
    res.status(404).send("No yarn with that id.")
  }
})
Once you have Postman installed and open, you'll need to open a new request tab and enter the information required to build a request. For the DELETE route, all you have to do is select the DELETE method from the drop down and type in the URL. If I enter http://localhost:8080/yarn/delete/3, and hit the send button, I see "Yarn id 3 deleted!" in the response body in Postman. When the array is logged in the server terminal, I only see yarns 1, 2, and 4 in my yarnDB array now.

The response section in Postman also shows us some information about the HTTP response message that we couldn't see in the browser. The status code and message are shown right by the response body. Both the request and response sections have tabs like headers where you can see all the headers for the message and other information and tools. We'll definitely dig more into the headers tab in part 3, but check out Postman's docs to see all the tools it can provide.
Body Parsing and Middleware
I also need to add a body parser to decode my request body data into something I can work with in JavaScript in my server. This is why both requests and responses use Content-Type headers. Translating an HTTP message body into something useful is significantly easier if we know what the body's media/MIME type is.
I add some middleware in my server file so that my Express server will automatically parse JSON in the body of requests it receives:
app.use(express.json())
In this context, middleware refers to functions outside of the route handler executed when an HTTP message triggers a route in the server. By using app.use() I'm telling app to run the built in JSON body parser Express provides before every route handler that receives a request body is executed.
Express also provides methods for writing your own middleware, including error handling middleware. You can run middleware on every route or call middleware before or after specific routes execute. For example, if a route added data to your database, you might want to run logging middleware before the route handler is executed to say that adding data was attempted and after the route handler is executed to log whether it was successful.
If you want to know more about middleware, including error handlers, and more about what you can do with Express, check out the LogRocket guide.
"But wait," you might be thinking, "we've been sending data without specifying the Content Type header or formatting the body this whole time!" Express's res.send() method automatically sets headers and formats the body based on the type of the parameter passed to it. Using res.json() instead of res.send() would set the Content Type header to "application/json" and format whatever is passed as JSON. You can also use res.type() to set the header yourself. This is the main reason I chose Express for this guide - the formatting and parsing of HTTP messages will only get more manual as we go on.
POST and JSON
Next up, my POST route:
app.post('/yarn/create', (req, res) => {
  let yarn = req.body.yarn
  if (yarn.id && yarn.name && yarn.weight && yarn.meters) {
    yarnDB.push(yarn)
    console.log(yarnDB)
    res.send("Yarn added to database!")
  } else {
    res.status(400).statusMessage("Yarn object not formatted correctly.")
  }
})
(In the real world, I would validate data sent to my server a lot more before adding it to my database. This code allows me to add the same yarn object multiple times. It doesn't check the body's structure and I'm not checking if the fields are the correct data type.)
To test this route, I'll need to build a valid JSON string to pass in the body of my HTTP request. In practice, writing JSON boils down to building a JavaScript object or array, but nothing can be a variable. For example, this is a valid JavaScript object:
let person = {
  name: "George"
}
In JavaScript, I could access person.name and get "George". To be valid JSON, object and field names have to be strings and everything must be contained in an object or an array:
{ "person":
  {
    "name": "George"
  }
}
Once my server uses the express.json() middleware, that JSON string will be turned back into a JavaScript object and we can access person.name to get "George" again.
To be able to access req.body.yarn in my route handler, my JSON will look like this:
{
    "yarn": {
        "id": 5,
        "name": "Wonderland Yarns & Frabjous Fibers Mary Ann",
        "weight": "Light Fingering",
        "meters": 539.5
    }
}
"Hold on a second!" you might be saying, "5 and 539.5 aren't strings!" That's because JSON allows multiple data types to be used. To get used to translating data into valid JSON, try using a JSON parser like JSON formatter. They even have an example with all the possible data types you can play with. We'll cover the methods available within JavaScript to convert objects between JSON and JavaScript soon, but being able to recognize valid JSON will help when you're trying to troubleshoot down the road.
To use the POST route with Postman, we'll have to create a body. After selecting POST from the drop down and entering http://localhost:8080/yarn/create, I move down to the request tabs and select the body tab. Next I select the radio button labelled raw. Then, from the dropdown that appears to the right of the radio buttons, I select JSON and enter my JSON object into the box below. When I hit the send button, I see "Yarn added to database!" in Postman and the array logged in my server confirms yarn #5 has been added to my array.

CORS
Postman ignores CORS. Even though we've got our basic server set up to send HTTP responses once it's received HTTP requests, we still need to enable CORS before we move on to generating HTTP requests in a client. To do this, I install the cors package by running npm install cors in my terminal. At the top of my app.js file, I import the package:
const cors = require('cors')
Then, I add the CORS middleware on every route, just like the body parser:
app.use(cors())
This is the equivalent of adding this header to every pre-flight and response message sent by this server:
Access-Control-Allow-Origin: *
* is a wildcard. This tells browsers to allow any request from any origin. This is the least amount of security possible. Since my goal is to practice HTTP requests on my local machine, I'm going with the easiest option. If this was a server I was going to deploy, I would use the configuration options to limit origins and methods that can access my server.
A Simple React App
Now, we need a client! At the same level as your server folder, make a folder called client. Navigate to the folder in a terminal and run npm install react.
After it finishes installing, run npx create-react-app <app-name> and follow the prompts. When you see <word> in code, it means replace <word> with your own new word without the < >. So for my code, I ran npx create-react-app http101. npx is bundled with npm. Where npm installs packages, npx executes/runs them. create-react-app will generate all the files you need for a React app.
After it's done, in addition to the new folders and files, you should see "Success! Created <app-name>" and other successful build logs in your terminal. Run npm start, and you should see build logs and "Compiled successfully!". Your browser should open a new tab navigated to the URL http://localhost:3000/ with the boilerplate React app displayed.
Like with the Node.js Express server, use ctrl + c to kill the app. Unlike with the server, the React development build will watch for changes and rebuild for you.
Open client > src > index.js in your text editor. This file is the JavaScript entry point. In other words, any components we create need to be imported here to be rendered when the app runs. I import my 3 components like this:
import React from 'react';
import ReactDOM from 'react-dom';
import './index.css';
import XHR from './Components/XHR';
import Fetch from './Components/Fetch';
import Axios from './Components/Axios';
import reportWebVitals from './reportWebVitals';

ReactDOM.render(
  <React.StrictMode>
    <XHR />
    <Fetch />
    <Axios />
  </React.StrictMode>,
  document.getElementById('root')
);

// If you want to start measuring performance in your app, pass a function
// to log results (for example: reportWebVitals(console.log))
// or send to an analytics endpoint. Learn more: https://bit.ly/CRA-vitals
reportWebVitals();
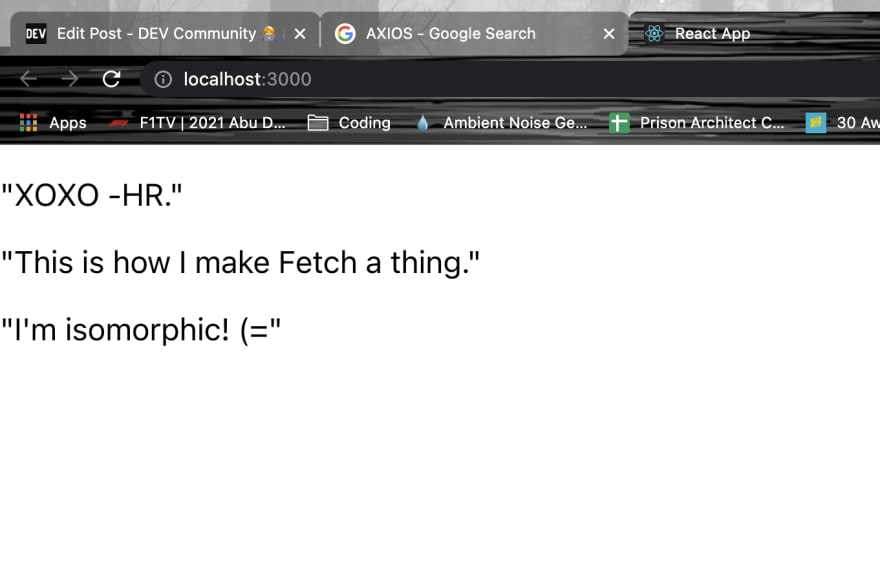
In the src folder created by create-react-app, I made a folder named Components and added three component files, XHR.js, Fetch.js, and Axios.js. The structure of my Fetch component looks like this:
import React from 'react';

function Fetch() {
  return (
    <p>"This is how I make Fetch a thing."</p>
  )
}

export default Fetch;
The other two look almost exactly the same. When I run npm start from my terminal and my browser tab opens http://localhost:3000, I see all three of my components' strings displayed.
JSON.parse() and JSON.stringify()
Before we get into the code for the HTTP requests individually, let's talk about JavaScript's built-in methods for converting JSON to JavaScript and vice versa. JSON.parse() takes a JSON object or array and turns it into valid JavaScript. JSON.stringify() takes valid JavaScript and turns it into valid JSON, sometimes referred to as a JSON string.
In the following code block, the first log would print out a JavaScript object, and the second would print a JSON string.
let yarn = JSON.parse({
    "yarn": {
        "id": 5,
        "name": "Wonderland Yarns & Frabjous Fibers Mary Ann",
        "weight": "Light Fingering",
        "meters": 539.5
    }
})

console.log(yarn)

let newBody = JSON.stringify(yarn)

console.log(newBody)
It's manually doing what the express.json() body parser was doing for us in the Express server.
XHR
We don't have to import XMLHttpRequest into our React app - it's already available because you're writing JavaScript for the browser. For every request, we will have to instantiate XHR and build the request using a handful of methods.
GET
To build a GET request to my /yarn endpoint, I instantiate an XHR object I've called gXHR, open the request while passing the method and URL, and then send the request. Finally, I write a gXHR.onload() function to handle what happens when the response is received. In my gXHR.onload() function, I parse the JSON I received into a valid JavaScript object with JSON.parse() and log the first item in the array that was returned.
function getRequest() {
    // create a request object
    let gXHR = new XMLHttpRequest()

    // set method and URL
    gXHR.open("GET", "http://localhost:8080/yarn")

    // send GET request
    gXHR.send()

    // what happens when the response is received
    gXHR.onload = function() {
      if (gXHR.status !== 200) {
        console.log(gXHR.status, gXHR.statusText)
      } else {
        let yarns = JSON.parse(gXHR.response)
        console.log(yarns[0])
      }
    }
  }
.onload() is a listener, essentially a loop that runs until the .send() method finishes. The function I wrote and assigned to .onload() is a callback function to run after the HTTP request has concluded.
POST
The POST request looks similar, but we also have to pass a body. I start by defining my POST body and passing it to JSON.stringify() to turn the JavaScript object into JSON. I also have to set the Content-Type header so XHR knows to send the body formatted as JSON. Then, when I create my request, I pass my JSON string to the pHXR.send() method. Finally, I don't JSON.parse() the response in pXHR.onload() because the response is a string.
function postRequest() {

    let body = JSON.stringify({
      yarn: {
        id: 5,
        name: "Wonderland Yarns & Frabjous Fibers Mary Ann",
        weight: "Light Fingering",
        meters: 539.5
      }
    })

    let pXHR = new XMLHttpRequest()

    pXHR.open("POST", "http://localhost:8080/yarn/create")

    // set request header
    pXHR.setRequestHeader('Content-type', 'application/json; charset=utf-8')

    pXHR.send(body)

    pXHR.onload = function() {
      if (pXHR.status !== 200) {
        console.log(pXHR.status, pXHR.statusText)
      } else {
        console.log(pXHR.response)
      }
    }
  }
DELETE
Finally, my DELETE request:
function deleteRequest() {
    let dXHR = new XMLHttpRequest()

    dXHR.open("DELETE", 'http://localhost:8080/yarn/delete/3')

    dXHR.send()

    dXHR.onload = function() {
      if (dXHR.status !== 200) {
        console.log(dXHR.status, dXHR.statusText)
      } else {
        console.log(dXHR.response)
      }
    }
  }
If this was a real app, I would pass the id of the yarn I wanted deleted to deleteRequest() and add it dynamically to the URL in a template string like this:
`http://localhost:8080/yarn/delete/${id}`
However, passing an id to an onClick handler in React is a tutorial for another time.
Putting It All Together
I use these functions as onClick handlers for three buttons:
return (
    <section>
      <button onClick={getRequest}>GET</button>
      <button onClick={postRequest}>POST</button>
      <button onClick={deleteRequest}>DELETE</button>
    </section>
  )
To test, I run the client in one terminal using npm start and the server in a second terminal using node app.js. In the browser, I watch the console tab in the browser developer tools. As I press the buttons, the different strings I expect to see appear.
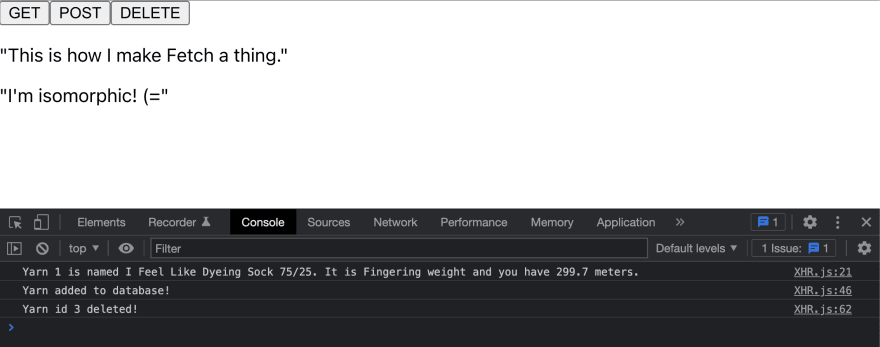
We've built our first full HTTP conversation! The buttons trigger JavaScript that builds and encodes an HTTP request and then sends it to our server. Our server receives the HTTP request, decodes it, and based on the instructions, sends back an encoded request message. When the client receives the encoded request message, it decodes it and logs part of it to the console.
Fetch
Having worked mainly in newer HTTP packages at this point, XHR feels very manual to me. To write one request, we have to use multiple methods. With Fetch, we can write a GET request in one line. Fetch is also a Web API, so we don't have to import it either. We don't even have to instantiate it - fetch() is a function all on its own.
GET
Here is the one line GET request:
function getRequest() {
    fetch("http://localhost:8080/yarn")
    .then(response => response.json())
    .then(data => console.log(data))
    .catch(error => console.log(error))
  }
fetch() is doing a lot of work for us. Because we didn't pass configuration options, Fetch is using the default settings. The method is automatically set to GET. In the first .then(), response.json() is using Fetch's built-in JSON parser to convert the JSON body to JavaScript.
Similarly, the next few lines do a lot in a few characters. In fact, they're on new lines for readability for humans, as far as JavaScript is concerned, it's actually all one line.
fetch("http://localhost:8080/yarn").then(response => response.json()).then(data => console.log(data[0])).catch(error => console.log(error))
Because Fetch is based on promises under the hood, it returns a promise object. This means we can use chained .then() and .catch() functions to handle the result of the HTTP request. So this code is saying after the promise object is returned as fulfilled, take the response message body and parse the JSON. Then take the newly parsed data and log the first result in the array. If the promise object is instead returned as failed, catch it, and log the error.
Learning the arrow function syntax and async chaining at the same time can be confusing - I know from experience. The .then() function is waiting for the execution of the function before it to finish and then executing the function passed to it. We could rewrite it like this:
function parseData(response) {
  response.json()
}

fetch("http://localhost:8080/yarn").then(parseData(response))
Not to mention, this is essentially like creating a callback, but outside of the function that needs to run before the callback is executed. We could rewrite the getRequest function using async/await syntax and a callback with the same result:
function parseData(response) {
  return response.json()
}

async function getFetch() {
  fetch("http://localhost:8080/yarn")
}

function getRequest(callback) {
  let response = await getFetch()

  callback(response)
}

getRequest(parseData)
Notice I didn't write any error handling to replace .catch(). .catch() is there to handle errors that happen within the Fetch request. It is triggered by a JavaScript error. To handle a response with a 500 status code, or server error, I would have to check the response after I've received it to verify it's an error. We'll go into this more in part 3.
POST
To make the POST request to my /yarn/create endpoint work, we'll have to pass configuration options to the fetch() method. I start by building my body and converting it to JSON. Then, when I create my Fetch request, I pass a config object after my URL. Finally, because the response is a string, we have to parse it using .text() instead of .json() before we can log it to the console.
function postRequest() {

    let bodyString = JSON.stringify({
      yarn: {
        id: 5,
        name: "Wonderland Yarns & Frabjous Fibers Mary Ann",
        weight: "Light Fingering",
        meters: 539.5
      }
    })

    fetch("http://localhost:8080/yarn/create", {
      method: "POST",
      headers: {
        'Content-Type': 'application/json'
      },
      body: bodyString
    }).then(response => response.text())
    .then(data => console.log(data))
    .catch(error => console.log(error))
  }
DELETE
The DELETE method also requires a config object and the .text() method to parse the body.
function deleteRequest() {
    fetch("http://localhost:8080/yarn/delete/2", {
      method: "DELETE"
    })
    .then(response => response.text())
    .then(data => console.log(data))
    .catch(error => console.log(error))
  }
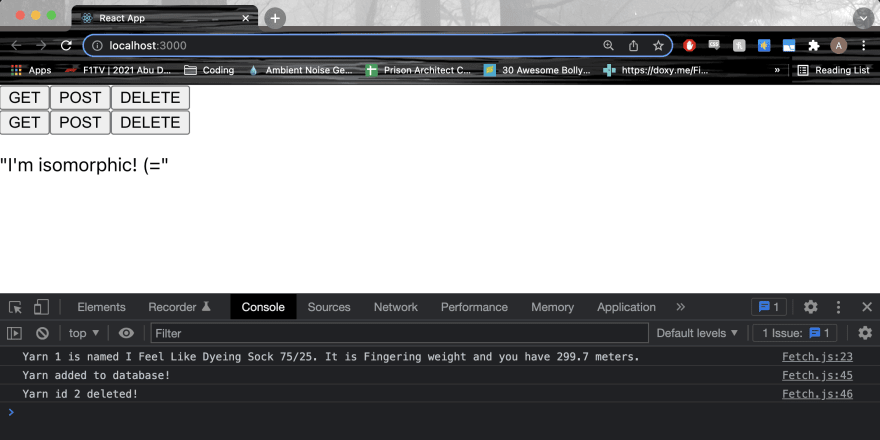
Putting It All Together
Like with my XHR component, I hooked those three functions up to three buttons. When I run my client in one terminal and my server in another and click them, the responses I expect are logged to the console.
Axios
Axios is an npm package, so I run npm install axios in my terminal to install it. I also have to import it at the top of my file:
import axios from 'axios';
GET
Now that it's been imported, we can use the .get() method to write a request. Since Axios also uses promises, we can still chain with .then() and .catch().
function getRequest() {
    axios.get('http://localhost:8080/yarn')
    .then(response => console.log(response.data[0]))
    .catch(error => console.log(error))
  }
Right off the bat you can see how this format is closer to the Express server than XHR. Furthermore, you may have noticed I didn't have to parse the body of the response - Axios does that for us. As part of that formatting, the structure of the response object we can reference is changed - instead of response.body, I have to reference response.data. Because they have it in the docs, I knew to expect that. We'll delve into evaluating response format when you don't know what to expect in part 3.
POST
Next up, the POST request. Thanks to Axios, I don't have to JSON.stringify() my body and the .post() method allows you to pass an object to add to the body after the URL.
function postRequest() {
    axios.post('http://localhost:8080/yarn/create', {
      yarn: {
        id: 5,
        name: "Wonderland Yarns & Frabjous Fibers Mary Ann",
        weight: "Light Fingering",
        meters: 539.5
      }
    }).then(response => console.log(response.data))
    .catch(error => console.log(error))
  }
I didn't even have to pass a header - Axios tries to JSON.stringify() all request bodies and JSON.parse() all response bodies. We'll cover how to use the config object to set headers (and method and authentication) in part 3.
DELETE
Finally, the DELETE request to my /yarn/delete/:id endpoint, looking much like the GET request:
function deleteRequest() {
  axios.delete('http://localhost:8080/yarn/delete/1')
    .then(response => console.log(response.data))
    .catch(error => console.log(error))
  }
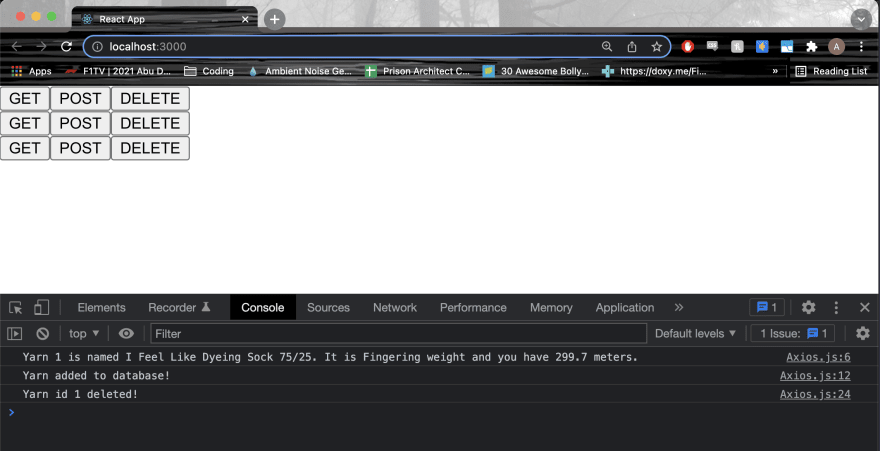
Putting It All Together
Once again, I hook these functions up to buttons, and now I have 3 rows of ugly buttons returning the responses I expect.
Conclusion
Starting with XHR and ending with Axios, you can really see how HTTP request packages and async methods for JavaScript have evolved and been abstracted over the years. Because there's so much going on under the hood but the methods themselves are easy to use, a lot of these concepts are glazed over when teaching students about how to use HTTP. I hope this article has given you a better understanding of the inner workings of HTTP messages as a whole.
If you're left confused or have any questions about any of the topics I've touched on in this part of the series, please don't hesitate to leave a comment! I made an effort to link to resources for topics when they came up, but if there are topics you'd like to see in a "more resources" section like in part 1, let me know.
Now we know how requests and responses are generated in JavaScript. Stay tuned for A Beginner's Guide to HTTP - Part 3: APIs. Once I finish writing it, this next part of the series will cover evaluating APIs other people have built and using them in your own app. This will include authentication, displaying what we receive from APIs in the browser, error handling, and more.
This content originally appeared on DEV Community and was authored by Abbey Perini
Abbey Perini | Sciencx (2022-02-16T17:03:40+00:00) A Beginner’s Guide to HTTP – Part 2: an App and a Server. Retrieved from https://www.scien.cx/2022/02/16/a-beginners-guide-to-http-part-2-an-app-and-a-server/
Please log in to upload a file.
There are no updates yet.
Click the Upload button above to add an update.