
This content originally appeared on Bits and Pieces - Medium and was authored by Thomas Sentre
Learn how to use Helmet to set Content-Security-Policy, X-DNS-Prefetch-Control, X-Frame-Options, X-Powered-By, plus much more.

While it was useful to implement HTTPS, that’s not the end of implementing security measures. It’s hardly the beginning of security, for that matter. The browser makers working with the standards organizations have defined several mechanisms for telling the browser what security measures to take. In this post, we will go over some of those mechanisms, and how to implement them using Helmet.
The topics covered in this post include the following:
- Using Helmet to set the Content-Security-Policy header
- Using Helmet to set the X-DNS-Prefetch-Control header
- Controlling enabled browser features using the Feature-Policy header
- Using Helmet to set the X-Frame-Options header
- Using Helmet to remove the X-Powered-By header
- Improving HTTPS with Strict Transport Security
- Mitigating XSS attacks with Helmet
- And much more…
Helmet is, as the development team says, not a security silver bullet. Instead, it is a toolkit for setting various security headers and taking other protective measures in Node.js applications. It integrates with several packages that can be either used independently or through Helmet. Using Helmet is largely a matter of importing the library into node_modules, making a few configuration settings, and integrating it with Express.
Getting Started with Helmet
Before getting started with Helmet, let us initialize a simple Express application.
First, open your terminal and install all the necessary modules:
npm install express dotenv
Create a new file named secure-app.js and add the following code in it:
import express from 'express'
import dotenv from 'dotenv'
dotenv.config()
const app=express()
app.use(express.json())
app.use(express.urlencoded({extended: true}))
app.get('/',(req,res)=>{
res.send(`<h1>Securing Express Aplication with Helmet</h1>`)
})
app.listen(process.env.PORT,(err)=>{
if(err){
console.error(err)
}
console.info(`Server started at port ${process.env.PORT}`)
})
This code has nothing special. It is a simple setup of an Express application.
Now, let’s hook up Helmet to our project and add the following middleware to the project:
import helmet from "helmet"
//declaring middlewares
...
app.use(helmet());
...
That’s enough for most applications. Using Helmet out of the box provides a reasonable set of default security options. We could be done with this post right now, except that it’s useful to examine closely what Helmet does, and its options.
Helmet is actually a collection of 15 smaller middlewares for applying several security techniques. Each can be individually enabled or disabled, and many have configuration settings to make. One option is instead of using that last line, to initialize and configure the sub-modules individually. That’s what we’ll do in the following sections.
Using Helmet to set the Content-Security-Policy header
The Content-Security-Policy (CSP) header can help to protect against injected malicious JavaScript and other file types. With this header, we instruct the web browser the scope from which it can download certain types of content. Specifically, it is an effective way to whitelist what kind of external resources are allowed in your web application, such as JavaScript, CSS, and images, for instance., and which domains the application is allowed to connect to for services.
This header, therefore, solves the named issue, namely our app users entering malicious JavaScript code. But it also handles a similar risk of a malicious actor breaking in and modifying the templates to include malicious JavaScript code. In both cases, telling the application a specific list of allowed domains means references to JavaScript from malicious sites will be blocked.
Here is a kind of Content-Security-Policy header implementation:
app.use(
helmet.contentSecurityPolicy({useDefaults: false,
directives: {defaultSrc: ["'self'"],
scriptSrc: ["'self'", "'unsafe-inline'"],
styleSrc: ["'self'", "fonts.googleapis.com"],
fontSrc: ["'self'", "fonts.gstatic.com"],
connectSrc: ["'self'", "wss://video.geekwisdom.net"],
},
})
);
For better or for worse, the application implements one security best practice — all CSS and JavaScript files are loaded from the same server as the application. Therefore, for the most part, we can use the ‘self’ policy. There are several exceptions:
- scriptSrc: Defines where we are allowed to load JavaScript
- styleSrc, fontSrc: We are loading CSS files from both the local server and from Google Fonts.
- connectSrc: The default value is none but here suppose that we will use WebSocket in our app. So we declare our WebSockets channel.
In this section, we learned about the potential for a site to send malicious scripts to browsers. Sites that accept user-supplied content can be a vector for malware. By using this header, we are able to notify the web browser which domains to trust when visiting this website, which will then block any malicious content added by malicious third parties.
Next, let’s learn about preventing excess DNS queries.
Using Helmet to set the X-DNS-Prefetch-Control header
DNS Prefetch is a nicety implemented by some browsers where the browser will preemptively make DNS requests for domains referred to by a given page. If a page has links to other websites, it will make DNS requests for those domains so that the local DNS cache is pre-filled. This is nice for users because it improves browser performance, but it is also a privacy intrusion and can make it look like the person visited websites they did not visit. For documentation, see here.
Set the DNS prefetch control with the following middleware:
app.use(helmet.dnsPrefetchControl({ allow: false })); // or trueNow that we learned about preventing the browser from making premature DNS queries, let’s learn how to control which browser features can be enabled.
Controlling enabled browser features using the Feature-Policy header
Web browsers nowadays have a long list of features that can be enabled, such as vibrating a phone, or turning on the camera or microphone, or reading the accelerometer. These features are interesting and very useful in some cases but can be used maliciously. The Feature-Policy header lets us notify the web browser about which features to allow to be enabled or to deny enabling.
For instance, let us suppose that we are working on application like Airbnb which require features like uploading images, geolocation, payment. So, we need to control enabled browser features. We will use the feature-policy package. This package is included in past versions of Helmet.
Installing the feature-policy package
npm install feature-policy
The configuration will look like:
import featurePolicy from 'feature-policy'
app.use(
featurePolicy({features: {accelerometer: ["'none'"],
ambientLightSensor: ["'none'"],
autoplay: ["'none'"],
camera: ["'none'"],
encryptedMedia: ["'self'"],
fullscreen: ["'none'"],
geolocation: ["'self'"],
gyroscope: ["'none'"],
vibrate: ["'none'"],
payment: ["stripe.com"],
syncXhr: ["'none'"],
},
})
);
To enable a feature, either set it to ‘self’ to allow the application to turn on the feature, or a domain name of a third-party application to allow to enable that feature. For example, enabling the payment feature might require adding ‘stripe.com’ or some other payment processor.
In this section, we have learned about allowing the enabling or disabling of browser features.
In the next section, let’s learn about preventing clickjacking.
Using Helmet to set the X-Frame-Options header
Clickjacking has nothing to do with carjacking but instead is an ingenious technique for getting folks to click on something malicious. The attack uses an invisible <iframe>, containing malicious code, positioned on top of a thing that looks enticing to click on. The user would then be enticed into clicking on the malicious thing.
The frameguard module for Helmet will set a header instructing the browser on how to treat an <iframe>.
Set the X-Frame-Options header with the following:
app.use(helmet.frameguard({ action: 'deny' }));This setting controls which domains are allowed to put this page into an <iframe>. Using deny, as shown here, prevents all sites from embedding this content using an <iframe>. Using the same origin allows the site to embed its own content. We can also list a single domain name to be allowed to embed this content.
Using Helmet to remove the X-Powered-By header
The X-Powered-By header can give malicious actors a clue about the software stack in use, informing them of attack algorithms that are likely to succeed. The Hide Powered-By submodule for Helmet simply removes that header.
Express can disable this feature on its own:
app.disable('x-powered-by')Or you can use Helmet to do so:
app.use(helmet.hidePoweredBy())
Another option is to masquerade as some other stack like so:
app.use(helmet.hidePoweredBy({ setTo: 'Drupal 5.7.0' }))There’s nothing like throwing the miscreants off the scent. We’ve learned how to let your Express application go incognito to avoid giving miscreants clues about how to break in.
Next, let’s learn about declaring a preference for HTTPS.
Improving HTTPS with Strict Transport Security
The Strict Transport Security header notifies the browser that it should use the HTTPS version of the site. Since that’s simply a notification, it’s also necessary to implement a redirect from the HTTP to HTTPS version of our application. We can set Strict-Transport-Security like so:
const sixtyDaysInSeconds = 5184000 // 60 * 24 * 60 * 60
app.use(helmet.hsts({maxAge: sixtyDaysInSeconds
}))
This tells the browser to stick with the HTTPS version of the site for the next 60 days, and never visit the HTTP version.
Next, let’s learn about cross-site-scripting (XSS) attacks.
Mitigating XSS attacks with Helmet
Cross-site scripting, also known as XSS, is a security vulnerability that mainly affects web applications. It is one of the most common security issues and the implications can be huge for the customer as potentially, someone could steal the user identity with this attack.
The attack is an injection code put into a third-party website that could steal data from the client’s browser. There are a few ways of doing it, but by far, the most common is by unescaped input from the client.
In a few web applications, users can add comments containing arbitrary input. This arbitrary input can contain script tags that load JavaScript from a remote server that can steal the session cookie (or other types of valuable information), letting the attacker replicate the user session on a remote machine.
There are two main types of XSS attacks: persistent and non-persistent.
- The persistent type of XSS consists of storing the XSS attack by crafting a particular string of text that resolves into the attack once it is displayed to the user in the website. This code could be injected via an arbitrary input text that is stored in the database (such as a comment in a forum).
- The non-persistent type of XSS is when the attack is inserted into a non-persistent part of the application due to bad data handling.
Let’s take a look at the following screenshot:
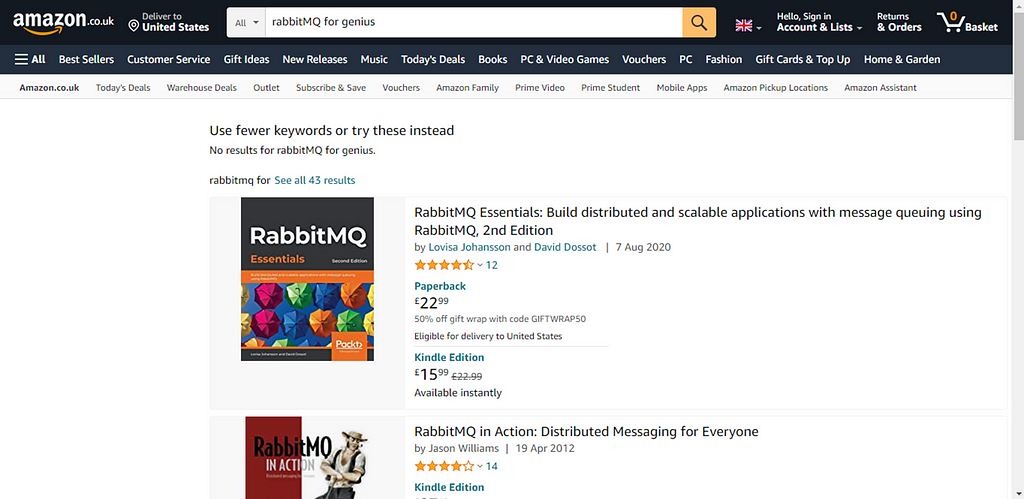
As you can see, we have searched for a book at http://www.amazon.co.uk/. It does not produce any output (as the book is not published yet), but it specifies that No results for rabbitMQ for genius, which is somehow using the input from the web browser as output. Even more, when I clicked on search, Amazon redirected me to the following URL:
We know Amazon is secure, but if it was sensible to XSS attacks, we could have modified the value of the fields keywords parameter to craft a request that injected a script tag in the content, leading to the attacker being able to steal the session cookie that could result in some serious problems for the applications.
To mitigate XSS attacks, use the following middleware:
app.use(helmet.xssFilter());
But with this, we have exhausted what most essentials middlewares provided by Helmet. You can learn about other’s Helmet middlewares on the Helmet documentation.
In this post, we have learned how to secure Express application using Helmet, although it is a subject big enough to write a full book on it. The problem with security is that companies usually see investing in security as burning money, but that is far from reality.
Build composable applications
Don’t build web monoliths. Use Bit to create and compose decoupled software components — in your favorite frameworks like React or Node. Build scalable and modular applications with a powerful and enjoyable dev experience.
Bring your team to Bit Cloud to host and collaborate on components together, and greatly speed up, scale, and standardize development as a team. Start with composable frontends like a Design System or Micro Frontends, or explore the composable backend. Give it a try →
Learn More
- How We Build Micro Frontends
- How we Build a Component Design System
- The Composable Enterprise: A Guide
- 7 Tools for Faster Frontend Development in 2022
Securing Express Web Applications With Helmet was originally published in Bits and Pieces on Medium, where people are continuing the conversation by highlighting and responding to this story.
This content originally appeared on Bits and Pieces - Medium and was authored by Thomas Sentre
Thomas Sentre | Sciencx (2022-03-25T11:43:19+00:00) Securing Express Web Applications With Helmet. Retrieved from https://www.scien.cx/2022/03/25/securing-express-web-applications-with-helmet/
Please log in to upload a file.
There are no updates yet.
Click the Upload button above to add an update.