
This content originally appeared on DEV Community 👩💻👨💻 and was authored by Alex Eagleson
Front End Frameworks
What is a front end framework?
New developers often hear that they "need to learn a framework" in order to get a job, and that of course begs the question: "What is a framework?".
There is no one-size-fits-all answer to that. Many people have different definitions, but the simplest one in the context of Javascript and web development is that it is a library/package that provides structure and opinions on how you should organize your code, and typically also provides tools and helper functions to build the code itself.
What are React, Angular, Vue, Svelte and jQuery?
Popular front end frameworks in the web development world include React, Angular and Vue. These tools are chosen because they provide much better ways of building and managing re-usable code templates for UI elements than the native browser does.
To give an example, you could create a React component called Card which includes <h2>, <p> and <img> tags wrapped in a <div>. It is created as a Javascript function that takes an object as an input argument with text/links to fill in those values. Once built you now have a "component" you can use like an HTML tag in the format <Card> over and over to build, for example, a page with a list of employee profiles.
The language used to build these components is called JSX and is basically a mix of HTML and Javascript. Here's an example of how the Card we just described would look in React:
(In the below example, props is a Javascript object with three properties: url, title, and text, each of which are strings)
Card.jsx
export const Card = (props) => {
  return (
    <div>
      <img src={props.url} />
      <h2>{props.title}</h2>
      <p>{props.text}</p>
    </div>
  );
};
Then using your custom component on your website/app looks like:
App.jsx
<div>
  <Card
    url="www.example.com/steven.png"
    title="Steven Lastname"
    text="Steven is a wonderful employee!"
  />
  <Card
    url="www.example.com/nancy.png"
    title="Nancy Lastname"
    text="Nancy is here to help!"
  />
</div>
Each framework has different levels of how opinionated they get. For example React is a lot more flexible as to how you set up your file structure, but it provides very strict rules about how its components are built.
Angular is also very opinionated about how components are structured, but much more than React enforces a particular directory and file structure within your project as well.
Vue and Svelte are much less opinionated in that regard.
Another one you may have heard of is jQuery. In its heyday, jQuery was te go-to JS tool for providing additional functions that made creating and updating the DOM (the elements on your website) much easier. Much of the reasons developers no longer reach for it is that many of its functions have now been implemented into the Javascript built-in standard itself (for example document.querySelector for DOM manipulation and fetch for AJAX calls), so the language would not be what it is today without jQuery having paved the way.
What is a CSS framework?
What are Bootstrap and TailwindCSS?
A CSS framework is a term typically used to refer to packaged code that focuses on provided pre-written CSS rather than Javascript (though many CSS frameworks including Bootstrap also include Javascript code as well to provide additional functionality).
Two popular CSS frameworks worth knowing about are Bootstrap and TailwindCSS.
Both libraries focus on simplifying and reducing the amount of CSS you need to write, and creating systems to make things like margins, paddings and layout more consistent across your site so you don't need to build and implement your own design system.
Bootstrap popularized the 12 column grid system you'll see in many layout tools these days, for example using a CSS class like col-3 to represent 3/12 (or 25%) of the screen.
Bootstrap is far more opinionated of the two (and therefore a larger footprint in terms of size in your application) but provides some great defaults for developers who are not design savvy and prefer to focus on the function of their application. Bootstrap, similar to jQuery, was far more of a standard in the earlier days of web development as has gradually fallen out of favour, but you'll still find it commonly used in many applications still in operation today.
TailwindCSS on the other hand has seen a massive rise in popularity in recent years mostly due to its small form factor and simple to use classes, as well as being easy to customize. Tailwind is a great choice for devs and designers who want to get a nice looking up up off the ground quickly, while still leaving room to customize it to your desired look and feel.
If you want to really quickly get a feel for what using a CSS framework is like, the simplest way is to simply include the <link> tag example from the Include via CDN section on the front page of https://getbootstrap.com/ in your index.html file and use the Bootstrap documentation to try out some of the different classes.
Here's a super minimal example of a site that loads and uses bootstrap. The class="btn btn-primary" and other classes on buttons is what's hooking those elements into the Bootstrap styles.
index.html
<!DOCTYPE html>
<html lang="en">
  <head>
    <link
      href="https://cdn.jsdelivr.net/npm/bootstrap@5.2.0/dist/css/bootstrap.min.css"
      rel="stylesheet"
      integrity="sha384-gH2yIJqKdNHPEq0n4Mqa/HGKIhSkIHeL5AyhkYV8i59U5AR6csBvApHHNl/vI1Bx"
      crossorigin="anonymous"
    />
  </head>
  <body>
    <button type="button" class="btn btn-primary">Primary</button>
    <button type="button" class="btn btn-secondary">Secondary</button>
    <button type="button" class="btn btn-success">Success</button>
  </body>
</html>

How do I use a front end framework?
How do I use React?
Once you have a strong grasp of the HTML/CSS/Javascript fundamentals, it's a good idea to get familiar with at least one framework (the most popular of which at the time of this writing is React).
Kent C. Dodds has a good introduction on the specific Javascript you'll want to know for React before diving in.
I highly recommend you get yourself to a comfortable level with Javascript and understand all of the topics in the above link before you start. Many frustrations people often experience with React when starting with it too early are actually Javascript frustrations.
The fastest and easiest way to start writing React is to use a pre-configured tool like Create React App or Vite.
Create React App (CRA) has been the de-facto standard for many years, also Vite has been picking up traction recently. From the perspective of a beginner learning the basics it won't make much of a difference. Let's start a react app with CRA using the following command on the command line:
npx create-react-app@latest my-cool-app

cd my-cool-app

npm run start
Notice the first command is npx and not npm. The third argument is just the name of the app you want to make. The second command cd is to change into that directory when the installation is complete.
Then when you run npm run start in that new directory you browser will be opened automatically and you'll be taken to http://localhost:3000 where your new app is being served on. It should look like a big animated spinning atom with some title text describing how to edit your app.
Create React App provides a "live reload" dev server which means that changes to your app will be reflected in the browser instantly, making it very easy to make changes to your app and quickly see and debug the results. Try making changes to the src/App.js file and seeing what happens!
What else do I need to know about React?
You should know the difference between functional components and class components. Class components are still perfectly valid, though are considered the "old" way to doing things and all modern React features and syntax are designed primarily to support functional components moving forward.
You should know what hooks are.
You should know what rendering a components means in the context of React.
You should understand React state and understand why React prefers to replace values rather than mutate (hint: it's to make it easier to keep track of when something changes to know when to update the DOM)
You should understand what a lifecycle effect and how you can use a hook like useEffect to watch values and trigger different actions/events when those values change.
You should know what global state management solutions are and why people use them. This includes bu not limited to ReduX, MobX, Zustand, Recoil, etc (there's tons). You should also understand the Context API and when it does and doesn't act as a global state management tool.
What are the best free resources for learning React?
My Blog Post on React shameless plug for my blog post where I go into more detail into how to configure a React project from the group up to get a better understanding of what's going on
Official Documentation and The Official Beta Docs written by the React team should be your first source of information. The beta docs are quite new, but they are much improved and updated to use modern React syntax, so you should always check them first before falling back on the original docs if you can't find what you're looking for.
Reactiflux mark Erikson's (developer of Redux) suggested path for learning React.
Codeacademy's React course.
The Road to React by Robin Wieruch. Not a free resource I admit, though I felt I should include it because I did read it while learning React and think it was extremely helpful for improving my understanding.
Typescript
What is Typescript?
What is the difference between Typescript and Javascript?
Typescript is an absolutely incredible programming language. It is largely responsible for adoption of Javascript to build large-scale business applications that might otherwise never have been possible or realistic without it.
Typescript is Javascript. That's one of those really critical things to realize.
Typescript is just Javascript code with additional syntax added on top of it to check for correctness and potential errors while you are writing it that otherwise would not be caught until you actually run the program with standard Javascript.
If you are proficient in Javascript, you still may not know how to write Typescript. However, if learn Typescript, then you also know Javascript as well. A good TS developer would be more than qualified for any JS job.
It can be difficult to explain to new developers why Typescript is so important. Often they will find it frustrating that they cannot get code to work, or it feels too complex with little payoff.
When it comes down to it, if you want to be employed as a web developer professionally, Typescript is unquestionably the way to go. You will severely limit your job prospects if you only learn JS.
This is probably a good time to show an example of the difference between JS and TS:
script.js
function addNumbers(a, b) {
  return a + b;
}
script.ts
function addNumbers(a: number, b: number): number {
  return a + b;
}
The first JS example is pretty simple. It takes two arguments, and adds them together. If you run the following:
const result = addNumbers(3, 4);
console.log(result);
The output will be 7
What if we did the following though?
const result = addNumbers("3", "4");
console.log(result);
What would the output be? The answer is the strong "34" because each argument was actually a string, so Javascript just assumed you meant "concatenate" when you used the plus sign.
Next let's take a look at the second example above that was labelled as script.ts. It's the same function but the parameters are annotated as number and number also appears after the parentheses to indicate that the return value should also be a number.
The screenshot below demonstrates what you would see when writing this using VS Code:

So although this is a simple example, you can immediately see one of the many benefits. Typescript has stopped us from making a simple syntax error and using our function incorrectly.
Remember that even if you look at this and think "I would never make such a simple mistake", in reality, when working on large projects for long hours everyone makes small stupid mistakes. All the time.
And even if you don't, your coworkers will.
Typescript is there to help you with a warning as soon as you make these errors so you can correct them and get back to working on your code.
So that's great, but how do you actually use it? .ts files?
Browsers do not understand Typescript. They only understand Javascript. So modern working setups are created to allow you to write Typescript code, but then transpile _convert) it into Javascript code when you are ready to run it.
How do I use Typescript?
The easiest way to practice and learn it is with the Typescript playground.
Once you move beyond that and want to start writing your own Typescript code on your machine, the most basic setup involves the following:
First, install Node.js on your machine. This will automatically install
npm.Next, create a folder for your project, then navigate to that folder on the command line and run
npm init. Just hit enter to select all the defaults.Run the following command:
npm install --save-dev typescript
That will install Typescript in your project as a "dev dependency". You should be able to see it listed with a version number in the package.json file that NPM created.
- Run the following command:
npx tsc --init
(Note that's npx not npm. npx is a "package runner" which is different from your package manager. It can run packages that are installed in your project as code directly)
This will create a tsconfig.json file which has all the configuration for your Typescript project. You can learn more about tsconfig.json here
- Create a
script.tsfile with any Typescript code you like in it. This file should be in the project root in the same directory as yourtsconfig.json.
You can use the example above with the addNumbers function if you like, code below:
script.ts
function addNumbers(a: number, b: number): number {
  return a + b;
}

const result = addNumbers(3, 4);

console.log(result);
- Now you need to convert that
.tsfile into Javascript. Run the following command.
npx tsc script.ts
That will run Typescript on the script.ts file and output a script.js file right beside it with all the type information removed.
That information was only there to help you with development, once you have verified there are no errors none if it is necessary anymore, which is great, because it means it does not add any size/bloat to the actual code that you will be including in your site.
- Once the
script.jsfile has been generated, run it with Node!
node script.js
If you copied the above example the output will be 7!
What are the best resources for learning Typescript?
Official documentation As far as I'm concerned there is no better source than the Typescript docs themselves. Lots of great examples starting at the beginner level and up from there.
No BS TS Some great videos on getting up and running with Typescript quickly
Web Hosting
Where do I host a website?
How do I put my website on the internet?
Web hosting is, simply put, the act of putting your website or web app files onto a machine or service somewhere that the general public can access them. There are basically a million different ways you can do this and a lot of factors that go into the decision of which one you might choose, so in this tutorial we are going to focus on the simplest ones.
Things that are important to us right now:
- Simplicity & cost (ideally free)
Things that are not important to us right now:
- Scalability (ability to handle large amounts of traffic, with large referring to hundreds of thousands of requests and beyond)
So with those in mind I'll start by showing you two great options for hosting a simple website built with HTML, CSS and JS. This type of setup we call a static site which basically means all the files used are "static" in that they are already written and don't change (as opposed to a dynamic app which generates HTML automatically, something like React for example).
The two options I would suggest depend on whether or not you have set up a Github account yet, and pushed your site to a repository.
If your code is already on Github, then I recommend Static Site Hosting Option 1: Github Pages if not, then I suggest Static Site Hosting Option 2: Netlify which is a great service with an excellent free tier for hosting projects.
Static Site Hosting Option 1: Github Pages
This section will follow up with the tutorial that teaches you how to push your site to a remote Github repository. We will be using a repository that is hosting the Basic Website Example but you can host your own custom site if you choose.
Navigate to your site's repository on Github and choose Settings -> Pages:

Use the dropdown to select which branch you want to publish (default is main if you followed the tutorial, but if you're on an older version of git it could be master and then click Save).
...that's it! You're done. You'll be given a custom generated URL based on the name of your Github account and repository that you can share with anyone. Here's mine:
https://alexeagleson.github.io/example-git-project/
Github pages is an absolutely fantastic way to quickly host and share static websites.
If you've reached a point where you are now wondering where to host more complex web apps (React apps for example) or Node apps/APIs then skip ahead to the How do I host a web app? section.
Static Site Hosting Option 2: Netlify
If your HTML, CSS and JS files are on your computer and you haven't learned how to use Github yet don't fret, Netlify is a great option.
Navigate to the Netlify website and create a free account.
Once you have logged in your will see a dashboard that gives you three options: to host a project from Github, or use a template, or upload files manually. We are going to upload the files ourselves:

I'm going to click "browse to upload" and select the directory that has my index.html, script.js and style.css files in it from the Basic Website Example. You can take those files for learning purposes, or upload your own site.
The process will take a few minutes, Netlify will be configuring its web server to load your files as well as creating a custom domain name (URL) for your site that you can share with other people.
Cool! My upload is done, Once finished yours should be publicly available just like mine. Here's the link I received with the files I uploaded, feel free to check it out:
https://stellular-brioche-c71cfe.netlify.app/
That's pretty much it. If you own your own domain you can direct it to the site you just uploaded with the tools they provide and add an SSL certificate as well if you like. Otherwise the randomized Netlify domain they provide you automatically is enough to be able to share your work with others.
Working with free services like this the main downsides you will get is that once your site reaches a certain level of traffic Netlify will likely shut it down until you registered for a paid tier.
This practice is pretty universal, you'll find that it's easy to find free hosting for projects as long as they don't get too much traffic.
If you're looking for a more scaleable option that you are willing to pay for with hosting, then check out services like AWS, Microsoft Azure, and Digital Ocean.
(I'll take this opportunity to warn you to avoid _Godaddy at all costs just in case that comes up as an option in your search, I won't waste time getting into the details, but suffice to say there are far better options. Here and here and here can get you started on reasons if you're curious)._
How do I host a web app?
How do I host a React app?
This section will discuss options for hosting web apps, we'll focus specifically on React apps, but the basic premise is the same for other popular frameworks (like Angular, Vue, etc) as well.
First we will create a basic React app with the popular tool Create React App. For a major production React app for your business, there are probably better options in 2022, but for quickly getting a simple React app up and running with little to no configuration it's still the best option out there.
(Note that the following command requires Node.js to be installed on your machine. If you haven't done that already, make sure you check out that tutorial first. It also assumes you have already learned how to hos your project on Github)
npx create-react-app example-react-app
Next I will go to my Github profile and create a project called example-react-app.
Back on my terminal I'll change directory into the project directory, add the remote Github repository I just created as the origin and then push my code.
cd example-react-app
git remote add origin YOUR_GITHUB_URL
git push -u origin main
Here is my personal repository where I've pushed by React app. Yours will have a different URL.
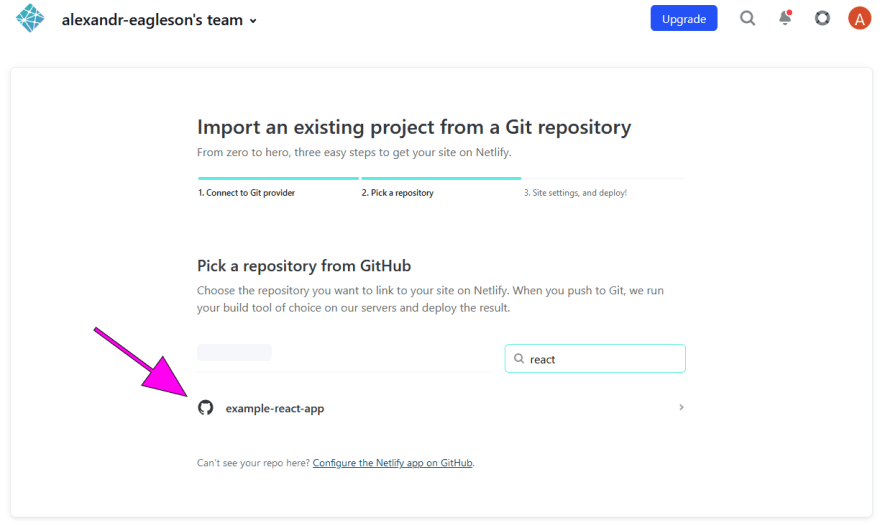
Next navigate over to Netlify, login to your account (or create one if you don't already have one), select "Start new project" and then "Import an existing project from a Git repository".
You will need to give Netlify permission to access your Github profile, and then either select the repository to give permission manually, or give permission to all repositories. Once permission is given you can select your React app repository.
For configuration select the main branch, and unless you've altered the default configuration, you can leave all the rest of the commands as-is. Netlify will go through the process of deploying your site, and provide you with an automatically generated public URL afterward.
That's it! It's that simple. If you want to make updates you can simply commit changes to your repository, and then choose to redeploy on Netlify. You can even configure it to watch for changes on your Github repository, and redeploy automatically whenever you push new changes to the main branch.
Here's the result of my upload and the public URL that is generated, yours should look very similar:
https://magenta-conkies-c988a1.netlify.app/
How do I host a Node.js server?
How do I host a Node.js app?
Hosting a Node app is a little bit trickier than a standard website, but not too much so. You'll have more difficulty finding a free tier for a Node app.
Before getting into other options, I should say I've heard very good things about fly.io. I've never used it personally, but it seems like a potentially great free option for Node.js hosting. If you're interested give this tutorial a try and let me know how it goes.
One other common suggestions is to use AWS Lambda. One benefit of lambda functions is that although you will still need to provide your credit card, they will only charge you based on actual usage. So if you and your friends are the only ones using the app, you're likely only looking at a few pennies a month.
I personally haven't used AWS Lambda, so I'll be focusing on a different option for this tutorial, A service provided by Digital Ocean called droplets.
Droplets are simply a fancy name given to access to a Linux server that is fully accessible to anyone on the internet. They're great because you can run pretty much anything you want on them. The lowest tier which is more than enough to run basic Node applications is only $5 per month, and will more than serve our purposes.
It's a pretty small price to pay for something that you can use to host almost any project you work on, including the websites and web apps we've already discussed.
Once you have signed up for a droplet, log into your account and select it.
You will want to make sure you can access your droplet from the command line on your machine. To do this you need to set up SSH. If you have not already created SSH keys on your machine then check out the What is SSH? tutorial to create them.
Once you have created your public key, from your digital ocean droplet dashboard click Settings -> Security -> Add SSH Key. After it is added, copy the IP address for your droplet and return to your terminal.
You can now access your remote Linux server (droplet) with this command:
ssh root@YOUR_DROPLET_IP_ADDRESS
When successful, your terminal will show a welcome message (by default) and you are in a different location/directory. This will be the home directory of the root use of your droplet. You can now create additional users if you choose, or whatever you like.
Once you have access to your droplet via SSH, you are in a good position to begin following the official guide for running a Node.js app on Digital Ocean:
Here's a quick overview of what it will show you how to do, and why each step is necessary:
Step 1 — Installing Node.js: Node is not installed on Linux by default so you need to install it on your droplet yourself.
Step 2 — Creating a Node.js Application: The tutorial assumes you will be writing the application on your droplet, which most often won't be the case. This step is where you may need to deviate a bit. If you have a Node app hosted on a Github repository, then you will want to install
giton your droplet as well and then clone your repository onto your droplet. That way the app you created and pushed will be on your droplet and ready to run.Step 3 — Installing PM2: PM2 is an amazing robust production quality tool for running Node.js apps. Technically you could run the normal command
node my-app.jssame as you do on your machine, but what happens if it crashes? PM2 will take care of running the app, as well as automatically rebooting it if it crashes along with a number of other quality of life features like monitoring.Step 4 — Setting Up Nginx as a Reverse Proxy Server: Nginx is one of the most popular web servers in the world and a fantastic tool. The reason you need it in this case is to control access to your app from the outside world. If your app is running on port 300 for example and you want people to access it on a domain name you bought like
mycoolapp.com, Nginx is the one responsible for directing requests to that domain name on your droplet to your app on the correct port.
So with that context provided, here is the tutorial to help get your Node app up and running live:
What is a CDN?
CDN stands for content delivery network and it's basically a hosting service designed to maximize speed and uptime for resources on the web (files, images, full sites themselves, etc).
The main difference between standard hosting and a CDN is that content on a CDN will be hosted in multiple places, potentially all over the world.
So if one user from your site needs to load Cat-Picture.jpg and they are in USA, and another requests it in France, the CDN will serve the same cat picture from a physical server located in the USA to the user in the USA, and vice versa (or at least the nearest one).
Obviously there's much more to it than that, but this definition should be more than enough to get you to know what people are talking about when they use the acronym.
One of the biggest CDNs out there is called Cloudflare.
If you want to learn more about CDNs then Wikipedia is a great place to start.
Web Domains
What is a URL?
What is a domain name?
What is DNS?
A domain name is simply some text that gets converted into an IP address through a process called DNS.
An example of a domain name is www.google.com. The https:// is the scheme and technically not part of the domain name.
DNS (domain name system) servers exist all over the internet and act as kind of a global dictionary of names and the IP addresses they belong to. They are constantly being updated as names and IP addresses change. There is no one single DNS server that acts as the source of truth, there are countless DNS servers out there and you can even choose which one you want to use to resolve a domain, or host your own.
If you've ever seen the dreaded "This site cannot be reached, server's DNS address could not be found" then that's because your request could not find a way to translate the name into the address of an actual server that is hosting the website or app you are looking for.
How do I get a custom domain name?
In order to get your own custom domain name you must purchase it first from a domain name registrar. Typically these names are purchased as an annual plan that can be renewed. You will always have first choice of renewal, but if you ever opt not to renew there is nothing to stop someone else from buying the name and preventing you from ever getting it back (or having to pay a steep price to buy it from them).
I will not get into the nitty gritty of the business of domain names, but suffice to say it can be big business and common phrases in the .com space an easily go for tens or hundreds of thousands of dollars.
Fortunately there's a near infinite number of possible names out there and as long as you aren't too picky you can probably get something close enough to what you want for as low as a few dollars a year.
First you must choose where to purchase from. There are plenty of options. I'd recommend either Gandi or Namecheap or Cloudflare. Avoid Godaddy if at all possible (Google their reputation around customer service before making any decisions).
After you've purchased the name, most of the services that sell you the name will also be willing to sell you site/app hosting services as well. You can use them if you wish, but it's not necessary, they will have options available for you to point your domain name to your existing server, whether it be something like a Digital Ocean droplet or anything similar.
The final step you need to arrange after buying and configure a domain name is called an SSL certificate so that you site can be accessed over secure HTTPS rather than insecure HTTP.
What is SSL?
What is HTTPS?
How do I get an SSL certificate?
The full scope of exactly what HTTPS and SSL are is beyond the scope of this tutorial, but they are interesting topics if you wish to read more about them.
I will be focusing on the practical application of setting up an SSL certificate for your domain. The first thing I will stress to you is that generating an SSL certificate is a completely free process. I stress this because although it requires a bit of effort, there are no shortage of domain name sales services that will gladly charge you a $50+ fee to "secure" you domain for you.
It's a completely predatory charge that targets non-technical folks who don't know any better. Don't fall for it.
How you generate it will really depend on the hosting service you are using. For example if you are using Digital Ocean as I have discussed throughout this tutorial, then this guide will get you up and running.
If you are using another hosting service then simply Google their name along with "ssl" and you will almost certainly find a tutorial to generate one for free among the top results.
SSH
What is SSH?
SSH (secure shell) is a very important concept to be familiar with, though it is often challenging for beginners to understand. I'll try to explain it as simply as possible.
SSH provides a way for two machines to communicate securely. It is most commonly used over the command line. It provides a way to authenticate a machine without explicitly requiring a password (though a password can optionally be used).
Though SSH can be used to transmit data for a variety of applications and uses, the most common use of it you will encounter in web developer is authenticating your machine when logging into remote servers (for example ones that may be hosting your web app) and for authenticating for version control services like Github, so that when you want to push your code to your company's repository, your machine is already authenticated and don't need to provide your username and password.
How do I use SSH?
What are SSH keys?
So that explains what SSH is as a tool, now let's take a look at how to use it. SSH uses the concept of keys, specifically a public key and a private key.
(The explanation of how it actually works to provide security is far above the scope of this tutorial, but it's a fascinating topic and I'd recommend you check out this Wikipedia page if you want to learn more about it.)
We will focus on the most common developer's use case, using SSH to authenticate ourselves so we can push code to Github. If you're not familiar with Github you can check out the What is Github section of the tutorial and return here when you reach the point of setting up your SSH keys.
The idea behind the public and private keys is that when you generate them, your private key should remain on your machine and you should never ever share it with anyone. As soon as anyone gains access to your private key, they immediately gain the ability to impersonate you, and if you ever suspect that may have occurred (someone got access to your computer for example), you should delete your keys and generate new ones.
The public key on the other hand can freely be shared with anyone. That is what you will add to Github, and whenever a connection request is made from your machine, Github will use that public key to verify the request being sent from your computer with the private key matches.
The keys themselves are simply long strings of text characters, usually a few hundred depending on the algorithm used. When the keys are generated two files will be created, and you can differentiate between the public and private keys with the extension.
The private key will be generated as FILENAME (the filename again will depend on the algorithm used) and the public key will be generated in FILENAME.pub. So remember whenever anyone or any service asks you to provide your SSH key, you want to always make sure you provide the one in the file with the .pub extension.
How do I generate SSH keys?
Rather than go through the actual step-by-step instructions on how to genertae them, I will direct you to one of many great tutorials out there. Generating the keys is easy on any operating system using a free command line tool called ssh-keygen.
(Before showing how to generate keys from the command line, I would also take the opportunity to suggest the SSH key generation and SSH agent in 1Password. Full disclosure, this is the company I work for and I don't usually like to pitch products, but this is a rare case while I am genuinely impressed by how useful it is to manage SSH keys in 1Password and be able to share them between different machines I'm working from.)
That said, it's absolutely not necessary to use at all, just a nice convenience thing. The below links show you how to generate your own keys on the command line completely free:
Github itself also has a own tutorial if for any reason you prefer to use that, but both it and the Atlassian one should give you the same result.
(You have the option of adding a password to SSH keys that you need to enter each time you use them. SSH keys themselves are already very secure, I personally find adding a password on top of that not worth the inconvenience, but it's completely up to you.)
Once your keys are generated, make sure you know where the .pub file was creating. On macOS/Linus you'll find it in the ~/.ssh directory, and on Windows the %userprofile%/.ssh directory. You can view its contents by opening it in any text editor.
To add it to your Github profile, copy the contents of the .pub file and go to your Github dashboard. Click your profile icon then Settings -> SSH and GPG Keys. Now click the green New SSH Key button.
Paste the text of the key itself in the Key text box and give it a title. Typically the title refers to the machine the key is tied to, so if I generated it I might give it a title like "Alex's Personal Laptop" or "Alex's Work Laptop" etc. Probably good to provide even more details if you work with multiple machines.
Once that is saved you are ready to clone, push and pull Github projects over SSH. Make sure that from now on you are always copying the SSH version of the URL and not the HTTPS one. You can tell which is which based on their structure, examples below:
- SSH URL Example: git@github.com:alexeagleson/example-git-project.git
- HTTPS URL Example: https://github.com/alexeagleson/example-git-project.git
If you have already been working with a Github project over HTTPS and want to switch an existing project, you will need to change the remote URL. To do that, navigate to the project on your machine and run this command:
git remote set-url origin YOUR_REPOSITORY_SSH_URL
That will update the default origin to use the SSH URL and you will no longer need to enter your username and password when pushing to it.
DevOps
DevOps is one of those terms that can mean ten different things to ten different people. I will not make any attempt to assign any kind of formal definition to the term, my only concern is helping you understand the basic concept.
DevOps is at its simplest the automation of the deployment process. We've talked at great length about what a website and web app is, but maybe a little bit less about deployment. Deployment is simply the act of getting your site or app online and available to access for your consumer.
In the distant past there was a very clear divide between software developers and systems administrators (often called SysAdmins or just more generally IT personnel). As the industry matured it became clear that the divide between these two roles was not as large as once thought, and that a lot of benefits could be gained from having developers who were familiar with how their apps were deployed, as well as system administrators who were familiar with code, so that each could communicate their needs better to one another.
These days very few companies manage their own infrastructure (the servers their code is deployed on) and even fewer have their own physical servers. The majority of tech companies deploy their products using cloud services like Microsoft Azure or Amazon Web Services (AWS).
Using these services rather than purchasing and maintaining physical servers allows tech companies to focused entirely on their product and not maintain a large infrastructure team. As their application userbase grows and scales tools like AWS are designed to automatically handle that increase in traffic in real time in ways that would be far more difficult if not impossible to do if it were necessary to purchase and install more physical servers.
That feature of course comes at a cost, but that cost presumably will be less than trying to manage your infrastructure yourself.
Nevertheless, managing the needs of a high traffic application can be very complex. Tools like AWS are designed to be easily configured by code rather than through direct access to the servers themselves. DevOps personnel are particularly adept at building and maintaining configurations for cloud services so that developers do not need to think as much about how the code they write is actually deployed and served to the public.
What is CI/CD?
In addition to managing things like cloud configuration, a good DevOps engineer also takes care of building an application's CI/CD pipeline. CI/CD stands for continuous integration and continuous delivery. It essentially means creating the needed processes so that developers can continue to build and implement features for the application with minimal risk of introducing bugs or errors.
DevOps engineers will use features within tools like Gitlab or Github to ensure that in order for code to be allowed to merge into the primary main or master branch of the project, it must meet certain conditions.
Those conditions can range in anything from simple linter checks to full blow end-to-end tests which run real simulated user actions on your code and check to see if they match conditions you have set. If they fail, the code a developer submitted will not be allowed to merge.
Continuous integration refers to the idea of frequently merging new code into the priamry project branch, rather than keeping it in a separate branch. This has the benefit of keeping every developer up to date with the most recent state of the project, and avoids the risk of large merge conflicts if separate devs have been making changes to similar areas of the codebase over days or even weeks and months.
Continuous delivery refers to the idea of releasing these changes frequently to the customer. This provides the significant benefit of being able to quickly turn around customer feedback into real usable features or bug fixes. If your CI/CD automated pipeline is solid then you can be confident that any code changes which have passed all your tests are potentially ready to be released to your users without the need for extensive QA (though manual QA is always a good idea regardless of how good your pipeline is.
Containers
What is Docker?
Docker is a tool that allows you package the environment for running your application along with the application itself. You can accomplish this as simply as including a single file called Dockerfile with your project.
A developer might choose to use Docker because it provides guarantees that the versions of each tool installed (like Node, Python, NPM, MySQL, etc) are the same for every developer working on the project, regardless of what they have installed on their own machine.
If you've ever had trouble getting your environment setup properly to start your development work, that's exactly what a tool like Docker is designed to solve.
It uses a concept it calls containers which are lighter weight (require less resources) than full on virtual machines to create the environment for your application. These containers are designed to be extremely portable which means that you can quickly deploy them anywhere, and also scale up your app quickly by simply deploying more copies of your container.
All you need to do is define the requirements for your environment in the Dockerfile (for example Ubuntu 18, Node.js, etc) and every time your container is started on any machine, it will recreate exactly that environment. So you already know in advance that you will not have any issue with missing dependencies or incorrect versions.
If you would like to learn more about Docker from the perspective of a Javascript developer I have written a brief introductory Docker tutorial.
What are the best free resources for learning DevOps?
DevOps is more challenging to learn on your own than some other programming topics, simply because at its core its about empowering development teams at scale which is difficult to emulate when trying to learn as a solo developer.
Remember that we discussed how being a good DevOps engineer is about understanding the needs of the development team. Being a good DevOps engineer requires you to have a very solid understanding of a lot of developer and sysadmin fundamentals including but not limited to: Git, Linux, bash scripting, and different cloud services (particularly the one the company you work for uses).
Make sure you have a solid understanding of Git and Linux commands before you go any further:
What are the best free resources for learning the command line terminal?
What are the best free resources for learning Git?
After that depending on your code repository and hosting provider you'll want to familiarize yourself using their own tutorials and documentation:
This really good reddit post about DevOps resources
I'd like to end this by acknowledging that I am certainly no DevOps expert, the resources and descriptions I have included here are best effort and hopefully do not offend any serious DevOps people. There are still further many advanced topics I have not covered that will inevitably come up if you take the plunge into the DevOps world.
If you are interested would encourage your to at least familiarize yourself with additional tools like Kubernetes, Ansible, Jenkins and Terraform. Their use cases are mostly beyond my needs as someone who is focused primarily on the development side, but are undoubtedly critical for anyone looking to dive further into DevOps.
This content originally appeared on DEV Community 👩💻👨💻 and was authored by Alex Eagleson
Alex Eagleson | Sciencx (2022-09-22T13:50:28+00:00) The Complete Guide to a Career in Web Development: Frameworks, Typescript, Hosting and DevOps. Retrieved from https://www.scien.cx/2022/09/22/the-complete-guide-to-a-career-in-web-development-frameworks-typescript-hosting-and-devops/
Please log in to upload a file.
There are no updates yet.
Click the Upload button above to add an update.