
This content originally appeared on Level Up Coding - Medium and was authored by Jiten Patel

I have seen that most ML practitioners can build the machine learning model but when it comes to deployment of the model or building a real-world application with the ML model they don’t know how to do it. They show the code they have written in jupyter or colab notebook.
A common complaint that I hear is that deploying ML models in production is a complicated process which indeed is true. Research shows that almost 90% of ML models never make it into production in the first place.
It’s like the car which you have built, parked in the garage, and never used it.
The goal of building a machine learning application is to solve a problem, and an ML model can only do this when it is actively being used in production. ML model deployment is as important as ML model development. The process of deploying a machine learning model is called MLOps.
In this article, we will be building a web app that takes the image as input, and the ML model will output the predictions.
Before I start, I want you to know that this is the continuation of my previous article, "Brain Tumor Classification using Tensorflow and Transfer Learning”.
In my previous article, I talked about making a classification model using transfer learning and saving the Tensorflow model for future use. In this article, I am going to cover
- How to load saved ML model
- How to build a web app
We learned how to save the model but now, how can we load the model so that we can use it in production?
Loading the ML model
import gradio as gr
import tensorflow as tf
import cv2
import numpy as np

# Loading the Machine Learning model
model = tf.keras.models.load_model("models/modelv1.h5")
To load the machine learning model we can make use of the function called load_model provided by the Tensorflow library. In the above code, we are importing the necessary libraries, and simply loading the model by giving the path of the model.
I have also imported the library called Gradio. Gradio will help us to build a web interface so that anyone can use it anywhere!
Let’s build the user interface first.
# Building the Interface
with gr.Blocks() as demo:

    # Image inputs and outputs widget
    with gr.Row():
        image = gr.inputs.Image(shape=(224, 224))
        label = gr.outputs.Label(num_top_classes=4)

    # Submit button for classiying the image
    with gr.Row():
        submit_btn = gr.Button(value="Submit")
        submit_btn.click(classify_image, inputs=[image], outputs=[
                         label], show_progress=True)
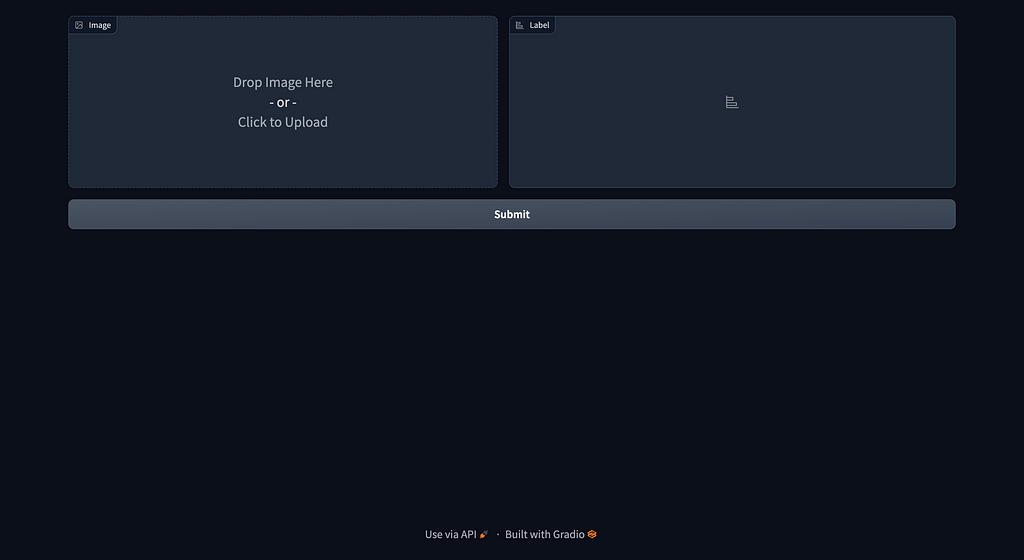
Imagine the web app we are designing consists of rows and columns, we need two containers in one row, one container for the image input and another for the output. In the second row, we need one button labeled submit so that the user can press the button and our model can make a prediction.
The above code creates two different rows. In one row, we are creating to input container (gr.inputs.Image) that takes the image of shape 244x244. You don't have to worry to resize your image to 244x244 the code does it all for us. In the same row, we also have another container (gr.inputs.Label) label. This label will help us to display the predictions i.e. No Tumor, Glioma Tumor, Meningioma Tumor, and Pituitary Tumor.
In the second row, we are creating the button (gr.Button) with the value “Submit”. Note the button is only created and it is not clickable yet. We have to make it clickable. Gradio helps us to create a clickable button easily by the click() method provided by the Button class of Gradio.
The click() method accepts the different parameters, the first parameter takes a function as input, and the other two parameters take input and output. In our case, the input is our image, and the output we have to show on the label, so, we will provide the label to the output parameter.
The interface will look like 👇👇👇
The above code will give the error “classify_image is not defined”. Let’s remove that error by creating the classify_image function.
def classify_image(input_image):
    opencvImage = cv2.cvtColor(np.array(input_image), cv2.COLOR_RGB2BGR)
    img = cv2.resize(opencvImage, (150, 150))
    img = img.reshape(1, 150, 150, 3)
    p = model.predict(img)
    p = np.argmax(p, axis=1)[0]

    if p == 0:
        p = 'Glioma Tumor'
    elif p == 1:
        p = "No Tumor"
    elif p == 2:
        p = 'Meningioma Tumor'
    else:
        p = 'Pituitary Tumor'
    if p != 1:
        print(f'The Model predicts that it is a {p}')


    return p
The classify_image function takes the image as a parameter. We convert this image from RGB to BGR by using the cvtColor method of OpenCV. We then resize our image to 150x150. Why? Because at the time we were building our classifier model we provided images of size 150x150. Every time we build any ML model, we have to make sure that the input size while creating the ML model and the input size while using the model in production must be the same.
After performing the image necessary conversion and resizing, we then actually pass this image to predict method. This is where the actual predictions are made by our model.
Here again, we have to use the argmax function as each row from the prediction array contains four values for the respective labels. The maximum value which is in each row depicts the predicted output out of the 4 possible outcomes.
So with argmax, we’ll be able to find out the index associated with the predicted outcome. Based on the predictions made by our classification model, we assign different values to one variable (p). For example, if our model predicts 0 then the image is of Glioma Tumor, if it predicts 1 then the image is of No Tumor, and so on. We return this variable (p) so that we can able to show the value of p to the Gradio label. If we don’t return anything then our model will do its work fine but it won’t show the output to the user.
At this point, we are almost done but when you run the program it won’t show anything, it won’t show any error or anything, why? because we haven’t created the entry point of our program.
Let’s create the entry point of our program which is the main function.
# Main Function
if __name__ == "__main__":
    demo.launch()
The above code creates the main function and inside the main function, we call the demo.launch() which in turn launches the website on our localhost machine.
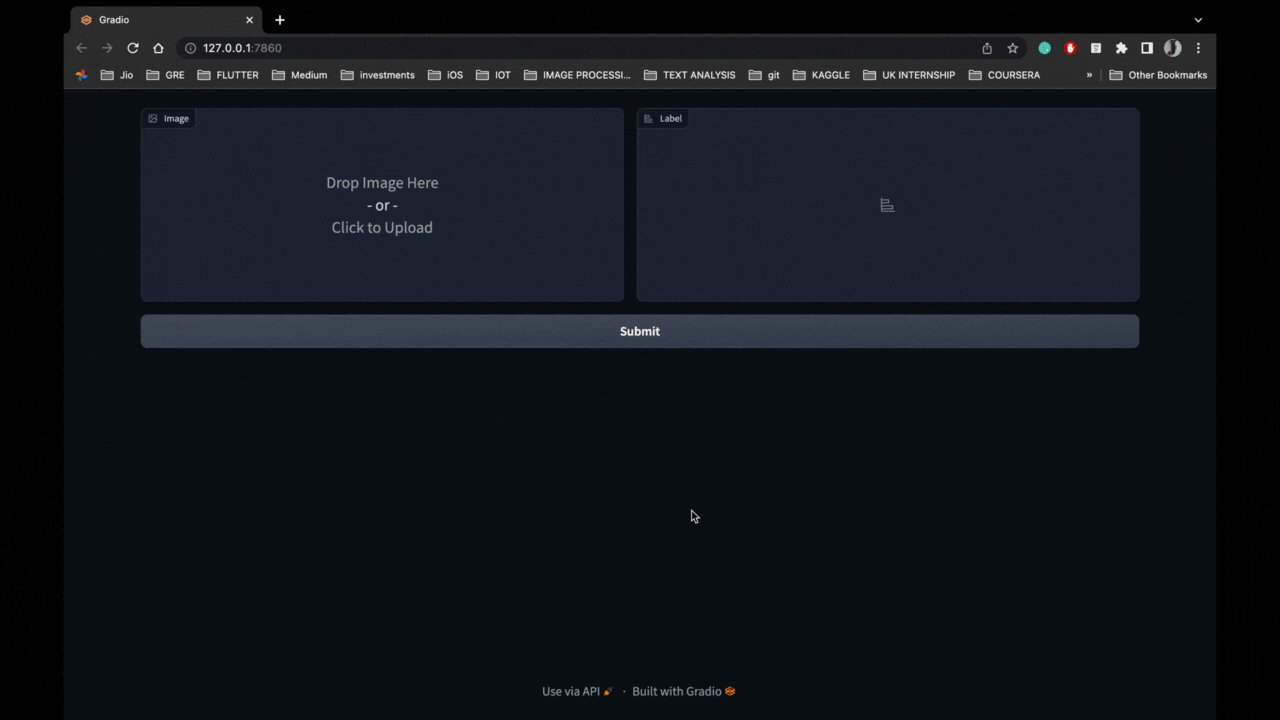
To access our web app, head over to your browser and type http://127.0.0.1:7860/ this will launch the website that we just made. Note if you want to share this website with any other users you have to add share=True to the launch function: demo.launch(share=True)
Phew! 😮💨
Lots of work isn’t it? So, we are done with creating our web app. You can deploy this code into any server of Heroku, amazon, etc.
Output
Note: MLOps is a whole different thing it contains so many things such as defining the pipelines, defining the ML architecture, etc. It involves data scientists, data engineers, and ML engineers.
Read the part first of this article “Brain Tumor Classification Using Tensorflow and Transfer Learning”. The code of parts 1 and 2 are provided on GitHub. If you have any doubts, recommendations, issues, or anything you can always contact me on LinkedIn, Twitter, and Instagram.
A very small request, if you have any suggestions or anything please fill out the below form which will help me to write on the technology and topics which you wish me to write. Thank you :)
Happy Coding 😉
https://forms.gle/1zB9GiKAdejyNbkh6
- Brain Tumor Classification Using Tensorflow and Transfer Learning
- GitHub - thejitenpatel/brainTumorDetection
- Jiten Patel - Medium
Level Up Coding
Thanks for being a part of our community! Before you go:
- 👏 Clap for the story and follow the author 👉
- 📰 View more content in the Level Up Coding publication
- 🔔 Follow us: Twitter | LinkedIn | Newsletter
🚀👉 Join the Level Up talent collective and find an amazing job
Machine Learning in Production was originally published in Level Up Coding on Medium, where people are continuing the conversation by highlighting and responding to this story.
This content originally appeared on Level Up Coding - Medium and was authored by Jiten Patel
Jiten Patel | Sciencx (2022-12-04T21:14:48+00:00) Machine Learning in Production. Retrieved from https://www.scien.cx/2022/12/04/machine-learning-in-production/
Please log in to upload a file.
There are no updates yet.
Click the Upload button above to add an update.