
This content originally appeared on Level Up Coding - Medium and was authored by Andrew Allison
An under-the-hood look for curious minds

Intro
Have you ever wanted to know what is going on inside your computer while you’re surfing the internet? Not really? Well I’m going to tell you anyway, because it’s actually pretty interesting stuff and you should care about it. This is an high-level overview of what’s going on behind the scenes from the perspective of a frontend developer. It’s helpful to do a refresher every now and then on how our applications actually work. This article took quite some time to conceptualize; feel free to skip around and be sure to bookmark or add to your reading list, since it’s full of good references. I also want to preface by saying all topics discussed here are only current as of 2024. Given the fast-paced nature of the web, this will no doubt become a nice little time capsule in a few years…

Typing an address in the search bar
Let’s start with the Domain Name System (DNS) journey. What happens after typing a URL into your browser’s search bar? This question gets asked all the time in interviews as a conversation starter. Everyone needs to know how to recall the DNS journey. In my opinion, the best place to learn how DNS works is unsurprisingly from the official “howdns.works “ site (link at the bottom).
I’ll briefly go over how the journey works here plus some interesting side notes. The first Internet Engineering Task Force (IETF) specification for DNS was “Domain Names — Implementation and Specification” in 1987 which laid the groundwork for the scalable growth of the web as we know it today. The name is only part of the solution; here’s what happens when you type something in the address bar and hit enter:
- You make the request to the browser by typing in the website name and pressing Enter
- The browser checks its local DNS cache (a map of URLs to source IP addresses) and also checks that the IP address is not expired (using the TTL field). If it’s not expired it attempts to connect to the server at that IP address
- If the IP address can’t be found or is expired in the local DNS cache the browser next sends a resolver query to the local DNS server
- Local DNS server checks its cache first. If local DNS does not have it in cache it starts a DNS lookup process, querying root DNS servers which maintain info about the authoritative DNS servers for top level domains like “.com”, “.net”, or “.org”. Now, these type of servers are absolute hard-asses because there are supposedly only 13 of them in the world and they are responsible for hosting the databases that translate all public IP addresses. How can 13 servers be trusted with all that? What would happen if hackers were able to take down one or more of these servers? As it turns out, there have been a few feeble attempts to do exactly that. One threat by “Anonymous” (think goofy Guy Fawkes masks and Wikileaks) was even called “Operation Global Blackout” (not-so-covert name for a DDoS attack). Despite sounding scary, there is good reason none of these attacks have succeeded and are of little interest to the media. I won’t bore you with the details but you can read all about it → here.
- Root DNS servers will give us the info for finding the TLD (again, for top level domains like “.com”, “.net”, or “.org”) servers and drill further into the stack. Within a TLD there will be a list of the domains it handles, including (hopefully) yours. With TLD servers, it was at one point possible to exploit these but clearly not recommended.
- The TLD servers provide the IP address of the authoritative DNS servers responsible for the domain name. The authoritative servers store the IP addresses for the domain. For example “xyz.com” could be directed to something like “192.168.10.100” if using IPv4 or “1001:0bx6:0000:0000:0000:aa00:0033:0809” if using IPv6. By the way, what does IP mean and what is the difference between v4 and v6? The TL;DR is that Internet Protocol is the way to send communication to an address on the internet. It’s a way for machines to find each other. IPv4 (which in true internet fashion was actually the first deployed version of this protocol) addresses are 32-bit address spaces which means they can hold 4.2 billion unique addresses. Before the arrival of smart phones and other smart devices that used to be enough addresses to serve the entire internet. But now there is a need to expand and IPv6 has a new 128-bit address format which can hold 3.4 x 10³⁸ unique addresses.
- Back to the journey, the Local DNS Server has now been reached and it can query the Authoritative Server. This is the final boss server, which will respond with the most up-to-date IP address(es) for the webpage server and does not provide any cached results. The Local DNS server sends this authoritative IP address back to your browser. Your browser now has to make a request directly to that IP address we just fetched to get your webpage content.
- The resolved IP address should now be cached locally to avoid having to repeat this (finding the website name you wanted to search for would have taken longer than expected by now).

Using Protocols and Security
HyperText Transfer Protocol (HTTP) and Transport Layer Security (TLS; remember this layer for later) are how your browser and the webpage server can communicate with and without encryption. The DNS resolution process provided a foundation for establishing a secure HTTPS/TLS connection by translating the domain name to the appropriate IP address. For all intents and purposes, we want communication with encryption. Most search engines won’t even rank your page if it’s missing a cert.
Starting with HTTP, this is just the protocol for transmitting stuff between your browser and a server. It’s the rules of communication for the web. One significant detail is that HTTP as a protocol is stateless; there is only data in transit, no data at rest (if you need this capability then using cookies is an option). Furthermore, HTTP communication by default is not encrypted, which is where TLS comes in. A HTTPS connection is a secure TLS protocol over an insecure HTTP connection.
TLS Overview
TLS provides a secure channel between computers communicating over the internet or a private network. It uses a Message Authentication Code (MAC) for verifying the authenticity of messages. By using a secret key, the record protocol generates a MAC as a fixed-length code and attaches it to the original message. For more complex cryptography and security, TLS uses Hash-Based Message Authentication Code (HMAC). To keep this explanation of TLS concise, we can just focus on TLS version 1.2, which is most widely in use at the moment. In 2018, IETF published version 1.3, making it the superior cryptography protocol; versions 1.0 and 1.1 were both deprecated in 2021. However, it takes time for the industry to catch up and at the moment 1.2 is the minimum enforced version.
TLS Messages
There are 3 alert message types: warning, fatal, and close notify. A warning alert indicates that an error has occurred, but connection can continue. A fatal indicates the connection should be terminated immediately. Close notify signals the end of a session. TLS alert messages are encrypted as well as the communication messages.
TLS Handshake
The process for creating the HTTPS connection is called the TLS handshake and they are more complicated than an Irish family reunion. Here’s a simplified overview of how the TLS handshake works:
1. Three-way communication between client, server, and Certificate Authority (CA) server
2. The server’s identity is verified by the certificate authority using a public key
3. Data in transit is encrypted and can only be decrypted by the intended recipient using a session key

The less simple explanation
When you navigate to your web page, your browser initiates the TLS handshake by hitting the web server’s IP address on secure port 443. Your browser sends a hello message and the server sends one back. From here there are a series of back and forth exchanges:
- The server hello will include a selected cryptographic algorithm and TLS version from the options your browser provides, as well as its TLS certificate. This contains a public key and a digital signature from the trusted CA server. It’s is like showing your ID to the bouncer at a bar.
- Your browser can then verify this whole bundle using its pre-installed CA public keys. If it all checks out, your browser has to send back a generated secret which has been encrypted with the CA public key.
- If the server owns the certificate then it can decrypt the message to obtain the secret. Using the secret and random values exchanged earlier, both sides independently derive a combined secret and session key.
- The session key will be used for the actual data transmission. To conclude the handshake, both sides exchange encrypted hashes of the handshake messages. If it succeeds on both ends this confirms that the keys match and the handshake is over.
The crazy thing is this all happens in the blink of an eye and works very well at protecting you from Man in the Middle (MITM) attacks. Maximum certificate validity periods are currently 398 days, so this whole process doesn’t need to be repeated if you frequently return to the same web page over time.

Many services, like GetSSL offer easy ways to implement TLS for your website (plus they give me a 10% commission). The TL;DR — if you don’t see the secure “lock” icon like this in your nav bar then your web page probably isn’t safe.

OSI Model — The ogre with layers
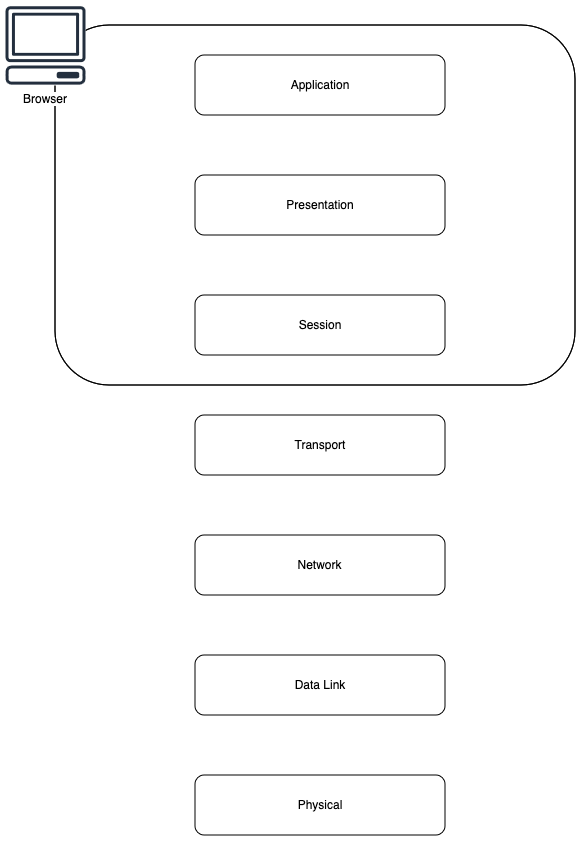
Once you wrap your mind around how DNS and HTTP work, the next thing to understand is how they fit into the OSI model. OSI stands for “Open Systems Interconnection” and the first IETF specification for it was the “Information processing systems — OSI — Basic Reference Model” in 1984. There are Seven Layers in this model that standardize network communication starting with it’s physical implementation (wires and hardware) to the highest-level representation (this Medium article showing on your screen). There’s no need to understand OSI in-depth, but rather how it applies to serving a webpage. Starting at the last layer and working backwards, this is how it goes:
7. Application Layer: This is what you are looking at right now; applications like web browsers can serve web pages (or any information really) for you to look at, listen to, even sense physically. Your web browser acts as the application layer service that interacts with the HTTPS protocol to request a webpage
6. Presentation Layer: This layer is responsible for translating, encrypting, and compressing data. Your browser converts asset files from the server (that have been compressed and encrypted in transit) into a format that can be displayed on your screen
5. Session Layer: This layer establishes, manages, and terminates the connection between your browser and the web server. Remember the TLS handshake and session keys? They ensure that your browser session remains active while you navigate around the webpage
4. Transport Layer: The transport layer uses Transmission Control Protocol (TCP) to ensure that data packets (in this case webpage files) are delivered error-free and in the correct sequence. When using HTTPS, this is the layer that handles the TLS protocol for establishing secure a connection.
3. Network Layer: The Network layer uses a known IP address (remember the section on the DNS journey?) to route data packets from your computer to the web server. It finds the best path through a network to reach its destination
2. Data Link Layer: Handles the Media Access Control (MAC — same acronym, different concept) addresses to ensure that data packets are sent to the correct physical device on your local network, like your home router
1. Physical Layer: This layer involves the actual hardware used to send and receive data; specifically your Wi-Fi signal. It transmits the raw bit stream through the physical hardware
The three top layers in the OSI model (application, presentation, and session) are not separated in the TCP/IP model which only has an application layer above the transport layer.
As you can see by now, DNS and HTTP were just the tip of the iceberg, but they are an important part of what goes on under the hood. Now that we’ve covered some of the complexities of the internet backbone, my favorite quote by Gilfoyle from the show Silicon Valley becomes particularly relatable:
What do I do? System architecture, Networking, and Security. No one in this house can touch me on that. But does anyone appreciate that? While you were busy minoring in gender studies and singing a capella at Sarah Lawrence, I was gaining root access to NSA servers. I was one click away from starting a second Iranian revolution. I prevent cross-site scripting, I monitor for DDoS attacks, emergency database rollbacks, and faulty transaction handlings. The Internet — heard of it? Transfers half a petabyte of data every minute. Do you have any idea how that happens? All those YouPorn ones and zeroes streaming directly to your shitty, little smart phone day after day? Every dipshit who shits his pants if he can’t get the new dubstep Skrillex remix in under 12 seconds? It’s not magic, it’s talent and sweat. People like me, ensuring your packets get delivered, un-sniffed. So what do I do? I make sure that one bad config on one key component doesn’t bankrupt the entire fucking company. That’s what the fuck I do.

Starting a User Session
Did you login when you navigated to a web page for the first time? If you did, the browser will most likely store your user session for 30 days and periodically ask you to re-sign-in. It’s a pain in the ass but it’s for your own good. You’ve undoubtedly seen many password leaks mentioned in the news lately. Hackers routinely sit on these list of stolen passwords for a long time before doing anything with them. Furthermore, you can compound your troubles by using the same password across multiple sites. If you update your passwords frequently and don’t use the same password twice then it won’t be an issue, but the reality is most people don’t because that is harder to remember.
SRP and JWTs
Secure Remote Password is the standard username and password-based authentication. This flow securely sends credentials from the client to the server without exposing them as raw strings. Once authenticated, this is where JSON Web Tokens come in. JWTs are composed of three parts:
- Header: contains metadata about the token, such as the signing algorithm.
- Payload: contains the “claims”, which are pieces of information about you or your session (the user ID, expiration time, etc.).
- Signature: used to verify that the token hasn’t been tampered with and is generated using a secret key.
The client receives an short-lived access token, and long-lived refresh token. The refresh token can be used to obtain new access tokens without re-authenticating (usually for 30 days max).
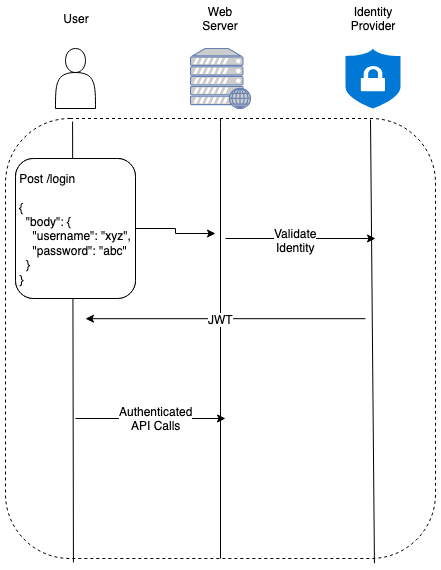
SRP has been the easiest for me to use and understand, however there are many other notable authentication and authorization protocols.
OAuth
If you’ve ever seen “Login with Google” or “Login with Facebook” that is a OAuth2.0 login. It provides a secure way to use your existing accounts on those sites to log into another website. This eliminates the need to create and remember separate usernames and passwords. It also protects your personal information by not sharing your Google or Facebook password with new third-party applications. As an added layer of protection OAuth has a concept of “scopes”, so you can only allow certain levels (ex. read-only access to first name and profile photo) of access to third-party applications.
SAML and OIDC
OAuth is the framework that controls authorization to your webpage. In contrast, OpenID Connect (OIDC) and Security Assertion Markup Language (SAML) are both industry standards for federated authentication.
SAML is yet another digital ID system that lets you log into many different websites with just one set of credentials. It’s not really a markup language either but rather a scoped-down version of XML.
OIDC is an interoperable authentication protocol that aims to address the security risks associated with traditional password-based authentication. By delegating the handling of user credentials to a trusted Identity Provider (IdP), OIDC helps to reduce the burden of securely storing passwords, which are a common point of failure in data breaches.
LDAP
Lightweight Directory Access Protocol is an old-school system for handling authentication that’s still in use today. This is often integrated with other auth systems, such as being the identity provider for OAuth or SAML authentication
On a Typical Webpage
To bring it all together in a real-world example, LDAP could be used to manage your user accounts, while OIDC would handle the authentication, and OAuth 2.0 would handle the authorization. The combination of these protocols would allow your website to securely authenticate users, obtain their profile information, and access third-party services on their behalf. All this while minimizing the need for the website to directly handle sensitive user credentials. LDAP can store hashed usernames and passwords. OIDC and OAuth never even have to see the username and password.

Serving Assets
Assets are what get bundled inside the HTTP response that your browser receives. These files are independent of the user session management discussed in the last section. It’s common knowledge that you’ll see HTML and CSS here — literally everyone knows this in 2024, even kids on the street. So what exactly can I tell you about web assets that you don’t already know? Hopefully a lot.
HTML
HTML is the skeleton of a webpage. Similar to the HTTP acronym, HTML stands for HyperText Markup Language. It’s a bare bones structure; it’s the raw, unadorned framework which holds everything together. It’s not sexy, and it’s not glamorous, but it’s absolutely essential. The introduction of Semantic HTML gave us even more precise ways to tell the browser exactly where to put text, images, and links — any basic ingredient — to a webpage
I doubt you’ve never seen HTML before, but just in case here’s an example →
<html>
  <body>
    <nav> Nav Menu Goes Here </nav>
    <section>
      <p>
        Hello World!
      </p>
    </section>
    <aside> Side Menu Goes Here </aside>
    <footer> Site Footer Goes Here </footer>
  </body>
</html>
When serving HTML files it’s good practice to keep each asset under a max size depending on network connection type. This can be done by compressing and/or chunking.
CSS
CSS stands for “Cascading Style Sheets” and without it your web page is as bland as boiled chicken. The most simple explanation is that CSS is a different notation and can be specified inline with HTML or pulled in from a separate file. Going back to the example, our HTML now becomes →
<html>
  <head>
    <link rel="stylesheet" href="some.css">
  </head>
  <body>
    <nav id="nav"> Nav Menu Goes Here </nav>
    <section class="section">
      <p class="hello-world-paragraph">
        Hello World!
      </p>
    </section>
    <aside> Side Menu Goes Here </aside>
    <footer> Site Footer Goes Here </footer>
  </body>
</html>
And our new file some.css is born. A simple stylesheet would look like this →
html {
  height: 100%;
  width: 100%;
}
#nav {
  display: "flex";
  justify-content: "center";
  align-items: "center";
  font-size: 24px;
}
.hello-world-paragraph {
  text-align: "center";
  font-size: 14px;
}
Do you remember what the “Cascading” part in CSS means? It means that styles can “cascade” over each other if they are more specific than the existing rules. Take a look at the now stylesheet after a few modifications →
html {
  height: 100%;
  width: 100%;
}
p {
  text-align: "left";
  font-size: 10px;
}
nav {
  display: "flex";
  justify-content: "center";
  align-items: "center";
  font-size: 24px;
}
#nav {
  display: "inline";
  font-size: 20px;
}
nav#nav {
  display: "flex";
  justify-content: "flex-start";
  align-items: "flex-start";
  font-size: 18px;
}
.hello-world-paragraph {
  text-align: "center";
  font-size: 14px;
}
p.hello-world-paragraph {
  text-align: "right";
  font-size: 12px;
}
So which of these rules would get observed and which ones would get drowned in the cascades? The rule of thumb is, the more detailed the selector, the better. Given the above CSS these are the styles which will ultimately be applied →
html {
  height: 100%;
  width: 100%;
}
nav#nav {
  display: "flex";
  justify-content: "flex-start";
  align-items: "flex-start";
  font-size: 18px;
}
p.hello-world-paragraph {
  text-align: "right";
  font-size: 12px;
}
Being specific is all good and well until someone comes along and drops one of these in the stylesheet →
opacity: 0.5 !important;
The !important declaration is generally discouraged due to its potential to complicate your entire life. This flag can override normal CSS specificity rules so use sparingly, you’ve been warned!
CSS can be tedious. Chances are you’re not writing raw CSS, but using a preprocessor, CSS-in-JS, or CSS modules. According to the 2023 State of CSS survey, 75% of developers use some form of CSS preprocessor, with SASS being the most popular. Bootstrap used to be the most popular CSS framework but it’s soon to be eclipsed by Tailwind CSS. Preprocessor usage has been declining in recent years with the rise of CSS-in-JS. At any rate, these styles are all going to come out on the other side as CSS assets. The average CSS file size should be around 60KB. Also, CSS is also considered render-blocking, meaning browsers will pause rendering until the CSS sources are loaded and parsed. The best way to ensure this doesn’t become an issue is to use efficient selectors, minimize queries, and use critical path CSS, and also minify/compress production assets.
JS
We all know JavaScript is the nervous system and muscle of the web. This language is a hero; a gritty bicep that supports all the flashy bullshit you see on your screen. Regardless if it has been abused beyond it’s original purpose by now, driving webpages is what JS was born to do.
To bring our example web page to life we can add a script tag in the head →
<html>
  <head>
    <link rel="stylesheet" href="someStyles.css">
    <script src="someJavascript.js"></script>
  </head>
  <body>
    <nav id="nav"> Nav Menu Goes Here </nav>
    <section class="section">
      <p class="hello-world-paragraph">
        Hello World!
      </p>
    </section>
    <aside> Side Menu Goes Here </aside>
    <footer> Site Footer Goes Here </footer>
  </body>
</html>
And a new someJavascript.js JS source file →
window.onload = function() {
  const image = document.createElement('img');
  image.src = 'path/to/image.jpg';
  image.style.display = 'block';
  image.style.width = '30px';
  image.style.height = '50px';
  image.alt = 'Dynamic Image';
  const section = Array.from(document.getElementsByClassName('section')).pop();
  section.appendChild(image);
};
Most web apps nowadays are built as Single Page Applications (SPA) so you’ll only have one HTML asset served. For example, in React.js you have a single root entry node in the DOM from which to launch the rest of your JS code. Once the JS app is initialized it can then spin up all the non-blocking HTML it needs instead of slowly loading everything like a stoned sloth. Furthermore, tools like lazy loading and webpack make it easier to split code and only serve the assets that are immediately needed. You don’t need that user profile CSS on the shopping cart page!
ETags, Cache Control, and Invalidation
Collectively these are the 3 Dons who control how fresh your webpage content will stay. Let’s say you never want to change the name of your HTML file, index.html, no matter how much it’s changed over the years. That’s fine but the browser will cache it for a certain amount of time. So while you’re working away making improvements, your users are still looking at the version of your webpage from a month ago. ETags are unique identifiers for a specific version of your HTML file (or CSS or Image or JS or whatever asset you want to serve). They are included in the response headers when serving the asset. Your browser can see if subsequent requests are even needed if it hasn’t been modified since the last time it was fetched. This is done by including the ETag in the If-None-Match header of the request. If the resource has not been modified, the server will respond with a 304 Not Modified status, allowing your browser to use the cached version which saves time.
You’ll notice how we mentioned the browser caching your HTML file for a certain amount of time. The way it knows how to do this comes from “Cache Control”, which sadly, despite its name, has nothing to do with money. This is an HTTP header which provides instructions on how the file should be cached. Some common Cache-Control directives include:
- max-age=<seconds>: Specifies the maximum time the resource can be cached before it is considered stale.
- no-cache: Forces you to re-validate the asset before using a cached version.
- no-store: Will not allow you to cache the file at all (not good if you want fast performance)
- public: Allows your file to be cached by any cache, including shared caches 😱
- private: Will only cache the file for your user account
The ETags and Cache-Control directives tackle performance issues from the browser side. When you want to update your assets from the server sid you’ll need to send out a message that cached versions need to be invalidated. Any requests after invalidation fetch a new version of the file. This can be achieved in a few ways:
- Changing the URL: When your assets are updated, the URL can be changed (e.g. index.html -> index-remix-no-2.html)
- Changing the ETag: When an asset is updated, the server can generate a new ETag for it, which causes your browser to see it as a different version and fetch the new one
- Adjusting Cache-Control: The server shortens the max-age or sets Cache-Control to no-cache to force the client to fetch the new asset on the next request
Screen Readers and Accessibility
ARIA (Accessible Rich Internet Applications) is the W3 standard for accessibility. Most website users (and developers) aren’t aware that the same page can be read out loud using a screen reader. There are also users with assistive technology which emulates keyboard functionality, such as speech control, switch controls, mouth sticks, head wands, etc. For this reason you should implement ARIA rules on your webpages. For example, let’s update our HTML to read like this →
<html lang="en">
  <head>
    <link rel="stylesheet" href="someStyles.css">
    <script src="someJavascript.js"></script>
    <title>Accessible Web Page</title>
  </head>
  <body>
    <nav id="nav" aria-label="Nav Menu">
      <ul>
        <li><a href="#placeholder"> Nav Menu Goes Here </a></li>
      </ul>
    </nav>
    <main>
      <section class="section" aria-labelledby="section-title">
        <h1 id="section-title"> Section </h1>
        <p class="hello-world-paragraph">
          Hello World!
        </p>
        <button type="button" aria-label="Click Me!">
          Click Me!
        </button>
      </section>
    </main>
    <aside aria-label="Related content">
      <nav aria-label="Side navigation">
        <ul>
          <li><a href="#link1"> Side Menu Goes Here </a></li>
        </ul>
      </nav>
    </aside>
    <footer aria-label="Site footer">
      <p> Site Footer Goes Here </p>
    </footer>
  </body>
</html>
Here’s a breakdown of what makes that accessible now:
- We specified the page language
- Added aria labels; screen readers will attempt to read out the element’s text when focusing. If however, we add an icon the element or remove the text, it’s still possible to use aria-label to provide a label for screen readers to read
- Used semantic elements instead of a <div> or <span> ensures that they are recognized by screen readers and can be focused using the keyboard. <ul> and <li> provide better structure in the navigation and aside
- Explicitly setting the button type attribute prevents the default behavior of submitting a form if the button is placed inside a <form> element. We can use type="submit" though if the button is meant to submit a form instead.
- By default, <button> and <a> elements are focus-able. For elements that are not focus-able by default we can always add tabindex=0.

Service Workers
Web Workers and Service Workers sometimes get used interchangeably but they are not the same thing. Well, I guess a Service Worker is the same as a Web Worker but not vice versa. Service Workers are a type of Web Worker that act as proxy servers between the webpage, the browser, and the network. The main thing you’re going to hear about Service Workers is that they can provide a reasonable offline experience for your webpage. Service Workers can intercept network requests and serve cached responses, allowing your site to function even when the user is offline or has a poor network connection.
Some real-world use cases for Service Workers on a simple webpage include:
- Offline Caching: Service Workers can cache assets, allowing the page to load instantly from the cache when the user is offline.
- Background Sync: Service Workers can queue up background tasks like form submissions or data syncing, and execute them when the user regains connectivity. This is especially useful for interaction and impression metrics which we’ll cover later.
- Push Notifications: Service Workers can receive and display annoying push notifications even when a page is not open.
- Asset Versioning & Updating: Here we encounter versioning and invalidation again. Service Workers are useful for cache invalidation. They watch and detect when a new version is available and proactively update your cache, ensuring you always see the latest content
- Optimized Fetching: Service Workers can intercept network requests and serve the most appropriate response, such as a scaled-down video stream for a slow connection
Both Web Workers and Service Workers run in the background and do not block on the main JS thread. You can offload CPU-intensive tasks here to improve the responsiveness of your page.

Browser Storage and Your Digital Footprint
Cookies
This has to be the most cursed invention of the internet; ways for “websites” to track you when you’re visiting other websites but still using the same browser. Cookies are basically small text files and they’re not always bad. Some are very useful for storing info related to the current web page you are on. The “SameSite” key lets you declare whether your cookie is restricted to first-party or “same-site” usage. There are three different ways to control this restriction: “Strict”, “Lax” or undefined.
Web Storage
HTML web storage is better than cookies. According to W3:
Web storage is more secure, and large amounts of data can be stored locally, without affecting website performance. Unlike cookies, the storage limit is far larger (at least 5MB) and information is never transferred to the server. Web storage is per origin (per domain and protocol). All pages, from one origin, can store and access the same data.
Web storage can be accessed directly as an API in HTML. There are two types of storage:
- Local Storage: Local storage is a type of web storage that allows web applications to store data locally in your web browser with no expiration date. This data will not be sent to the server with each HTTP request, unlike cookies. Local storage can store different data on a per domain basis.
- Session Storage: Session storage is similar to Local Storage, but the data stored in it gets cleared every time you close the tab or window. Useful for storing data that is only relevant for the current session, such as form data or shopping carts. Not useful for storing things like lastPageHitTimestamp or “do not show this message again” preferences.
IndexedDB
When you start to have significant amounts of structured data, including files/blobs, IndexedDB can store it sort of like having a database in your browser. It provides features like transactions, cursors, indexes, and querying.
Manifests
These are simply JSON files that provide metadata about your web page. They contain information such as the app name, author, icon, and display preferences. Manifests can also be used to enable "Add to Homescreen" functionality on mobile devices, allowing pages you view in the browser to be “installed” and launched like a native mobile application.
Tracking Pixels
This is the probably the most important part of what is going on in your browser under the hood and without you realizing it exists.
Tracking Pixels are even more cursed than cookies. Cookies can be stored on a your browser but they can’t follow a you across devices or browsers without additional help of a larger tracking strategy. Additionally, you can block and clear your cookies whenever you want (and you should). The benign use cases for tracking pixels include storing your information for an easier login experience and adding multiple items to a shopping cart for a single checkout experience. The most monetized use cases are ad campaigns.
Tracking pixels do not rely on your browser and can follow you across all your devices. This allows marketing campaigns to be linked across desktop and mobile as well. The key difference is that tracking pixels cannot be disabled in the way that cookies can be disabled. Have you ever had a thought about a product or said it out loud only for it to show up in your feed 30 seconds later? Half of that is confirmation bias in predicting your habits based on data. But the other half is knowing how to serve it to you. If you’re like me you’ve probably thought “how in the hell can tracking pixels be secure”?
Any type of Personally Identifiable Information (PII) can be collected. Your social media profiles can be matched to your email address through tracking pixels. Some tracking pixels hash their contents to scramble PII (I believe it’s even required by GDPR). In the US, the FTC has said this may be not be enough in some cases. Personally I do not ever consent for a webpage to collect data about me in the form of cookies or tracking pixels.

Network Calls — The nasty back alley behind webpages
Once the webpage assets are loaded into the webpage, the code they contain start to request data as well. If at any time you are curious about what they are requesting you can always right-click on a webpage → “inspect” and then → “network” tab. Network calls as a topic is very broad so here is a scoped-down explanation of how they are used in the context of a webpage.
REST APIs
The true number of REST API methods isn’t standardized, but I’m going to say there are 11 in principle. In reality you’ll only ever need to know how to use 4 of them:
The main methods:
- GET: The name says it all, you request to get something from the server
- POST: When you want to create an entity you send it’s details to the server
- PUT: When you want to update something you already created
- DELETE: delete the entity you butchered the first time around
Lesser-known methods:
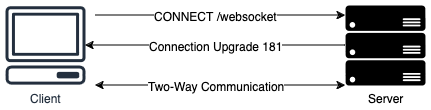
- CONNECT: Used to start two-way communication such as a websocket connection
- PATCH: Same as PUT except this only replaces fields on an entity rather than overwriting the entire entity
- HEAD: Fetches the headers that would be returned if the HEAD request’s URL was requested with a GET call
- OPTIONS: I’ve only ever seen this used for CORS; it’s for fetching permitted communication options
- TRACE: For tracing web server connections. The response sent back to the requester can be used for debugging purposes. As you can imagine exposing this info is an obvious security risk so use sparingly
- LINK: This and UNLINK are less common in everyday web development. They were used more often in the early days of the web. This method tells the server that two assets should be associated with each other. For example if you wanted some CSS styles to be applied to a HTML doc you would link them.
- UNLINK: This simply undoes a LINK operation you previously made
Web Sockets
Sending a REST API request and waiting for a response doesn’t work for the use case of real-time interactions. How does a customer service chat bot send messages back to the customer? Websockets are needed for two-way communication over a single TCP connection.
Business Analytics
These types of metrics fall under the category of regular REST API calls but they are a special breed of network calls as most people don’t even know they are being made behind the scenes. They help to measure the effectiveness of ad campaigns among other things. Some of the things advertisers and webpage owners want to know about you and what you are doing are:
- Impressions: When you see an ad on a webpage it’s going to record that as an impression. Modern ad systems often track not just when the ad is loaded, but also if it’s actually viewable on screen. This may involve multiple network calls as the you scrolls through the page
- Interactions: Likes, Scrolls, Clicks, basically anything you do to interact with a webpage will be recorded to inform business decisions about future expansion and features for the webpage
- Click-Through Rate (CTR): A combination of interactions and impressions; CTR is the number of clicks that an ad receives divided by the number of times it is shown
- Real-Time Bidding (RTB): In programmatic advertising, multiple network calls can occur within a millisecond as ad space is auctioned in real-time
Operational Analytics
- Performance Metrics (PMET): Additional calls may be made to measure rendering speed, user engagement time, and other performance indicators.
Other Considerations
- Privacy: These network calls contain user data and they are subject to various privacy regulations such as the General Data Protection Regulation (GDPR — the European data privacy law) and the California Consumer Privacy Act (CCPA — A law in the same spirit but for Californians). Every website you visit nowadays has those annoying consent forms which adds additional network calls to ensure your privacy preferences are respected
- Lagginess: Because we don’t want the overall quality of a webpage to suffer as a result of recording every little movement a user makes, it’s important to batch the metric events into fewer network requests

Conclusion
I hope this doesn’t come as a surprise, but I have no more web page analysis left in me. The solutions architect vultures are circling overhead. Hopefully you can take what you’ve learned here and use it as a base to learn more — because there is always way more that can be learned. Stay tuned and thank you for clapping / following — please drop any questions, comments, or hot takes you may have below!

Further reading
Original Request for Comments on DNS
RFC 1035: Domain names - implementation and specification
How DNS works
How DNS works. What is DNS? Learn how step by step.
The OSI Spec
TTL
RNS
Funny anecdote on TLDs
The Journey to Hijacking a Country's TLD - The Hidden Risks of Domain Extensions
DNS and OSI relationship
OSI Wiki
2024 Internet Usage Statistics
30+ Internet Usage Statistics for 2024: Users, Speed, Behavior
Optimizing content delivery with a CDN
Optimizing Content Delivery: The Complete Guide Through S3 Caching and CloudFront
ARIA Spec
Accessible Rich Internet Applications (WAI-ARIA) 1.3
SameSite Cookies
SameSite cookies explained | Articles | web.dev
Pixel Tracking Article from the FTC
Lurking Beneath the Surface: Hidden Impacts of Pixel Tracking
State of CSS 2023
State of CSS 2023: CSS Frameworks
Hack This Site: learn to hack the website which is teaching you how to hack
TLS Certificates Baseline Requirements
Baseline Requirements for TLS Server Certificates
Personally Identifiable Information
Guidance on the Protection of Personal Identifiable Information
HTTP Methods Registry
Hypertext Transfer Protocol (HTTP) Method Registry
What’s happening in the browser behind a typical webpage? was originally published in Level Up Coding on Medium, where people are continuing the conversation by highlighting and responding to this story.
This content originally appeared on Level Up Coding - Medium and was authored by Andrew Allison
Andrew Allison | Sciencx (2024-08-23T11:34:22+00:00) What’s happening in the browser behind a typical webpage?. Retrieved from https://www.scien.cx/2024/08/23/whats-happening-in-the-browser-behind-a-typical-webpage/
Please log in to upload a file.
There are no updates yet.
Click the Upload button above to add an update.