
This content originally appeared on Level Up Coding - Medium and was authored by Rajtilak Pal

Welcome to the 6th part of this series: “Powerful Design Patterns to create an Amazing Stopwatch App”. Our Stopwatch App is almost complete. We just have to give a good finishing touch to it. The problem with the current version of our app is: It is not scalable. Take a look at the way we have handled the button presses in a state:
private void handleStartPress() {
    if(currentState==NOT_RUNNING)
    {
        sw =  new Stopwatch();
        sw.registerObserver(this);
        sw.start();
        start.setText("Pause");
        stop.setVisible(true);
        currentState=RUNNING;
    }
    else if(currentState==RUNNING)
    {
        sw.stop();
        start.setText("Resume");
        currentState=PAUSED;
    }
    else if(currentState==PAUSED)
    {
        sw.start();
        start.setText("Pause");
        currentState=RUNNING;
    }

}
Too many if-else statements. If we try to add more states to it, we have to make changes in a lot of places which could potentially introduce bugs when we forget to update even one place. We have to think about how we can make this app scalable and easy to understand.
Previous Tutorial
If you are reading this part first, you should definitely check out Part 5 of this series to catch up.
As the name of the tutorial suggests, we are going to implement the State pattern. Warning: this pattern includes adding a lot of new java files and might be a little difficult to understand. But I will do my best to make you understand, so keep reading till the last.
Recall the State Diagram of our App:
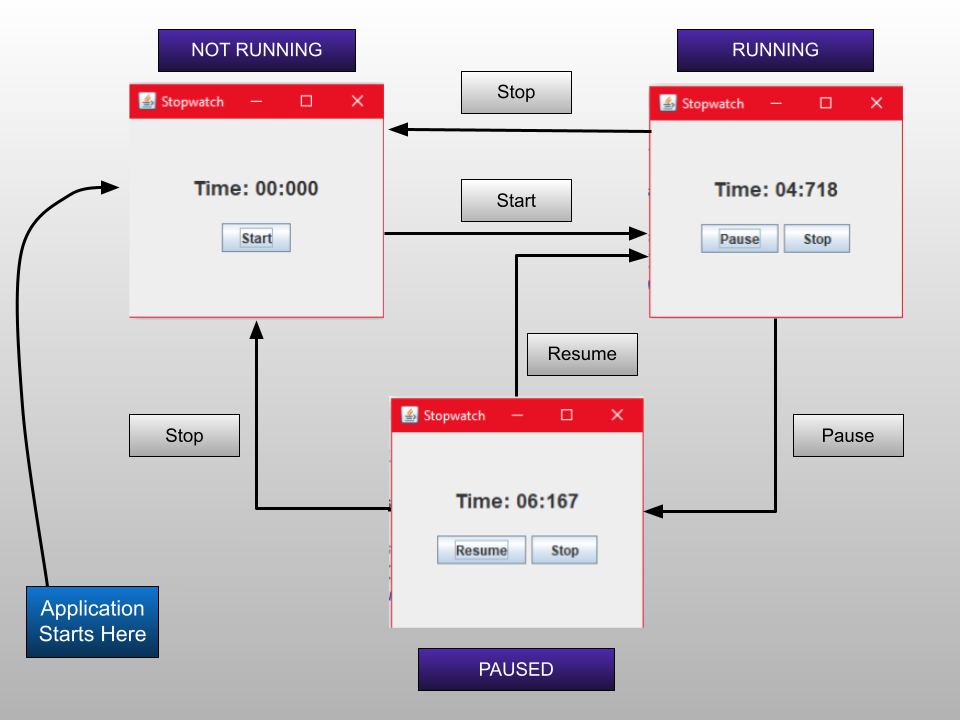
Keep this diagram in mind as we will be building our pattern using this. Before jumping right into the pattern, let’s identify some common tasks that are executed when the start button is pressed. This is the code that runs when the user presses the Start button in the NOT RUNNING state:
if(currentState==NOT_RUNNING)
{
    sw =  new Stopwatch();
    sw.registerObserver(this);
    sw.start();
    start.setText("Pause");
    stop.setVisible(true);
    currentState=RUNNING;
}
Can you identify some common tasks that are here?
sw =  new Stopwatch();
sw.registerObserver(this);
sw.start();
These three lines definitely suggest that we are doing something with the stopwatch.
start.setText("Pause");
stop.setVisible(true);
These two lines suggest that we are updating the UI.
currentState=RUNNING;
This line suggests that we are changing the state.
Very similarly, you can identify these three classes of tasks in every state:
- handleStopwatch
- handleUI
- changeState
Take a look at the picture below.

Let us understand the State Pattern now. There is a common interface State from which concrete classes derive their methods from. This State interface has some common methods which are applicable to all states. The class diagram of State Pattern is given below:

You can see there is an interface State which has a method handle(). All the derived classes override handle() and put their own functionality. This includes doing its own stuff and changing the state too (Important).
The Context is the class that has these States which change from time to time. This context has a request() method that only takes the current state and calls its handle() method. Whatever is the current state, the appropriate handle() method is called and all the tasks are implemented.
Formal definition:
The State Pattern allows an object to alter its behaviour when its internal state changes. The object will appear to change its class.
As in our app, every state has three common tasks, we are going to put these tasks in their individual methods in each state. The state interface will define these common methods and it will be the responsibility of the appropriate state to handle the inner contents of these common methods. Let’s start by drawing the Class diagram of our application as that will give you more sense.

Let’s state by making the interface StopwatchState. Make a java file StopwatchState.java
public interface StopwatchState {

    public void handleStopwatch();
    public void handleUI();
    public void changeState();
}
Notice the handleStopwatch(), handleUI() and changeState() need to be called sequentially. Therefore, let's make another method that encapsulates this algorithm: execute(). You will probably be wondering how can you write code inside a method of an interface? Are the methods not abstract? We are going to make use of the default keyword provided by java from Java8. This keyword lets you write a method body of an interface method. We are not doing much here, we are just writing the order in which these methods need to be called when it has to change state.
public interface StopwatchState {default void execute()
{
handleStopwatch();
handleUI();
changeState();
}
public void handleStopwatch();
public void handleUI();
public void changeState();
}
The advantage of the execute() method is that the StopwatchSwing only has to call execute on the currentState and all its Stopwatch tasks will be handled, all its UI stuff will be handled and the state will change automatically.
Make the NOT RUNNING state. Create a java file NotRunningStopwatchState.java and write:
public class NotRunningStopwatchState implements StopwatchState{


    @Override
    public void handleStopwatch() {

    }

    @Override
    public void handleUI() {
    }

    @Override
    public void changeState() {
    }
}
We have overridden the StopwatchState interface and all its methods. Now, we will need a reference to the context class which is the StopwatchSwing class here. Therefore, we will create a class variable to hold the StopwatchSwing object and initialize it in the constructor.
public class NotRunningStopwatchState implements StopwatchState{
    StopwatchSwing stopwatchSwing;

    public NotRunningStopwatchState(StopwatchSwing stopwatchSwing) {
        this.stopwatchSwing = stopwatchSwing;
    }

   ....
}
We will fill in these overridden methods later. Let’s first create two more states: RunningStopwatchState and PausedStopwatchState following the same drill.
PausedStopwatchState.java
public class PausedStopwatchState implements StopwatchState{
    StopwatchSwing stopwatchSwing;

    public PausedStopwatchState(StopwatchSwing stopwatchSwing) {
        this.stopwatchSwing = stopwatchSwing;
    }

    @Override
    public void handleStopwatch() {
    }

    @Override
    public void handleUI() {
    }

    @Override
    public void changeState() {
    }
}
RunningStopwatchState.java
public class RunningStopwatchState implements StopwatchState{
    StopwatchSwing stopwatchSwing;

    public RunningStopwatchState(StopwatchSwing stopwatchSwing) {
        this.stopwatchSwing = stopwatchSwing;
    }

    @Override
    public void handleStopwatch() {
    }

    @Override
    public void handleUI() {
    }

    @Override
    public void changeState() {
    }
}
We will fill in all of these overridden methods later. First, let’s go to the StopwatchSwing class and make the States there. Replace the following code with the given code:
//Replace this
public class StopwatchSwing implements Observer {

    ...
    final int NOT_RUNNING=0, RUNNING=1, PAUSED=2;
    int currentState;
    ....
}
// Replace it with this
public class StopwatchSwing implements Observer {....
StopwatchState notRunningState;
StopwatchState runningState;
StopwatchState pausedState;
StopwatchState currentState;
    .....
}
We have made three of our states and their type is StopwatchState, as we know they are going to implement StopwatchState. Let’s create their individual objects in the constructor of StopwatchSwing and initialize the currentState with the NotRunningStopwatchState object first (same as before when we were implementing this with final integers):
StopwatchSwing()
{
    // Remove this
    currentState = NOT_RUNNING;
    sw = new Stopwatch();
    sw.registerObserver(this);
    // Add this
    notRunningState = new NotRunningStopwatchState(this);
    runningState = new RunningStopwatchState(this);
    pausedState = new PausedStopwatchState(this);
    currentState = notRunningState;
    ....
}
Notice, we are passing the context in the constructor of each state because they will require it to update the UI elements and stopwatch.
Next, we will add some state accessor methods to the StopwatchSwing so that these state classes can get access to the class variables. It’s very simple, just add these getter and setter methods:
public class StopwatchSwing implements Observer {

    ....

// <-------------------- Accessor Methods ------------------->
public void setState(StopwatchState state)
    {
        currentState = state;
    }


    public StopwatchState getState()
    {
        return currentState;
    }

    public void setStopwatch(Stopwatch sw)
    {
        this.sw =sw;
    }
    public StopwatchState getNotRunningState() {
        return notRunningState;
    }

    public StopwatchState getRunningState() {
        return runningState;
    }

    public StopwatchState getPausedState() {
        return pausedState;
    }
    ....
}
Notice, we have a setState() method to set the currentState, getState() to get the currentState, setStopwatch() to set a new Stopwatch, getNotRunningState() to get the not running state object, and similarly other getter methods.
Now, let’s go and fill up the incomplete overridden methods of the state classes. Start with NotRunningStopwatchState. The code is similar and easy to follow:
public class NotRunningStopwatchState implements StopwatchState{
    StopwatchSwing stopwatchSwing;

    public NotRunningStopwatchState(StopwatchSwing stopwatchSwing) {
        this.stopwatchSwing = stopwatchSwing;
    }

    @Override
    public void handleStopwatch() {
        Stopwatch sw = new Stopwatch();
        stopwatchSwing.setStopwatch(sw);
        sw.registerObserver(stopwatchSwing);
        sw.start();
    }

    @Override
    public void handleUI() {
        stopwatchSwing.start.setText("Pause");
        stopwatchSwing.stop.setVisible(true);
    }

    @Override
    public void changeState() {
        stopwatchSwing.setState(stopwatchSwing.getRunningState());
    }
}
You can see in the handleStopwatch() method, we are creating a new Stopwatch and setting it to the StopwatchSwing objects stopwatch variable. we are registering the observer and starting it. In the handleUI() method, we are updating the UI of the StopwatchSwing class. Notice the change state method at last. It is getting the running state from the context class and updating it using the setState() method of StopwatchSwing class.
The code for all other States are almost the same and I will just give them without any explanation:
PausedStopwatchState.java:
public class PausedStopwatchState implements StopwatchState{
    StopwatchSwing stopwatchSwing;

    public PausedStopwatchState(StopwatchSwing stopwatchSwing) {
        this.stopwatchSwing = stopwatchSwing;
    }

    @Override
    public void handleStopwatch() {
        stopwatchSwing.sw.start();
    }

    @Override
    public void handleUI() {
        stopwatchSwing.start.setText("Pause");
    }

    @Override
    public void changeState() {
        stopwatchSwing.setState(stopwatchSwing.getRunningState());
    }
}
RunningStopwatchState.java:
public class RunningStopwatchState implements StopwatchState{
    StopwatchSwing stopwatchSwing;

    public RunningStopwatchState(StopwatchSwing stopwatchSwing) {
        this.stopwatchSwing = stopwatchSwing;
    }

    @Override
    public void handleStopwatch() {
        stopwatchSwing.sw.stop();
    }

    @Override
    public void handleUI() {
        stopwatchSwing.start.setText("Resume");
    }

    @Override
    public void changeState() {
        stopwatchSwing.setState(stopwatchSwing.getPausedState());
    }
}
There are only two things that are left till now: updating the two button listener methods. In the handleStartPress() method, remove everything and write:
private void handleStartPress() {
    currentState.execute();

}
So simple, right?
In the handleStopPress() method, just replace the line currentState = NOT_RUNNING:
private void handleStopPress(){
    ...
    // Replace this
currentState=NOT_RUNNING;
// Replace it with
currentState = notRunning;
}
At this point, if you run the code, it will run just as before but this time we have implemented the State pattern. We will take a walkthrough of this in just a bit. First, let’s see the handleStopPress() method once more.
private void handleStopPress(){
    if(sw!=null)
        sw.stop();
    sw = null;
    timerDisplay.setText("Time: "+formatTime(0L));
    start.setText("Start");
    stop.setVisible(false);
    currentState=notRunningState;
}
Here, it is the same problem. We are manually changing the stopwatch and manually updating the UI whereas the other states handle these things themselves. We have got to change this implementation but what can we do about this?
If you are thinking of creating another state, you are right. And given we have implemented the State pattern, it should be pretty simple to add a new state to it. Just create a new class, implement StopwatchState, override the methods and fill them. In the StopwatchSwing class, do the appropriate changes, and Boom: We’re done.
Create a new State: StopPressedStopwatchState.java
public class StopPressedStopwatchState implements StopwatchState{
    StopwatchSwing stopwatchSwing;


    public StopPressedStopwatchState(StopwatchSwing stopwatchSwing)      {
        this.stopwatchSwing = stopwatchSwing;
    }

    @Override
    public void handleStopwatch() {
        if(stopwatchSwing.sw != null)
            stopwatchSwing.sw.stop();
        stopwatchSwing.sw =null;
    }

    @Override
    public void handleUI() {
        stopwatchSwing.timerDisplay.setText("Time: "+ stopwatchSwing.formatTime(0L));
        stopwatchSwing.start.setText("Start");
        stopwatchSwing.stop.setVisible(false);
    }

    @Override
    public void changeState() {
        stopwatchSwing.setState(stopwatchSwing.getNotRunningState());
    }
}
Notice, we have written all the logic that will be executed when the user presses the Stop button in this state. At last, this state changes the state to the NotRunningState.
Create a new State variable in the StopwatchSwing class:
public class StopwatchSwing implements Observer {

    ...
    StopwatchState notRunningState;
    StopwatchState runningState;
    StopwatchState pausedState;
    StopwatchState stopPressedStopwatchState; // New State

    StopwatchState currentState;
    ....
}
Initialize it in the constructor and initialize the currentState with this stopPressedStopwatchState:
StopwatchSwing()
{
    notRunningState = new NotRunningStopwatchState(this);
    runningState = new RunningStopwatchState(this);
    pausedState = new PausedStopwatchState(this);
    stopPressedStopwatchState = new StopPressedStopwatchState(this);
    currentState = stopPressedStopwatchState;
    currentState.execute();
    ....
}
Notice we are calling the execute() method of the stopPressedStopwatchState object which is in the currentState immediately. This will initialize the Stopwatch object, initialize the UI elements like the buttons and timerDisplay, and then changes the state to NotRunningState.
Remember why we made this new state: to reduce the code in handleStopPress() method. Now we update that:
private void handleStopPress(){
    currentState = stopPressedStopwatchState;
    currentState.execute();
}
Here, we are transitioning to the stopPressedStopwatchState and then calling the execute() method. This will initialize everything and change the state to Not Running.
Now we can run this code. But as soon as you run it, you will get a NullPointerException. Can you guess why?
The reason is, we are calling the currentState.execute() method before creating any of the UI elements. When we call the execute() method, it tries to update the timerDisplay which has still not been created yet. Therefore the app crashes. We have to move the currentState.execute() method to a place where all the UI elements have been initialized (to the last of the constructor). So move these lines to the end of the constructor and your app will run fine:
notRunningState = new NotRunningStopwatchState(this);
runningState = new RunningStopwatchState(this);
pausedState = new PausedStopwatchState(this);
stopPressedStopwatchState = new StopPressedStopwatchState(this);
currentState = stopPressedStopwatchState;
currentState.execute();
That’s it! That is all of our code.
You will notice that the constructor has too much code in it which may be difficult for somebody to understand who is seeing this for the first time. Therefore, let’s put them in separate functions:
StopwatchSwing()
{
    initializeJFrame();
    setUpPanels();
    addButtonListeners();
    initializeStates();
    frame.setVisible(true);
}

public void initializeJFrame()
{
// Initializing the JFrame
frame = new JFrame("Stopwatch");
    frame.setSize(300,300);
    frame.setMinimumSize(new Dimension(300,300));
    frame.setLayout(new GridLayout(2,1));
    frame.setDefaultCloseOperation(JFrame.EXIT_ON_CLOSE);
}
public void setUpPanels()
{
// Setting Up Panels
panel1 = new JPanel();
    panel1.setLayout(new FlowLayout(FlowLayout.CENTER, 0, 50));

    timerDisplay = new JLabel();
    Font font = timerDisplay.getFont();
    timerDisplay.setFont(new Font(font.getFontName(), font.getStyle(), 18));

    panel1.add(timerDisplay);


    panel2 = new JPanel();
    panel2.setLayout(new FlowLayout(FlowLayout.CENTER));
    start = new JButton("Start");
    stop = new JButton("Stop");
    stop.setVisible(false);
    panel2.add(start);
    panel2.add(stop);

    frame.add(panel1);
    frame.add(panel2);
}
public void addButtonListeners()
{
// Adding Listeners to the Buttons

start.addActionListener(new ActionListener() {
        @Override
        public void actionPerformed(ActionEvent e) {
            handleStartPress();
        }
    });

    stop.addActionListener(new ActionListener() {
        @Override
        public void actionPerformed(ActionEvent e) {
            handleStopPress();
        }
    });
}

public void initializeStates()
{
// Initializing states
notRunningState = new NotRunningStopwatchState(this);
    runningState = new RunningStopwatchState(this);
    pausedState = new PausedStopwatchState(this);
    stopPressedState = new StopPressedStopwatchState(this);
    currentState=stopPressedState;
    currentState.execute();
}
Notice, I have moved all the JFrame creation and initialization code to one function, all the Panel creation and initialization code to one function, all the button listeners to one function, and all the state initialization to one function. At last, I am calling frame.visible(true).
This is your final code for the stopwatch app.
Let’s take a walkthrough of the whole thing:
- First, our JFrame is being created and intialized.
- Then, we are adding the two panels and adding the JLabel and JButtons to it.
- Then, we are adding the button listeners to it.
- We are initializing all the states and making the currentState to stopPressedStopwatchState.
- On calling execute on currentState, initializes all the UI elements like the JLabel and Jbuttons and changes the state to NotRunningStopwatchState.
- Whenever the user presses the start button, we just call the curentState’s execute() method. We don’t even have to think about changing the states and all that bullsh*t because it is taken care of by the States themselves.
- On Pressing the execute() method on a state object, it sequentially calls handleStopwatch(), handleUI() and changeState() methods.
- Whenever the user presses the stop button, we just make the stopPressedStopwatchState to be the currentState and call its execute() method.
- Since this StopwatchSwing class is a registered observer, it automatically gets notified about the time changes when the stopwatch is running.
That’s it! That’s all we got to care about.
Let’s revise what we have done till now and understand why we took this path:
- First, we made the core Stopwatch class which runs on a different Thread.
- We implemented the Observer pattern to not let the StopwatchSwing class create a different thread to see the stopwatch time.
- We implemented the State Pattern to reduce the load of manually changing the UI whenever there was a state transition.
We have implemented one more pattern unknowingly: Template Pattern. Recall, the execute method of the State interface. We have defined the algorithm in the execute method and left the other methods abstract so that they can be filled in according to the derived class’s need. This is the Template Pattern.
The power of design patterns can be seen only when it is compared to an exploratory style of programming. That’s why I have given it a try. Here is the same version of the Stopwatch but without the use of any Design Patterns:
Stopwatch2.java
public class Stopwatch2 {
    private long offset, currentStart;
    private boolean isStopped;
    public Stopwatch2()
    {
        offset = 0L;
        currentStart = System.currentTimeMillis();
        isStopped = true;
    }
    public void start()
    {
        if(isStopped)
            currentStart = System.currentTimeMillis() - offset;
        isStopped = false;
    }
    public void stop()
    {
        if(!isStopped)
            offset = System.currentTimeMillis() - currentStart;
        isStopped = true;
    }
    public long getTime()
    {
        if(!isStopped)
            return System.currentTimeMillis() - currentStart;
        else
            return offset;
    }
    public boolean isStopped(){
        return isStopped;
    }
}
This class is simple. Nothing heavy is being used here.
StopwatchSwing2.java
import javax.swing.*;
import java.awt.*;
import java.awt.event.ActionEvent;
import java.awt.event.ActionListener;

public class StopwatchSwing2 implements Runnable {
    Stopwatch2 sw;

// UI Widgets
JFrame frame;
    JPanel panel1, panel2;
    JLabel timerDisplay;
    JButton start, stop;

    final int NOT_RUNNING=0, RUNNING=1, PAUSED=2;
    int currentState;

    Thread th;

    public StopwatchSwing2()
    {
        currentState = NOT_RUNNING;

// Initializing the JFrame
frame = new JFrame("Stopwatch");
        frame.setSize(300,300);
        frame.setMinimumSize(new Dimension(300,300));
        frame.setLayout(new GridLayout(2,1));
        frame.setDefaultCloseOperation(JFrame.EXIT_ON_CLOSE);

// Setting Up Panels
panel1 = new JPanel();
        panel1.setLayout(new FlowLayout(FlowLayout.CENTER, 0, 50));

        timerDisplay = new JLabel("Time: "+formatTime(0L));
        Font font = timerDisplay.getFont();
        timerDisplay.setFont(new Font(font.getFontName(), font.getStyle(), 18));

        panel1.add(timerDisplay);


        panel2 = new JPanel();
        panel2.setLayout(new FlowLayout(FlowLayout.CENTER));
        start = new JButton("Start");
        stop = new JButton("Stop");
        stop.setVisible(false);
        panel2.add(start);
        panel2.add(stop);

        frame.add(panel1);
        frame.add(panel2);


// Adding Listeners to the Buttons

start.addActionListener(new ActionListener() {
            @Override
            public void actionPerformed(ActionEvent e) {
                handleStartPress();
            }
        });

        stop.addActionListener(new ActionListener() {
            @Override
            public void actionPerformed(ActionEvent e) {
                handleStopPress();
            }
        });
        frame.setVisible(true);
    }

    private void handleStartPress(){
        if(currentState==NOT_RUNNING)
        {
            sw =  new Stopwatch2();
            th = new Thread(this);
            sw.start();
            th.start();
            start.setText("Pause");
            stop.setVisible(true);
            currentState=RUNNING;
        }
        else if(currentState==RUNNING)
        {
            th = null;
            sw.stop();

            start.setText("Resume");
            currentState=PAUSED;
        }
        else if(currentState==PAUSED)
        {
            sw.start();
            th = new Thread(this);
            th.start();
            start.setText("Pause");
            currentState=RUNNING;
        }
    }
    private void handleStopPress()
    {
        th=null;
        if(sw!=null)
            sw.stop();
        sw = null;
        timerDisplay.setText("Time: 000");
        start.setText("Start");
        stop.setVisible(false);
        currentState=NOT_RUNNING;
    }

    String formatTime(long time)
    {
        int time1 = (int)time;
        int milis=0, secs = 0, minutes = 0, hours = 0;
        String formattedTime="";

        milis = time1%1000;
        time1 = time1 / 1000;
        secs = time1 % 60;
        time1 = time1 / 60;
        minutes = time1 % 60;
        time1 = time1 / 60;
        hours = time1 % 60;

        formattedTime = String.format("%02d", secs) + ":" +String.format("%03d", milis);
        if(minutes>0)
            formattedTime = String.format("%02d", minutes) + ":" + formattedTime;
        if(hours>0)
            formattedTime = String.format("%02d", hours) + ":" + formattedTime;
        return formattedTime;

    }
    public static void main(String[] args) {
        SwingUtilities.invokeLater(new Runnable() {
            @Override
            public void run() {
                new StopwatchSwing2();
            }
        });
    }

    @Override
    public void run() {
        while(sw!=null && !sw.isStopped())
        {
            timerDisplay.setText("Time: "+ formatTime(sw.getTime()));
            try {
                Thread.sleep(10);
            } catch (InterruptedException e) {
                e.printStackTrace();
            }
        }
    }
}
At first glance, you might say that this code is a lot less than the ones in which we have implemented the design patterns. You are right but look at the way we have presented the code. Even I will forget what I have written when I come back to this one month later. Everything is so unstructured and everything is manual.
This is the beauty of design patterns and I am glad I was able to give you a clear understanding of how to use them in a real-world application.
Full Code:
References:
- Book: Head First Design Patterns, by Eric Freeman, Elisabeth Robson, Bert Bates, Kathy Sierra.
Implementing the State Pattern (Part 6) was originally published in Level Up Coding on Medium, where people are continuing the conversation by highlighting and responding to this story.
This content originally appeared on Level Up Coding - Medium and was authored by Rajtilak Pal
Rajtilak Pal | Sciencx (2021-03-26T12:22:46+00:00) Implementing the State Pattern (Part 6). Retrieved from https://www.scien.cx/2021/03/26/implementing-the-state-pattern-part-6/
Please log in to upload a file.
There are no updates yet.
Click the Upload button above to add an update.