
This content originally appeared on Level Up Coding - Medium and was authored by Roshan Rajbanshi
Default Nmap scans are often easy to detect. Here’s what to send instead — and what each technique actually costs you.
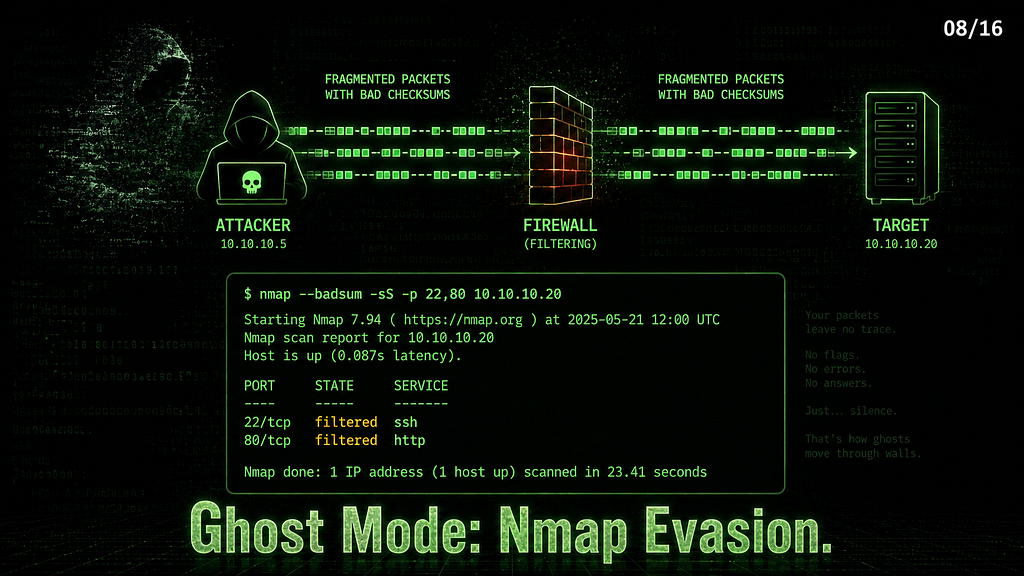
Series: Nmap — The Tool You Think You Know | Part 8 of 16
A default nmap -sS <TARGET> scan is about as subtle as a floodlight — many IDS/IPS platforms have signatures or heuristics for SYN scan patterns, most corporate firewalls log it, and some block it entirely.
This article covers what you’re actually evading, the techniques that address each detection method, and the honest trade-offs — because evasion always costs something, and knowing the price is part of using these flags correctly.
What You’re Evading — IDS Detection Methods
Before touching a single flag, understand what IDS systems actually look for:
Port scan patterns — many ports probed in rapid sequence from one IP. Statistical detection, not signature-based. Rate limiting and randomization address this.
Packet signatures — Nmap’s default TTL values, TCP window sizes, IP ID patterns, and payload lengths are fingerprinted. Changing them breaks the signature match.
Timing — too many probes, too fast trigger rate-based alerts. Slowing down is the simplest and most effective first step.
Flag combinations — SYN floods, NULL packets, FIN packets, and Xmas tree packets all have dedicated IDS rules. Alternative scan types exploit RFC behavior instead of triggering these rules.
Understanding which method detects which behavior tells you which flag to reach for first.
Bucket 1 — IDS Evasion
Techniques that change how packets look or arrive so signature-based and statistical detection systems don’t recognize them as Nmap.
Timing Evasion
Timing evasion is the simplest and most effective first step. Slow down, and rate-based detection becomes irrelevant.
sudo nmap -T1 --max-rate 5 -p 22,80,443 <TARGET_IP>
PORT    STATE  SERVICE
22/tcp  open   ssh
80/tcp  closed http
443/tcp closed https
Nmap done: 1 IP address (1 host up) scanned in 60.17 seconds
The same three ports can take significantly longer depending on timing settings and network conditions — in this lab run, 60 seconds versus a typical sub-second default scan. That’s the cost of -T1. Statistical detection systems look for bursts — spreading probes across 60 seconds produces no burst signature.
# Per-probe delay instead of rate limiting
sudo nmap --scan-delay 2s -p 22,80 <TARGET_IP>
PORT   STATE  SERVICE
22/tcp open   ssh
80/tcp closed http
Nmap done: 1 IP address (1 host up) scanned in 6.09 seconds
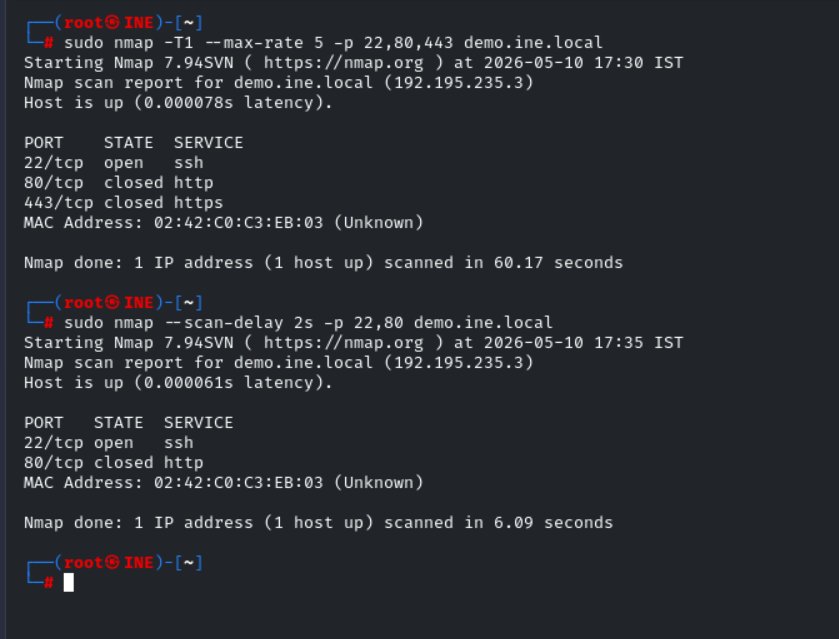
Two ports, 2-second delay between each probe — 6 seconds total. --scan-delay gives you precise control over the gap between individual probes rather than an overall rate cap.
Timing flags reference:
Flag Delay Use case -T0 (Paranoid) 5 minutes between probes. Maximum stealth is impractical for most engagements -T1 (Sneaky) 15 seconds between probes Practical stealth — slow but usable -T2 (Polite) 0.4 seconds between probes. Reduces network load, minimal stealth --scan-delay <time> Exact per-probe delay Precise control, combine with -T1 --max-rate <n> Max packets per second Rate cap — complement to timing flags
-T1 with --max-rate 5 is the practical stealth baseline — evades most rate-based detection while remaining usable in a real engagement.
Fragmentation
sudo nmap -f -p 22 <TARGET_IP>
PORT   STATE SERVICE
22/tcp open  ssh
Nmap done: 1 IP address (1 host up) scanned in 0.14 seconds
sudo nmap --mtu 16 -p 22 <TARGET_IP>
PORT   STATE SERVICE
22/tcp open  ssh
Nmap done: 1 IP address (1 host up) scanned in 0.12 seconds
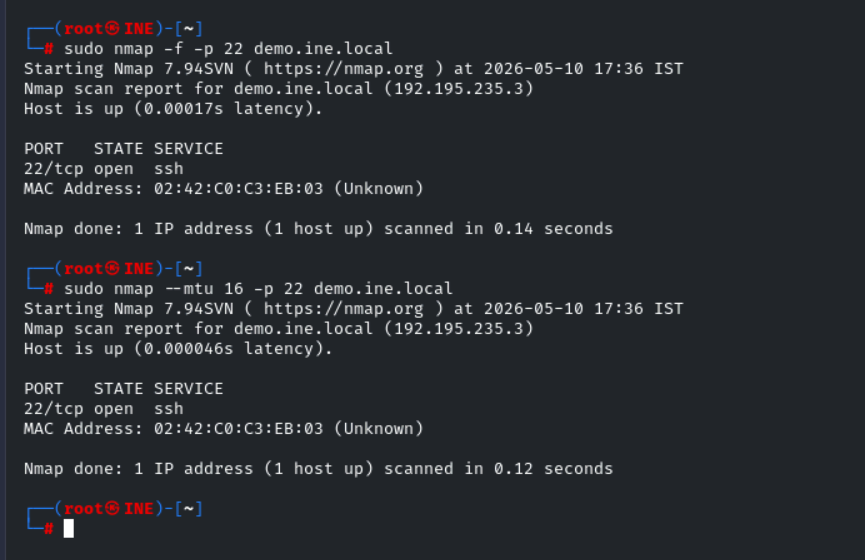
-f fragments IP packets into small pieces, making it harder for IDS systems to reassemble and inspect the full packet. --mtu sets a custom fragment size — must be a multiple of 8. Smaller values create more fragments and increase reassembly difficulty, though there is no strict list of "valid" values beyond that constraint.
Some older IDS systems reassemble fragments poorly and miss signatures buried across multiple packets. Modern IDS handles fragmentation correctly — this is less effective than it was in 2005, but still worth including in a combined evasion profile. It costs nothing in scan time and may bypass older signature rules.
Bucket 2 — Firewall Bypass
Techniques that exploit firewall rule logic rather than IDS signatures.
Source Port Spoofing
sudo nmap -g 53 -p 22,80 <TARGET_IP>
PORT   STATE  SERVICE
22/tcp open   ssh
80/tcp closed http
Nmap done: 1 IP address (1 host up) scanned in 0.14 seconds
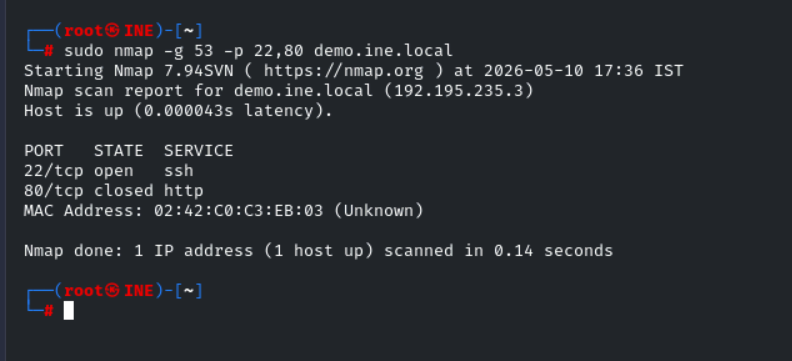
-g 53 sends all scan packets from source port 53. On networks with source-port allowlist rules — a rule permitting "traffic from port 53" (DNS responses) — this may let your scan through. -g 80 works the same way for HTTP allowlists. This is not a general IDS evasion technique and won't help against modern stateful inspection, but it's worth trying where source-port rules exist.
-g and --source-port are identical flags — use whichever you remember. This is a firewall bypass technique more than an IDS evasion technique.
Packet Manipulation
--data-length — Change Packet Size
sudo nmap --data-length 25 -p 22 <TARGET_IP>
PORT   STATE SERVICE
22/tcp open  ssh
Nmap done: 1 IP address (1 host up) scanned in 0.12 seconds
Appends 25 random bytes to each packet. IDS signature rules often match on specific payload lengths — Nmap’s default packets have predictable sizes. Adding random padding changes the size signature without altering scan behavior.
--ttl — Custom Time-To-Live
sudo nmap --ttl 64 -p 22 <TARGET_IP>
PORT   STATE SERVICE
22/tcp open  ssh
Nmap done: 1 IP address (1 host up) scanned in 0.16 seconds
Nmap’s default TTL values are fingerprinted. Setting --ttl 64 makes packets look like standard Linux traffic. --ttl 128 mimics Windows. Match the TTL to the network environment you're operating in.

--spoof-mac — MAC Address Spoofing
sudo nmap --spoof-mac Cisco -p 22 <TARGET_IP>   # Cisco vendor OUI
sudo nmap --spoof-mac 0 -p 22 <TARGET_IP>        # random MAC
Local network only — MAC addresses don’t traverse routers. On a network where Cisco devices are trusted or where MAC-based filtering is in use, spoofing a Cisco OUI can bypass access controls. --spoof-mac 0 generates a completely random MAC for each scan.
Bucket 3 — Source Concealment
Techniques that obscure or hide which IP the scan is actually coming from.
Decoy Scans
sudo nmap -D RND:5 -p 22 <TARGET_IP>
PORT   STATE SERVICE
22/tcp open  ssh
Nmap done: 1 IP address (1 host up) scanned in 0.12 seconds
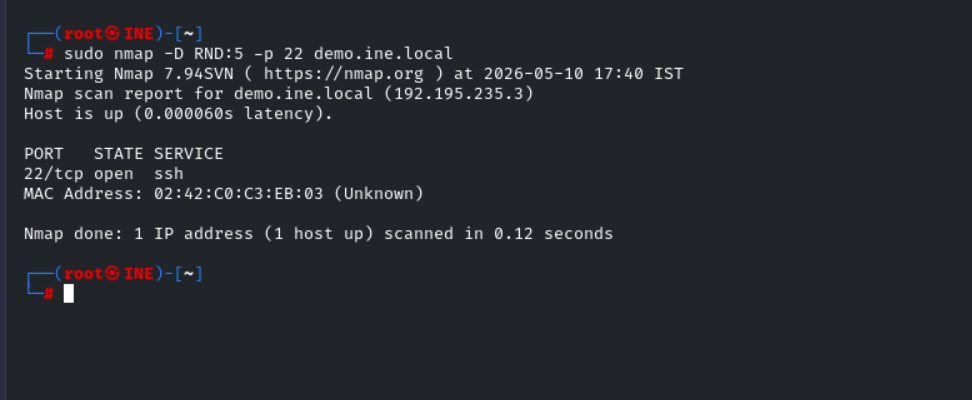
Five random decoy IPs send spoofed packets alongside your real packets. The target sees packets associated with multiple source IPs — the analyst has to identify which one is real.
# Specific decoys with your IP positioned explicitly
sudo nmap -D 10.0.0.1,10.0.0.2,ME,10.0.0.3 <TARGET_IP>
ME positions your real IP in the decoy list. Without ME, your IP still sends, but isn't explicitly listed. The decoy IPs must be reachable — spoofed packets from unreachable addresses don't reach the target, and the trick fails.
Alternative Scan Types — Exploiting RFC Behavior
This is where evasion gets interesting. NULL, FIN, and Xmas scans work by exploiting how RFC 793 defines TCP behavior — not by modifying packets, but by sending packets that well-behaved firewalls and IDS systems don’t expect.
-sN — NULL Scan (no flags set)
sudo nmap -sN -p 22,80 <TARGET_IP>
PORT   STATE         SERVICE
22/tcp open|filtered ssh
80/tcp closed        http
-sF — FIN Scan
sudo nmap -sF -p 22,80 <TARGET_IP>
PORT   STATE         SERVICE
22/tcp open|filtered ssh
80/tcp closed        http
-sX — Xmas Scan (FIN + PSH + URG flags)
sudo nmap -sX -p 22,80 <TARGET_IP>
PORT   STATE         SERVICE
22/tcp open|filtered ssh
80/tcp closed        http
All three return identical results — and those results require explanation.
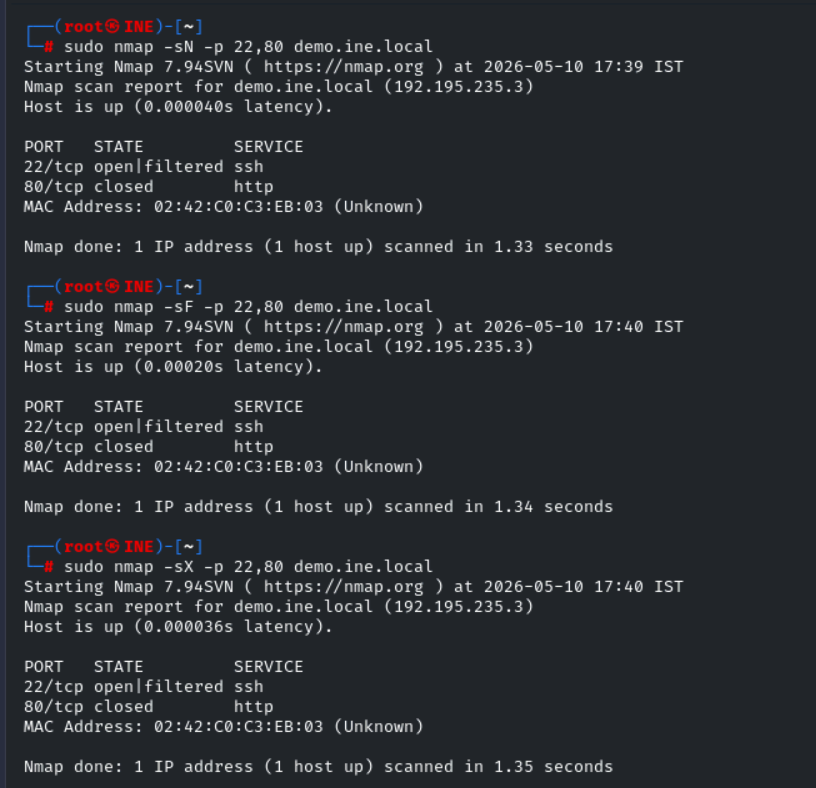
Reading open|filtered:
RFC 793 states that a closed port must respond to unexpected TCP packets with an RST. An open port should ignore them — no response required. Nmap exploits this:
- closed port → RST received → port is definitively closed
- No response → port is either open or filtered by a firewall — Nmap can’t tell which
- Hence: open|filtered
Why the same result on all three: NULL, FIN, and Xmas send different flag combinations but rely on the same RFC behavior. The target’s response logic is identical for all three.
The Linux vs Windows difference: Linux strictly follows RFC 793 — open ports return no response, giving open|filtered. Windows typically sends RST for all of them regardless of state, making these scans less informative against Windows targets. These scans are most informative on Unix/Linux systems and some network devices, though behavior varies by OS version and configuration.
The IDS evasion angle: Many IDS rules target SYN packets specifically. NULL, FIN, and Xmas scans contain no SYN flag — they bypass rules written for SYN-based detection. This is the reason they exist.
--badsum — The IDS Diagnostic
--badsum is the most misunderstood flag in Nmap's evasion toolkit — it's not a scan technique, it's a diagnostic:
sudo nmap --badsum -p 22,80 <TARGET_IP>
PORT   STATE    SERVICE
22/tcp filtered ssh
80/tcp filtered http
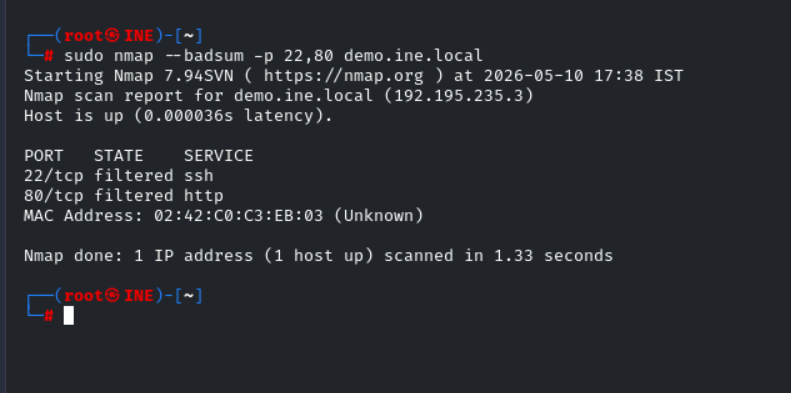
--badsum sends packets with deliberately incorrect TCP/UDP checksums.
A real TCP/IP stack drops bad checksum packets immediately — corrupt packet, discard, no response. Nmap reports that silence as filtered. An IDS/IPS sitting in the path may process packets before checksum validation and respond anyway, which is the tell.
Reading this output: Both ports returned filtered — No response received. The target's TCP stack correctly dropped the bad checksum packets, and no device in the path responded in a way that indicates checksum processing before validation. This is the clean baseline.
If --badsum returns anything other than filtered Or silence, something in the path is processing packets before checksum validation — that's your IDS signal. Adjust your evasion profile accordingly.
The Idle/Zombie Scan — True Source Concealment
sudo nmap -sI <zombie_host> <TARGET_IP>
Every other technique in this article still exposes your IP at some level. The idle scan doesn’t — the target never sees your IP. All packets appear to come from the zombie host.
How it works: Exploits the IP ID field. The zombie’s IP ID increments predictably. You probe the zombie’s IP ID before and after sending spoofed packets to the target — the change in IP ID tells you whether the target’s port is open or closed, without ever sending a packet from your IP.
Finding a zombie — ipidseq:
sudo nmap --script ipidseq <TARGET_IP>
|_ipidseq: All zeros
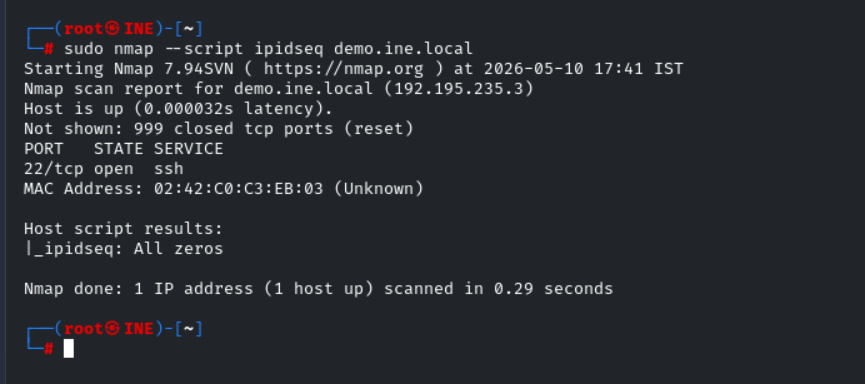
All zeros — This host uses randomized IP IDs. Modern Linux kernels randomize IP IDs for external probes, returning all zeros or random values. Not a usable zombie.
A usable zombie returns:
|_ipidseq: Incremental!
Windows XP, some printers, and some older network devices still use sequential IP IDs. On modern networks, suitable zombies are rare — this is the most powerful technique available when you find one, and practically unavailable on hardened modern networks.
The Ghost Profile — Everything Combined
sudo nmap -sS -T1 \
  -f --mtu 16 \
  -D RND:5 \
  -g 53 \
  --data-length 15 \
  --ttl 64 \
  --scan-delay 2s \
  -p 22,80 <TARGET_IP>
PORT   STATE    SERVICE
22/tcp open     ssh
80/tcp filtered http
Nmap done: 1 IP address (1 host up) scanned in 61.17 seconds
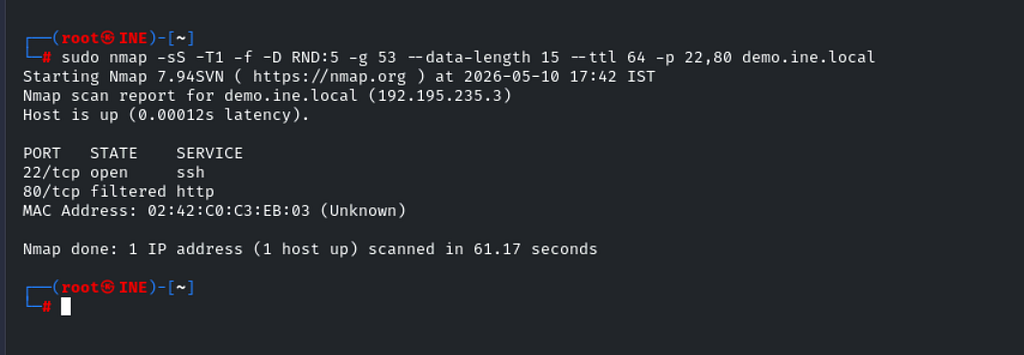
Fragmented packets with custom MTU, five random decoys, source port 53, 15 bytes of random padding, TTL set to 64, and a 2-second delay between probes — two ports took 61 seconds.
What each layer addresses:
Flag Evades -T1 --scan-delay 2s Rate-based and statistical detection -f --mtu 16 Signature-based reassembly detection -D RND:5 Source IP attribution -g 53 Firewall source-port rules --data-length 15 Payload length signatures --ttl 64 OS fingerprint signatures
The honest caveat: 61 seconds for two ports. A full /24 Subnet scan at this profile takes hours. Modern enterprise EDR with behavioral analysis may still flag slow, methodical scanning. "Not detected by Snort" and "not detected by everything" are not the same thing. Use this profile when stealth matters more than speed — not as a default.
Evasion Technique Summary
Bucket 1 — IDS Evasion
Technique What It Addresses Cost -T1 / --scan-delay Rate-based and statistical detection Speed — significantly slower -f / --mtu Fragmentation-blind IDS Minimal — slight overhead --data-length Payload size signatures None --ttl OS fingerprint signatures None -sN / -sF / -sX SYN-based IDS rules: Ambiguous results — varies by OS --badsum IDS diagnostic (not a scan). Not a scan technique
Bucket 2 — Firewall Bypass
Technique What It Addresses Cost -g <port> Source-port allowlist rules None — limited to rule-based firewalls --spoof-mac MAC-based filtering, Local network only
Bucket 3 — Source Concealment
Technique What It Addresses Cost -D RND:n Source IP attribution Minimal — slight overhead -sI <zombie> Full source concealment, rare usable zombies on modern networks
What’s Next
You now have a toolkit for scanning quietly — timing, fragmentation, decoys, alternative scan types, and the --badsum diagnostic to know whether any of it matters on a given network. In Part 9, we go further — scanning networks you can't directly reach, through a pivot, using proxychains. The flags are different, the limitations are real, and the technique is something most eJPT learners don't encounter until mid-engagement.
Part 9← Link will be live once published
🔒 Legal reminder: Evasion techniques are for authorized engagements only. Using them against systems you don’t own is illegal regardless of whether detection is evaded — and evasion itself may constitute an aggravating factor in prosecution.
Part of the series: Nmap — The Tool You Think You Know
Ghost Mode: Nmap Evasion Techniques That Actually Work was originally published in Level Up Coding on Medium, where people are continuing the conversation by highlighting and responding to this story.
This content originally appeared on Level Up Coding - Medium and was authored by Roshan Rajbanshi
Roshan Rajbanshi | Sciencx (2026-06-24T16:38:20+00:00) Ghost Mode: Nmap Evasion Techniques That Actually Work. Retrieved from https://www.scien.cx/2026/06/24/ghost-mode-nmap-evasion-techniques-that-actually-work/
Please log in to upload a file.
There are no updates yet.
Click the Upload button above to add an update.